No edit summary |
|||
| Line 118: | Line 118: | ||
** Mamool Ja on this floor sometimes drop 2 stat / hp / mp cells. |
** Mamool Ja on this floor sometimes drop 2 stat / hp / mp cells. |
||
* [[Archaic Rampart]] x4 |
* [[Archaic Rampart]] x4 |
||
| + | ** The teleporter is unlocked by defeating a certain rampart (see below). |
||
| − | ** When you pull one, the others despawn. When it dies, the teleporter is activated, but it will take you back to this level again if you chose the wrong one. |
||
| + | *** All other ramparts despawn when one is pulled. |
||
| − | ** When you teleport back to this level again the right Rampart may change. {{verification}} |
||
| + | *** The teleporter is activated when the rampart is killed, but if the incorrect (see below) rampart was chosen the teleporter will return you to the beginning of the same floor. |
||
** Rampart Reinforcements summons [[Rogue Marid]]. |
** Rampart Reinforcements summons [[Rogue Marid]]. |
||
| Line 131: | Line 132: | ||
* [[Mamool Ja Strapper]] ([[BST]]) |
* [[Mamool Ja Strapper]] ([[BST]]) |
||
* [[Archaic Rampart]] x4 |
* [[Archaic Rampart]] x4 |
||
| + | ** The teleporter is unlocked by defeating a certain rampart (see below). Ramparts do not despawn when one is pulled. |
||
| − | ** Other ramparts do not despawn on pull. You do not need to kill all to teleport up. |
||
** Rampart Reinforcements summons [[Rogue Marid]]. |
** Rampart Reinforcements summons [[Rogue Marid]]. |
||
** [[Zhayolm Card]]s drop from ramparts. They can drop even when reinforcements are called. |
** [[Zhayolm Card]]s drop from ramparts. They can drop even when reinforcements are called. |
||
'''Both Areas''' |
'''Both Areas''' |
||
| − | * |
+ | * The day you enter the [[Salvage]] run determines which rampart you need to defeat in order to activate the teleport: |
| − | ** Defeat First Rampart if you entered on Firesday or Earthsday |
+ | ** Defeat [[First Rampart]] if you entered on [[Firesday]] or [[Earthsday]] |
| − | ** Defeat Second Rampart if you entered on Watersday or Windsday |
+ | ** Defeat [[Second Rampart]] if you entered on [[Watersday]] or [[Windsday]] |
| − | ** Defeat Third Rampart if you entered on Iceday or Lightningday |
+ | ** Defeat [[Third Rampart]] if you entered on [[Iceday]] or [[Lightningday]] |
| − | ** Defeat Fourth Rampart if you entered on Lightsday or Darksday |
+ | ** Defeat [[Fourth Rampart]] if you entered on [[Lightsday]] or [[Darksday]] |
| Line 160: | Line 161: | ||
'''South Area''' |
'''South Area''' |
||
| + | |||
| − | * [[Poroggo Madame]] NM popped if entry time on the floor is between 50 and 52 minutes. |
||
* First room: [[Archaic Gears]] x8 |
* First room: [[Archaic Gears]] x8 |
||
| − | * Side room: [[Archaic Rampart]] x3 ([[Slime Mold]] reinforcements) |
+ | * Side room: [[Archaic Rampart]] x3 ([[Slime Mold]] reinforcements), [[Poroggo Madame]] |
| + | ** [[Poroggo Madame]] pop condition is unknown, but the NM has been confirmed to be up immediately upon entering the floor. |
||
| + | ** The NM has been popped over a wide spectrum of times (45 minutes, 52 minutes, 82 minutes), so time is not thought to be a factor. |
||
| + | ** Possibilities include random pop, a condition based on 4F Ramparts, a condition based on killing a random mob previously in the zone, or any number of other possibilities. |
||
* Second room: [[Archaic Gears]] x4, [[Archaic Rampart]] ([[Wajaom Tiger]] reinforcements) |
* Second room: [[Archaic Gears]] x4, [[Archaic Rampart]] ([[Wajaom Tiger]] reinforcements) |
||
* Third Room: [[Archaic Gears]] x8, [[Archaic Chariot]] |
* Third Room: [[Archaic Gears]] x8, [[Archaic Chariot]] |
||
Revision as of 14:45, 11 July 2007
- The Zhayolm Remnants are one of the areas of Salvage.
- A cage of Zhayolm Remnants Fireflies is given to all participating mercenaries who enter. They can be used to return to the Zhayolm Remnants section of the Alzadaal Undersea Ruins.
The following maps are slightly out of date until the original creator (Lokim, Foodmonsters, Carbuncle) updates them.
Zhayolm Remnants
Map 1
First Floor
After the June 5th, 2007 update, as you begin this zone you will encounter a Treasure Chest immediately past the first doorway which contains 10 cells. The cells go into the alliance treasure pool immediately after the first person opens the chest, much the same as a KS or BCNM chest will do.
It is unclear at this point if the cells that will drop are random or are fixed.
10 Cells dropped: Magic, Abilities, Sub Job, Weapon, Ranged were among them.
(This information about cell drops is incorrect and should be adjusted.)
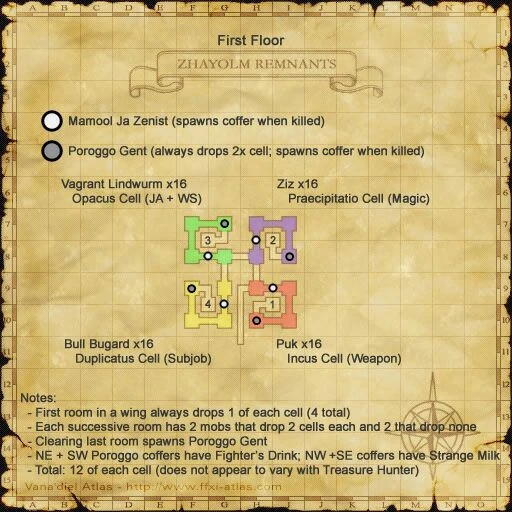
Each "wing" on the first floor has one kind of monster; they will drop the same item all the way through (with the exception of the first few).
The drops on this floor are not affected by Treasure Hunter. In each room of mobs, two will drop and two will not; once you have gotten drops from two of the mobs you can move on to the next room unless you want to clear the whole wing to pop a Poroggo Gent.
The first room of each mob type drops one of each type of cell (weapons, magic, abilities, and subjobs), two each from two of the four mobs. The other rooms drop only one type of cell (determined by which wing you're in), one each from two of the four mobs.
SE Wing
- Puk (Puk) x15: Incus Cell (Weapons)
NE Wing
- Ziz (Cockatrice) x15: Praecipitatio Cell (Magic)
NW Wing
- Vagrant Lindwurm (Raptor) x16: Opacus Cell (Abilities)
SW Wing
- Bull Bugard (Bugard) x16: Duplicatus Cell (Subjobs)
All Wings
- Poroggo Gent (Poroggo) x4: (Only pops after clearing all mobs of one type, and drops 2 of whichever cell predominates the wing in question.)
- Mamool Ja Zenist (NIN) x4: Drops item chests, nothing else.
Zhayolm Remnants
Map 2
Second Floor
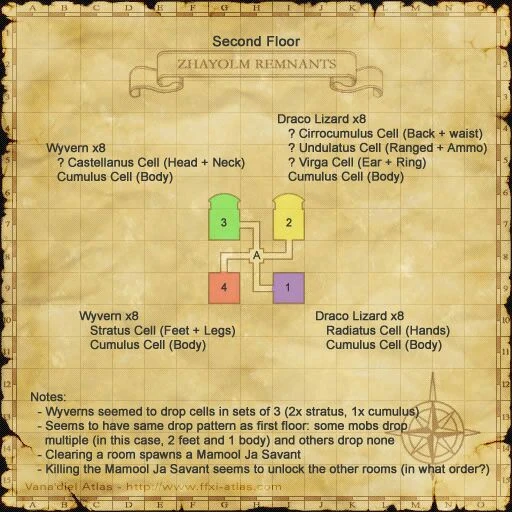
Like the first floor, half of the mobs have guaranteed drops, while the other half drop nothing. However, every mob that has guaranteed drops also has not guaranteed drops which are affected by Treasure Hunter.
The room which is open initially is determined by the teleporter you took up from the first floor.
Clearing all 8 of the normal mobs in a room causes the Mamool Ja to spawn.
You need to kill the Mamool Ja in the initial room to get access to the other rooms.
The Slot is found in the NW room, while the Socket is found in the NE room.
SE Room
- Draco Lizard x8: 4/8 drop 2 Radiatus Cell (Hands) with a chance to drop 1 Cumulus Cell (Body); the other 4 drop nothing.
- Mamool Ja Zenist (NIN): Drops 2 Radiatus Cell and 2 Cumulus Cell.
- Cumulus Cells from the zenist are guaranteed.

- Cumulus Cells from the zenist are guaranteed.
NE Room
- Draco Lizard x8: 4/8 drop 2 Cirrocumulus Cell (Waist) with a chance to drop 2 Undulatus Cell (Ranged), 2 Virga Cell (Rings), and/or 1 Cumulus Cell; the other 4 drop nothing.
- The Draco Lizards which drop cells are #1, #4, #6, and #7 on Widescan in this room.
- Mamool Ja Savant (WHM): drops 2 Cirrocumulus Cell, with a chance to drop 2 Virga Cell and 2 Cumulus Cell.
- It cannot drop Undulatus Cells.

- It cannot drop Undulatus Cells.
- Socket: Trade a cell to pop a Poroggo Madame which drops multiples of the traded cell. It is not necessary to kill any mobs to make the socket pop.
NW Room
- Wyvern x8: 4/8 drop 2 Castellanus Cell (Head/Neck) with a chance to drop 1 Cumulus Cell (Body); the other 4 drop nothing.
- Mamool Ja Bounder (THF): drops 2 Castellanus Cell and 2 Cumulus Cell.
- Cumulus Cells from the bounder are guaranteed.
- Cumulus Cells from the bounder are guaranteed.
- Slot: Trade a Silver Sea Card to pop Jakko which drops Njord's Jerkin. It is not necessary to kill any mobs to make the slot pop.
SW Room
- Wyvern x8: 4/8 drop Stratus Cell (Legs/Feet) with a chance to drop 1 Cumulus Cell (Body); the other 4 drop nothing.
- Mamool Ja Spearman (DRG): drops 2 Stratus Cell.
- Cumulus Cells from the spearman are possible.
- Cumulus Cells from the spearman are possible.
Zhayolm Remnants
Map 3
Third floor
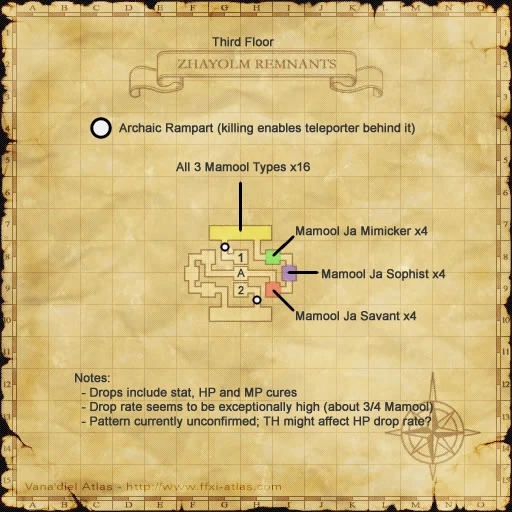
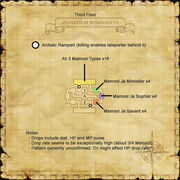
- East/North Path
- None of the Mamool Ja on this path drop anything at all.
- First Room, 4x Mamool Ja Savant (WHM)
- Second Room, 4x Mamool Ja Sophist (BLM)
- Third Room, 4x Mamool Ja Mimicker (BLU)
- Fourth Large Room, All 3 Mamool Types (20 total):
- 6x Mamool Ja Savant (WHM)
- 6x Mamool Ja Sophist (BLM)
- 8x Mamool Ja Mimicker (BLU)
- If you defeat all of the Mamool Ja on this path and kill an Archaic Rampart, a NM Poroggo Madame will spawn which will drop both Enyo's Gauntlets and Nemain's Cuffs.
- West/South Path
- Each of the Mamool Ja in the first three rooms usually drop 3 one type of stat cell, and either an HP or MP cell.
- First Room, 4x Mamool Ja Zenist (NIN)
- Second Room, 4x Mamool Ja Spearman (DRG)
- Third Room, 4x Mamool Ja Strapper (BST)
- Fourth Large Room, All 3 Mamool Types + Mamool Ja Bounder (THF) (12 total):
- 3x Mamool Ja Zenist (NIN)
- 3x Mamool Ja Spearman (DRG)
- 3x Mamool Ja Strapper (BST)
- 3x Mamool Ja Bounder (THF)
- If you defeat all of the Mamool Ja on this path and kill an Archaic Rampart, a NM Poroggo Madame will spawn which drops 5x HP and 5x MP Cells.
- Both Paths
- There is an Archaic Rampart at the end, although it is not necessary to defeat this to continue to the next floor, as the teleporter will already be active.
- Rampart Reinforcements summons a Wajaom Tiger.
- There is an Archaic Rampart at the end, although it is not necessary to defeat this to continue to the next floor, as the teleporter will already be active.

Zhayolm Remnants
Map 4
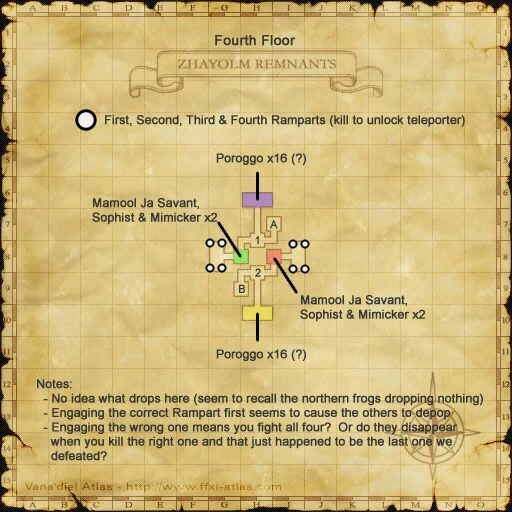
Fourth floor
North Area
- Poroggo Madame NM popped by reaching the fourth floor in under 30 minutes.
- Poroggo Gent x12
- Mamool Ja Savant x2
- Mamool Ja Sophist x2
- Mamool Ja Mimicker x2
- Mamool Ja on this floor sometimes drop 2 stat / hp / mp cells.
- Archaic Rampart x4
- The teleporter is unlocked by defeating a certain rampart (see below).
- All other ramparts despawn when one is pulled.
- The teleporter is activated when the rampart is killed, but if the incorrect (see below) rampart was chosen the teleporter will return you to the beginning of the same floor.
- Rampart Reinforcements summons Rogue Marid.
- The teleporter is unlocked by defeating a certain rampart (see below).
South Area
- Poroggo Madame NM popped by reaching the fourth floor within 40-45 minutes.
- Poroggo Gent x8: Can drop 3 or 6 Armor cells and/or 3 MP cells
- Nothing spawns after all 8 Poroggo Gents are killed.
- Mamool Ja Zenist (NIN)
- Mamool Ja Spearman (DRG)
- Mamool Ja Bounder (THF)
- Mamool Ja Strapper (BST)
- Archaic Rampart x4
- The teleporter is unlocked by defeating a certain rampart (see below). Ramparts do not despawn when one is pulled.
- Rampart Reinforcements summons Rogue Marid.
- Zhayolm Cards drop from ramparts. They can drop even when reinforcements are called.
Both Areas
- The day you enter the Salvage run determines which rampart you need to defeat in order to activate the teleport:
- Defeat First Rampart if you entered on Firesday or Earthsday
- Defeat Second Rampart if you entered on Watersday or Windsday
- Defeat Third Rampart if you entered on Iceday or Lightningday
- Defeat Fourth Rampart if you entered on Lightsday or Darksday

Zhayolm Remnants
Map 5
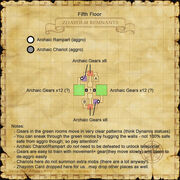
Fifth Floor
- Zhayolm Card drops here (from Archaic Machinery)
- It is not necessary to kill the Chariot or Rampart to activate the teleporter.
- At least one of the Chariots is reported to attract nearby Gears (not exactly linking) when attacked.
North Area
- Poroggo Madame NM popped by killing the Archaic Rampart at (H-7)/(H-8) that aggroes to magic as well as one or more Archaic Gear in the nearby room.
- First room: Archaic Gears x12
- Side Room: Archaic Rampart x3 (Mindgazer reinforcements)
- Second Room: Archaic Gears x8, Archaic Rampart (Torama reinforcements)
- Third Room: Archaic Gears x12, Archaic Chariot
South Area
- First room: Archaic Gears x8
- Side room: Archaic Rampart x3 (Slime Mold reinforcements), Poroggo Madame
- Poroggo Madame pop condition is unknown, but the NM has been confirmed to be up immediately upon entering the floor.
- The NM has been popped over a wide spectrum of times (45 minutes, 52 minutes, 82 minutes), so time is not thought to be a factor.
- Possibilities include random pop, a condition based on 4F Ramparts, a condition based on killing a random mob previously in the zone, or any number of other possibilities.
- Second room: Archaic Gears x4, Archaic Rampart (Wajaom Tiger reinforcements)
- Third Room: Archaic Gears x8, Archaic Chariot

Zhayolm Remnants
Map 6
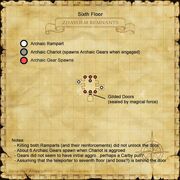
Sixth Floor
- Poroggo Madame NM popped how?
- Archaic Chariot
- Spawns Archaic Gears x10 and Archaic Gear x2 throughout the room when attacked
- Archaic Rampart x2
- Greater Manticore reinforcements
- Gilded Doors, sealed by a magical force.
- Defeating the Archaic Chariot plus all enemies that spawn when the Archaic Chariot engages unlocks the door to the seventh floor.
Zhayolm Remnants
Map 7
Seventh Floor
- Battleclad Chariot boss
Walkthrough
Equipment
Area Drop Theme
- Level 15 Armor
- Body Armor: Drops from Jakko (Slot NM).
- Other Armor: Certain Poroggo Madames.
- Level 25 Armor
- Drops from Battleclad Chariot.
- Level 35 Armor
- May drop off of Poroggo Madames (5th, 6th floor) that have yet to be popped (general consensus is that at least the fifth floor (north) and sixth floor madames drop level 35 armor and perhaps the fourth floor (south) and fifth floor (south) madames, too).
- May be low drop rate from the Poroggo Madames (3rd, 4th floor) that drop the Lv. 15 armor.
- May drop off of Poroggo Madames (5th, 6th floor) that have yet to be popped (general consensus is that at least the fifth floor (north) and sixth floor madames drop level 35 armor and perhaps the fourth floor (south) and fifth floor (south) madames, too).
Availability
| Area | Tier 1 (Lv.15) | Tier 2 (Lv.25) | Tier 3 (Lv.35) | ||||||||||||
|---|---|---|---|---|---|---|---|---|---|---|---|---|---|---|---|
| Head | Body | Hands | Legs | Feet | Head | Body | Hands | Legs | Feet | Head | Body | Hands | Legs | Feet | |
| Ares | |||||||||||||||
| Skadi | |||||||||||||||
| Usukane | |||||||||||||||
| Marduk | |||||||||||||||
| Morrigan | |||||||||||||||
Locations
| Enemy Classification | Floor | Enemy Name | Set | Lv. | Item Name |
|---|---|---|---|---|---|
| NM 100% |
3rd | Poroggo Madame | Ares | 15 | Enyo's Gauntlets |
| Morrigan | 15 | Nemain's Cuffs | |||
| 4th (N) | Poroggo Madame | Skadi | 15 | Njord's Mask | |
| Usukane | 15 | Hoshikazu Kyahan | |||
| Marduk | 15 | Anu's Brais | |||
| Silver Sea Card NM 100% Drop |
2nd | Jakko | Skadi | 15 | Njord's Jerkin |
| Boss 2 drops, 100% |
7th | Battleclad Chariot | Ares | 25 | Phobos's Cuisses |
| Skadi | 25 | Freyr's Gloves | |||
| Usukane | 25 | Tsukikazu Jinpachi | |||
| 25 | Tsukikazu Togi | ||||
| Marduk | 25 | Ea's Crackows | |||
| Morrigan | 25 | Bodb's Slops | |||
| NM Pop conditions not well understood Drops unconfirmed |
4th (S) | Poroggo Madame | Ares | 35 | Deimos's Leggings |
| Morrigan | 35 | Macha's Pigaches | |||
| 5th (N/S) | Poroggo Madame | Skadi | 35 | Freya's Trousers | |
| Marduk | 35 | Enlil's Tiara | |||
| 6th | Poroggo Madame | Usukane | 35 | Hikazu Gote | |
| Marduk | 35 | Enlil's Gambison |
| Salvage | |
|---|---|
| Ruins of Alzadaal |
|
| Bosses | |
| Pathos of Alzadaal | |
| Rewards | |
| Other | |