mNo edit summary |
mNo edit summary |
||
| (4 intermediate revisions by 3 users not shown) | |||
| Line 6: | Line 6: | ||
| npc = Any [[Windurst Gate Guard]] |
| npc = Any [[Windurst Gate Guard]] |
||
| requirements = |
| requirements = |
||
| − | | level = 30 |
||
| title = |
| title = |
||
| reward = Rank points<br>Ability to obtain the {{KeyItem}}[[Portal Charm]] |
| reward = Rank points<br>Ability to obtain the {{KeyItem}}[[Portal Charm]] |
||
| Line 16: | Line 15: | ||
| next = [[A New Journey]] |
| next = [[A New Journey]] |
||
| cutscenes = |
| cutscenes = |
||
| − | {{Mission/Cutscene|Written in the Stars|[[Mashua]] [[Heavens Tower]] |
+ | {{Mission/Cutscene|Written in the Stars|[[Mashua]] [[Heavens Tower]]}} |
| − | {{Mission/Cutscene|Written in the Stars|[[Goblin Footprint]] |
+ | {{Mission/Cutscene|Written in the Stars|[[Goblin Footprint]] {{Location|Inner Horutoto Ruins|map=Lily Tower|I-7}}}} |
}} |
}} |
||
| Line 23: | Line 22: | ||
=== Accept the Mission === |
=== Accept the Mission === |
||
*Trading 1 crystal to a Windurstian [[Conquest Overseer]] will unlock this mission after completing the previous mission. |
*Trading 1 crystal to a Windurstian [[Conquest Overseer]] will unlock this mission after completing the previous mission. |
||
| − | *This mission may be skipped by turning in a total of |
+ | *This mission may be skipped by turning in a total of 3 crystals since gaining rank 3; however, '''if this mission is skipped, you will not obtain the {{KeyItem}}[[Portal Charm]]. For this reason, if you are soloing missions, it is recommended that you not skip this mission.''' |
*Accept the Mission from the [[Windurst Gate Guard|Gate Guard]] and then go to [[Heavens Tower]]. |
*Accept the Mission from the [[Windurst Gate Guard|Gate Guard]] and then go to [[Heavens Tower]]. |
||
*Head up to the second floor and talk to [[Zubaba]] to get a necessary {{KeyItem}}[[Charm of Light]]. |
*Head up to the second floor and talk to [[Zubaba]] to get a necessary {{KeyItem}}[[Charm of Light]]. |
||
| + | **''Optional:'' The [[Windurst Gate Guard]]s, the NPCs around them, [[Kupipi]], and most NPCs on the upper floor of [[Heavens Tower]] will comment on the mission. |
||
=== Reach the Gate of Light === |
=== Reach the Gate of Light === |
||
*Your objective is to reach the "Gate of Light" located at {{Location|Inner Horutoto Ruins|map=Rose Tower 2|G-7|}} (west side, north room) |
*Your objective is to reach the "Gate of Light" located at {{Location|Inner Horutoto Ruins|map=Rose Tower 2|G-7|}} (west side, north room) |
||
| Line 31: | Line 31: | ||
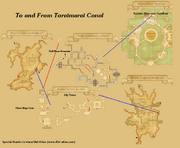
[[File:Toraimarai Composite.PNG|thumb|Composite map to the Three Mage Gate]] |
[[File:Toraimarai Composite.PNG|thumb|Composite map to the Three Mage Gate]] |
||
*Sources of [[Sneak (Status Effect)]] and [[Invisible (Status Effect)]] will be required past the gate to avoid the high level monsters along the route. |
*Sources of [[Sneak (Status Effect)]] and [[Invisible (Status Effect)]] will be required past the gate to avoid the high level monsters along the route. |
||
| − | *Gather a group that includes a [[Black Mage]], [[White Mage]], and [[Red Mage]] |
+ | *Gather a group that includes a [[Black Mage]], [[White Mage]], and [[Red Mage]]. |
**Someone that has done this Mission before and has obtained the {{KeyItem}}[[Portal Charm]] can open the gate solo. |
**Someone that has done this Mission before and has obtained the {{KeyItem}}[[Portal Charm]] can open the gate solo. |
||
| + | **You could also flag or complete [[Toraimarai Turmoil]] (gives you access to [[Toraimarai Canal]] which connects to [[Inner Horutoto Ruins]]) to completely solo this. |
||
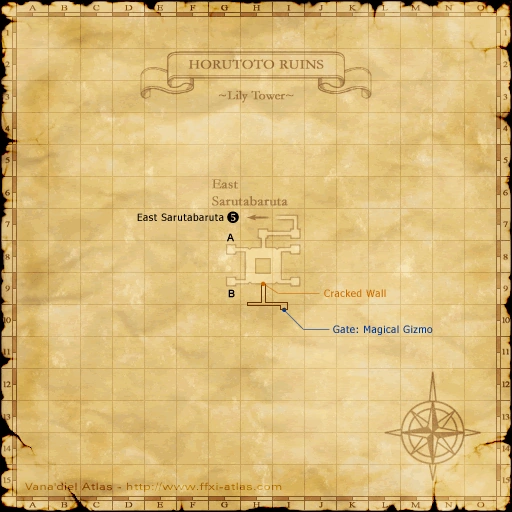
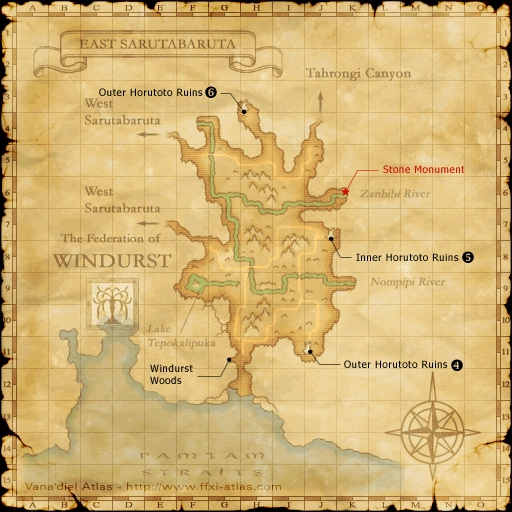
*Head out to the entrance to ''[[:File:InnerHorutotoRuins1.png|Lily Tower]]'' in {{Location|East Sarutabaruta|J-7}}. |
*Head out to the entrance to ''[[:File:InnerHorutotoRuins1.png|Lily Tower]]'' in {{Location|East Sarutabaruta|J-7}}. |
||
| − | *Go to the small room at (G-8) and through the ''Cracked Wall'' on the north side of the room. |
+ | *Go to the small room at ({{Location Tooltip|area=Inner Horutoto Ruins|map=Lily Tower|pos=G-8}}) and through the ''Cracked Wall'' on the north side of the room. |
| − | **Entering the ''Cracked Wall'' at (G-9) is safer, but either way [[Invisible (Status Effect)]] is recommended. |
+ | **Entering the ''Cracked Wall'' at ({{Location Tooltip|area=Inner Horutoto Ruins|map=Lily Tower|pos=G-9}}) is safer, but either way [[Invisible (Status Effect)]] is recommended. |
| − | *Make your way to (E-10) and go through the ''Magical Gate of Horutoto'' there. |
+ | *Make your way to ({{Location Tooltip|area=Inner Horutoto Ruins|map=Beetle's Burrow|pos=E-10}}) and go through the ''Magical Gate of Horutoto'' there. |
| − | *Continue straight west to a ''Cracked Door'' at (D-10) and go through to the next area. |
+ | *Continue straight west to a ''Cracked Door'' at ({{Location Tooltip|area=Inner Horutoto Ruins|map=Beetle's Burrow|pos=D-10}}) and go through to the next area. |
| − | *Follow the path to the large room at (H-9). You'll find the ''Sealed Portal'' on the north side of the room. In front of this door are 3 circles on the floor - a whitish one, blackish one, and reddish one. This is the [[Three Mage Gate]]. |
+ | *Follow the path to the large room at ({{Location Tooltip|area=Inner Horutoto Ruins|map=Rose Tower 1|pos=H-9}}). You'll find the ''Sealed Portal'' on the north side of the room. In front of this door are 3 circles on the floor - a whitish one, blackish one, and reddish one. This is the [[Three Mage Gate]]. |
*To open the gate have your [[Black Mage]] stand on the dark circle, [[White Mage]] on the light one, and [[Red Mage]] on the reddish one. They will begin to glow and the door will open. If you brought someone who has the {{KeyItem}}[[Portal Charm]], they just need to click on the door to open it. |
*To open the gate have your [[Black Mage]] stand on the dark circle, [[White Mage]] on the light one, and [[Red Mage]] on the reddish one. They will begin to glow and the door will open. If you brought someone who has the {{KeyItem}}[[Portal Charm]], they just need to click on the door to open it. |
||
*Everyone needs to head through quickly - when the door closes, that's it. ''It cannot be re-opened from the inside.'' |
*Everyone needs to head through quickly - when the door closes, that's it. ''It cannot be re-opened from the inside.'' |
||
| Line 46: | Line 47: | ||
[[File:ToraimaraiCanal2.png|thumb|Toraimarai Canal Map 2]] |
[[File:ToraimaraiCanal2.png|thumb|Toraimarai Canal Map 2]] |
||
[[File:ToraimaraiCanal1.png|thumb|Toraimarai Canal Map 1]] |
[[File:ToraimaraiCanal1.png|thumb|Toraimarai Canal Map 1]] |
||
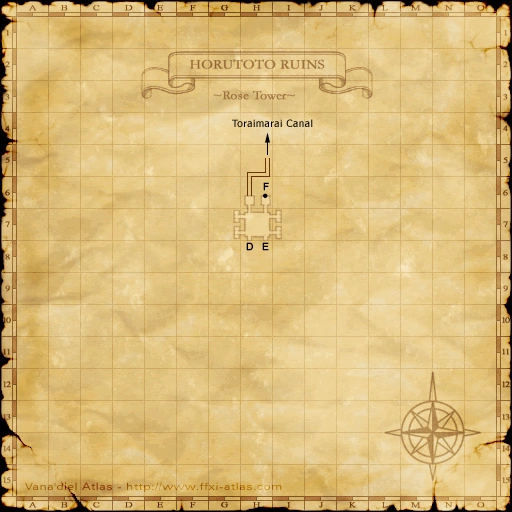
| − | *There is a [[Survival Guide]] at (F-5) near the zone line to Horutoto Ruins. If you have previously activated it the trip to Rose Tower, Map 2 in [[Inner Horutoto Ruins]] takes mere seconds. |
+ | *There is a [[Survival Guide]] at ({{Location Tooltip|area=Toraimarai Canal|map=Map 1|pos=F-5}}) near the zone line to Horutoto Ruins. If you have previously activated it the trip to Rose Tower, Map 2 in [[Inner Horutoto Ruins]] takes mere seconds. |
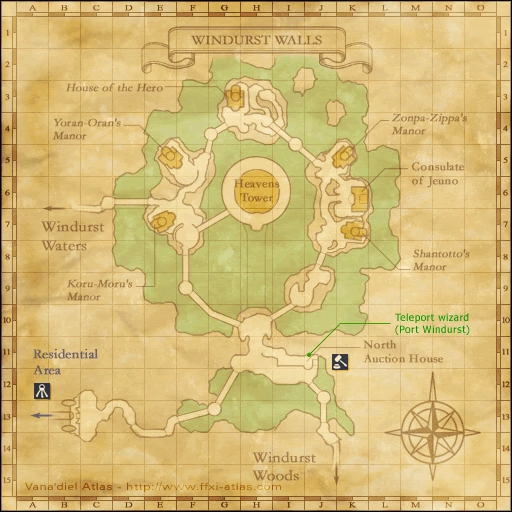
*If you have started the quest [[Toraimarai Turmoil]], you can enter [[Toraimarai Canal]] from [[Windurst Walls]] and go behind the gate that way. You will need [[Sneak]] the entire route. |
*If you have started the quest [[Toraimarai Turmoil]], you can enter [[Toraimarai Canal]] from [[Windurst Walls]] and go behind the gate that way. You will need [[Sneak]] the entire route. |
||
**Enter [[Toraimarai Canal]] from the Priming Gate at {{Location|Windurst Walls|H-3}}. |
**Enter [[Toraimarai Canal]] from the Priming Gate at {{Location|Windurst Walls|H-3}}. |
||
| − | **Follow the path and take the west path from the fork at (H-7). Head down the stairs into the water at (G-7) and continue west. |
+ | **Follow the path and take the west path from the fork at ({{Location Tooltip|area=Toraimarai Canal|map=Map 2|pos=H-7}}). Head down the stairs into the water at ({{Location Tooltip|area=Toraimarai Canal|map=Map 2|pos=G-7}}) and continue west. |
| − | **Turn north, then west at (G-6) to reach Map 1 of Toraimarai Canal. |
+ | **Turn north, then west at ({{Location Tooltip|area=Toraimarai Canal|map=Map 2|pos=G-6}}) to reach Map 1 of Toraimarai Canal. |
| − | **Turn north at (J-7), then continue West until the path forks. |
+ | **Turn north at ({{Location Tooltip|area=Toraimarai Canal|map=Map 1|pos=J-7}}), then continue West until the path forks. |
| − | **Turn south, go up the stairs at (H-7) to reach dry ground and then head north. |
+ | **Turn south, go up the stairs at ({{Location Tooltip|area=Toraimarai Canal|map=Map 1|pos=H-7}}) to reach dry ground and then head north. |
| − | **Cross the small footbridge to reach the eastern side of the dry ground, then follow the path until it leads you to [[Inner Horutoto Ruins]] at (F-6). ''The Survival Guide is nearby at (F-5) so be sure to activate it.'' |
+ | **Cross the small footbridge to reach the eastern side of the dry ground, then follow the path until it leads you to [[Inner Horutoto Ruins]] at ({{Location Tooltip|area=Toraimarai Canal|map=Map 1|pos=F-6}}). ''The Survival Guide is nearby at ({{Location Tooltip|area=Toraimarai Canal|map=Map 1|pos=F-5}}) so be sure to activate it.'' |
*You should now be in Rose Tower, Map 2, behind the Three Mage Gate. |
*You should now be in Rose Tower, Map 2, behind the Three Mage Gate. |
||
=== At the Gate of Light === |
=== At the Gate of Light === |
||
[[File:InnerHorutotoRuins4.png|thumb|Rose Tower, Map 2]] |
[[File:InnerHorutotoRuins4.png|thumb|Rose Tower, Map 2]] |
||
| − | *Once inside Rose Tower, Map 2, head over to the small room in (G-7) (west side, north room) and click on the ''Gate of Light'' for a cutscene. |
+ | *Once inside Rose Tower, Map 2, head over to the small room in ({{Location Tooltip|area=Inner Horutoto Ruins|map=Rose Tower 2|pos=G-7}}) (west side, north room) and click on the ''Gate of Light'' for a cutscene. |
*You can now safely warp home or return via one of a few options: |
*You can now safely warp home or return via one of a few options: |
||
| − | **You can get back to the [[Three Mage Gate]] by walking into the glowing light on the platform in the east room at H-6. From here you can make your way back through the ruins the same way you came. |
+ | **You can get back to the [[Three Mage Gate]] by walking into the glowing light on the platform in the east room at {{Location Tooltip|area=Inner Horutoto Ruins|map=Rose Tower 2|pos=H-6}}. From here you can make your way back through the ruins the same way you came. |
**You can also head into [[Toraimarai Canal]]. If you follow the hallway there will be a [[Grounds Tome]] and a [[Survival Guide]] to help you return to Windurst. |
**You can also head into [[Toraimarai Canal]]. If you follow the hallway there will be a [[Grounds Tome]] and a [[Survival Guide]] to help you return to Windurst. |
||
| Line 69: | Line 70: | ||
=== Rusty Daggers === |
=== Rusty Daggers === |
||
| − | *This mission has an alternate objective depending on your mission completion state. If you are repeating this mission or have |
+ | *This mission has an alternate objective depending on your mission completion state. If you are repeating this mission or have completed [[The Final Seal]] after skipping this mission, Zubaba will instead ask for 3 [[Rusty Dagger|Rusty Daggers]] as proof of her request to "clean up some vermin" beyond the [[Three Mage Gate]]. |
**[[Zubaba]] will accept [[Rusty Dagger|Rusty Daggers]] bought at the [[Auction House]] |
**[[Zubaba]] will accept [[Rusty Dagger|Rusty Daggers]] bought at the [[Auction House]] |
||
| − | **[[Rusty Dagger|Rusty Daggers]] drop from [[Wendigo]] in Rose Tower, Map 2 at {{Location|Inner Horutoto Ruins|map=Rose Tower 2}}, the large chamber adjacent to the "Gate of Light." See above on how to reach them. |
+ | **[[Rusty Dagger|Rusty Daggers]] drop from club-wielding [[Wendigo]] in Rose Tower, Map 2 at {{Location|Inner Horutoto Ruins|map=Rose Tower 2}}, the large chamber adjacent to the "Gate of Light." See above on how to reach them. |
** Caster-type [[Wendigo]] in the same area drop [[Test Answers]] used for [[Making the Grade]], a quest that rewards a scroll of [[Aspir]]. |
** Caster-type [[Wendigo]] in the same area drop [[Test Answers]] used for [[Making the Grade]], a quest that rewards a scroll of [[Aspir]]. |
||
*Trade the Rusty Daggers to [[Zubaba]] to complete the objective. |
*Trade the Rusty Daggers to [[Zubaba]] to complete the objective. |
||
Revision as of 15:04, 3 December 2019
| Mission Name | Written in the Stars |
|---|---|
| Number | 3-2 |
| Start NPC | Any Windurst Gate Guard |
| Items Needed | Depending on mission completion, 3 Rusty Daggers see below |
| Reward | Rank points Ability to obtain the |
| Repeatable | Yes |
| ← Previous Mission | Next Mission → |
|---|---|
| To Each His Own Right | A New Journey |
| Replay Cutscenes | |
|---|---|
| Written in the Stars | Mashua Heavens Tower |
| Written in the Stars | Goblin Footprint Inner Horutoto Ruins, Lily Tower (I-7) |
Walkthrough
Accept the Mission
- Trading 1 crystal to a Windurstian Conquest Overseer will unlock this mission after completing the previous mission.
- This mission may be skipped by turning in a total of 3 crystals since gaining rank 3; however, if this mission is skipped, you will not obtain the
 Portal Charm. For this reason, if you are soloing missions, it is recommended that you not skip this mission.
 - Accept the Mission from the Gate Guard and then go to Heavens Tower.
- Head up to the second floor and talk to Zubaba to get a necessary
 Charm of Light.
- Optional: The Windurst Gate Guards, the NPCs around them, Kupipi, and most NPCs on the upper floor of Heavens Tower will comment on the mission.
Reach the Gate of Light
- Your objective is to reach the "Gate of Light" located at Inner Horutoto Ruins, Rose Tower 2 (G-7) (west side, north room)
via The Three Mage Gate
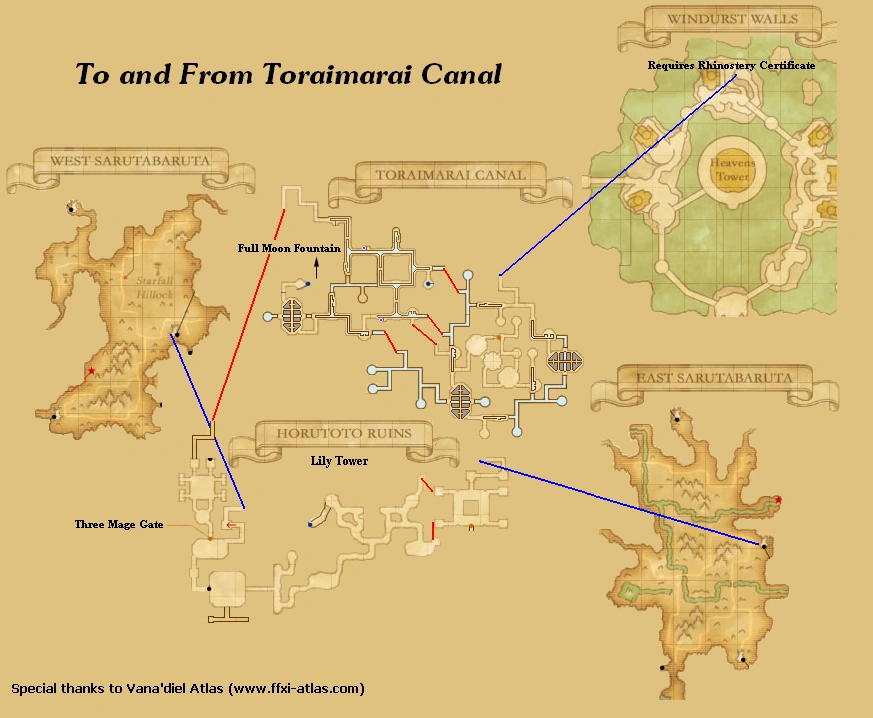
Composite map to the Three Mage Gate
- Sources of Sneak (Status Effect) and Invisible (Status Effect) will be required past the gate to avoid the high level monsters along the route.
- Gather a group that includes a Black Mage, White Mage, and Red Mage.
- Someone that has done this Mission before and has obtained the Portal Charm can open the gate solo.
- You could also flag or complete Toraimarai Turmoil (gives you access to Toraimarai Canal which connects to Inner Horutoto Ruins) to completely solo this.
- Someone that has done this Mission before and has obtained the
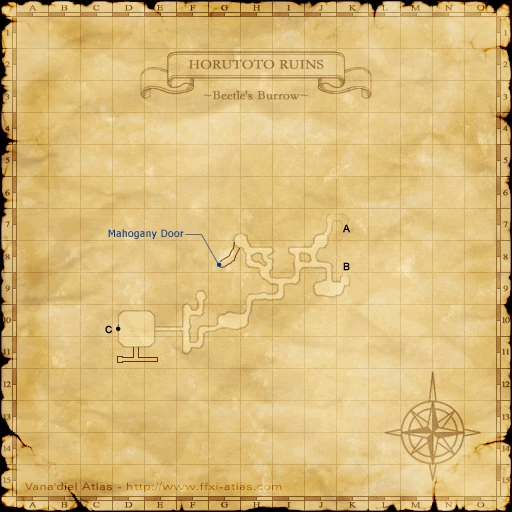
- Head out to the entrance to Lily Tower in East Sarutabaruta (J-7).
- Go to the small room at (G-8) and through the Cracked Wall on the north side of the room.
- Entering the Cracked Wall at (G-9) is safer, but either way Invisible (Status Effect) is recommended.
- Make your way to (E-10) and go through the Magical Gate of Horutoto there.
- Continue straight west to a Cracked Door at (D-10) and go through to the next area.
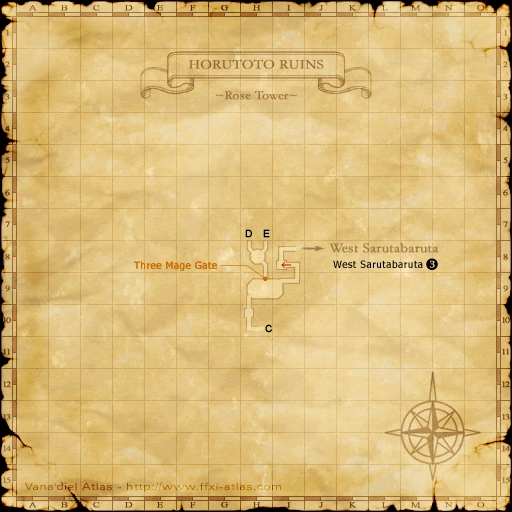
- Follow the path to the large room at (H-9). You'll find the Sealed Portal on the north side of the room. In front of this door are 3 circles on the floor - a whitish one, blackish one, and reddish one. This is the Three Mage Gate.
- To open the gate have your Black Mage stand on the dark circle, White Mage on the light one, and Red Mage on the reddish one. They will begin to glow and the door will open. If you brought someone who has the Portal Charm, they just need to click on the door to open it.
- Everyone needs to head through quickly - when the door closes, that's it. It cannot be re-opened from the inside.
- Follow this passage a few steps to a round room with two hallways - one to the north-east, and one to the north-west. It doesn't matter which one you take - they'll both lead to the same place. They look like dead ends, but they're just false walls. Walk right through the wall at the end of the tunnel to find yourself in a room full of Wendigos and Battle Bats. This is Rose Tower, Map 2.
via Toraimarai Canal
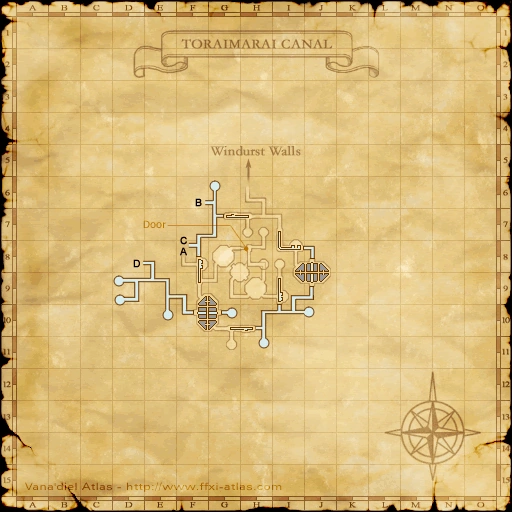

Toraimarai Canal Map 2

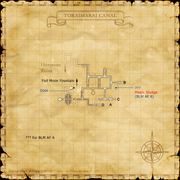
Toraimarai Canal Map 1
- There is a Survival Guide at (F-5) near the zone line to Horutoto Ruins. If you have previously activated it the trip to Rose Tower, Map 2 in Inner Horutoto Ruins takes mere seconds.
- If you have started the quest Toraimarai Turmoil, you can enter Toraimarai Canal from Windurst Walls and go behind the gate that way. You will need Sneak the entire route.
- Enter Toraimarai Canal from the Priming Gate at Windurst Walls (H-3).
- Follow the path and take the west path from the fork at (H-7). Head down the stairs into the water at (G-7) and continue west.
- Turn north, then west at (G-6) to reach Map 1 of Toraimarai Canal.
- Turn north at (J-7), then continue West until the path forks.
- Turn south, go up the stairs at (H-7) to reach dry ground and then head north.
- Cross the small footbridge to reach the eastern side of the dry ground, then follow the path until it leads you to Inner Horutoto Ruins at (F-6). The Survival Guide is nearby at (F-5) so be sure to activate it.
- You should now be in Rose Tower, Map 2, behind the Three Mage Gate.
At the Gate of Light

Rose Tower, Map 2
- Once inside Rose Tower, Map 2, head over to the small room in (G-7) (west side, north room) and click on the Gate of Light for a cutscene.
- You can now safely warp home or return via one of a few options:
- You can get back to the Three Mage Gate by walking into the glowing light on the platform in the east room at H-6. From here you can make your way back through the ruins the same way you came.
- You can also head into Toraimarai Canal. If you follow the hallway there will be a Grounds Tome and a Survival Guide to help you return to Windurst.
Finishing Up
- Return to Heavens Tower and talk to Zubaba again.
- At this stage, your mission is completed BUT you will NOT get your Portal Charm. You must obtain a Rolanberry and trade it to Kupipi to receive it.
- If you traded a Rolanberry to Kupipi earlier, she will not give you the Portal Charm until now.
- If you traded a Rolanberry to Kupipi earlier, she will not give you the
Rusty Daggers
- This mission has an alternate objective depending on your mission completion state. If you are repeating this mission or have completed The Final Seal after skipping this mission, Zubaba will instead ask for 3 Rusty Daggers as proof of her request to "clean up some vermin" beyond the Three Mage Gate.
- Zubaba will accept Rusty Daggers bought at the Auction House
- Rusty Daggers drop from club-wielding Wendigo in Rose Tower, Map 2 at Inner Horutoto Ruins, Rose Tower 2, the large chamber adjacent to the "Gate of Light." See above on how to reach them.
- Caster-type Wendigo in the same area drop Test Answers used for Making the Grade, a quest that rewards a scroll of Aspir.
- Trade the Rusty Daggers to Zubaba to complete the objective.
- If you have not previously done so, trade a Rolanberry to Kupipi to receive your Portal Charm
- An easy place to acquire a Rolanberry is Duty Free in Port Jeuno or M&P's Market in Upper Jeuno for 120 gil.
Game Description
- Mission Orders
- On the command of Zubaba, the head lady-in-waiting, you are to journey beneath the central magic tower of the Horutoto Ruins. There, you are to report to the facility managed by Heavens Tower, which protects the talisman that seals Castle Zvahl. Render whatever assistance is necessary.