mNo edit summary |
mNo edit summary |
||
| (32 intermediate revisions by 16 users not shown) | |||
| Line 1: | Line 1: | ||
| + | [[de:Windurst-Mauern]]{{Zone Infobox |
||
| − | [[Category:Areas]] |
||
| + | | ToC = [[#Involved in Quests/Missions|Quests/Missions]] • [[#fishing|Fishing]] • [[#NPCs Found Here|NPCs]] |
||
| − | {|border="0" width="100%"| |
||
| + | | Description = This quiet, residential area of [[Windurst|Federation of Windurst]] provides a home away from home for some of the more respected residents of the Federation. Accessible from all other areas of Windurst, the Walls district also provides access to the [[Auction House|North Auction House]]. To the extreme north of the Walls district is the abandoned House of the Hero, underneath which is a hidden and guarded passageway into the [[Toraimarai Canal]]. |
||
| − | |width="90%"| |
||
| + | [[File:Windurst-walls-pic.jpg|300px|center]] |
||
| − | {| cellspacing="3" width="50%" align="center" |
||
| + | | Connections = |
||
| − | |valign="top" align="center" style="border: 1px solid gray; padding-left:1em;"| |
||
| + | [[Windurst Waters]]: {{Tooltip-Connection-Map|map=Windurst-walls.png|blip=GreenBlip|text=B-6|x=14.25|y=40.82}}{{spc}} |
||
| − | '''Table of Contents:'''<br> |
||
| + | <br>[[Port Windurst]]: via [[Komulili]]: {{Tooltip-Connection-Map|map=Windurst-walls.png|blip=RedBlip|text=J-11|x=60.35|y=69.53}}{{spc}} |
||
| − | [[#Connecting Areas|Connecting Areas]] | [[#Quests Started Here|Quests/Missions]] | [[#NPCs Found Here|NPCs]] |
||
| + | <br>[[Windurst Woods]]: {{Tooltip-Connection-Map|map=Windurst-walls.png|blip=GreenBlip|text=J-14|x=65.82|y=91.01}}{{spc}} |
||
| − | |}__NOTOC__ |
||
| + | <br>[[Heavens Tower]]: {{Tooltip-Connection-Map|map=Windurst-walls.png|blip=GreenBlip|text=H-7|x=50.19|y=42.18}}{{spc}} |
||
| − | <p align="justify">This quiet, residential area of [[Windurst|Federation of Windurst]] provides a home away from home for some of the more respected residents of the Federation. Accessible from all other areas of Windurst, the Woods also provides access to the [[Auction House|North Auction House]]. To the extreme north of the Woods is the abandoned House of the Hero, underneath which is a hidden and guarded passageway into the [[Toraimarai Canal]]s. </p> |
||
| + | <br>[[Toraimarai Canal]]: {{Tooltip-Connection-Map|map=Windurst-walls.png|blip=GreenBlip|text=H-3|x=51.36|y=18.35}} (Requires [[Rhinostery Certificate]]){{spc}} |
||
| + | <br>[[Dynamis - Windurst]]: via [[Trail Markings]]: {{Tooltip-Connection-Map|map=Windurst-walls.png|blip=RedBlip|text=C-12|x=17.38|y=77.14}}{{spc}} |
||
| + | <br>[[Home Point]] #1: (F-7) |
||
| + | <br>[[Home Point]] #2: (C-12) |
||
| + | <br>[[Home Point]] #3: (I-11) |
||
| + | | Stats = None |
||
| − | == Connecting Areas == |
||
| + | | Region = Windurst |
||
| − | :[[Heavens Tower]]: H-7 |
||
| + | | Type = City |
||
| − | :[[Windurst Woods]]: J-14 |
||
| + | | HELM = {{Zone Icon|fishing}} |
||
| − | :[[Windurst Waters]]: B-6 |
||
| + | | Weather = None |
||
| − | :[[Toraimarai Canal]]: H-3 |
||
| + | | Maps = |
||
| − | :[[Port Windurst]]: via [[Komulili]] J-11 |
||
| + | {{Zone Tooltip Map|Map 1}} |
||
| − | |width="10%"| |
||
| + | | Map Acquisition = N/A |
||
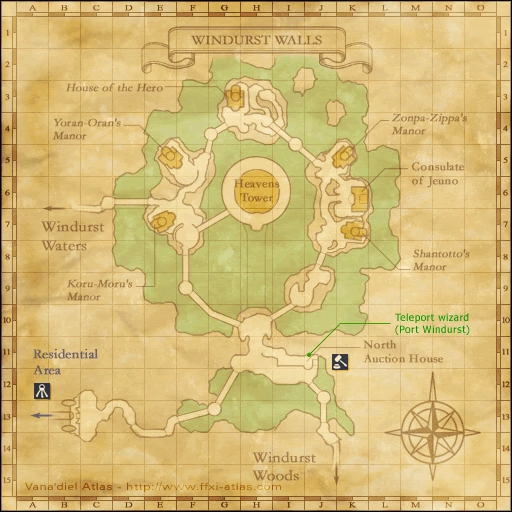
| − | [[Image:Windurst-walls.jpg|thumb|150px|Windurst Walls]] |
||
| + | | Restrictions = None |
||
| − | |} |
||
| + | | Requirements = None |
||
| + | | Expansion = Final Fantasy XI |
||
| + | | BGM = "The Federation of Windurst" |
||
| + | }} |
||
| + | == Involved in [[:Category:Quests|Quests]]/[[:Category:Missions|Missions]] == |
||
| − | == Quests Started Here == |
||
| + | {{TableQuestHeader}} |
||
| − | {| border="0" width="90%" cellpadding="3" cellspacing="2" |
||
| − | |align="center" width="30%" BGCOLOR="#ffdead"|'''Quest''' |
||
| − | |align="center" width="17%" BGCOLOR="#ffdead"|'''Type''' |
||
| − | |align="center" width="21%" BGCOLOR="#ffdead"|'''Starter''' |
||
| − | |align="center" width="16%" BGCOLOR="#ffdead"|'''Location''' |
||
| − | |align="center" width="16%" BGCOLOR="#ffdead"|'''Fame''' |
||
| − | |- |
||
| − | |align="left" BGCOLOR="#D5D9FF"| [[Blast From the Past]] |
||
| − | |align="center" BGCOLOR="#D5D9FF"|General |
||
| − | |align="center" BGCOLOR="#D5D9FF"|[[Koru-Moru]] |
||
| − | |align="center" BGCOLOR="#D5D9FF"| E-7 |
||
| − | |align="center" BGCOLOR="#D5D9FF"|? |
||
| − | |- |
||
| − | |align="left" BGCOLOR="#D5D9FF"| [[Blood and Glory]] |
||
| − | |align="center" BGCOLOR="#D5D9FF"|[[:category:Weapon Skills|Weapon Skill]] |
||
| − | |align="center" BGCOLOR="#D5D9FF"|[[Shantotto]] |
||
| − | |align="center" BGCOLOR="#D5D9FF"| K-7 |
||
| − | |align="center" BGCOLOR="#D5D9FF"|? |
||
| − | |- |
||
| − | |align="left" BGCOLOR="#D5D9FF"| [[Carbuncle Debacle]] |
||
| − | |align="center" BGCOLOR="#D5D9FF"|[[SMN]] [[:category:Artifact Armor|AF]] 3 |
||
| − | |align="center" BGCOLOR="#D5D9FF"|-- |
||
| − | |align="center" BGCOLOR="#D5D9FF"| I-9 |
||
| − | |align="center" BGCOLOR="#D5D9FF"|-- |
||
| − | |- |
||
| − | |align="left" BGCOLOR="#D5D9FF"| [[Class Reunion]] |
||
| − | |align="center" BGCOLOR="#D5D9FF"|[[SMN]] [[:category:Artifact Armor|AF]] 2 |
||
| − | |align="center" BGCOLOR="#D5D9FF"|-- |
||
| − | |align="center" BGCOLOR="#D5D9FF"| G-3 |
||
| − | |align="center" BGCOLOR="#D5D9FF"|-- |
||
| − | |- |
||
| − | |align="left" BGCOLOR="#D5D9FF"| [[Curses, Foiled A-Golem!?]] |
||
| − | |align="center" BGCOLOR="#D5D9FF"|Spell |
||
| − | |align="center" BGCOLOR="#D5D9FF"|[[Shantotto]] |
||
| − | |align="center" BGCOLOR="#D5D9FF"| K-7 |
||
| − | |align="center" BGCOLOR="#D5D9FF"|4 |
||
| − | |- |
||
| − | |align="left" BGCOLOR="#D5D9FF"| [[Curses, Foiled Again!]] |
||
| − | |align="center" BGCOLOR="#D5D9FF"|General |
||
| − | |align="center" BGCOLOR="#D5D9FF"|[[Shantotto]] |
||
| − | |align="center" BGCOLOR="#D5D9FF"| K-7 |
||
| − | |align="center" BGCOLOR="#D5D9FF"|0 |
||
| − | |- |
||
| − | |align="left" BGCOLOR="#D5D9FF"| [[Curses, Foiled...Again!?]] |
||
| − | |align="center" BGCOLOR="#D5D9FF"|General |
||
| − | |align="center" BGCOLOR="#D5D9FF"|[[Shantotto]] |
||
| − | |align="center" BGCOLOR="#D5D9FF"| K-7 |
||
| − | |align="center" BGCOLOR="#D5D9FF"|2 |
||
| − | |- |
||
| − | |align="left" BGCOLOR="#D5D9FF"| [[Flower Child]] |
||
| − | |align="center" BGCOLOR="#D5D9FF"|Mog Exit |
||
| − | |align="center" BGCOLOR="#D5D9FF"|[[Ojha Rhawash]] |
||
| − | |align="center" BGCOLOR="#D5D9FF"| C-13 |
||
| − | |align="center" BGCOLOR="#D5D9FF"|0 |
||
| − | |- |
||
| − | |align="left" BGCOLOR="#D5D9FF"| [[I Can Hear A Rainbow]] |
||
| − | |align="center" BGCOLOR="#D5D9FF"|[[Summoner|SMN Flag]] |
||
| − | |align="center" BGCOLOR="#D5D9FF"|[[Ajido-Marujido]] |
||
| − | |align="center" BGCOLOR="#D5D9FF"| G-3 |
||
| − | |align="center" BGCOLOR="#D5D9FF"|-- |
||
| − | |- |
||
| − | |align="left" BGCOLOR="#D5D9FF"| [[Mandragora-Mad]] |
||
| − | |align="center" BGCOLOR="#D5D9FF"|General ''(R)'' |
||
| − | |align="center" BGCOLOR="#D5D9FF"|[[Yoran-Oran]] |
||
| − | |align="center" BGCOLOR="#D5D9FF"| E-5 |
||
| − | |align="center" BGCOLOR="#D5D9FF"|0 |
||
| − | |- |
||
| − | |align="left" BGCOLOR="#D5D9FF"| [[Nothing Matters]] |
||
| − | |align="center" BGCOLOR="#D5D9FF"|General |
||
| − | |align="center" BGCOLOR="#D5D9FF"|[[Koru-Moru]] |
||
| − | |align="center" BGCOLOR="#D5D9FF"| E-7 |
||
| − | |align="center" BGCOLOR="#D5D9FF"|9 |
||
| − | |- |
||
| − | |align="left" BGCOLOR="#D5D9FF"| [[Star Struck]] |
||
| − | |align="center" BGCOLOR="#D5D9FF"|General |
||
| − | |align="center" BGCOLOR="#D5D9FF"|[[Koru-Moru]] |
||
| − | |align="center" BGCOLOR="#D5D9FF"| E-7 |
||
| − | |align="center" BGCOLOR="#D5D9FF"|2 |
||
| − | |- |
||
| − | |align="left" BGCOLOR="#D5D9FF"| [[The Postman Always K.O.s Twice]] |
||
| − | |align="center" BGCOLOR="#D5D9FF"|General ''(R)'' |
||
| − | |align="center" BGCOLOR="#D5D9FF"|[[Ambrosius]] |
||
| − | |align="center" BGCOLOR="#D5D9FF"| J-12 |
||
| − | |align="center" BGCOLOR="#D5D9FF"|0 |
||
| − | |- |
||
| − | |align="left" BGCOLOR="#D5D9FF"| [[The Puppet Master]] |
||
| − | |align="center" BGCOLOR="#D5D9FF"|[[SMN]] [[:category:Artifact Armor|AF]] 1 |
||
| − | |align="center" BGCOLOR="#D5D9FF"|[[Juroro]] |
||
| − | |align="center" BGCOLOR="#D5D9FF"| I-8 |
||
| − | |align="center" BGCOLOR="#D5D9FF"|-- |
||
| − | |- |
||
| − | |align="left" BGCOLOR="#D5D9FF"| [[To Bee or not to Bee?]] |
||
| − | |align="center" BGCOLOR="#D5D9FF"|General |
||
| − | |align="center" BGCOLOR="#D5D9FF"|[[Raamimi]] |
||
| − | |align="center" BGCOLOR="#D5D9FF"| F-7 |
||
| − | |align="center" BGCOLOR="#D5D9FF"|2 |
||
| − | |} |
||
| + | {{TableQuestLine |Name=Blast from the Past| Type=General| Starter= [[Koru-Moru]]| Zone= [[Windurst Walls]]| Coordinates= E-7}} |
||
| − | == NPCs Found Here == |
||
| + | |||
| − | {| border="0" width="100%" |
||
| + | {{TableQuestLine |Name=Blood and Glory| Type=[[:category:Weapon Skills|Weapon Skill]]| Starter= [[Shantotto]]| Zone= [[Windurst Walls]]| Coordinates= K-7}} |
||
| − | |width="47%" valign="top"| |
||
| + | |||
| − | {| border="0" width="100%" cellpadding="3" cellspacing="2" |
||
| + | {{TableQuestLine |Name=Carbuncle Debacle| Type=[[SMN]] [[:category:Artifact Armor|AF3]]| Starter= [[Carbuncle]]| Zone= [[Windurst Walls]]| Coordinates= G-3}} |
||
| − | |align="center" width="40%" BGCOLOR="#ffdead"|'''Name''' |
||
| + | |||
| − | |align="center" width="20%" BGCOLOR="#ffdead"|'''Location''' |
||
| + | {{TableQuestLine |Name=Class Reunion| Type=[[SMN]] [[:category:Artifact Armor|AF2]]| Starter= [[Carbuncle]]| Zone= [[Windurst Walls]]| Coordinates= G-3}} |
||
| − | |align="center" width="40%" BGCOLOR="#ffdead"|'''Type''' |
||
| + | |||
| − | |- |
||
| + | {{TableQuestLine |Name=Curses, Foiled A-Golem!?| Type=Spell Scroll| Starter= [[Shantotto]]| Zone= [[Windurst Walls]]| Coordinates= K-7}} |
||
| − | |align="left" BGCOLOR="#D5D9FF"| [[Ambrosius]] |
||
| + | |||
| − | |align="center" BGCOLOR="#D5D9FF"|J-12 |
||
| + | {{TableQuestLine |Name=Curses, Foiled Again!| Type=General| Starter= [[Shantotto]]| Zone= [[Windurst Walls]]| Coordinates= K-7}} |
||
| − | |align="center" BGCOLOR="#D5D9FF"|--- |
||
| + | |||
| − | |- |
||
| + | {{TableQuestLine |Name=Curses, Foiled...Again!?| Type=General| Starter= [[Shantotto]]| Zone= [[Windurst Walls]]| Coordinates= K-7}} |
||
| − | |align="left" BGCOLOR="#D5D9FF"| [[Anini]] |
||
| + | |||
| − | |align="center" BGCOLOR="#D5D9FF"|H-5 |
||
| + | {{TableQuestLine |Name=Flower Child| Type=Mog House Exit| Starter= [[Ojha Rhawash]]| Zone= [[Windurst Walls]]| Coordinates= C-13}} |
||
| − | |align="center" BGCOLOR="#D5D9FF"|--- |
||
| + | |||
| − | |- |
||
| + | {{TableQuestLine |Name=I Can Hear a Rainbow| Type=Job: [[Summoner]]| Starter= [[House of the Hero]]| Zone= [[Windurst Walls]]| Coordinates= G-3}} |
||
| − | |align="left" BGCOLOR="#D5D9FF"| [[Aromu-Oromu]] |
||
| + | |||
| − | |align="center" BGCOLOR="#D5D9FF"|F-9 |
||
| + | {{TableQuestLine |Name= Know One's Onions| Type=General| Starter= [[Kohlo-Lakolo]]| Zone= [[Port Windurst]]| Coordinates= G-5}} |
||
| − | |align="center" BGCOLOR="#D5D9FF"|--- |
||
| + | |||
| − | |- |
||
| + | {{TableQuestLine |Name=Lure of the Wildcat (Windurst)| Type=General| Starter=[[Ibwam]]| Zone= [[Windurst Woods]]| Coordinates= G-11}} |
||
| − | |align="left" BGCOLOR="#D5D9FF"| [[Augu-Maugu]] |
||
| + | |||
| − | |align="center" BGCOLOR="#D5D9FF"|G-11 |
||
| + | {{TableQuestLine |Name= Making Headlines| Type=General| Starter=[[Naiko-Paneiko]]| Zone= [[Windurst Waters]]| Coordinates= C-11 South}} |
||
| − | |align="center" BGCOLOR="#D5D9FF"|--- |
||
| + | |||
| − | |- |
||
| + | {{TableQuestLine |Name=Mandragora-Mad| Type=General| Starter= [[Yoran-Oran]]| Zone= [[Windurst Walls]]| Coordinates= E-5}} |
||
| − | |align="left" BGCOLOR="#D5D9FF"| [[Bonchacha]] |
||
| + | |||
| − | |align="center" BGCOLOR="#D5D9FF"|F-7 |
||
| + | {{TableQuestLine |Name=Nothing Matters| Type=General| Starter= [[Koru-Moru]]| Zone= [[Windurst Walls]]| Coordinates= E-7}} |
||
| − | |align="center" BGCOLOR="#D5D9FF"|--- |
||
| + | |||
| − | |- |
||
| + | {{TableQuestLine |Name=The Postman Always K.O.s Twice| Type=General| Starter= [[Ambrosius]]| Zone= [[Windurst Walls]]| Coordinates= E-12}} |
||
| − | |align="left" BGCOLOR="#D5D9FF"| [[Burute-Sorute]] |
||
| + | |||
| − | |align="center" BGCOLOR="#D5D9FF"|H-10 |
||
| + | {{TableQuestLine |Name=The Puppet Master| Type=[[SMN]] [[:category:Artifact Armor|AF1]]| Starter= [[Carbuncle]]| Zone= [[Windurst Walls]]| Coordinates= G-3}} |
||
| − | |align="center" BGCOLOR="#D5D9FF"|[[Title Changer]] |
||
| + | |||
| − | |- |
||
| + | {{TableQuestLine |Name=Star Struck| Type=General| Starter= [[Koru-Moru]]| Zone= [[Windurst Walls]]| Coordinates= E-7}} |
||
| − | |align="left" BGCOLOR="#D5D9FF"| [[Chawo Shipeynyo]] |
||
| + | |||
| − | |align="center" BGCOLOR="#D5D9FF"|H-7 |
||
| + | {{TableQuestLine |Name=To Bee or Not to Bee?| Type=General| Starter= [[Raamimi]]| Zone= [[Windurst Walls]]| Coordinates= F-7}} |
||
| − | |align="center" BGCOLOR="#D5D9FF"|--- |
||
| + | |||
| − | |- |
||
| + | {{TableQuestLine |Name=Toraimarai Turmoil| Type=General| Starter=[[Ohbiru-Dohbiru]]| Zone= [[Windurst Waters]]| Coordinates= J-9 South}} |
||
| − | |align="left" BGCOLOR="#D5D9FF"| [[Chomomo]] |
||
| + | |||
| − | |align="center" BGCOLOR="#D5D9FF"|H-3 |
||
| + | {{TableMissionHeader}} |
||
| − | |align="center" BGCOLOR="#D5D9FF"|--- |
||
| + | |||
| − | |- |
||
| + | {{TableMissionLine |Name = The Jester who'd be King| Nation= [[Windurst Missions|Windurst 8-2]]| Starter= [[Windurst Gate Guard]]| Zone= [[Windurst]]| Coordinates= }} |
||
| − | |align="left" BGCOLOR="#D5D9FF"| [[Dabaide-Obaide]] |
||
| + | |||
| − | |align="center" BGCOLOR="#D5D9FF"|H-11 |
||
| + | {{TableMissionLine |Name = Doll of the Dead| Nation= [[Windurst Missions|Windurst 9-1]]| Starter= [[Windurst Gate Guard]]| Zone= [[Windurst]]| Coordinates= }} |
||
| − | |align="center" BGCOLOR="#D5D9FF"|--- |
||
| + | |||
| − | |- |
||
| + | {{TableMissionLine |Name= The Road Forks| Nation= [[Chains of Promathia Missions|Promathia 3-3]]| Starter= ---| Zone= ---| Coordinates= }} |
||
| − | |align="left" BGCOLOR="#D5D9FF"| [[Ekamama]] |
||
| + | |||
| − | |align="center" BGCOLOR="#D5D9FF"|K-5 |
||
| + | {{TableMissionLine |Name= Where Messengers Gather (Ulmia's Path) | Nation= [[Chains of Promathia Missions|Promathia 5-3]]| Starter= [[Cid]]| Zone= [[Metalworks]]| Coordinates=H-8 }} |
||
| − | |align="center" BGCOLOR="#D5D9FF"|--- |
||
| + | |||
| − | |- |
||
| + | {{TableMissionLine |Name = Curses! A Horrifically Harrowing Hex| Nation= [[A Moogle Kupo d'Etat Missions|A Moogle Kupo d'Etat]]| Starter= [[Shantotto]]| Zone= [[Windurst Walls]]| Coordinates= K-7}} |
||
| − | |align="left" BGCOLOR="#D5D9FF"| [[Esmeralda]] |
||
| + | |||
| − | |align="center" BGCOLOR="#D5D9FF"|K-6 |
||
| + | {{TableMissionLine |Name = An Errand! The Professor's Price| Nation= [[A Moogle Kupo d'Etat Missions|A Moogle Kupo d'Etat]]| Starter= [[Shantotto]]| Zone= [[Windurst Walls]]| Coordinates= K-7}} |
||
| − | |align="center" BGCOLOR="#D5D9FF"|Consul. Rep. |
||
| + | |||
| − | |- |
||
| + | {{TableMissionLine |Name = A Shantotto Ascension (Mission)| Nation= [[:Category:A Shantotto Ascension Missions|A Shantotto Ascension]]| Starter= --| Zone= [[Windurst Walls]]| Coordinates= }} |
||
| − | |align="left" BGCOLOR="#D5D9FF"| [[Finene]] |
||
| + | |||
| − | |align="center" BGCOLOR="#D5D9FF"|I-5 |
||
| + | |||
| − | |align="center" BGCOLOR="#D5D9FF"|--- |
||
| + | {{TableMissionLine |Name = An Uneasy Peace| Nation= [[:Category:A Shantotto Ascension Missions|A Shantotto Ascension]]| Starter= --| Zone= [[Sacrificial Chamber]]| Coordinates= }} |
||
| − | |- |
||
| + | |||
| − | |align="left" BGCOLOR="#D5D9FF"| [[Five of Diamonds]] |
||
| + | {{TableQuestFooter}} |
||
| − | |align="center" BGCOLOR="#D5D9FF"|C-13 |
||
| + | |||
| − | |align="center" BGCOLOR="#D5D9FF"|--- |
||
| + | ==Other Information== |
||
| − | |- |
||
| + | {| border="0" width="100%" cellpadding="5" cellspacing="2" |
||
| − | |align="left" BGCOLOR="#D5D9FF"| [[Florencia]] |
||
| + | |BGCOLOR="#DFDFDF" rowspan="1" width="50%" valign="top"| |
||
| − | |align="center" BGCOLOR="#D5D9FF"|K-6 |
||
| + | {{Zone Section Header|fishing}} |
||
| − | |align="center" BGCOLOR="#D5D9FF"|--- |
||
| + | {{:{{PAGENAME}}/Fishing}} |
||
| − | |- |
||
| + | |BGCOLOR="#DFDFDF" rowspan="1" width="50%" valign="top"| |
||
| − | |align="left" BGCOLOR="#D5D9FF"| [[Four of Diamonds]] |
||
| − | |align="center" BGCOLOR="#D5D9FF"|C-6 |
||
| − | |align="center" BGCOLOR="#D5D9FF"|--- |
||
| − | |- |
||
| − | |align="left" BGCOLOR="#D5D9FF"| [[Gerun-Garun]] |
||
| − | |align="center" BGCOLOR="#D5D9FF"|H-4 |
||
| − | |align="center" BGCOLOR="#D5D9FF"|--- |
||
| − | |- |
||
| − | |align="left" BGCOLOR="#D5D9FF"| [[Haah Chakaila]] |
||
| − | |align="center" BGCOLOR="#D5D9FF"|G-6 |
||
| − | |align="center" BGCOLOR="#D5D9FF"|--- |
||
| − | |- |
||
| − | |align="left" BGCOLOR="#D5D9FF"| [[Hiwon-Biwon]] |
||
| − | |align="center" BGCOLOR="#D5D9FF"|K-8 |
||
| − | |align="center" BGCOLOR="#D5D9FF"|--- |
||
| − | |- |
||
| − | |align="left" BGCOLOR="#D5D9FF"| [[Horuni-Mawoni]] |
||
| − | |align="center" BGCOLOR="#D5D9FF"|H-10 |
||
| − | |align="center" BGCOLOR="#D5D9FF"|--- |
||
| − | |- |
||
| − | |align="left" BGCOLOR="#D5D9FF"| [[Ignaz]] |
||
| − | |align="center" BGCOLOR="#D5D9FF"|K-6 |
||
| − | |align="center" BGCOLOR="#D5D9FF"|--- |
||
| − | |- |
||
| − | |align="left" BGCOLOR="#D5D9FF"| [[Jack of Diamonds]] |
||
| − | |align="center" BGCOLOR="#D5D9FF"|C-13 |
||
| − | |align="center" BGCOLOR="#D5D9FF"|[[Adventurer's Assistant|Adv. Assistant]] |
||
| − | |- |
||
| − | |align="left" BGCOLOR="#D5D9FF"| [[Juna Moshal]] |
||
| − | |align="center" BGCOLOR="#D5D9FF"|H-3 |
||
| − | |align="center" BGCOLOR="#D5D9FF"|--- |
||
| − | |- |
||
| − | |align="left" BGCOLOR="#D5D9FF"| [[Juvillie]] |
||
| − | |align="center" BGCOLOR="#D5D9FF"|D-6 |
||
| − | |align="center" BGCOLOR="#D5D9FF"|Event Replayer |
||
| − | |- |
||
| − | |align="left" BGCOLOR="#D5D9FF"| [[Kaaya Majiad]] |
||
| − | |align="center" BGCOLOR="#D5D9FF"|I-10 |
||
| − | |align="center" BGCOLOR="#D5D9FF"|--- |
||
| − | |- |
||
| − | |align="left" BGCOLOR="#D5D9FF"| [[Kalupa-Tawalupa]] |
||
| − | |align="center" BGCOLOR="#D5D9FF"|F-7 |
||
| − | |align="center" BGCOLOR="#D5D9FF"|--- |
||
| − | |- |
||
| − | |align="left" BGCOLOR="#D5D9FF"| [[Karija-Marija]] |
||
| − | |align="center" BGCOLOR="#D5D9FF"|J-12 |
||
| − | |align="center" BGCOLOR="#D5D9FF"|--- |
||
| − | |- |
||
| − | |align="left" BGCOLOR="#D5D9FF"| [[Karola]] |
||
| − | |align="center" BGCOLOR="#D5D9FF"|K-6 |
||
| − | |align="center" BGCOLOR="#D5D9FF"|--- |
||
| − | |- |
||
| − | |align="left" BGCOLOR="#D5D9FF"| [[Keir]] |
||
| − | |align="center" BGCOLOR="#D5D9FF"|K-6 |
||
| − | |align="center" BGCOLOR="#D5D9FF"|--- |
||
| − | |- |
||
| − | |align="left" BGCOLOR="#D5D9FF"| [[Kenono]] |
||
| − | |align="center" BGCOLOR="#D5D9FF"|I-12 |
||
| − | |align="center" BGCOLOR="#D5D9FF"|-- |
||
| − | |- |
||
| − | |align="left" BGCOLOR="#D5D9FF"| [[Keo-Horuo]] |
||
| − | |align="center" BGCOLOR="#D5D9FF"|H-7 |
||
| − | |align="center" BGCOLOR="#D5D9FF"|--- |
||
| − | |- |
||
| − | |align="left" BGCOLOR="#D5D9FF"| [[Kimumu]] |
||
| − | |align="center" BGCOLOR="#D5D9FF"|J-11 |
||
| − | |align="center" BGCOLOR="#D5D9FF"|--- |
||
| − | |- |
||
| − | |align="left" BGCOLOR="#D5D9FF"| [[Kobunono]] |
||
| − | |align="center" BGCOLOR="#D5D9FF"|I-11 |
||
| − | |align="center" BGCOLOR="#D5D9FF"|[[Adventurer's Assistant|Adv. Assistant]] |
||
| − | |- |
||
| − | |align="left" BGCOLOR="#D5D9FF"| [[Kohpo-Akuupo]] |
||
| − | |align="center" BGCOLOR="#D5D9FF"|G-13 |
||
| − | |align="center" BGCOLOR="#D5D9FF"|--- |
||
| − | |- |
||
| − | |align="left" BGCOLOR="#D5D9FF"| [[Komomo]] |
||
| − | |align="center" BGCOLOR="#D5D9FF"|C-6 |
||
| − | |align="center" BGCOLOR="#D5D9FF"|--- |
||
| − | |- |
||
| − | |align="left" BGCOLOR="#D5D9FF"| [[Komulili]] |
||
| − | |align="center" BGCOLOR="#D5D9FF"|J-11 |
||
| − | |align="center" BGCOLOR="#D5D9FF"|Teleporter |
||
| − | |- |
||
| − | |align="left" BGCOLOR="#D5D9FF"| [[Koru-Moru]] |
||
| − | |align="center" BGCOLOR="#D5D9FF"|E-7 |
||
| − | |align="center" BGCOLOR="#D5D9FF"|--- |
||
| − | |- |
||
| − | |align="left" BGCOLOR="#D5D9FF"| [[Lala Gohma]] |
||
| − | |align="center" BGCOLOR="#D5D9FF"|I-5 |
||
| − | |align="center" BGCOLOR="#D5D9FF"|--- |
||
| − | |- |
||
| − | |align="left" BGCOLOR="#D5D9FF"| [[Luuh Koplehn]] |
||
| − | |align="center" BGCOLOR="#D5D9FF"|F-7 |
||
| − | |align="center" BGCOLOR="#D5D9FF"|--- |
||
| − | |- |
||
| − | |align="left" BGCOLOR="#D5D9FF"| [[Maan-Pokuun]] |
||
| − | |align="center" BGCOLOR="#D5D9FF"|F-7 |
||
| − | |align="center" BGCOLOR="#D5D9FF"|--- |
||
| − | |} |
||
| − | |width="5%"| |
||
| − | |width="48%" valign="top"| |
||
| − | {| border="0" width="100%" cellpadding="3" cellspacing="2" |
||
| − | |align="center" width="40%" BGCOLOR="#ffdead"|'''Name''' |
||
| − | |align="center" width="20%" BGCOLOR="#ffdead"|'''Location''' |
||
| − | |align="center" width="40%" BGCOLOR="#ffdead"|'''Type''' |
||
| − | |- |
||
| − | |align="left" BGCOLOR="#D5D9FF"| [[Malmi-Monmi]] |
||
| − | |align="center" BGCOLOR="#D5D9FF"|E-6 |
||
| − | |align="center" BGCOLOR="#D5D9FF"|--- |
||
| − | |- |
||
| − | |align="left" BGCOLOR="#D5D9FF"| [[Mehruru]] |
||
| − | |align="center" BGCOLOR="#D5D9FF"|H-11 |
||
| − | |align="center" BGCOLOR="#D5D9FF"|--- |
||
| − | |- |
||
| − | |align="left" BGCOLOR="#D5D9FF"| [[Migi Centa]] |
||
| − | |align="center" BGCOLOR="#D5D9FF"|I-9 |
||
| − | |align="center" BGCOLOR="#D5D9FF"|--- |
||
| − | |- |
||
| − | |align="left" BGCOLOR="#D5D9FF"| [[Moan-Maon]] |
||
| − | |align="center" BGCOLOR="#D5D9FF"|J-6 |
||
| − | |align="center" BGCOLOR="#D5D9FF"|--- |
||
| − | |- |
||
| − | |align="left" BGCOLOR="#D5D9FF"| [[Mukuku]] |
||
| − | |align="center" BGCOLOR="#D5D9FF"|G-5 |
||
| − | |align="center" BGCOLOR="#D5D9FF"|--- |
||
| − | |- |
||
| − | |align="left" BGCOLOR="#D5D9FF"| [[Naih Arihmepp]] |
||
| − | |align="center" BGCOLOR="#D5D9FF"|F-5 |
||
| − | |align="center" BGCOLOR="#D5D9FF"|--- |
||
| − | |- |
||
| − | |align="left" BGCOLOR="#D5D9FF"| [[Nine of Diamonds]] |
||
| − | |align="center" BGCOLOR="#D5D9FF"|F-7 |
||
| − | |align="center" BGCOLOR="#D5D9FF"|--- |
||
| − | |- |
||
| − | |align="left" BGCOLOR="#D5D9FF"| [[Nozaza]] |
||
| − | |align="center" BGCOLOR="#D5D9FF"|G-7 |
||
| − | |align="center" BGCOLOR="#D5D9FF"|--- |
||
| − | |- |
||
| − | |align="left" BGCOLOR="#D5D9FF"| [[Ojha Rhawash]] |
||
| − | |align="center" BGCOLOR="#D5D9FF"|C-13 |
||
| − | |align="center" BGCOLOR="#D5D9FF"|[[Adventurer's Assistant|Adv. Assistant]] |
||
| − | |- |
||
| − | |align="left" BGCOLOR="#D5D9FF"| [[Orudoba-Sondeba]] |
||
| − | |align="center" BGCOLOR="#D5D9FF"|J-12 |
||
| − | |align="center" BGCOLOR="#D5D9FF"|--- |
||
| − | |- |
||
| − | |align="left" BGCOLOR="#D5D9FF"| [[Pakeke]] |
||
| − | |align="center" BGCOLOR="#D5D9FF"|E-6 |
||
| − | |align="center" BGCOLOR="#D5D9FF"|--- |
||
| − | |- |
||
| − | |align="left" BGCOLOR="#D5D9FF"| [[Pakke-Pokke]] |
||
| − | |align="center" BGCOLOR="#D5D9FF"|H-7 |
||
| − | |align="center" BGCOLOR="#D5D9FF"|--- |
||
| − | |- |
||
| − | |align="left" BGCOLOR="#D5D9FF"| [[Pakora-Makora]] |
||
| − | |align="center" BGCOLOR="#D5D9FF"|H-7 |
||
| − | |align="center" BGCOLOR="#D5D9FF"|--- |
||
| − | |- |
||
| − | |align="left" BGCOLOR="#D5D9FF"| [[Pantsa-Karutsa]] |
||
| − | |align="center" BGCOLOR="#D5D9FF"|H-10 |
||
| − | |align="center" BGCOLOR="#D5D9FF"|--- |
||
| − | |- |
||
| − | |align="left" BGCOLOR="#D5D9FF"| [[Polikal-Ramikal]] |
||
| − | |align="center" BGCOLOR="#D5D9FF"|H-5 |
||
| − | |align="center" BGCOLOR="#D5D9FF"|--- |
||
| − | |- |
||
| − | |align="left" BGCOLOR="#D5D9FF"| [[Polink-Moink]] |
||
| − | |align="center" BGCOLOR="#D5D9FF"|H-10 |
||
| − | |align="center" BGCOLOR="#D5D9FF"|--- |
||
| − | |- |
||
| − | |align="left" BGCOLOR="#D5D9FF"| [[Purakoko]] |
||
| − | |align="center" BGCOLOR="#D5D9FF"|F-7 |
||
| − | |align="center" BGCOLOR="#D5D9FF"|--- |
||
| − | |- |
||
| − | |align="left" BGCOLOR="#D5D9FF"| [[Purere]] |
||
| − | |align="center" BGCOLOR="#D5D9FF"|H-10 |
||
| − | |align="center" BGCOLOR="#D5D9FF"|--- |
||
| − | |- |
||
| − | |align="left" BGCOLOR="#D5D9FF"| [[Quentin]] |
||
| − | |align="center" BGCOLOR="#D5D9FF"|F-9 |
||
| − | |align="center" BGCOLOR="#D5D9FF"|--- |
||
| − | |- |
||
| − | |align="left" BGCOLOR="#D5D9FF"| [[Raamimi]] |
||
| − | |align="center" BGCOLOR="#D5D9FF"|F-7 |
||
| − | |align="center" BGCOLOR="#D5D9FF"|--- |
||
| − | |- |
||
| − | |align="left" BGCOLOR="#D5D9FF"| [[Ran]] |
||
| − | |align="center" BGCOLOR="#D5D9FF"|K-6 |
||
| − | |align="center" BGCOLOR="#D5D9FF"|--- |
||
| − | |- |
||
| − | |align="left" BGCOLOR="#D5D9FF"| [[Rutango-Botango]] |
||
| − | |align="center" BGCOLOR="#D5D9FF"|F-7 |
||
| − | |align="center" BGCOLOR="#D5D9FF"|--- |
||
| − | |- |
||
| − | |align="left" BGCOLOR="#D5D9FF"| [[Scavnix]] |
||
| − | |align="center" BGCOLOR="#D5D9FF"|H-4 |
||
| − | |align="center" BGCOLOR="#D5D9FF"|[[Standard Merchant]] |
||
| − | |- |
||
| − | |align="left" BGCOLOR="#D5D9FF"| [[Selulu]] |
||
| − | |align="center" BGCOLOR="#D5D9FF"|I-11 |
||
| − | |align="center" BGCOLOR="#D5D9FF"|Mail-Person |
||
| − | |- |
||
| − | |align="left" BGCOLOR="#D5D9FF"| [[Seven of Diamonds]] |
||
| − | |align="center" BGCOLOR="#D5D9FF"|H-3 |
||
| − | |align="center" BGCOLOR="#D5D9FF"|--- |
||
| − | |- |
||
| − | |align="left" BGCOLOR="#D5D9FF"| [[Shantotto]] |
||
| − | |align="center" BGCOLOR="#D5D9FF"|K-7 |
||
| − | |align="center" BGCOLOR="#D5D9FF"|--- |
||
| − | |- |
||
| − | |align="left" BGCOLOR="#D5D9FF"| [[Shinchai-Tocchai]] |
||
| − | |align="center" BGCOLOR="#D5D9FF"|C-13 |
||
| − | |align="center" BGCOLOR="#D5D9FF"|Moghouse Renter |
||
| − | |- |
||
| − | |align="left" BGCOLOR="#D5D9FF"| [[Six of Diamonds]] |
||
| − | |align="center" BGCOLOR="#D5D9FF"|J-13 |
||
| − | |align="center" BGCOLOR="#D5D9FF"|--- |
||
| − | |- |
||
| − | |align="left" BGCOLOR="#D5D9FF"| [[Suhie-Kaihie]] |
||
| − | |align="center" BGCOLOR="#D5D9FF"|D-6 |
||
| − | |align="center" BGCOLOR="#D5D9FF"|--- |
||
| − | |- |
||
| − | |align="left" BGCOLOR="#D5D9FF"| [[Takoda]] |
||
| − | |align="center" BGCOLOR="#D5D9FF"|H-10 |
||
| − | |align="center" BGCOLOR="#D5D9FF"|--- |
||
| − | |- |
||
| − | |align="left" BGCOLOR="#D5D9FF"| [[Ten of Diamonds]] |
||
| − | |align="center" BGCOLOR="#D5D9FF"|F-7 |
||
| − | |align="center" BGCOLOR="#D5D9FF"|--- |
||
| − | |- |
||
| − | |align="left" BGCOLOR="#D5D9FF"| [[Toi-Poi]] |
||
| − | |align="center" BGCOLOR="#D5D9FF"|K-5 |
||
| − | |align="center" BGCOLOR="#D5D9FF"|--- |
||
| − | |- |
||
| − | |align="left" BGCOLOR="#D5D9FF"| [[Tsuaora-Tsuora]] |
||
| − | |align="center" BGCOLOR="#D5D9FF"|J-12 |
||
| − | |align="center" BGCOLOR="#D5D9FF"|--- |
||
| − | |- |
||
| − | |align="left" BGCOLOR="#D5D9FF"| [[Uwaine]] |
||
| − | |align="center" BGCOLOR="#D5D9FF"|H-10 |
||
| − | |align="center" BGCOLOR="#D5D9FF"|--- |
||
| − | |- |
||
| − | |align="left" BGCOLOR="#D5D9FF"| [[Yanakiki]] |
||
| − | |align="center" BGCOLOR="#D5D9FF"|G-7 |
||
| − | |align="center" BGCOLOR="#D5D9FF"|--- |
||
| − | |- |
||
| − | |align="left" BGCOLOR="#D5D9FF"| [[Yoran-Oran]] |
||
| − | |align="center" BGCOLOR="#D5D9FF"|E-5 |
||
| − | |align="center" BGCOLOR="#D5D9FF"|--- |
||
| − | |- |
||
| − | |align="left" BGCOLOR="#D5D9FF"| [[Yoriri]] |
||
| − | |align="center" BGCOLOR="#D5D9FF"|J-11 |
||
| − | |align="center" BGCOLOR="#D5D9FF"|--- |
||
| − | |- |
||
| − | |align="left" BGCOLOR="#D5D9FF"| [[Zayhi-Bauhi]] |
||
| − | |align="center" BGCOLOR="#D5D9FF"|F-7 |
||
| − | |align="center" BGCOLOR="#D5D9FF"|--- |
||
| − | |- |
||
| − | |align="left" BGCOLOR="#D5D9FF"| [[Zokima-Rokima]] |
||
| − | |align="center" BGCOLOR="#D5D9FF"|H-7 |
||
| − | |align="center" BGCOLOR="#D5D9FF"|--- |
||
|} |
|} |
||
| + | |||
| + | ==[[:Category:NPCs|NPCs]] Found Here== |
||
| + | {| border="0" width="100%" cellpadding="5" cellspacing="2" |
||
| + | |rowspan="1" width="50%" valign="top"| |
||
| + | {{TableNPCHeader}} |
||
| + | {{TableNPCLine | Name=[[Ambrosius]]| Coordinates= J-12| Type= }} |
||
| + | {{TableNPCLine | Name=[[Anini]]| Coordinates= H-5| Type= }} |
||
| + | {{TableNPCLine | Name=[[Aromu-Oromu]]| Coordinates= F-9| Type= }} |
||
| + | {{TableNPCLine | Name=[[Augu-Maugu]]| Coordinates= G-11| Type= }} |
||
| + | {{TableNPCLine | Name=[[Bonchacha]]| Coordinates= F-7| Type= }} |
||
| + | {{TableNPCLine | Name=[[Burute-Sorute]]| Coordinates= H-10| Type= [[Title Changer]]}} |
||
| + | {{TableNPCLine | Name=[[Chawo Shipeynyo]]| Coordinates= H-7| Type= }} |
||
| + | {{TableNPCLine | Name=[[Chomomo]]| Coordinates= H-3| Type= }} |
||
| + | {{TableNPCLine | Name=[[Dabaide-Obaide]]| Coordinates= H-11| Type= }} |
||
| + | {{TableNPCLine | Name=[[Ekamama]]| Coordinates= K-5| Type= }} |
||
| + | {{TableNPCLine | Name=[[Esmeralda]]| Coordinates= K-6| Type= Consul. Rep.}} |
||
| + | {{TableNPCLine | Name=[[Finene]]| Coordinates= I-5| Type= }} |
||
| + | {{TableNPCLine | Name=[[Five of Diamonds]]| Coordinates= C-13| Type= }} |
||
| + | {{TableNPCLine | Name=[[Florencia]]| Coordinates= K-6| Type= }} |
||
| + | {{TableNPCLine | Name=[[Four of Diamonds]]| Coordinates= C-6| Type= }} |
||
| + | {{TableNPCLine | Name=[[Gerun-Garun]]| Coordinates= H-4| Type= }} |
||
| + | {{TableNPCLine | Name=[[Haah Chakaila]]| Coordinates= G-6| Type= }} |
||
| + | {{TableNPCLine | Name=[[Hiwon-Biwon]]| Coordinates= K-8| Type= }} |
||
| + | {{TableNPCLine | Name=[[Horuni-Mawoni]]| Coordinates= H-10| Type= }} |
||
| + | {{TableNPCLine | Name=[[Ignaz]]| Coordinates= K-6| Type= }} |
||
| + | {{TableNPCLine | Name=[[Jack of Diamonds]]| Coordinates= C-13| Type= [[Adventurer's Assistant|Adv. Assistant]]}} |
||
| + | {{TableNPCLine | Name=[[Juna Moshal]]| Coordinates= H-3| Type= }} |
||
| + | {{TableNPCLine | Name=[[Juvillie]]| Coordinates= D-6| Type= Event Replayer}} |
||
| + | {{TableNPCLine | Name=[[Kaaya Majiad]]| Coordinates= I-10| Type= }} |
||
| + | {{TableNPCLine | Name=[[Kalupa-Tawalupa]]| Coordinates= F-7| Type= }} |
||
| + | {{TableNPCLine | Name=[[Karija-Marija]]| Coordinates= J-12| Type= }} |
||
| + | {{TableNPCLine | Name=[[Karola]]| Coordinates= K-6| Type= }} |
||
| + | {{TableNPCLine | Name=[[Keir]]| Coordinates= K-6| Type= }} |
||
| + | {{TableNPCLine | Name=[[Kenono]]| Coordinates= I-12| Type= }} |
||
| + | {{TableNPCLine | Name=[[Keo-Horuo]]| Coordinates= H-7| Type= }} |
||
| + | {{TableNPCLine | Name=[[Kimumu]]| Coordinates= J-11| Type= }} |
||
| + | {{TableNPCLine | Name=[[Kobunono]]| Coordinates= I-11| Type= [[Adventurer's Assistant|Adv. Assistant]]}} |
||
| + | {{TableNPCLine | Name=[[Kohpo-Akuupo]]| Coordinates= G-13| Type= }} |
||
| + | {{TableNPCLine | Name=[[Komomo]]| Coordinates= C-6| Type= }} |
||
| + | {{TableNPCLine | Name=[[Komulili]]| Coordinates= J-11| Type= [[Warp NPCs|Warp NPC]]}} |
||
| + | {{TableNPCLine | Name=[[Koru-Moru]]| Coordinates= E-7| Type= }} |
||
| + | {{TableNPCLine | Name=[[Lala Gohma]]| Coordinates= I-5| Type= }} |
||
| + | {{TableNPCLine | Name=[[Luuh Koplehn]]| Coordinates= F-7| Type= }} |
||
| + | {{TableNPCLine | Name=[[Maan-Pokuun]]| Coordinates= F-7| Type= }} |
||
| + | {{TableNPCFooter}} |
||
| + | |rowspan="1" valign="top"| |
||
| + | {{TableNPCHeader}} |
||
| + | {{TableNPCLine | Name=[[Malmi-Monmi]]| Coordinates= E-6| Type= }} |
||
| + | {{TableNPCLine | Name=[[Mehruru]]| Coordinates= H-11| Type= }} |
||
| + | {{TableNPCLine | Name=[[Migi Centa]]| Coordinates= I-9| Type= }} |
||
| + | {{TableNPCLine | Name=[[Moan-Maon]]| Coordinates= J-6| Type= }} |
||
| + | {{TableNPCLine | Name=[[Mukuku]]| Coordinates= G-5| Type= }} |
||
| + | {{TableNPCLine | Name=[[Naih Arihmepp]]| Coordinates= F-5| Type= }} |
||
| + | {{TableNPCLine | Name=[[Nine of Diamonds]]| Coordinates= F-7| Type= }} |
||
| + | {{TableNPCLine | Name=[[Nozaza]]| Coordinates= G-7| Type= }} |
||
| + | {{TableNPCLine | Name=[[Ojha Rhawash]]| Coordinates= C-13| Type= [[Adventurer's Assistant|Adv. Assistant]]}} |
||
| + | {{TableNPCLine | Name=[[Orudoba-Sondeba]]| Coordinates= J-12| Type= }} |
||
| + | {{TableNPCLine | Name=[[Pakeke]]| Coordinates= E-6| Type= }} |
||
| + | {{TableNPCLine | Name=[[Pakke-Pokke]]| Coordinates= H-7| Type= }} |
||
| + | {{TableNPCLine | Name=[[Pakora-Makora]]| Coordinates= H-7| Type= }} |
||
| + | {{TableNPCLine | Name=[[Pantsa-Karutsa]]| Coordinates= H-10| Type= }} |
||
| + | {{TableNPCLine | Name=[[Polikal-Ramikal]]| Coordinates= H-5| Type= }} |
||
| + | {{TableNPCLine | Name=[[Polink-Moink]]| Coordinates= H-10| Type= }} |
||
| + | {{TableNPCLine | Name=[[Purakoko]]| Coordinates= F-7| Type= }} |
||
| + | {{TableNPCLine | Name=[[Purere]]| Coordinates= H-10| Type= }} |
||
| + | {{TableNPCLine | Name=[[Quentin]]| Coordinates= F-9| Type= }} |
||
| + | {{TableNPCLine | Name=[[Raamimi]]| Coordinates= F-7| Type= }} |
||
| + | {{TableNPCLine | Name=[[Ran]]| Coordinates= K-6| Type= }} |
||
| + | {{TableNPCLine | Name=[[Rutango-Botango]]| Coordinates= F-7| Type= }} |
||
| + | {{TableNPCLine | Name=[[Scavnix]]| Coordinates= H-4| Type= [[Standard Merchant]]}} |
||
| + | {{TableNPCLine | Name=[[Selulu]]| Coordinates= I-11| Type= [[Item Deliverer]]}} |
||
| + | {{TableNPCLine | Name=[[Seven of Diamonds]]| Coordinates= H-3| Type= }} |
||
| + | {{TableNPCLine | Name=[[Shantotto]]| Coordinates= K-7| Type= }} |
||
| + | {{TableNPCLine | Name=[[Shinchai-Tocchai]]| Coordinates= C-13| Type= Moghouse Renter}} |
||
| + | {{TableNPCLine | Name=[[Six of Diamonds]]| Coordinates= J-13| Type= }} |
||
| + | {{TableNPCLine | Name=[[Suhie-Kaihie]]| Coordinates= D-6| Type= }} |
||
| + | {{TableNPCLine | Name=[[Takoda]]| Coordinates= H-10| Type= }} |
||
| + | {{TableNPCLine | Name=[[Ten of Diamonds]]| Coordinates= F-7| Type= }} |
||
| + | {{TableNPCLine | Name=[[Toi-Poi]]| Coordinates= K-5| Type= }} |
||
| + | {{TableNPCLine | Name=[[Tsuaora-Tsuora]]| Coordinates= J-12| Type= }} |
||
| + | {{TableNPCLine | Name=[[Uwaine]]| Coordinates= H-10| Type= }} |
||
| + | {{TableNPCLine | Name=[[Yanakiki]]| Coordinates= G-7| Type= }} |
||
| + | {{TableNPCLine | Name=[[Yoran-Oran]]| Coordinates= E-5| Type= }} |
||
| + | {{TableNPCLine | Name=[[Yoriri]]| Coordinates= J-11| Type= }} |
||
| + | {{TableNPCLine | Name=[[Zayhi-Bauhi]]| Coordinates= F-7| Type= }} |
||
| + | {{TableNPCLine | Name=[[Zokima-Rokima]]| Coordinates= H-7| Type= Mission Starter}} |
||
| + | {{TableNPCFooter}} |
||
|} |
|} |
||
Latest revision as of 15:51, 7 February 2018
|
Table of Contents
|
Zone Information
| ||||||||||||||||||||||||||||||
|
Description
This quiet, residential area of Federation of Windurst provides a home away from home for some of the more respected residents of the Federation. Accessible from all other areas of Windurst, the Walls district also provides access to the North Auction House. To the extreme north of the Walls district is the abandoned House of the Hero, underneath which is a hidden and guarded passageway into the Toraimarai Canal. 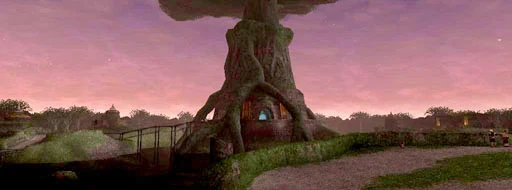 | |||||||||||||||||||||||||||||||
|
Connections
Windurst Waters: B-6
Port Windurst: via Komulili: J-11 Windurst Woods: J-14 Heavens Tower: H-7 Toraimarai Canal: H-3 (Requires Rhinostery Certificate) Dynamis - Windurst: via Trail Markings: C-12
|
Involved in Quests/Missions
Other Information
|
[ edit ]
|
||||||||||||||||||||||