(→BCNM) |
No edit summary |
||
| (24 intermediate revisions by 17 users not shown) | |||
| Line 1: | Line 1: | ||
| + | {{disambig3|[[Elixir]] or [[Elixir Vitae]]}} |
||
| − | __NOTOC__ |
||
| + | {{Item Sections}}<section begin="Item Image"/>{{Item Image|VileElixir.jpg}}<section end="Item Image"/> |
||
| − | [[Image:VileElixir.jpg|Vile Elixir]] |
||
| − | {|cellpadding="5" width="100%" |
||
| − | |width="50%" valign="top"| |
||
==Statistics== |
==Statistics== |
||
| + | {{Item Statistics |
||
| − | '''Vile elixir''' {{Rare}}<br> |
||
| + | | type = Medicine |
||
| ⚫ | |||
| + | | icon id = 4174 |
||
| − | <br><br> |
||
| + | | tags = {{Rare}} |
||
| − | '''Stackable:''' ''Not Stackable'' |
||
| ⚫ | |||
| − | <br><br> |
||
| + | | stackable = 1 |
||
| − | '''Medicine Effect:''' (Instant, All Races) |
||
| + | | use delay = 1 second |
||
| ⚫ | |||
| + | | effects = |
||
| ⚫ | |||
| ⚫ | |||
| − | :''Takes 1 second to use.'' |
||
| ⚫ | |||
| − | |||
| + | | see also = [[Vile Elixir +1]] |
||
| − | |width="50%" valign="top"| |
||
| ⚫ | |||
==Other Uses== |
==Other Uses== |
||
| + | {{Used In |
||
| − | {{Resale Price|None}} |
||
| + | | resale price = None |
||
| − | |||
| + | | gobbie mystery box = 25 |
||
| ⚫ | |||
| + | }} |
||
| − | |width="50%" valign="top"| |
||
| − | ==Synthesis Recipes== |
||
| − | ''None'' |
||
| − | |||
| − | |width="50%" valign="top"| |
||
| − | ==Used in Recipes== |
||
| − | *''None'' |
||
| − | |||
| ⚫ | |||
| − | |width="50%" valign="top"| |
||
| − | ==Desynthesis Recipe== |
||
| − | ''None'' |
||
| − | |||
| − | |width="50%" valign="top"| |
||
| − | ==Obtained From Desynthesis== |
||
| − | *''None'' |
||
| − | |||
| ⚫ | |||
==How to Obtain== |
==How to Obtain== |
||
{{AH|Medicines}} |
{{AH|Medicines}} |
||
===Quest=== |
===Quest=== |
||
| − | + | *[[Nothing Matters]] |
|
| + | |||
| + | ===Curio Vendor Moogle=== |
||
| + | {{Curio Vendor Moogle|20,000|Mauve}} |
||
| − | ===Dropped |
+ | ===Dropped By=== |
| + | {| class="ffxi-table wide-table" |
||
| − | :{|width="60%" cellpadding="2" cellspacing="2" |
||
| ⚫ | |||
| − | |- style="background:#ffdead;" |
||
!width="35%"| Name |
!width="35%"| Name |
||
!width="15%"| Level |
!width="15%"| Level |
||
!width="60%"| Zone |
!width="60%"| Zone |
||
| ⚫ | |||
| − | |- style="background:#ffd9d9" |
||
| '''[[Lumber Jack]] ([[NM]])''' |
| '''[[Lumber Jack]] ([[NM]])''' |
||
|align="center"| 55 |
|align="center"| 55 |
||
| [[Batallia Downs]] |
| [[Batallia Downs]] |
||
| + | |- |
||
| − | |- style="background:#ffd9d9" |
||
| '''[[King Arthro]] ([[NM]])''' |
| '''[[King Arthro]] ([[NM]])''' |
||
|align="center"| 55 |
|align="center"| 55 |
||
| [[Jugner Forest]] |
| [[Jugner Forest]] |
||
| + | |- |
||
| − | |- style="background:#ffd9d9" |
||
| '''[[Roc]] ([[NM]])''' |
| '''[[Roc]] ([[NM]])''' |
||
|align="center"| 55 |
|align="center"| 55 |
||
| [[Sauromugue Champaign]] |
| [[Sauromugue Champaign]] |
||
| + | |- |
||
| − | |- style="background:#ffd9d9" |
||
| '''[[Simurgh]] ([[NM]])''' |
| '''[[Simurgh]] ([[NM]])''' |
||
|align="center"| 58 |
|align="center"| 58 |
||
| [[Rolanberry Fields]] |
| [[Rolanberry Fields]] |
||
| + | |- |
||
| − | |- style="background:#ffd9d9" |
||
| '''[[Capricious Cassie]] ([[NM]])''' |
| '''[[Capricious Cassie]] ([[NM]])''' |
||
|align="center"| 70 |
|align="center"| 70 |
||
| [[Fei'Yin]] |
| [[Fei'Yin]] |
||
| + | |- |
||
| − | |- style="background:#ffd9d9" |
||
| '''[[Serket]] ([[NM]])''' |
| '''[[Serket]] ([[NM]])''' |
||
|align="center"| 70 |
|align="center"| 70 |
||
| [[Garlaige Citadel]] |
| [[Garlaige Citadel]] |
||
| + | |- |
||
| − | |- style="background:#ffd9d9" |
||
| ⚫ | |||
| − | |align="center"| 80 |
||
| − | | [[Behemoth's Dominion]] |
||
| − | |- style="background:#ffd9d9" |
||
| '''[[Hakutaku]] ([[NM]])''' |
| '''[[Hakutaku]] ([[NM]])''' |
||
|align="center"| 85 |
|align="center"| 85 |
||
| Line 83: | Line 64: | ||
===BCNM=== |
===BCNM=== |
||
| + | {| class="ffxi-table wide-table" |
||
| − | :{|width="60%" cellpadding="2" cellspacing="2" |
||
| + | |- |
||
| − | |- style="background:#ffdead" |
||
!width="30%"| Name |
!width="30%"| Name |
||
!width="30%"| Zone |
!width="30%"| Zone |
||
| Line 90: | Line 71: | ||
!width="15%"| Time |
!width="15%"| Time |
||
!width="10%"| Members |
!width="10%"| Members |
||
| + | |- |
||
| − | |- style="background:#e3e6ff" align="center" |
||
|align="left"| [[Under Observation]] |
|align="left"| [[Under Observation]] |
||
|align="left"| [[Horlais Peak]] |
|align="left"| [[Horlais Peak]] |
||
| Line 96: | Line 77: | ||
| 15 minutes |
| 15 minutes |
||
| 3 |
| 3 |
||
| + | |- |
||
| − | |- style="background:#e3e6ff" align="center" |
||
| + | |align="left"| [[Royal Jelly (BCNM)|Royal Jelly]] |
||
| + | |align="left"| [[Waughroon Shrine]] |
||
| + | | 40 |
||
| + | | 15 minutes |
||
| + | | 3 |
||
| + | |- |
||
|align="left"| [[Steamed Sprouts]] |
|align="left"| [[Steamed Sprouts]] |
||
|align="left"| [[Balga's Dais]] |
|align="left"| [[Balga's Dais]] |
||
| Line 102: | Line 89: | ||
| 30 minutes |
| 30 minutes |
||
| 6 |
| 6 |
||
| + | |- |
||
| − | |- style="background:#e3e6ff" align="center" |
||
| + | |align="left"| [[Hostile Herbivores]] |
||
| + | |align="left"| [[Horlais Peak]] |
||
| + | | 50 |
||
| + | | 30 minutes |
||
| + | | 6 |
||
| + | |- |
||
|align="left"| [[Demolition Squad]] |
|align="left"| [[Demolition Squad]] |
||
|align="left"| [[Qu'Bia Arena]] |
|align="left"| [[Qu'Bia Arena]] |
||
| Line 108: | Line 101: | ||
| 30 minutes |
| 30 minutes |
||
| 6 |
| 6 |
||
| + | |- |
||
| − | |- style="background:#e3e6ff" align="center" |
||
|align="left"| [[Cactuar Suave]] |
|align="left"| [[Cactuar Suave]] |
||
|align="left"| [[Chamber of Oracles]] |
|align="left"| [[Chamber of Oracles]] |
||
| Line 114: | Line 107: | ||
| 30 minutes |
| 30 minutes |
||
| 6 |
| 6 |
||
| + | |- |
||
| − | |- style="background:#e3e6ff" align="center" |
||
|align="left"| [[Come Into My Parlor]] |
|align="left"| [[Come Into My Parlor]] |
||
|align="left"| [[Qu'Bia Arena]] |
|align="left"| [[Qu'Bia Arena]] |
||
| Line 120: | Line 113: | ||
| 30 minutes |
| 30 minutes |
||
| 6 |
| 6 |
||
| + | |- |
||
| − | |- style="background:#e3e6ff" align="center" |
||
|align="left"| [[Eye of the Storm]] |
|align="left"| [[Eye of the Storm]] |
||
|align="left"| [[Chamber of Oracles]] |
|align="left"| [[Chamber of Oracles]] |
||
| Line 126: | Line 119: | ||
| 30 minutes |
| 30 minutes |
||
| 6 |
| 6 |
||
| + | |- |
||
| − | |- style="background:#e3e6ff" align="center" |
||
|align="left"| [[Operation Desert Swarm]] |
|align="left"| [[Operation Desert Swarm]] |
||
|align="left"| [[Waughroon Shrine]] |
|align="left"| [[Waughroon Shrine]] |
||
| Line 132: | Line 125: | ||
| 30 minutes |
| 30 minutes |
||
| 6 |
| 6 |
||
| + | |- |
||
| − | |- style="background:#e3e6ff" align="center" |
||
|align="left"| [[Copycat]] |
|align="left"| [[Copycat]] |
||
|align="left"| [[Waughroon Shrine]] |
|align="left"| [[Waughroon Shrine]] |
||
| Line 138: | Line 131: | ||
| 30 minutes |
| 30 minutes |
||
| 6 |
| 6 |
||
| + | |- |
||
| − | |- style="background:#e3e6ff" align="center" |
||
|align="left"| [[Royale Ramble]] |
|align="left"| [[Royale Ramble]] |
||
|align="left"| [[Balga's Dais]] |
|align="left"| [[Balga's Dais]] |
||
| Line 144: | Line 137: | ||
| 30 minutes |
| 30 minutes |
||
| 6 |
| 6 |
||
| + | |- |
||
| − | |- style="background:#e3e6ff" align="center" |
||
|align="left"| [[The Hills Are Alive]] |
|align="left"| [[The Hills Are Alive]] |
||
|align="left"| [[Waughroon Shrine]] |
|align="left"| [[Waughroon Shrine]] |
||
| Line 150: | Line 143: | ||
| 30 minutes |
| 30 minutes |
||
| 18 |
| 18 |
||
| + | |- |
||
| − | |- style="background:#e3e6ff" align="center" |
||
|align="left"| [[Horns of War]] |
|align="left"| [[Horns of War]] |
||
|align="left"| [[Horlais Peak]] |
|align="left"| [[Horlais Peak]] |
||
| Line 156: | Line 149: | ||
| 30 minutes |
| 30 minutes |
||
| 18 |
| 18 |
||
| + | |- |
||
| − | |- style="background:#e3e6ff" align="center" |
||
|align="left"| [[Contaminated Colosseum]] |
|align="left"| [[Contaminated Colosseum]] |
||
|align="left"| [[Horlais Peak]] |
|align="left"| [[Horlais Peak]] |
||
| Line 163: | Line 156: | ||
| 6 |
| 6 |
||
|} |
|} |
||
| + | |||
===Tenshodo Coffer=== |
===Tenshodo Coffer=== |
||
| + | {| class="ffxi-table wide-table" |
||
| − | :{| width="60%" cellpadding="2" cellspacing="2" |
||
| + | |- |
||
| − | |- style="background:#ffdead;" |
||
| − | ! |
+ | !width="25%"| Key |
| − | ! |
+ | !width="75%"| Mission |
| + | |- |
||
| − | |- style="background:#ffd9d9;" valign="top" |
||
| − | |'''[[Ivory Key]]''' |
+ | | '''[[Ivory Key]]''' |
| − | + | |'''[[Those Who Lurk in Shadows (III)]]''' |
|
| + | |- |
||
| ⚫ | |||
| + | |'''[[Ode of Life Bestowing]]''' |
||
| + | |- |
||
| + | | '''[[Red coral key]]''' |
||
| + | |'''[[Roar! A Cat Burglar Bares Her Fangs]]''' |
||
| + | |- |
||
| + | |'''[[Angel skin key]]''' |
||
| + | |'''[[Smash! A Malevolent Menace]]''' |
||
| + | |- |
||
| + | |'''[[Chocobo Key]]''' |
||
| + | |'''[[Battaru Royale]]''' |
||
|} |
|} |
||
| + | |||
| + | ===Campaign Ops=== |
||
| + | {| class="ffxi-table wide-table" |
||
| + | |- |
||
| + | ! width="35%" | Name |
||
| + | ! width="45%" | Level Cap |
||
| + | ! width="30%" | Zone |
||
| + | |- |
||
| + | | [[Fiat Lux (San d'Oria)]] |
||
| + | |align="center" | No Level Restriction, 30 minutes, 6 members |
||
| + | | [[Throne Room (S)]] |
||
| + | |} |
||
| + | |||
| + | ===Treasure Casket=== |
||
| + | *[[The Boyahda Tree]] |
||
| + | *[[Gustav Tunnel]] |
||
| + | *[[Kuftal Tunnel]] |
||
Revision as of 03:19, 14 November 2018
Were you looking for Elixir or Elixir Vitae?

Statistics
Vile elixir
This potion instantly restores
some HP and MP.
some HP and MP.
Stackable: Not Stackable
Medicine Effects: (1 second, Instant)
See also: Vile Elixir +1
Other Uses
Gobbie Mystery Box: Awards 25 daily tally
Resale Price: Cannot be sold to NPCs.
How to Obtain
Auction House Category: Medicines ![]()
Can be obtained as a random reward from the Gobbie Mystery Box Special Dial and similar sources.
Quest
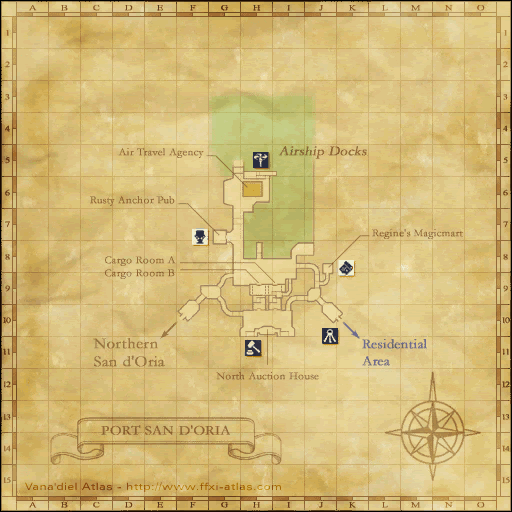
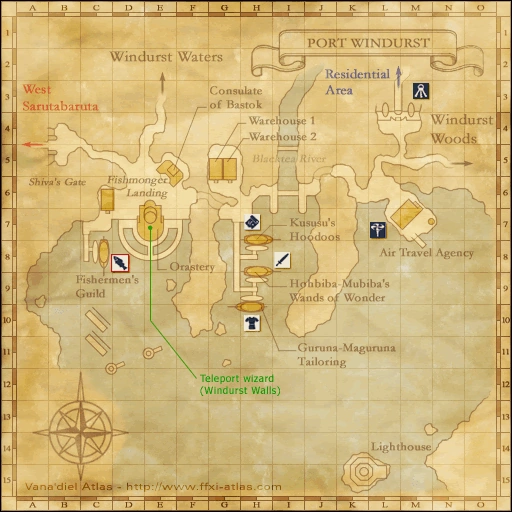
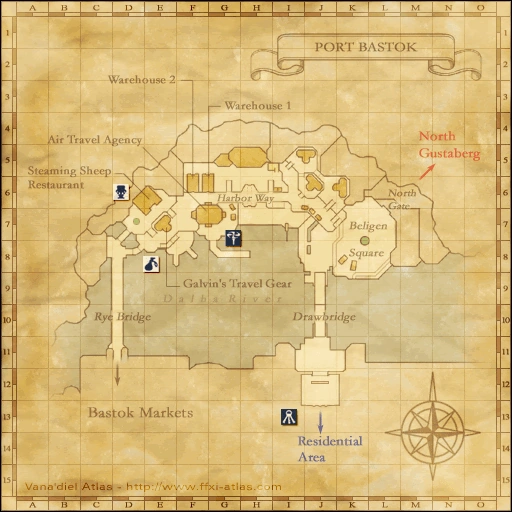
Curio Vendor Moogle
| Price: 20,000 gil | ||
| Name | Rhapsody | Location |
|---|---|---|
| Curio Vendor Moogle | Port San d'Oria (J-9) | |
| Port Windurst (M-4) | ||
| Port Bastok (K-13) | ||
Dropped By
| Name | Level | Zone |
|---|---|---|
| Lumber Jack (NM) | 55 | Batallia Downs |
| King Arthro (NM) | 55 | Jugner Forest |
| Roc (NM) | 55 | Sauromugue Champaign |
| Simurgh (NM) | 58 | Rolanberry Fields |
| Capricious Cassie (NM) | 70 | Fei'Yin |
| Serket (NM) | 70 | Garlaige Citadel |
| Hakutaku (NM) | 85 | Den of Rancor |
BCNM
| Name | Zone | Level | Time | Members |
|---|---|---|---|---|
| Under Observation | Horlais Peak | 40 | 15 minutes | 3 |
| Royal Jelly | Waughroon Shrine | 40 | 15 minutes | 3 |
| Steamed Sprouts | Balga's Dais | 40 | 30 minutes | 6 |
| Hostile Herbivores | Horlais Peak | 50 | 30 minutes | 6 |
| Demolition Squad | Qu'Bia Arena | 60 | 30 minutes | 6 |
| Cactuar Suave | Chamber of Oracles | 75 | 30 minutes | 6 |
| Come Into My Parlor | Qu'Bia Arena | 75 | 30 minutes | 6 |
| Eye of the Storm | Chamber of Oracles | 75 | 30 minutes | 6 |
| Operation Desert Swarm | Waughroon Shrine | 75 | 30 minutes | 6 |
| Copycat | Waughroon Shrine | 75 | 30 minutes | 6 |
| Royale Ramble | Balga's Dais | 75 | 30 minutes | 6 |
| The Hills Are Alive | Waughroon Shrine | 75 | 30 minutes | 18 |
| Horns of War | Horlais Peak | 75 | 30 minutes | 18 |
| Contaminated Colosseum | Horlais Peak | 75 | 30 minutes | 6 |
Tenshodo Coffer
Campaign Ops
| Name | Level Cap | Zone |
|---|---|---|
| Fiat Lux (San d'Oria) | No Level Restriction, 30 minutes, 6 members | Throne Room (S) |