| Line 238: | Line 238: | ||
*BLU are just as useful as NIN in this BCNM, BLU/NIN backwards tanking with [[Metallic Body]] and shadows up can finish one of the lesser hecteyes with a little less than half MP. With 2 [[Yagudo Drink]], MP is not a concern. [[Screwdriver]] is a useful DD spell for BLU, because it gains a damage boost against the the amorph hecteyes because it is an aquan spell. Jet Stream and Bludgeon are not as effective, due to hecteyes' resistance to blunt damage. |
*BLU are just as useful as NIN in this BCNM, BLU/NIN backwards tanking with [[Metallic Body]] and shadows up can finish one of the lesser hecteyes with a little less than half MP. With 2 [[Yagudo Drink]], MP is not a concern. [[Screwdriver]] is a useful DD spell for BLU, because it gains a damage boost against the the amorph hecteyes because it is an aquan spell. Jet Stream and Bludgeon are not as effective, due to hecteyes' resistance to blunt damage. |
||
| + | **Bludgeon is far more effective than Screwdriver on these, there's no need to cast any spell except Bludgeon and Head Butt here. |
||
*A skilled BST with an Antlion jug can take out one of the lesser eyes about as fast as a NIN, it just takes proper hate management so that you and your pet get paralyzed as little as possible, if at all. After a few trial runs with Antlion jug and trying to balance hate, as a BST I was able to finish the Compound Eyes at about the same time as NIN/BLM. Only one reward should be needed, along with only 1 jug pet in most cases. It is also nice to have BST around when it comes time to fight the Sobbing Eyes, as a properly used [[Smash Axe]] can stun a [[Breakga]] or [[Firaga]] that comes at the wrong time, along with the benfit of BST/WHM having [[Barfira]]. |
*A skilled BST with an Antlion jug can take out one of the lesser eyes about as fast as a NIN, it just takes proper hate management so that you and your pet get paralyzed as little as possible, if at all. After a few trial runs with Antlion jug and trying to balance hate, as a BST I was able to finish the Compound Eyes at about the same time as NIN/BLM. Only one reward should be needed, along with only 1 jug pet in most cases. It is also nice to have BST around when it comes time to fight the Sobbing Eyes, as a properly used [[Smash Axe]] can stun a [[Breakga]] or [[Firaga]] that comes at the wrong time, along with the benfit of BST/WHM having [[Barfira]]. |
||
Revision as of 20:28, 8 May 2009
| How do I format this? |
Strategy #1
Party Setup
Recommended subjob: WHM
Supplies
- Melon Pie (or Melon Pie +1)
- 1 Yagudo Drink per fight
- A reraise item (Reraise Earring, Scroll of Instant Reraise, etc.)
The Fight
You have 15 minutes to clear this BCNM, which means if you are there for drops and not to set records you have plenty of time to stop, buff up and rest to regain your MP. After entering the BCNM each Black Mage should use a Melon Pie, then cast Blink and Aquaveil. If you want, have one of the BLMs cast Protectra and Shellra, then wait for everyone to rest to get their MP back. Note: If you plan on sharing a reraise earring or similar item, pass it around before you cast Blink/Aquaveil, the wait time for everyone to get reraise up off the same item will be long enough for Blink/Aquaveil to wear off before you actually get to start casting.
Approach the arena at the top of the hill when everyone is ready. Have all 3 party members stand on the very edge of the hallway leading into the circular area where the mobs are. One BLM should put Barfira up, however if you forget it's not a big deal. It is important to get as close to the edge as possible without causing aggro, because if one or two of the Black Mages are out of range when they attempt to start casting, the one who was successful has a very low chance of surviving which can ultimatly lead to a wipe. When you are within casting range, have all 3 BLM turn their backs to the Hecteyes, this will prevent them from being able to hit you with AoE Petrify. You can not avoid Breakga, only Hex Eye and Petro Gaze. Whatever you do don't look them in the eye. Everyone should target the Sobbing Eyes and have one BLM call a time to start casting. Open the volley of spells with Elemental Seal + Stonega II. While Stonega is casting, start spamming your Thundaga or Blizzaga macro until you are able to cast it, repeat for your next -ga spell (whichever of the two you didn't use). By the time each BLM has 3 spells off, the 2 Compound Eyes should be dead, and the Sobbing Eyes should be around 50% or less. Just have each BLM start their 3 spell volley again (Stonega II, Bliz, Thunder). The Sobbing Eyes should drop dead after this second round, or be close enough that one or two more casts will kill it. Note: During casting, each BLM should use a Yagudo drink well before they need it, this should keep your MP high enough through the whole fight.
This entire process should take you no more than 5 or 6 minutes, including the time it took you to buff/rest at the start.
Alternative BLMx3 Strategy
If you happen to have an "unusually raced blm" (ie: Galka or Elvaan) with high HP/def, then you can have him tank. Designate one of the other two BLMs as healer for the tank. Then make sure the tank nukes first, to get the extra initial hate of "first damage". This can give you a win, without even using yagudo drinks (if you happen to have a Taru blm in the party, anyway) This method was successful 2/2 times, even with the Elvaan tank(me) only having Thundaga instead of Stonega II. No risk, easy win. Just make sure that you all face away, to avoid paralyze, and start with Blink+Aquaveil, and there's no problem. We did use melon pies. Just no drinks. (Note: It might be that the tank casting the smaller-faster -ga spells instead of Stonega II,helped keep hate. haven't tested otherwise]
Strategy #2
Party Setup
- NIN/BLM or NIN/RDM (or BLU/NIN)
- NIN/BLM or NIN/RDM (or BLU/NIN)
- RDM (Using /BLM or /WHM or /NIN) (or WHM/BLM)
The NINs should have BLM15+ or RDM20+, since Magic Attack Bonus will help out with the damage. NIN/BLM has better INT and Elemental Seal for sure landing of Jubaku: Ichi or Drain, while NIN/RDM has Barfire and Cure II.
For this strategy, BLU/NIN using Yagudo Drinks can substitute for NIN. Alternatively WHM/BLM can be used in place of RDM, the loss of Gravity is not so big a deal.
Supplies
Required:
- One stack of each tool for the Ninjas' level 40 elemental Ninjutsu spells. One stack will accommodate approximately 10 runs.
- At least one stack of Shihei.
- Yagudo Drinks if substituting with BLU.
Optional:
- INT+/MP+ food for everyone. (Use something cheap, like Melon Pie.)
- Yagudo Drink(s) for the RDM.
- A reraise item (Reraise Earring, Scroll of Instant Reraise, etc.)
- Jusatsu for Jubaku: Ichi (Paralyze)
The Fight
Summary:
- Shell/Protect II for all, Utsusemi up, MP rest.
- RDM starts the fight with Gravity on Sobbing Eyes, kites it toward entrance. Use Bind when Gravity is resisted or not up. Keep Stoneskin up.
- Each NIN (or BLU) takes a Compound Eyes, use the wheel (or Blue Magic) while facing away.
- Once done with both Compound Eyes, catch up with Sobbing Eyes, and attack the same way.
- Spread out to form a triangle while fighting Sobbing Eyes if possible, to minimize Breakga's danger.
As soon as everyone enters, go up to the hill before the hecteyes and buff up. Have the RDM cast Shell II on both NINs. Protect II can be helpful as well, but isn't necessary. Make sure everyone knows which mob is the his/her target.
Once the RDM is done buffing and resting MP, cast (Elemental Seal if available) Gravity on the Sobbing Eyes. Right when the RDM does this, both NINs cast a Ninjutsu spell on their respective Compound Eyes. NINs can start with the wheel or a debuff like Jubaku: Ichi. There will be breaks between wheels to (re)enfeeble the critters as well.
The RDM immediately starts running from the Sobbing Eyes, back toward the entrance of the BC. The NINs solo their eyes, making sure to tank them backwards, as the eyes' "Hex Eye" attack is devastating, but can be avoided if the target isn't facing the eye. Using only the level 40 elemental ninjutsu, each NIN should be able to defeat their eye easily within about two minutes.
If a NIN's HP gets low, can use Elemental Seal + Drain on /BLM, or just Cure II on /RDM. In the mean time, the RDM should be constantly casting Gravity (or Bind in an emergency) on the Sobbing Eyes when necessary, avoiding the enemy as much as possible while waiting for the NINs to get done. Blink or Utsusemi would be stripped by AoE, so save recasting for when bound to conserve Stoneskin from Sobbing Eyes' melee hits.
For the RDM kiter, get plenty of space to cast Stoneskin and Aquaveil after you start the pull, usually about halfway down the hill. If you cast Stoneskin at the beginning of the BCNM, it may wear off too early. Stay out of reach but not too far away that you miss when Gravity wears off. Avoid using Bind if possible, because the Sobbing Eyes will be more likely to cast magic like Breakga when bound. Keep your distance but allow it to get within casting range. It will begin casting Bindga or Breakga when first getting within range, which takes a few seconds to cast. When you see the casting animation, continue running and its casting will be interrupted. Also, there will be a small window where the Sobbing Eyes will not attempt to cast magic, use this to your advantage when you get to the bottom of the hill. To turn around and kite back up the hill safely, use the casting interruption technique, but as soon as you see the cast fail and the Sobbing Eyes start moving again, run directly for it and right past it. By the time it readies Hex Eye, you will be well past it and it will have no effect. Get the NINs to report when their Compound Eyes are at about half HP, so you know when to turn around.
With both Compound Eyes defeated, the NINs catch up to the Sobbing Eyes and start double teaming it, using the same method as they used on the Compound Eyes. NIN/BLM can toss out a Elemental Seal Jubaku, and NIN/RDM should put up Barfire to make the fight a bit safer. Try to stand apart, so won't both get hit by Breakga or Firaga. The Sobbing Eyes can be tricky with its -aga spells, so make sure the RDM stands out of range, throwing the NINs some Cures and Regens when necessary. The Sobbing Eyes should go down pretty easily. Feel free to nuke and Convert to speed things up, once NINs have completed a round or two of the wheel.
The entire fight should take no more than 10-12 minutes, even with a full MP rest at the start after full buffs, and without rushing the fights any.
-Key points to remember:-
- NINs (and BLUs) always face away from the enemy to avoid "Hex Eye".
- RDM stays out of AOE range as much as possible.
- Don't neglect Elemental Seal, Barfire, and Drain.
- If possible you can use a Powder Boots {feet gear}on your rdm which will give you "flee" and use it before casting the 1st elem-gravity which will give you good speed to be able to rest for a good amount of time.
Strategy #3
Party Setup
Supplies
Required:
- Funguar or Tiger Jug pet
- some Shihei for the BST/NIN.
Optional:
- Au Lait's for everyone.
- Hi-Potions
The Fight
As soon as everyone enters, Call Beast, buff up and rest to regain MP.
The BST/NIN should send his jugpet to fight Sobbing Eyes and quickly hit Heel. This should aggro all three mobs. The other BSTs should attack one of the Compound Eyes while the BST/NIN kites the other two around the zone. When the first Compound Eyes dies, the BST/WHMs should pick off the other Compound Eyes. If the BST/NIN gets low in HP, he should pop a potion or 2 or let one of the BST/WHM run to heal him. The kiter should be careful to stay out of range of the Sobbing Eyes's AOE petrify. Once the Compound Eyes are taken care of, everyone should finish off the Sobbing Eyes. Now make a mad dash to the Armoury crate because you should be running out of time.
Strategy #4
Jobs
- BST/NIN
- NIN/RDM
- NIN/WAR
Fight
Start by facing the away from the Eyes then BST/NIN sends in the HQ Crab Pet to the main eye aggroing all the eyes. While the BST/NIN runs down the path the NIN/WAR provokes one of the Lesser Eyes and the NIN/WAR and NIN/RDM both face away and use NIN Spells until its 10% and the BST/NIN comes back up and the NIN/RDM and NIN/WAR kill the 2nd eye using same method. When the 2nd Lesser drops dead everyone focus on the last main eye NIN/WAR still tanks while BST/NIN and NIN/RDM hit it from the back. We complete the BCNM in 10mins time.
Key Points
Make sure the BST uses Call Beast once you enter so they can recast Call Beast into the fight if needed.
If the NIN/RDM wants to melee also they have to make sure they dont get paralzed by making sure they don't look at the Eye.
Supplies
- Reraise Earring is a very good idea.
- Everyone brings 1 Hi-Potion and 1 HP Milk for each fight.
- Healing food for the BST's Pet crab.
Strategy #5
Jobs
- BST/NIN
- Any Damage Dealer
- NIN/WAR
Fight
BST/NIN begins the fight by Fighting thier tiger against the Sobbing Eyes, let the tiger only hit the Sobbing Eyes once then immediatley Heel and begin running to the bottom of the BCNM. NIN/WAR then Vokes one of the Compound Eyes off of the BSTs Tiger Pet. NIN/WAR and Damage Dealer kill the Compound Eyes that the NIN has pulled - Damage dealer must turn thier back to avoid paralyze if they get hate. BST and Tiger pet will have a distant lead over the Sobbing Eyes and Compund Eyes at this point and must use Stay when they get to the bottom of the BCNM - BST then starts running back to the top using "Heel" after he has passed the Eyes that are on the way down to attack the tiger (make sure they are out of hate range before using "Heel"). By the time the BST gets back to the top of the BCNM the first Compund eyes should be dead. Repeat strategy until all Monsters are eliminated.
Key Points
Make sure the BST uses Call Beast once you enter so they can recast Call Beast into the fight if needed.
The Damage Dealer must be careful to not pull too much hate away from the NIN/WAR and keep thier back turned to the mob if they get hate.
Supplies
- Reraise Earring is a very good idea.
- Everyone brings at least 1 Hi-Potion and 1 HP Milk for each fight.
- Healing food for the BST's Pet.
- Tiger Familiar pet Jugs for BST.
- Ninja Tools for Elemental Wheel: Ni for NIN/WAR
Strategy #6
Party Setup
Supplies
- Pear au Lait x 3 for THF, x4 for BLU
- Acid Bolt and Bloody Bolt x15 of each(estimated on use of run where THF used the most) For the THF
- Yagudo Drink x 2-3 For RDM and BLU
- BLU MAKE SURE YOU HAVE Bludgeon, Head Butt AND Metallic Body SET!
- Alternative to Yagudo Drink~~ Fruit Juice -see: Orange Juice, Apple Juice, Pineapple Juice, etc...
The Fight
First off I want to note that for this to work every player must make sure they do their best to make no mistakes at all. Not to say you can't make a comeback, but you will need as much of the time as you can get. We won this 3x in a row the first time we ever tried it.
First buff up semi close to the arena, then heal up. Bringing an extra juice for MP restore before the fight makes a large difference time wise. Begin the fight with RDM casting Gravity on Sobbing Eyes and dragging it out of the arena. As soon as RDM starts casting Gravity then the THF grabs one of the other monsters(use a bolt to avoid being paralyzed), BLU grabs the other. RDM make sure after binding to cast something to keep the hate on the mob so it won't go back and torment the others.
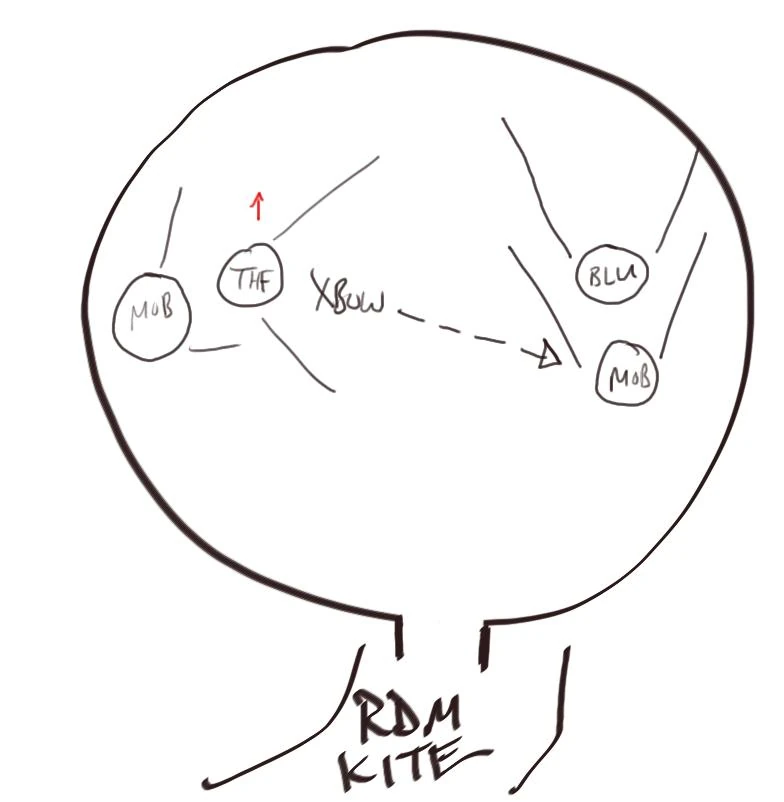
THF simply runs to the far side of the arena doing it's best to face away from the mob. All the THF has to do is keep up it's shadows. DO NOT FACE THE ENEMY or it will paralyze you, and chances of survival become extremely minimal. I suggest facing away from your mob, but far enough away from the BLU's mob to fire some bolts at it. Just hit the BLU's mob with an Acid Bolt so the BLU can kill it faster. Use a Juice to keep your HP up as well. Done properly you should have between/around 80% HP(Since it will hit you with some spells most likely) up to 100% HP. ♫ BLU drags his mob to the other side of the arena.
Like this - Red Arrow shows direction to face if THF somehow(yeah right) pulls hate with a few bolts.
BLU faces away from the monster and uses his Blue Magic to kill it, using Bludgeon and Head Butt to both smack it around and cancel it's casting. Make sure to have Metallic Body set as well. After you kill it go tank the one the THF is distracting. THF make sure you Sneak Attack+Weapon Skill(Viper Bite) from behind. If you pull hate TURN AROUND, the BLU should have the right spells to get hate back quickly. Use Acid and Blood Bolts to help kill it. Bloods work good on these things. 30 DMG + 65-80HP drain depending on gear. BLU must make the most out of shadows to minimize damage. So make sure the BLU knows how to time shadow casts. Same for THF.
When you kill it you should both have a LITTLE time to rest, yes I said rest, to get some HP/MP. Pop a Regen drink, and I suggest bringing something quick like a good Fruit Juice that'll give you just the right boost to MP regain. Don't bother to fill up. At around 60% MP or so, with around the same HP, and shadows up for both THF and BLU, RDM brings the NM back. BLU tanks the same way as before, THF does his thing from behind same as before. RDM heals and debuffs and uses Yagudo drinks, heals when not needed. Try to bind the mob where the THF and BLU are fighting it as well. Be quick about killing it.
Done right you should have about 2-5 minutes before the timer runs out. Really not that hard when you do it, goes by quick. Just remember to use those drinks!
Hey! Really good strategy was alot of fun. First time we tried it, it was myself, Tykain (THF) Patronus (RDM) Crimm (BLU) was VERY easy. We are all skilled at our jobs and even so it was not very complicated. None of us had regen drinks and only BLU had yag drinks RDM forgot lol. First fight was the very first time we did it so i was a little nervous. We pulled it off nicely no deaths. Second fight was a perfect fight. Near 100% health the whole time just the sobbing eyes firagad us once or twice. The third fight was the rockiest. Patronus (RDM) got stuck with breakga and paralyze while he was kiting running back to the top. Crimm was resting i was just waiting so i kited the Sobbing Eyes while Patronus got unpetrified and paralynad. Again, easy fight! Great strategy thank you for sharing it with us!! ♫♫♫♫
Strategy #7
Party Setup
- NIN (Sub anything helpful. Probably BLM for added INT and whatnot)
- BLU/NIN
- BST/WHM or RDM (Sub either BLM for Elemental Seal or go WHM)
Supplies
- Yagudo Drink > For the BLU (or RDM). Bring however many according to how many runs are being done.
The Fight
This is a little different from the other set-ups, although really a fusion if anything. Short and simple. BST is kiting, using their jugpet (preferably the tiger pet) to take the main Hecteyes away from the lesser ones that both the NIN and BLU will be tanking. Like the NIN and BLU strategies mentioned in the above strategies, you're back will be turned towards the Hecteyes.
NIN > Spam Utsusemi as well as ninjutsu.
BLU > Spam utsusemi and blue spells, preferably Screwdriver and Head Butt (for when spells are being casted by the Hecteyes, such as Fire II and Firaga). Use a Yagudo Drink before doing so, so you get an MP regen while tanking.
BST > While kiting, heal from far away while your pet tanks. Cure when necessary, kite, MP rest.. it's not as complicated as it sounds, although it might take time to get used to for new BST players. If by chance either tank is paralyzed, the BST can assist in Paralyna-ing the members.
Almost usually, the BLU will kill his/her hecteye before the NIN will, and in this case (depending on MP remaining) will either MP rest or assist the NIN~ which then both should full rest before taking on the bigger hecteye once the second lesser one has been downed.
From there, the method used earlier won't be changing much as the NIN and BLU will still be attacking using ninjutsu/blue magic, while the BST and pet assist in attacking.
If no BST is present, the RDM would kite by using the same strategy as shown in stragety #2.
Strategy #8
Party Setup
Supplies
- Yagudo Drink > For the BLU and SMN. Bring two per person per run. This strategy is not a speedy strategy by any means, and the first one will be well worn off before you're finished.
- Hi-Ether x3 and Hi-Potion +3 x3 > For the BLU and SMN. These are not necessary but good for recovering after killing the two peripheral Hecteyes.
The Fight
This strategy has won us 95% of our runs, it just takes good stress management and you must realize you'll be cutting it close (HP-wise) every time. Of course, start with buffs like every other fight. Make sure the BLU has Cocoon, Metallic Body and all of Head Butt, Screwdriver and Bludgeon equipped. Make sure everyone has Shellra, Utsusemi (and Blink on the SMN), and Barfire on.
After each pulling their eyes, and the SMN pulling the Sobbing Eyes, the BLU and NIN should backwards-tank the two Hecteyes as usual while the SMN keeps the Sobbing Eyes busy with Carbuncle. The BLU should kill his eyes a bit quicker than the NIN if he's spamming Head Butt Bludgeon and Screwdriver.
Once the BLU kills his, he can help the NIN finish off his and then heal for MP. The SMN should be running away from the Sobbing Eyes every time Carbuncle engages, and recasting when Carbuncle is KOed. Once the BLU is healed, the BLU and NIN can both engage the Sobbing Eyes.
Please note that if the SMN is bound and ends up under attack from the Sobbing Eyes before the BLU is ready, the NIN should go ahead and tank it while the SMN cures him. Once the BLU is ready, he should go ahead and engage the Sobbing Eyes, facing him for a quicker win. The SMN will have Paralyna ready for the inevitable Hex Eye.
Although this seems risky, if you fail to engage the mob quickly enough you run the risk of running out of time. BLU should be able to do great damage with his spells, using Hi-Potion +3s as needed. Fast Blade should do around 130 damage as well. This fight is very easy with this strategy and usually lasts about eleven minutes.
-done many times by Nij (BLU/NIN), Yama (SMN/WHM) and Zeike (NIN/BLM) on Asura.
-did today with Kirtash (BLU/NIN), Lysk (me) (NIN/BLM) and random (SMN/WHM) on Gilgamesh, amazing and the drops... belive it or not 2/3 PCC droped and 2/3 Utsusemi: Ni. (first time we did it)
Other Strategy Information
- BLU are just as useful as NIN in this BCNM, BLU/NIN backwards tanking with Metallic Body and shadows up can finish one of the lesser hecteyes with a little less than half MP. With 2 Yagudo Drink, MP is not a concern. Screwdriver is a useful DD spell for BLU, because it gains a damage boost against the the amorph hecteyes because it is an aquan spell. Jet Stream and Bludgeon are not as effective, due to hecteyes' resistance to blunt damage.
- Bludgeon is far more effective than Screwdriver on these, there's no need to cast any spell except Bludgeon and Head Butt here.
- A skilled BST with an Antlion jug can take out one of the lesser eyes about as fast as a NIN, it just takes proper hate management so that you and your pet get paralyzed as little as possible, if at all. After a few trial runs with Antlion jug and trying to balance hate, as a BST I was able to finish the Compound Eyes at about the same time as NIN/BLM. Only one reward should be needed, along with only 1 jug pet in most cases. It is also nice to have BST around when it comes time to fight the Sobbing Eyes, as a properly used Smash Axe can stun a Breakga or Firaga that comes at the wrong time, along with the benfit of BST/WHM having Barfira.
- This BCNM works well with a skilled RDM/WHM kiting the main Hecteyes and either two BLU/NIN or NIN/WHM backwards tanking the two lesser mobs. A party of BLU/NIN, RDM/WHM, NIN/WHM was 3/3 on this BCNM with no deaths, plenty of MP, and about 10 minutes to spare.
- Many jobs with healing capacity and/or damage reduction can likely be the "kiter" for the Sobbing Eyes while BLUs or NINs work on Compound Eyes. I successfully kited 4/4 as BRD/NIN with double Paeon up.
- Note from a SMN after AstralBurning this BCNM: I discovered that the Compound Eyes cannot have more than 1800 HP, and the Sobbing Eyes more than 2250 HP - the Compound Eyes went down after three Astral Flow Blood Pacts, one from each of us (just less than 600 damage per hit, on average), and the Sobbing Eyes got taken out pretty much by repeated melee hits from three avatars at once. Incidentally, I can't recommend AstralBurning the BC, you all have to blast the eyes with whichever avatar is strong on that Vana'diel day, and there's just so much downtime between runs that it's not funny. But the HP upper-limits are something to shout home about at any rate.
- A great party setup for this BCNM is 2 NIN/RDM and 1 RDM/BLM or 1 SMN/WHM. The Ninja's Ninjutsu (Ni elementals) away at the lesser eyes, while the rdm gravity's then kites. SMN kites with Carby. MP has never been an issue.
- This BCNM is easily duo'd by BST/RDM and NIN/RDM. The BST uses a tiger jug pet to kite two of the three eyes while the NIN takes out the first eye. Once that's done, the NIN goes and grabs the second small eye, then finally moves to the third. This method takes about 8-10 minutes.
- Although somewhat harder, it is also possible to duo this fight with a number of other job combos provided whomever is kiting can keep themselves alive. BLU/NIN fighting as per usual and DRG/WHM kiting (and later meleeing the Sobbing Eyes while the BLU tanks) was successful with the aid of a few Hi-Potions and Yagudo Drinks.
- It is also possible to manaburn this BCNM with 3 BLM. BLM/NIN is preferred for shadows (and dual Solid Wands), but BLM/WHM has been known to work as well. You WILL need Stonega II for this BCNM (it is often expensive on many servers), but I have done it with only 2 BLM with the spell before. Buff up, get as far away as you can from the eyes but just barely in casting range. Make sure you are facing AWAY from them to avoid Hex Eye. Target the center eye and pick a time (like you would in a manaburn) and have everyone cast Stonega II on it (or Thundaga if you don't have it). Then cast Thundaga on it, then Blizzaga, and then back to Stonega II (the first volley will probably kill the small eyes). Repeat until they are all dead. Do not bother to recast shadows or buffs, you will not have time.
- Duod by 40BST/NIN and BLU38/NIN March-11-08 using kite method with Tiger Familiar and Antlion Familiar to fight the sobbing eyes.--Arosan 03:16, 12 March 2008 (UTC)
- Easily done by BST/NIN, NIN/RDM, RNG/NIN - doing BLU/NIN, RNG/NIN, BST/NIN it wasn't so easy, but was successful.
- SMN kites as well as RDM can for this BCNM with Carbuncle and just running off and resummoning once he dies
Can Also Be Done PUP/MNK Valoredge Frame with flashbulb, shock absorber and strobe PUP/NIN Valoredge Frame with flashbulb, shock absorber and strobe RDM/NIN
Puppetmaster's cycle Provokes and flashes while the RDM kites the Sobbing Eyes and one compound eye then puppetmaster's take down the other compound eye and the RDM will have enough MP to heal the two Puppetmaster's while they take down the Sobbing Eyes
Another Strategy
WHM/NIN RDM/WHM BLU/NIN
WHM kite Right or left eye, Blu fight right or left eye, depending on which one the whm took, rdm gravities middle boss and kites to bottom of field. Kill 2, bring boss back and kill the boss. End.
-Jan.19 2009 Zeimeane, Temaruma, Socrates of Alexander.
Sure-fire Win
Nin Nin Rdm
Rdm pulls ES Gravity, kites the NM around. Nin's Grab a hecteye each and tank backwards using the ele-wheel to kill. doesn't take very long. Make sure your nin isn't doing the ele wheel backwards (actually happened) When the nin's are done they grab the NM and finish it off, rdm can do w/e heal, nuke, w/e. Reccomended yag drink for the rdm.