Tag: sourceedit |
m (→Castle Oztroja) Tag: Visual edit |
||
| (5 intermediate revisions by 5 users not shown) | |||
| Line 17: | Line 17: | ||
Quest: [[Onion Rings]] |
Quest: [[Onion Rings]] |
||
| cutscenes = |
| cutscenes = |
||
| − | {{Mission/Cutscene|To Each His Own Right (pt.1)|[[Mashua]] [[Heavens Tower]] |
+ | {{Mission/Cutscene|To Each His Own Right (pt.1)|[[Mashua]] [[Heavens Tower]]}} |
| − | {{Mission/Cutscene|To Each His Own Right|[[Goblin Footprint]] |
+ | {{Mission/Cutscene|To Each His Own Right|[[Goblin Footprint]] {{Location|Castle Oztroja|map=Map 1|F-8}}}} |
| − | {{Mission/Cutscene|To Each His Own Right (pt.2)|[[Mashua]] [[Heavens Tower]] |
+ | {{Mission/Cutscene|To Each His Own Right (pt.2)|[[Mashua]] [[Heavens Tower]]}} |
}} |
}} |
||
== Walkthrough == |
== Walkthrough == |
||
=== Accept the Mission === |
=== Accept the Mission === |
||
| − | *Trading |
+ | *Trading 1 crystal will unlock this mission. Alternatively, complete [[A Testing Time]] twice. |
| − | **Trading 2 full stacks and completing 3-1 and 3-2 will unlock 3-3. |
||
| − | **Trading 64 crystals will cap out your rank points for Rank 3. |
||
*After accepting the mission, go to [[Heavens Tower]] in [[Windurst Walls]] and speak with [[Kupipi]], who will give you the [[Key Item]] {{KeyItem}}[[Starway Stairway Bauble]].<br> |
*After accepting the mission, go to [[Heavens Tower]] in [[Windurst Walls]] and speak with [[Kupipi]], who will give you the [[Key Item]] {{KeyItem}}[[Starway Stairway Bauble]].<br> |
||
*Go through the doorway to the left in the same room, which will lead you up the Starway Stairway. |
*Go through the doorway to the left in the same room, which will lead you up the Starway Stairway. |
||
*Speak to [[Rhy Epocan]] on the highest floor for a cutscene.<br> |
*Speak to [[Rhy Epocan]] on the highest floor for a cutscene.<br> |
||
**After you finish the cutscene, you can use the blue "Transporter" in front of [[Foo Beibo]] to warp directly back to the first floor. |
**After you finish the cutscene, you can use the blue "Transporter" in front of [[Foo Beibo]] to warp directly back to the first floor. |
||
| − | *Talk to [[Hakkuru-Rinkuru]] in [[Port Windurst]] in the [[Orastery]] (E-7}. He will mention that the minister has gone to [[Castle Oztroja]]. |
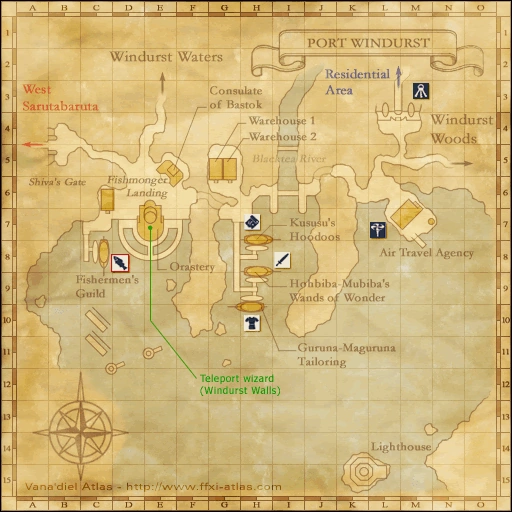
+ | *Talk to [[Hakkuru-Rinkuru]] in [[Port Windurst]] ([[Home Point]] #1) in the [[Orastery]] ({{Location Tooltip|area=Port Windurst|pos=E-7}}). He will mention that the minister has gone to [[Castle Oztroja]]. |
=== Castle Oztroja === |
=== Castle Oztroja === |
||
| Line 39: | Line 37: | ||
**If you have [[Wings of the Goddess]], you can teleport via [[Recall-Meriph]] and use the [[Cavernous Maw]]. |
**If you have [[Wings of the Goddess]], you can teleport via [[Recall-Meriph]] and use the [[Cavernous Maw]]. |
||
**If you have the [[Waypoint]] quest active and have the [[Geomagnetic Fount]] in Castle Oztroja, this will be the fastest way to get there. |
**If you have the [[Waypoint]] quest active and have the [[Geomagnetic Fount]] in Castle Oztroja, this will be the fastest way to get there. |
||
| + | **Alternatively, you can just warp with a [[Survival Guide]] to the entrance of [[Castle Oztroja]] |
||
| − | *Go to the door at (I-8) of the first map. You have to pull the levers until a trap door opens beneath you and a cut-scene will begin. You must stand between the two levers to trigger the cut-scene and drop down. |
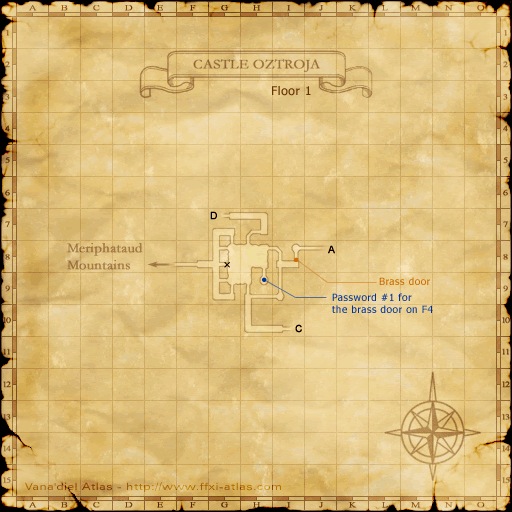
+ | *Go to the door at ({{Location Tooltip|area=Castle Oztroja|map=Map 1|pos=I-8}}) of the first map. You have to pull the levers until a trap door opens beneath you and a cut-scene will begin. You must stand between the two levers to trigger the cut-scene and drop down. |
**Note: If you choose to walk out from this trap door room have [[Invisible]] and [[Sneak]] as the bats agro on sound. The mobs outside check as [[Easy Prey]] at 50. |
**Note: If you choose to walk out from this trap door room have [[Invisible]] and [[Sneak]] as the bats agro on sound. The mobs outside check as [[Easy Prey]] at 50. |
||
**Note: If being assisted or assisting someone on this mission, the individual who has the mission flagged must hit the lever to get the cutscene. |
**Note: If being assisted or assisting someone on this mission, the individual who has the mission flagged must hit the lever to get the cutscene. |
||
| − | *(Separate Quest) Even if you don't have the quest [[Onion Rings]] active you can still retrieve the {{KeyItem}}[[Old Ring]]. After the cut-scene, click on the round trap door in the floor to obtain the key item: {{KeyItem}}[[Old Ring]]. |
+ | *'''(Separate Quest)''' Even if you don't have the quest [[Onion Rings]] active you can still retrieve the {{KeyItem}}[[Old Ring]]. After the cut-scene, click on the round trap door in the floor to obtain the key item: {{KeyItem}}[[Old Ring]]. |
**Clicking it a second time will cause you to fall down the hole. |
**Clicking it a second time will cause you to fall down the hole. |
||
*Go back to [[Heavens Tower]] in [[Windurst Walls]] and speak to [[Rhy Epocan]] to finish the mission. |
*Go back to [[Heavens Tower]] in [[Windurst Walls]] and speak to [[Rhy Epocan]] to finish the mission. |
||
Revision as of 02:00, 27 April 2020
| Mission Name | To Each His Own Right |
|---|---|
| Number | 3-1 |
| Start NPC | Any Windurst Gate Guard |
| Items Needed | |
| Reward | Rank points |
| Repeatable | No |
| ← Previous Mission | Next Mission → |
|---|---|
| The Three Kingdoms | Written in the Stars
Quest: Onion Rings |
| Replay Cutscenes | |
|---|---|
| To Each His Own Right (pt.1) | Mashua Heavens Tower |
| To Each His Own Right | Goblin Footprint Castle Oztroja, Map 1 (F-8) |
| To Each His Own Right (pt.2) | Mashua Heavens Tower |
Walkthrough
Accept the Mission
- Trading 1 crystal will unlock this mission. Alternatively, complete A Testing Time twice.
- After accepting the mission, go to Heavens Tower in Windurst Walls and speak with Kupipi, who will give you the Key Item
 Starway Stairway Bauble.
 - Go through the doorway to the left in the same room, which will lead you up the Starway Stairway.
- Speak to Rhy Epocan on the highest floor for a cutscene.
- After you finish the cutscene, you can use the blue "Transporter" in front of Foo Beibo to warp directly back to the first floor.
- Talk to Hakkuru-Rinkuru in Port Windurst (Home Point #1) in the Orastery (E-7). He will mention that the minister has gone to Castle Oztroja.
Castle Oztroja
Castle Oztroja
- Go out to Castle Oztroja.
- At level 30, the mobs will mostly be Easy Prey, but Sneak/Invis is still a good idea just because there are so many of them.
- If you have Wings of the Goddess, you can teleport via Recall-Meriph and use the Cavernous Maw.
- If you have the Waypoint quest active and have the Geomagnetic Fount in Castle Oztroja, this will be the fastest way to get there.
- Alternatively, you can just warp with a Survival Guide to the entrance of Castle Oztroja
- Go to the door at (I-8) of the first map. You have to pull the levers until a trap door opens beneath you and a cut-scene will begin. You must stand between the two levers to trigger the cut-scene and drop down.
- (Separate Quest) Even if you don't have the quest Onion Rings active you can still retrieve the Old Ring. After the cut-scene, click on the round trap door in the floor to obtain the key item: Old Ring.
- Clicking it a second time will cause you to fall down the hole.
- Go back to Heavens Tower in Windurst Walls and speak to Rhy Epocan to finish the mission.
Game Description
- Mission Orders
- On the command of Semih Lafihna, captain of the Sibyl Guards, you are requested to track down the Minister of the Orastery, Ajido-Marujido, and discover his true intentions. Inquire at the Orastery if you lose track of him.