mNo edit summary Tag: Visual edit |
|||
| (13 intermediate revisions by 7 users not shown) | |||
| Line 1: | Line 1: | ||
| ⚫ | |||
| ⚫ | |||
| ⚫ | |||
| − | {{Mission |
||
| name = The Temple of Uggalepih |
| name = The Temple of Uggalepih |
||
| number = ZM4 |
| number = ZM4 |
||
| Line 8: | Line 6: | ||
| level = 60+ |
| level = 60+ |
||
| title = Bearer of the Wisewoman's Hope |
| title = Bearer of the Wisewoman's Hope |
||
| − | | items = {{KeyItem}}[[Sacrificial Chamber Key]]<br>{{ |
+ | | items = {{KeyItem}}[[Sacrificial Chamber Key]]<br>{{IIn|Unlit Lantern|tags}} x1-4<br>{{IIn|Rancor Flame|tags}} x4<br>''Optional:<br>{{KeyItem}}[[Paintbrush of Souls]] (one member)'' |
| reward = {{KeyItem}}[[Dark Fragment]] |
| reward = {{KeyItem}}[[Dark Fragment]] |
||
| repeatable = Only to help others |
| repeatable = Only to help others |
||
| Line 16: | Line 14: | ||
| next = [[Headstone Pilgrimage]] |
| next = [[Headstone Pilgrimage]] |
||
| cutscenes = |
| cutscenes = |
||
| − | {{Mission/Cutscene|The Temple of Uggalepih|[[Goblin Footprint]] [[Sacrificial Chamber]]}} |
+ | {{Mission/Cutscene|The Temple of Uggalepih (pt.1-4)|[[Goblin Footprint]] [[Sacrificial Chamber]]}} |
}} |
}} |
||
==Walkthrough== |
==Walkthrough== |
||
| + | If you have already visited the [[Sacrificial Chamber]], you simply need to use a [[Home Point]] and choose '''Elshimo Uplands''', then '''Home Point #1''' to arrive at {{Location|Den of Rancor|E-4|map=Map 2|exact pos x=12|exact pos y=12}}, wherein you just take a few steps west to arrive at your destination ''(skip to the [[The Temple of Uggalepih#Sacrifical Chamber|Sacrifical Chamber]] section of the guide, below)''. |
||
| − | '''If you have the [[Den of Rancor]] [[Home Point]] #1, you can skip straight to the [[#Sacrificial Chamber|fight]].''' |
||
| + | ===To the Den of Rancor=== |
||
| − | |||
| + | If you are yet to activate the above Home Point, there are a number of other ways to travel to the {{Location|Sacrificial Chamber}}, the ultimate destination of this mission. You will require an {{IIn|Unlit Lantern|tags}} to do so, which you can collect on the way through, though checking you aren't somehow already in possession of this {{Rare|nc}} item by using with the ''/itemsearch "Unlit Lantern"'' command before setting off is a good idea.<br><font color=red>''*Only [[Invisible]] is needed in the Temple, while both [[Sneak]] and [[Invisible]] are needed for all party members in the [[Den of Rancor]].''</font> |
||
| − | *'''[[Temple of Uggalepih]] portion''' - obtain {{KeyItem}}[[Paintbrush of Souls]] to enter [[Den of Rancor]]. |
||
| + | *'''[[Unity_Concord_NPC#Teleportation|Unity Concord Teleportation]]:'''<br>If you are signed up to [[Unity Concord]], talking to a [[Unity Concord NPC]] and selecting the option '''Bring me to Wanted encounter area''' will enable you to choose [[Den of Rancor]] from the list of '''Level 128''' encounter areas. |
||
| − | **Obtain [[Uggalepih Key]] from the [[Tonberry Cutter]]'s around the temple of map1 (just walk through). |
||
| + | :*You will arrive on the lower level at {{Location|Den of Rancor|G-12|map=Map 2|exact pos x=18|exact pos y=12}} and will need to travel north to {{Location|Den of Rancor|I-5|map=Map 2|exact pos x=12|exact pos y=6}} to get to the upper level (Map 1). |
||
| − | **Trade the [[Uggalepih Key]] at the door to that tiny square room (with the little black dot) on the left side of Map1 at (F-7) to enter. |
||
| + | :*Once on the upper level, take the first passage on the left to arrive in a large cavern and skip to the ''[[The Temple of Uggalepih#Flame of Rancor|Flame of Rancor]]'' section below. |
||
| − | ***Everyone who wants to enter either needs their own [[Uggalepih Key]] or have someone with the key get inside and then [[Tractor]] them through. |
||
| − | * |
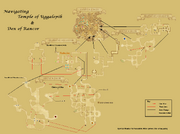
+ | *'''Via the [[Temple of Uggalepih]]:''' This is pretty time-consuming, so you should use the above method unless there is a significant reason why you can't, but it remains included here for a sense of completeness.<br>[[File:Temple of Uggalepih Composite.PNG|thumb]] |
| + | **Travel to the [[Temple of Uggalepih]], either via [[Survival Guide]] (Elshimo Uplands) to Map 1 {{Location Tooltip|area=Temple of Uggalepih|map=Map 1|pos=F-6}}, or via [[Yhoator Jungle]] to the main entrance at Map 1, {{Location Tooltip|area=Temple of Uggalepih|map=Map 1|pos=I-6}}. |
||
| − | **Just north on the map take the Northwest exit (Map1, F-5) to exit to [[Yhoator Jungle]] via (2). |
||
| + | **If you aren't in possession of the Permanent Key Item {{KeyItem}}[[Paintbrush of Souls]], follow the link to that page now and complete the mini-quest described therein to receive it. |
||
| ⚫ | |||
| + | **Once obtained, take the northwest exit to [[Yhoator Jungle]] (2) at Map 1, {{Location Tooltip|area=Temple of Uggalepih|map=Map 1|pos=F-5}}. |
||
| − | **Make your way south to (I-10) and kill the [[Temple Guardian]]. Make sure to stun [[Meltdown]]. |
||
| ⚫ | |||
| − | ***While getting there, kill some [[Tonberry Maledictor]], [[Tonberry Jinxer]], and [[Tonberry Pursuer]] in the western rooms to try to get an [[Unlit Lantern]]{{Rare}}{{Exclusive}} as you will need it in the [[Den of Rancor]]. There are mobs in the Den that drop it also. |
||
| + | **Head south to ({{Location Tooltip|area=Temple of Uggalepih|map=Map 2|pos=I-10}}). If you do not possess an {{IIn|Unlit Lantern|tags}}, kill any [[Tonberry Maledictor]], [[Tonberry Jinxer]], and [[Tonberry Pursuer]] you see in the western rooms on the way. There are mobs in the [[Den of Rancor]] that drop it also, so it is not necessary to wait around here if it doesn't drop immediately.<br><font color=red>*Only one is required, but having up to four speeds things up, if you have more party members.</font> |
||
| − | ****Only one is necessary, but having up to 4 speeds things up, if you have more party members. |
||
| + | **Once at ({{Location Tooltip|area=Temple of Uggalepih|map=Map 2|pos=I-10}}), kill the [[Temple Guardian]] to open the door. |
||
| − | **Go past the door and go north to that skinny rectangle room on Map2 (I-7) of the Temple. |
||
| + | **Enter the large room and take the northeast exit, following the corridor to arrive at ({{Location Tooltip|area=Temple of Uggalepih|map=Map 2|pos=I-7}}/8), the room containing the Picture Frames and the Granite Door. |
||
| − | **In that room click on the empty Picture Frame once (don't jam Enter key). |
||
| − | ** |
+ | **Click on the empty Picture Frame in the middle of the eastern wall just once and you will get two text messages. '''Do not confirm the second message just yet.''' |
| + | ***"There is a blank canvas in this frame. The paintbrush of souls begins to twitch." |
||
| − | ***If you get aggro'd you have to click and wait 30s to click again. |
||
| + | ***"By focusing your thoughts on the paintbrush of souls, a new painting begins to appear on the canvas..." |
||
| − | **A wall just north of you should open up a path to the [[Den of Rancor]]. |
||
| + | **You will need to stand directly in the center of the empty frame, as close to the wall as possible. It is VERY fussy about where you stand. If you only receive the first message, you need to adjust your position and stand closer. |
||
| ⚫ | |||
| + | **When you receive the second message, wait at least 30 seconds (the screen should flash, briefly, when 30 seconds have elapsed) before confirming it in order to get the next message.<br><font color=red>*If you get aggro'd whilst waiting you have to click and wait 30s to click again.</font> |
||
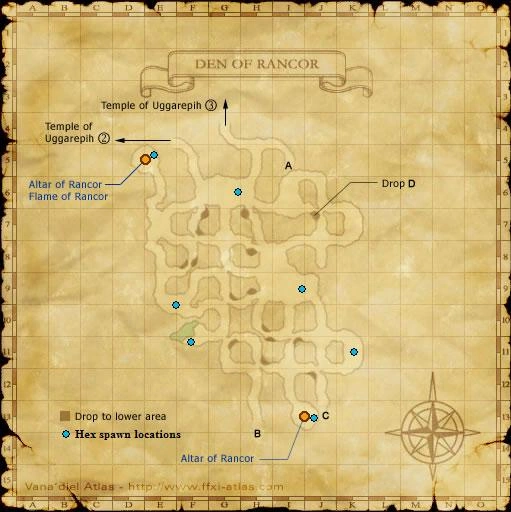
| − | **Kill [[Tonberry Imprecator]] (they're not far from where you enter) to obtain [[Unlit Lantern]]{{Rare}}{{Exclusive}} if you have not already obtained it. You'll see them as you head to the [[Altar of Rancor]] ala the next step.[[Image:DenofRancor1.png|thumb|Den of Rancor 1]] |
||
| + | ***"You succeeded in projecting the image in your soul to the blank canvas. The door to the Rancor Den has opened!" |
||
| − | **Head to the [[Altar of Rancor]] (Map1, E-5) in that little circular room in the Northwest portion of Map1. |
||
| + | **The Granite Door in the wall just to the north of you should now open up a path to the [[Den of Rancor]].<br><font color=red>*'''NOTE''': If the Windower Add-on ''Enternity'' is active, this will not work.</font> |
||
| − | ***Trade your [[Unlit Lantern]]{{Rare}}{{Exclusive}} to the flame to turn it into a [[Rancor Flame]]{{Rare}}{{Exclusive}}. |
||
| + | **Follow the passageway downward into the new area and take the first right to arrive in a large cavern. |
||
| − | ****Bombs will aggro sight and bats sound. Make a macro if you care /item "Unlit Lantern" <t> |
||
| + | ===Flame of Rancor=== |
||
| − | ****There are other [[Altar of Rancor]] deeper in the Den but those will render your [[Unlit Lantern]] useless for this quest. Luckily, you won't see them so you don't have to worry, unless you wander deeper for some other purpose. |
||
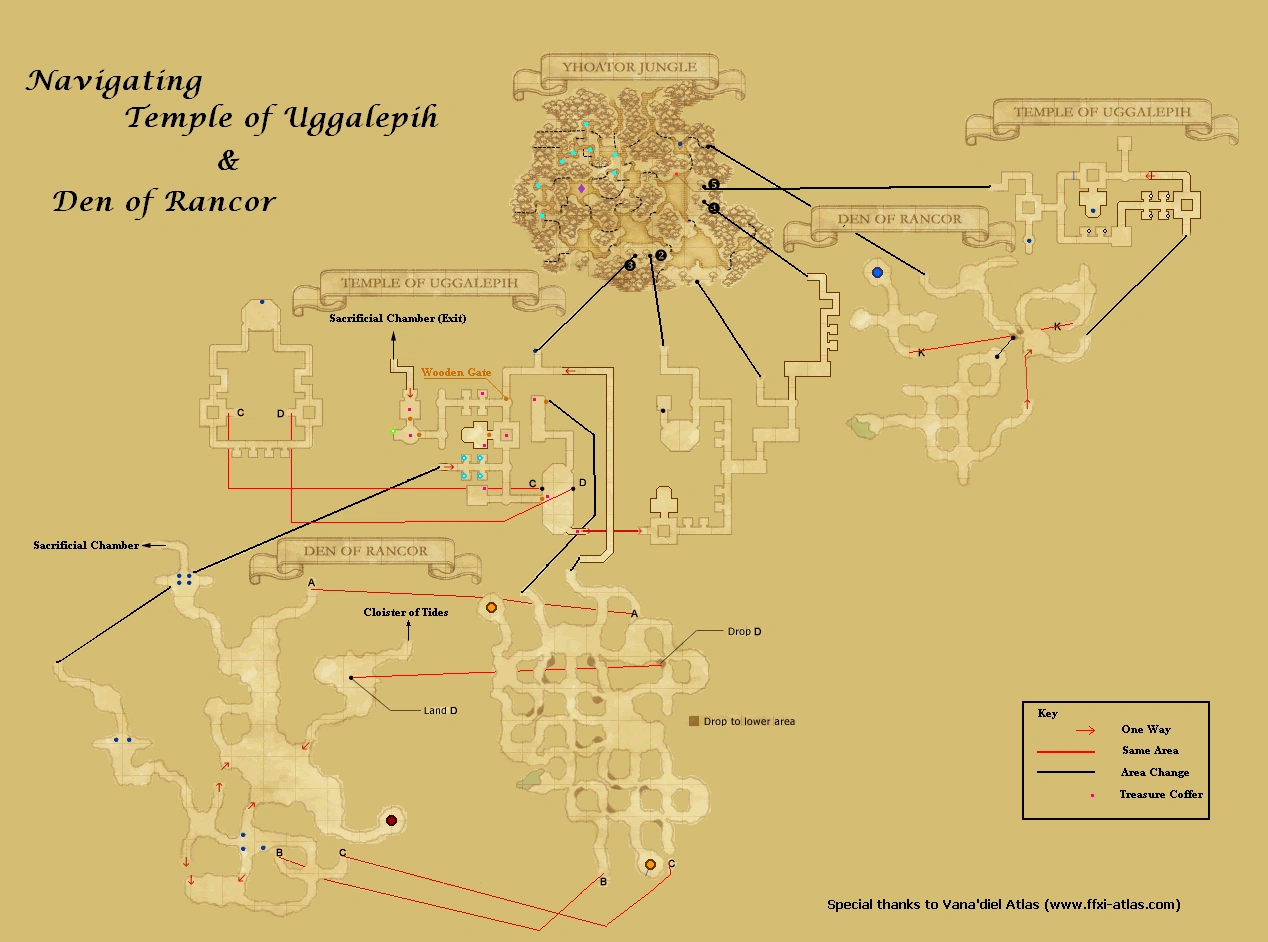
| + | [[Image:DenofRancor1.png|thumb|Den of Rancor 1]][[Image:DenofRancor2.png|thumb|Den of Rancor 2]] |
||
| ⚫ | |||
| ⚫ | |||
| − | ***It's basically the hole closest to you. You passed it on the way to the Rancor Flame. They're those little darker patches on the map. |
||
| + | *'''It is significantly easier to get somebody that already has the [[Home Point]] to open the gate. You can still do the below steps, but unless you want to replicate how the game used to work, you're way better off getting help.''' |
||
| ⚫ | |||
| + | *At this point, you should be in a cavern of {{Location|Den of Rancor|G-6|map=Map 1}} which contains some [[Tonberry Imprecator]]s who can drop the {{IIn|Unlit Lantern|tags}}, if you don't already possess one. |
||
| ⚫ | |||
| + | *Trade your{{IIn|Unlit Lantern|tags}} to the Altar of Rancor on Map 1 ({{Location Tooltip|area=Den of Rancor|map=Map 1|pos=E-5}}) to receive a {{IIn|Rancor Flame|tags}}.<br><font color="red">*There are other Altars of Rancor deeper in the Den but those will render your [[Unlit Lantern]] useless for this quest.</font> Only the "Rancor Flame" can open this door, the other "colored flames" are '''<u>''useless''</u>''' on this door.<br> |
||
| − | ***All four torches need to be lit in order to open the gate. |
||
| ⚫ | |||
| − | ***Again, this is soloable. The torches don't go out. |
||
| ⚫ | |||
| − | ***Tonberries aggro sight and bats sound. |
||
| ⚫ | |||
| − | **If you need more flames to light up more torches: |
||
| + | ** You cannot trade either the Unlit Lantern or the Rancor Flame while Invisible. In most cases, this will require fighting enemies to be able to trade. |
||
| − | ***head back Southeast and then Northeast, basically hugging the left wall, to reach A of Map2 in order to reach the same North area of Map1 and get more flames until you've lit all the torches and pass the gate. |
||
| + | *All four torches need to be lit in order to open the gate. The torches stay lit until the door is opened, so this can be done by a single person. |
||
| − | *One of the NMs in the upcoming battle uses [[Everyone's Rancor]]. Be sure the tank has recently cleared Tonberry hate. It probably doesn't matter if you're level 99. |
||
| + | **To re-light your lantern, take the northeast ramp (A) to return to Map 1 and repeat the process until the door opens.. |
||
| − | [[Image:Temple of Uggalepih Composite.PNG|thumb|Composite Map]] |
||
| + | **<font color="red">'''WARNING:'''</font> Players ''Exiting'' the door via the switch will also cause the lit torches to become unlit. If there are other players in the area, consider waiting for one to open the door first and go through. '''Remember to interact with the Home Point on the other side.''' So that you do not have to go through this again. |
||
| − | *Only [[Invisible (Status Effect)]] is needed in the Temple, while both [[Sneak]] and [[Invisible]] are needed for all party members in the [[Den of Rancor]]. |
||
===Sacrificial Chamber=== |
===Sacrificial Chamber=== |
||
*After entering the Sacrificial Chamber, examine the Mahogany Door to enter the Battlefield. |
*After entering the Sacrificial Chamber, examine the Mahogany Door to enter the Battlefield. |
||
**The battlefield is capped at level 99 and limited to six players. Buffs wear upon entry (including [[Reraise]]), but [[Experience Points]] are not lost. |
**The battlefield is capped at level 99 and limited to six players. Buffs wear upon entry (including [[Reraise]]), but [[Experience Points]] are not lost. |
||
| − | *There are three Tonberry [[NM]]s. All three must be defeated to clear the |
+ | *There are three Tonberry [[NM]]s. All three must be defeated to clear the battlefield. The recommended order in which to kill them is: |
**[[Grav'iton]] - [[Thief]], with a crown on its head |
**[[Grav'iton]] - [[Thief]], with a crown on its head |
||
**[[Molyb'iton]] - [[Black Mage]] |
**[[Molyb'iton]] - [[Black Mage]] |
||
| Line 70: | Line 68: | ||
*After the cutscene you will obtain a {{KeyItem}}[[Dark Fragment]], for use in the next mission. |
*After the cutscene you will obtain a {{KeyItem}}[[Dark Fragment]], for use in the next mission. |
||
*After the cutscene if you walk out of the [[Sacrificial Chamber]], you will zone out to Map2 of the [[Temple of Uggalepih]] at the Northwest room. |
*After the cutscene if you walk out of the [[Sacrificial Chamber]], you will zone out to Map2 of the [[Temple of Uggalepih]] at the Northwest room. |
||
| − | *'''If you're doing this for the [[:Category:Rhapsodies of Vana'diel Missions|Rhapsodies of Vana'diel]] prerequisite, you can now continue |
+ | *'''If you're doing this for the [[:Category:Rhapsodies of Vana'diel Missions|Rhapsodies of Vana'diel]] prerequisite, you can now continue past [[The Cursed Temple]]. You do not need any further Zilart progress to finish Rhapsodies. Rise of the Zilart will not block Rhapsodies progress, so you can continue Zilart without worry.''' |
==Video== |
==Video== |
||
| Line 79: | Line 77: | ||
{{spoiler2}} |
{{spoiler2}} |
||
| ⚫ | |||
Revision as of 17:00, 31 January 2020
| Mission Name | The Temple of Uggalepih |
|---|---|
| Number | ZM4 |
| Level | 60+ |
| Title Granted | Bearer of the Wisewoman's Hope |
| Items Needed | Optional: |
| Reward | |
| Repeatable | Only to help others |


| ← Previous Mission | Next Mission → |
|---|---|
| Kazham's Chieftainess | Headstone Pilgrimage |
| Replay Cutscenes | |
|---|---|
| The Temple of Uggalepih (pt.1-4) | Goblin Footprint Sacrificial Chamber |
Walkthrough
If you have already visited the Sacrificial Chamber, you simply need to use a Home Point and choose Elshimo Uplands, then Home Point #1 to arrive at Den of Rancor, Map 2 (E-4), wherein you just take a few steps west to arrive at your destination (skip to the Sacrifical Chamber section of the guide, below).
To the Den of Rancor
If you are yet to activate the above Home Point, there are a number of other ways to travel to the Sacrificial Chamber, the ultimate destination of this mission. You will require an ![]() Unlit Lantern
Unlit Lantern ![]()
![]() to do so, which you can collect on the way through, though checking you aren't somehow already in possession of this
to do so, which you can collect on the way through, though checking you aren't somehow already in possession of this ![]() item by using with the /itemsearch "Unlit Lantern" command before setting off is a good idea.
item by using with the /itemsearch "Unlit Lantern" command before setting off is a good idea.
*Only Invisible is needed in the Temple, while both Sneak and Invisible are needed for all party members in the Den of Rancor.
- Unity Concord Teleportation:
If you are signed up to Unity Concord, talking to a Unity Concord NPC and selecting the option Bring me to Wanted encounter area will enable you to choose Den of Rancor from the list of Level 128 encounter areas.
- You will arrive on the lower level at Den of Rancor, Map 2 (G-12) and will need to travel north to Den of Rancor, Map 2 (I-5) to get to the upper level (Map 1).
- Once on the upper level, take the first passage on the left to arrive in a large cavern and skip to the Flame of Rancor section below.
- Via the Temple of Uggalepih: This is pretty time-consuming, so you should use the above method unless there is a significant reason why you can't, but it remains included here for a sense of completeness.

- Travel to the Temple of Uggalepih, either via Survival Guide (Elshimo Uplands) to Map 1 F-6, or via Yhoator Jungle to the main entrance at Map 1, I-6.
- If you aren't in possession of the Permanent Key Item Paintbrush of Souls, follow the link to that page now and complete the mini-quest described therein to receive it.
- Once obtained, take the northwest exit to Yhoator Jungle (2) at Map 1, F-5.
- Head west in Yhoator on the outside of the temple to reach (3) and enter the Temple of Uggalepih's Map 2.
- Head south to (I-10). If you do not possess an Unlit Lantern , kill any Tonberry Maledictor, Tonberry Jinxer, and Tonberry Pursuer you see in the western rooms on the way. There are mobs in the Den of Rancor that drop it also, so it is not necessary to wait around here if it doesn't drop immediately.
*Only one is required, but having up to four speeds things up, if you have more party members. - Once at (I-10), kill the Temple Guardian to open the door.
- Enter the large room and take the northeast exit, following the corridor to arrive at (I-7/8), the room containing the Picture Frames and the Granite Door.
- Click on the empty Picture Frame in the middle of the eastern wall just once and you will get two text messages. Do not confirm the second message just yet.
- "There is a blank canvas in this frame. The paintbrush of souls begins to twitch."
- "By focusing your thoughts on the paintbrush of souls, a new painting begins to appear on the canvas..."
- You will need to stand directly in the center of the empty frame, as close to the wall as possible. It is VERY fussy about where you stand. If you only receive the first message, you need to adjust your position and stand closer.
- When you receive the second message, wait at least 30 seconds (the screen should flash, briefly, when 30 seconds have elapsed) before confirming it in order to get the next message.
*If you get aggro'd whilst waiting you have to click and wait 30s to click again.- "You succeeded in projecting the image in your soul to the blank canvas. The door to the Rancor Den has opened!"
- The Granite Door in the wall just to the north of you should now open up a path to the Den of Rancor.
*NOTE: If the Windower Add-on Enternity is active, this will not work. - Follow the passageway downward into the new area and take the first right to arrive in a large cavern.
Flame of Rancor
Den of Rancor 1
Den of Rancor 2
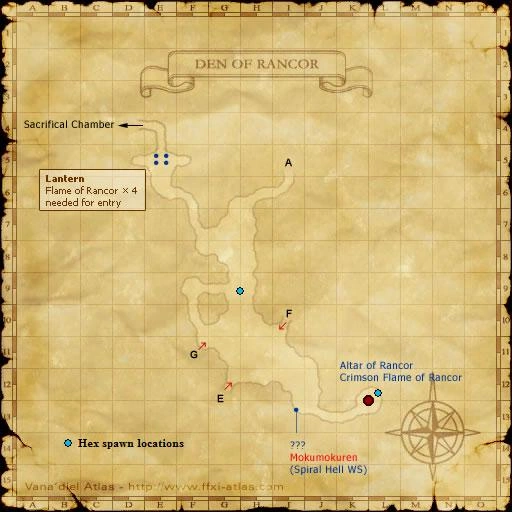
This section describes how to light the 4 torches in front of the Sacrificial Chamber to open its gate and enter.
- It is significantly easier to get somebody that already has the Home Point to open the gate. You can still do the below steps, but unless you want to replicate how the game used to work, you're way better off getting help.
- At this point, you should be in a cavern of Den of Rancor, Map 1 (G-6) which contains some Tonberry Imprecators who can drop the Unlit Lantern , if you don't already possess one.
- Trade your Unlit Lantern to the Altar of Rancor on Map 1 (E-5) to receive a Rancor Flame .
*There are other Altars of Rancor deeper in the Den but those will render your Unlit Lantern useless for this quest. Only the "Rancor Flame" can open this door, the other "colored flames" are useless on this door. - Drop down the hole at the northeast corner of (F-7) in order to reach Map 2.
- Head northwest up the passageway to reach the four torches and the gate of the Sacrificial Chamber at (E-5).
- Trade a Rancor Flame to one torch to light it up and to receive an Unlit Lantern in return.
- You cannot trade either the Unlit Lantern or the Rancor Flame while Invisible. In most cases, this will require fighting enemies to be able to trade.
- All four torches need to be lit in order to open the gate. The torches stay lit until the door is opened, so this can be done by a single person.
- To re-light your lantern, take the northeast ramp (A) to return to Map 1 and repeat the process until the door opens..
- WARNING: Players Exiting the door via the switch will also cause the lit torches to become unlit. If there are other players in the area, consider waiting for one to open the door first and go through. Remember to interact with the Home Point on the other side. So that you do not have to go through this again.
Sacrificial Chamber
- After entering the Sacrificial Chamber, examine the Mahogany Door to enter the Battlefield.
- The battlefield is capped at level 99 and limited to six players. Buffs wear upon entry (including Reraise), but Experience Points are not lost.
- There are three Tonberry NMs. All three must be defeated to clear the battlefield. The recommended order in which to kill them is:
- Grav'iton - Thief, with a crown on its head
- Molyb'iton - Black Mage
- Tungs'iton - Summoner
- The Thief is completely immune to sleep, so you'll probably want to kill it while you Silence and/or Sleep the other two NMs.
- The Summoner comes with a pet; a fire, water, or light elemental, chosen at random. It dies when its master does, so it need not be killed. The element of the pet is not an indication of which Astral Flow the Summoner will choose to use later in the fight.
- At approximately 25% HP, the Thief may use Everyone's Rancor. The person this hits is liable to be K.O.'d in one shot if they have not recently reset their Tonberry hate.
- The Summoner summons a random avatar for Astral Flow even if its elemental is asleep, so make sure your party is healed before waking it up. The maximum damage done by Astral Flow is approximately 700-800 without Shell or any sort of magical protection.
- This fight can be completed solo by most jobs at 99 and is easily duoed. '(see testimonials)'
- Clearing the battlefield gives a cutscene and places you in a different location from the entrance of the Sacrificial Chamber. Following this path leads back into Temple of Uggalepih away from the entrance to the Den.
- After the cutscene you will obtain a Dark Fragment, for use in the next mission.
- After the cutscene if you walk out of the Sacrificial Chamber, you will zone out to Map2 of the Temple of Uggalepih at the Northwest room.
- If you're doing this for the Rhapsodies of Vana'diel prerequisite, you can now continue past The Cursed Temple. You do not need any further Zilart progress to finish Rhapsodies. Rise of the Zilart will not block Rhapsodies progress, so you can continue Zilart without worry.
Video
See the Video page.
Game Description
- Mission Orders
- The Temple of Uggalepih is an ancient place where it is said that evil deities were once worshiped. Gilgamesh has ordered you to travel there and search out a strange, old hermit.