mNo edit summary Tag: Visual edit |
|||
| (29 intermediate revisions by 17 users not shown) | |||
| Line 1: | Line 1: | ||
[[category:Missions]][[Category:San d'Oria Missions|Shadow Lord, The]] |
[[category:Missions]][[Category:San d'Oria Missions|Shadow Lord, The]] |
||
[[de:San d'Oria-Mission 5-2]] |
[[de:San d'Oria-Mission 5-2]] |
||
| + | {{Disambig3|[[★The Shadow Lord]]}} {{Disambig3|[[Shadow Lord]]}} |
||
{{Mission |
{{Mission |
||
| name = The Shadow Lord |
| name = The Shadow Lord |
||
| Line 22: | Line 23: | ||
{{Mission/Cutscene|The Shadow Lord (pt.2)|[[Chaloutte]] [[Chateau d'Oraguille]] (I-9)}} |
{{Mission/Cutscene|The Shadow Lord (pt.2)|[[Chaloutte]] [[Chateau d'Oraguille]] (I-9)}} |
||
}} |
}} |
||
| + | |||
| + | |||
| + | '''Note:''' Helpers with this fight must be on 5-2 or higher in their own nation. |
||
| + | |||
| + | You need to be able to deal both physical and magic damage. |
||
| + | |||
| + | *This mission requires a certain level of [[Rank Bar]] for it to be offered. Complete [[Bat Hunt]] several times, or trade 3 crystals to a [[Conquest Overseer#City Conquest Overseers|Temple Knight]] gate guard. |
||
| + | **''Note: you might be able to flag this mission after completing [[Bat Hunt]] 5 times after Mission 5-1 is completed.'' |
||
| ⚫ | |||
== Walkthrough == |
== Walkthrough == |
||
| Line 32: | Line 42: | ||
[[Image:CastleZvahlKeep4.png|thumb|70px|Keep IV]] |
[[Image:CastleZvahlKeep4.png|thumb|70px|Keep IV]] |
||
| + | # Accept the mission from a [[San d'Orian Gate Guard]]. |
||
| − | * '''Again''' just like with 5-1, you must either be on mission 5-2 or have done this mission with your current nation to be allowed to enter the fight. |
||
| + | # Chateau d'Oraguille - {{Location Tooltip|area=Chateau d'Oraguille|text=Speak to Halver.|pos=I-9}} {{Location Tooltip|area=Chateau d'Oraguille|text=Speak to Trion.|pos=H-7}} |
||
| − | * After completing 5-1 and without doing any other missions, you will need 2 stacks and 7 crystals (31 total) worth of Rank points before you can get 5-2. |
||
| + | #* Trion: click on ''Door: Prince Royal's Rm'' @ H-7 for a short cutscene. |
||
| + | #{{Location Tooltip|text=Beaucedine Glacier (F-6)|area=Beaucedine Glacier|pos=F-6}} - Travel to [[Xarcabard|Xarcabard.]] |
||
| + | #*Xarcabard is in the {{Location Tooltip|text=northwest corner of Beaucedine Glacier.|area=Beaucedine Glacier|pos=F-6}} |
||
| + | #*You can warp to the outpost (tower 4 if you're walking) and go north then up a slope and west to Xarcabard. |
||
| + | #{{Location Tooltip|area=Xarcabard|text=Xarcabard (D-7)|pos=D-7}} - After zoning in from Beaucedine, go west-Northwest to reach and enter [[Castle Zvahl Baileys]]. |
||
| + | #*If you have already gotten the Home Point #1 near the [[Throne Room]], you can go straight to it. |
||
| ⚫ | |||
| + | #*Deliver supplies if you have them here, and also pick up the Teleport crystal if you haven't yet already. |
||
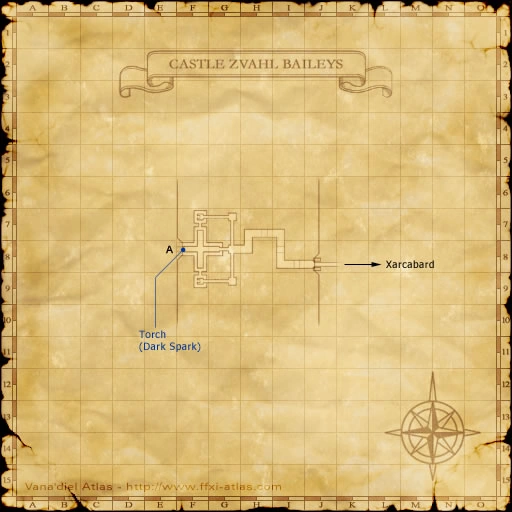
| + | #{{Location Tooltip|text=Castle Zvahl Baileys (G-8) Map 1 -|area=Castle Zvahl Baileys|map=Map 1|pos=G-8}} Move westward to the 4-way intersection. |
||
| ⚫ | |||
| + | #{{Location Tooltip|area=Castle Zvahl Baileys|map=Map 2|pos=I-9|text=Castle Zvahl Baileys (I-9) Map 2}} - From (A), move south to the bottom of (I-9) (Orcs), then go up the stairs here. |
||
| + | #*{{Location Tooltip|area=Castle Zvahl Baileys|map=Map 2|pos=G-9|text=move west to G-9}} (Yagudo) and go back down the stairs there (bottom-right corner of G-9) to the lower path |
||
| + | #**be careful to not fall into the big hole right before the down stairs |
||
| + | #**If you fall down the giant holes, you will have to look at Map 3 to reach either {{Location Tooltip|area=Castle Zvahl Baileys|text=staircase (B)|pos=H-6|map=Map 3}} or {{Location Tooltip|area=Castle Zvahl Baileys|text=staircase (C)|pos=H-10|map=Map 3}} back to Map 2. |
||
| + | #*On the lower path again, turn left from the staircase, heading east. |
||
| + | #*when you reach a gate, turn left again (going under the path you walked above earlier) |
||
| + | #*take the next right turn (located at {{Location Tooltip|area=Castle Zvahl Baileys|map=Map 2|pos=G-8|text=the bottom-right corner of G-8}}) |
||
| + | #*Reach and go up another short stairway, appearing on your right (located at {{Location Tooltip|area=Castle Zvahl Baileys|map=Map 2|pos=G-8|text=the middle of the right-edge of G-8}}) |
||
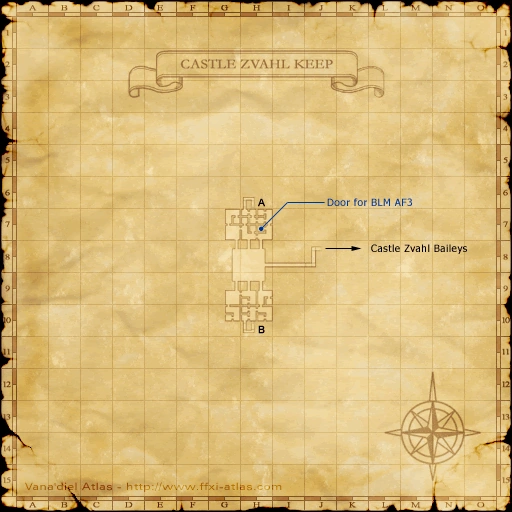
| + | #*{{Location Tooltip|area=Castle Zvahl Baileys|text=Castle Zvahl Baileys (F-8) Map 2|map=Map 2|pos=F-8}} - Move west/left to zone into [[Castle Zvahl Keep]] |
||
| + | #{{Location Tooltip|text=Castle Zvahl Keep (J-8) Map 1|area=Castle Zvahl Keep|map=Map 1|pos=J-8}}- Once you enter [[Castle Zvahl Keep]], you will have to open several gates/doors, very often in front of mobs that detect by sight. |
||
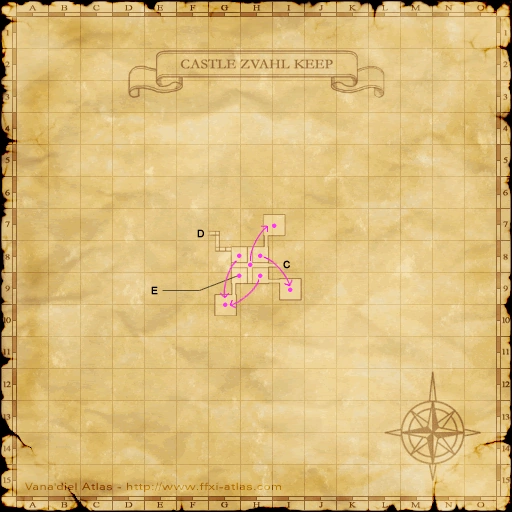
| + | #*{{Location Tooltip|area=Castle Zvahl Keep|map=Map 1|pos=H-6|text=(H-6) Map 1 (A)}} or {{Location Tooltip|area=Castle Zvahl Keep|map=Map 1|pos=H-10|text=(H-10) Map 1 (B)}} - Get to Map 2 via either spot. |
||
| + | #*{{Location Tooltip|area=Castle Zvahl Keep|map=Map 2|pos=E-8|text=(E-8) Map 2 (C)}} - From (A)/(B), strut through a few more doors and gates to reach (C). |
||
| + | #*{{Location Tooltip|text=(G-9) Map 3|area=Castle Zvahl Keep|map=Map 3|pos=G-9}} (E) - teleport devices. |
||
| + | #**Use middle device up to go up north, go south to use a device to go more south, go into the center room to use device and go southwest, go back northwest into center room again to enter Map 4 via (E). |
||
| + | #***These devices will cancel the [[Invisible]] effect after they are used. |
||
| + | #***They will turn on and off from time to time, so you may have to wait on one before it teleports you. |
||
| + | #{{Location Tooltip|text=Castle Zvahl Keep (G-7) Map 4|area=Castle Zvahl Keep|map=Map 4|pos=G-7}} - Make your way west, across the bridge, to reach the [[Throne Room]]. Examine the ''Ore Door'' to view a cutscene. |
||
| + | #*When ready, examine again and select "The Shadow Lord Battle" to enter the BC battle. |
||
| + | #*''Ore Door'' is next to Home Point #1. |
||
| ⚫ | |||
| − | **Information directly above is incorrect; amounts of crystals needed for trades differs dependent on quality; in my own experience I've found different amounts of rank points generated by donating crystals on different characters. I *believe* their value to be ...earth, wind, fire, water, ice, thunder, light, dark. The Earth crystals being least in value and dark the most. <Infidelity 04:14, March 15, 2012 (UTC)> |
||
| ⚫ | |||
| − | |||
| ⚫ | |||
| − | **Alternatively, you can repeat Mission 1-2 ([[Bat Hunt]]) six (6) times to gain access to this mission. |
||
| ⚫ | |||
| ⚫ | |||
| ⚫ | |||
| − | '''* After accepting this mission, speak to [[Halver]] and then to [[Trion|Prince Trion]] for a cutscene.''' |
||
| ⚫ | :* The [[Shadow Lord]] has 2 phases. In the first phase, he alternates between [[Invincible (Status Effect)|physical]] and [[Magic Shield|magic immunity]]. He has magic immunity until around 50% HP, then starts to switch to physical. From this point he will switch about every 5 minutes or 1000 damage. In this phase he has 9,000 HP. |
||
| − | |||
| ⚫ | |||
| − | *Form a full level 50+ party and travel to [[Xarcabard]] and on to [[Castle Zvahl Baileys]]. |
||
| − | :*You do not need a full party, if you bring players at or near level 75. It's recommended to at least have a melee fighter and a mage, however. |
||
| ⚫ | |||
| ⚫ | |||
| − | *On Map 2, move south to the bottom of I-9, finding a group of Orcs, then go up the stairs here; move west to G-9 (Yagudo) and go back down the stairs there, being careful to not fall off the circular ledges along the way; turn left from the staircase heading east, when you reach a gate, turn left again. Take the next right turn and make your way to another short stairway appearing on your right at the border of G/H-8 and go up; from there move west to zone into [[Castle Zvahl Keep]]. |
||
| − | |||
| − | *Once you enter [[Castle Zvahl Keep]], you will have to open several gates/doors, very often in front of mobs that detect by sight. On Map 1, make your way to either point "A" at H-6 or "B" at H-10 to get to Map 2; on Map 2, strut through a few more doors and gates to "C" at E-8. |
||
| − | *On Map 3 you will encounter a series of teleport devices. Be aware that these devices will cancel the [[Invisible]] effect after they are used. Also, they will turn on and off from time to time, so you may have to wait on one before it teleports you. Once you use the last device (top-right corner, G-9) you will be on Map 4; now make your way west, and zone to the [[Throne Room]] area via a door at G-7. |
||
| − | *Finally, go west all the way across the bridge here to the Throne Room door. Examine the door and, when ready, select "The Shadow Lord Battle" to view a cutscene and enter the BC. |
||
| − | |||
| ⚫ | |||
| ⚫ | |||
| ⚫ | |||
| ⚫ | |||
| ⚫ | |||
| − | :*The [[Shadow Lord]] has 2 phases: |
||
| ⚫ | |||
| ⚫ | |||
:::* Dark Nova seems to indicate that he will switch to melee stance very soon, after casting a spell or two. So use your TP quickly. |
:::* Dark Nova seems to indicate that he will switch to melee stance very soon, after casting a spell or two. So use your TP quickly. |
||
| − | ::*When he's |
+ | ::* When he's in his melee stance, he's immune to physical damage, and uses a variety of weaponskills: [[Giga Slash]], [[Kick Back]], [[Umbra Smash]]. Mages should start dealing magical damage during this stance. [[Monk]]s can use [[Formless Strikes]] to bypass the immunity. |
| − | :*After the first phase is defeated, a brief cutscene will occur as he switches to phase two. He will immediately attack after this cutscene, so there's no time for rest. |
+ | :* After the first phase is defeated, a brief cutscene will occur as he switches to phase two. He will immediately attack after this cutscene, so there's no time for rest. |
| − | ::*In this phase, the [[Shadow Lord]] will do nothing but his [[Implosion]] attack |
+ | ::* In this phase, the [[Shadow Lord]] will do nothing but his [[Implosion]] attack (which hits almost everywhere in the battlefield), but he only has 4000 HP and should go down quickly. |
| − | ::*Melees should use their two-hour abilities, and [[Icarus Wing]], if possible, to have TP for their best weaponskill. Mages should cast their [[Curaga]] spells, and try to keep [[Stoneskin]] (and [[Phalanx]], if available) up. |
+ | ::* Melees should use their two-hour abilities, and [[Icarus Wing]], if possible, to have TP for their best weaponskill. Mages should cast their [[Curaga]] spells, and try to keep [[Stoneskin]] (and [[Phalanx]], if available) up. |
| − | ::*Since hate is mostly irrelevant in this phase, mages should feel free to spam spells. |
+ | ::* Since hate is mostly irrelevant in this phase, mages should feel free to spam spells. |
| − | :*The battle ends after the second phase. The [[Shadow Lord]] gives experience points for a Level 60 mob. |
+ | :* The battle ends after the second phase. The [[Shadow Lord]] gives experience points for a Level 60 mob. |
| − | *After the Shadow Lord is defeated, another cutscene occurs. Once the cutscene ends, you will be transported back to the entrance of Castle Zvahl Baileys. You will also receive the key item [[Shadow Fragment]]. |
+ | * After the Shadow Lord is defeated, another cutscene occurs. Once the cutscene ends, you will be transported back to the entrance of Castle Zvahl Baileys. You will also receive the key item [[Shadow Fragment]]. |
| ⚫ | |||
| ⚫ | |||
| + | * Report back to the ''Great Hall'' for a cutscene. |
||
| + | * (Optional) Talk with [[Rahal]], [[Milchupain]], [[Aramaviont]], [[Curilla]] for additional dialogue. |
||
| ⚫ | |||
| + | == Upon Completion == |
||
| ⚫ | |||
| ⚫ | |||
| ⚫ | |||
| + | * Depending on your progress in the [[Rhapsodies of Vana'diel Missions]], you may get a cutscene when you zone to [[San d'Oria]] to see [[Halver]] reminding you that you can now progress to the mission [[What Lies Beyond]]. |
||
| − | *Report back to [[Prince Trion]] in the ''Great Hall'' for a cutscene (not in [[Prince Royal Trion I D'Oraguille's Room|Prince Trion's Room]]). |
||
| − | |||
| − | == Strategy == |
||
| − | *Very easy and fun solo Rdm/Blm. 10 minutes 11 seconds. |
||
| − | *This fight can be soloed by a RDM/NIN, PUP/WAR, PUP/DNC, BLU/NIN or PUP/NIN. Taking about 17 minutes for RDM, 9 to 11 minutes for PUP. Also soloable by a 75MNK/NIN with Formless Strikes, taking 6:55. |
||
| − | *Also able to be soloed by SCH/RDM at level 73 with little to no difficulty. High staff skill recommended to gain TP and use Spirit Taker during magic invulnerability times. Helix spells used around 51% can greatly help for the first magical invulnerability. Gravity/Bind then Nuke strategy used. {{testimonials}} |
||
| − | *Duoed by 75MNK/DNC & 75WAR/NIN Breaking Record @ 3:45 Fast Burn, Raging Rush Right Before Immunity Then Mnk Formless Strikes / Asuran Fist {Agent & Ukiyasan Of Bahamut} Retested, War (Agent) Used Dual Axes Rampaging For 1.8k Time Is 2Minutes 54Seconds |
||
| − | *Soloed as 75DRG/NIN with some difficulty during the immunity to physical attacks, just need to keep shadows up throughout the fight. May or may not need to 2 Hour, depends on how safely you want to do this fight. |
||
| − | *Soloable as a wellgeared 75WHM/37NIN with some difficulty. 5 Yagudo Drinks, 2 Elixirs, Icarus Wing and Tavnazian Taco. Afflatus Misery and Auspice Enlight effect bypasses Physical Immunity, Banish/Holy can help if mp suffices. Keep shadows and stoneskin on at all times. Will be a close fight timewise. 27 minutes 41 seconds |
||
| − | *Extremely easy solo as average geared 75SMN/37WHM. Use Carbuncle on second form. "Retreat" back to the entrance door and "Assault" so Carby fights him there. Then run to the top of the stairs and wait for Carby to kill the Shadow Lord while standing out of range of his AoE attack. To speed things up run into range to meteorite, but one Carbuncle should be enough to widdle him down in a few minutes. |
||
| − | *Extremely easy to duo with DRK75/NIN37 and DRG73/WHM36. Shadowlord doesn't stand a chance. Spamming Penta Thrust when he's immune to Magic, and spamming drain, and other various spells when immune to physical. |
||
| − | *Soloed as DRG89/SAM44, when his physical dmg resistance form comes up, make sure to have 100TP, ws and let wyvern breath do dmg, kite untill he changes repeat. I only had one high potion on me, but could of used more. Stfunoob Sylph sever. |
||
{{Mission/Description |
{{Mission/Description |
||
| Line 89: | Line 103: | ||
}} |
}} |
||
| + | {{spoiler2}} |
||
| − | {{spoiler3 |
||
| − | | spoiler = |
||
| − | {{/Plot Details}} |
||
| − | }} |
||
Latest revision as of 03:25, 29 November 2021
Were you looking for ★The Shadow Lord?
Were you looking for Shadow Lord?
| Mission Name | The Shadow Lord |
|---|---|
| Number | 5-2 |
| Start NPC | Any San d'Orian Gate Guard |
| Level | 50+ |
| Title Granted | Shadow Banisher |
| Reward | Rank 6 20,000g |
| ← Previous Mission | Next Mission → |
|---|---|
| The Ruins of Fei'Yin | Leaute's Last Wishes |
| Replay Cutscenes | |
|---|---|
| The Shadow Lord (pt.1) | Chaloutte Chateau d'Oraguille (I-9) |
| The Rank 5 Mission (pt.1) | Goblin Footprint Throne Room |
| The Rank 5 Mission (pt.2) | Goblin Footprint Throne Room |
| The Rank 5 Mission (pt.3) | Goblin Footprint Throne Room |
| The Shadow Lord (pt.2) | Chaloutte Chateau d'Oraguille (I-9) |
Note: Helpers with this fight must be on 5-2 or higher in their own nation.
You need to be able to deal both physical and magic damage.
- This mission requires a certain level of Rank Bar for it to be offered. Complete Bat Hunt several times, or trade 3 crystals to a Temple Knight gate guard.
- Note: you might be able to flag this mission after completing Bat Hunt 5 times after Mission 5-1 is completed.
- If you have previously accepted the quest Under Oath, you will be unable to speak to Trion about the mission. You must complete the first portion of Under Oath that involves talking to various people in Southern San d'Oria.
Walkthrough
Baileys I

Baileys II
Keep I


Keep II

Keep III


Keep IV
- Accept the mission from a San d'Orian Gate Guard.
- Chateau d'Oraguille - Speak to Halver. Speak to Trion.
- Trion: click on Door: Prince Royal's Rm @ H-7 for a short cutscene.
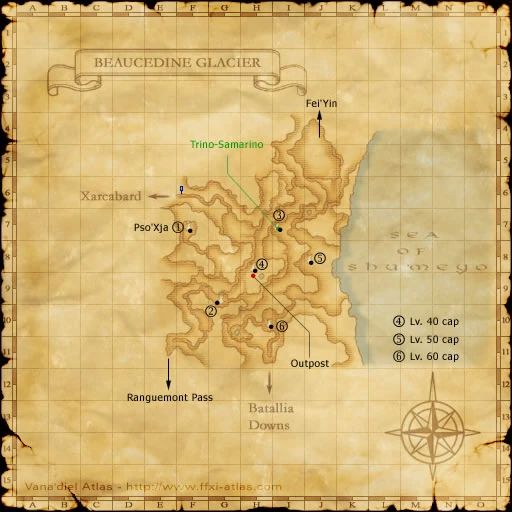
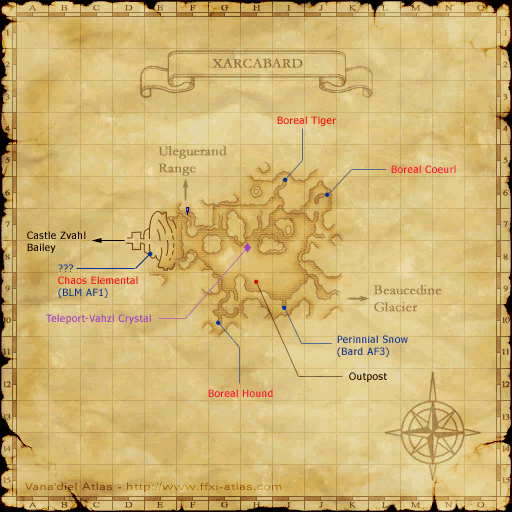
- Beaucedine Glacier (F-6) - Travel to Xarcabard.
- Xarcabard is in the northwest corner of Beaucedine Glacier.
- You can warp to the outpost (tower 4 if you're walking) and go north then up a slope and west to Xarcabard.
- Xarcabard (D-7) - After zoning in from Beaucedine, go west-Northwest to reach and enter Castle Zvahl Baileys.
- If you have already gotten the Home Point #1 near the Throne Room, you can go straight to it.
- Note: there is no cutscene upon entering Castle Zvahl Baileys or Castle Zvahl Keep. The next cutscene is when you start the fight.
- Deliver supplies if you have them here, and also pick up the Teleport crystal if you haven't yet already.
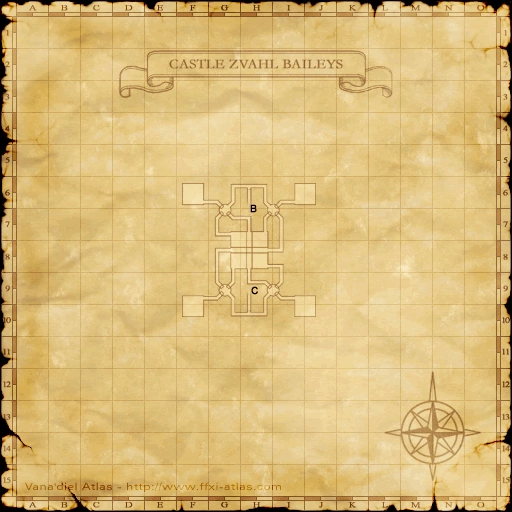
- Castle Zvahl Baileys (G-8) Map 1 - Move westward to the 4-way intersection.
- Castle Zvahl Baileys (E-8) Map 1 - To reach (A), head south from here, down the stairs that you will soon come to onto a lower path, and then on to the second map through the border of E/F-8.
- Castle Zvahl Baileys (I-9) Map 2 - From (A), move south to the bottom of (I-9) (Orcs), then go up the stairs here.
- move west to G-9 (Yagudo) and go back down the stairs there (bottom-right corner of G-9) to the lower path
- be careful to not fall into the big hole right before the down stairs
- If you fall down the giant holes, you will have to look at Map 3 to reach either staircase (B) or staircase (C) back to Map 2.
- On the lower path again, turn left from the staircase, heading east.
- when you reach a gate, turn left again (going under the path you walked above earlier)
- take the next right turn (located at the bottom-right corner of G-8)
- Reach and go up another short stairway, appearing on your right (located at the middle of the right-edge of G-8)
- Castle Zvahl Baileys (F-8) Map 2 - Move west/left to zone into Castle Zvahl Keep
- move west to G-9 (Yagudo) and go back down the stairs there (bottom-right corner of G-9) to the lower path
- Castle Zvahl Keep (J-8) Map 1- Once you enter Castle Zvahl Keep, you will have to open several gates/doors, very often in front of mobs that detect by sight.
- (H-6) Map 1 (A) or (H-10) Map 1 (B) - Get to Map 2 via either spot.
- (E-8) Map 2 (C) - From (A)/(B), strut through a few more doors and gates to reach (C).
- (G-9) Map 3 (E) - teleport devices.
- Use middle device up to go up north, go south to use a device to go more south, go into the center room to use device and go southwest, go back northwest into center room again to enter Map 4 via (E).
- These devices will cancel the Invisible effect after they are used.
- They will turn on and off from time to time, so you may have to wait on one before it teleports you.
- Use middle device up to go up north, go south to use a device to go more south, go into the center room to use device and go southwest, go back northwest into center room again to enter Map 4 via (E).
- Castle Zvahl Keep (G-7) Map 4 - Make your way west, across the bridge, to reach the Throne Room. Examine the Ore Door to view a cutscene.
- When ready, examine again and select "The Shadow Lord Battle" to enter the BC battle.
- Ore Door is next to Home Point #1.

BC Battle
When ready, gather in front of the door. When you enter, a cutscene will happen and the fight begins:
- This fight is still classified "level capped" (with the previous level 50 cap restriction removed), which means buffs will wear upon entry.
- You have 30 minutes to complete this battlefield event.
- The Shadow Lord does not attack until you approach, so cast pre-fight buffs before getting closer.
- The Shadow Lord has 2 phases. In the first phase, he alternates between physical and magic immunity. He has magic immunity until around 50% HP, then starts to switch to physical. From this point he will switch about every 5 minutes or 1000 damage. In this phase he has 9,000 HP.
- When he's in his magic stance, he's immune to magical damage, and will mainly cast BLM spells such as elemental debuffs and tier 2 AoE nukes. He also has a weaponskill, Dark Nova (AoE dark damage).
- Dark Nova seems to indicate that he will switch to melee stance very soon, after casting a spell or two. So use your TP quickly.
- When he's in his melee stance, he's immune to physical damage, and uses a variety of weaponskills: Giga Slash, Kick Back, Umbra Smash. Mages should start dealing magical damage during this stance. Monks can use Formless Strikes to bypass the immunity.
- After the first phase is defeated, a brief cutscene will occur as he switches to phase two. He will immediately attack after this cutscene, so there's no time for rest.
- In this phase, the Shadow Lord will do nothing but his Implosion attack (which hits almost everywhere in the battlefield), but he only has 4000 HP and should go down quickly.
- Melees should use their two-hour abilities, and Icarus Wing, if possible, to have TP for their best weaponskill. Mages should cast their Curaga spells, and try to keep Stoneskin (and Phalanx, if available) up.
- Since hate is mostly irrelevant in this phase, mages should feel free to spam spells.
- The battle ends after the second phase. The Shadow Lord gives experience points for a Level 60 mob.
- After the Shadow Lord is defeated, another cutscene occurs. Once the cutscene ends, you will be transported back to the entrance of Castle Zvahl Baileys. You will also receive the key item Shadow Fragment.
- Speak to Halver, who will promote you to Rank 6.
- Report back to the Great Hall for a cutscene.
- (Optional) Talk with Rahal, Milchupain, Aramaviont, Curilla for additional dialogue.
Upon Completion
- You can now take Lion's offer and visit Norg to begin the Zilart missions.
- If you are lv.65+ you may return to Xarcabard for the initial cutscene to begin Dynamis..
- Depending on your progress in the Rhapsodies of Vana'diel Missions, you may get a cutscene when you zone to San d'Oria to see Halver reminding you that you can now progress to the mission What Lies Beyond.
Game Description
- Mission Orders
- Head to Castle Zvahl in Xarcabard. Visit Chateau d'Oraguille to learn more.