| Mission Name | The Secrets of Worship |
|---|---|
| Number | PM4-3 |
| Title Granted | The Lost One |
| Items Needed | |
| Reward | Access to Sacrarium (Given at the start of the quest) |
| ← Previous Mission | Next Mission → |
|---|---|
| The Savage | Slanderous Utterings |
| Replay Cutscenes | |
|---|---|
| The Secrets of Worship | Latteaune Tavnazian Safehold (H-6) |
| The Secrets of Worship | Goblin Footprint Misareaux Coast |
| The Secrets of Worship (pt.1) | Goblin Footprint Sacrarium (E-7) |
| The Secrets of Worship (pt.2) | Goblin Footprint Sacrarium (E-7) |
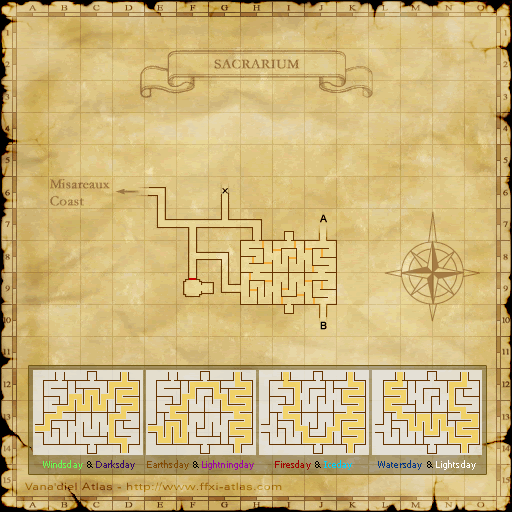
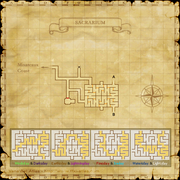
Ground Map

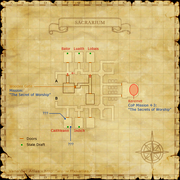
Lower Map
Walkthrough
As of the 6/21/2010 patch, there is no longer a level restriction in Sacrarium.
NOTE: This mission can now be done solo. After obtaining the ![]()
![]() Coral Crest Key and the
Coral Crest Key and the ![]()
![]() Sealion Crest Key, they can be traded to Quelveuiat after completing the A Hard Day's Knight quest for the
Sealion Crest Key, they can be traded to Quelveuiat after completing the A Hard Day's Knight quest for the ![]() Temple Knight key.
Temple Knight key.
1. Speak with Justinius at (J-6) on the Third floor (upstairs) of Tavnazian Safehold.
2. Click on the Walnut Door at (K-7) upstairs next to Parelbriaux for a cutscene.
- This door is very close to Justinius, just take the small ramp up and its right there.
3. Head to the Iron Gate in the northern part of Misareaux Coast (G-4) for a cutscene. After checking this, you will have access to Sacrarium.
4. Traverse the Sacrarium maze until you find the Fomor. Kill the Fomor until you get two ![]()
![]() Coral Crest Keys.
Coral Crest Keys.
- On the first map of the Sacrarium there is a big box area which is a maze that has interchanging corridors varying on the current elemental day in Vana'diel, see the map above for assistance.
- It is best if you obtain the
 Coral Crest Keys beforehand. You can do this mission with only one Coral Crest Key, but then it will be necessary to have an extra person to stay behind to operate the door, which means they will not be able to assist with the NM fight.
 - If you are doing this with only 2 people, farm one Coral Crest Key for player 1, and one Sealion Crest Key for player 2. After opening the lock the first time, farm another Coral Crest Key for player 1. This is the only way to open the door.
As of the February 2014 patch.
A new method for opening the doorto Sacrarium will be added.
- Trading a sealion crest key and coral crest key to Quelveuiat in Tavnazian Safehold (I-10) will provide the player with aTemplate:Key Item Temple Knight Key. While in possession of this key, players will be able to open the door by themselves by examining either the large keyhole or small keyhole in Sacrarium (H-7).
Keremet
Remember this part can be skipped if a party member already has a ![]()
![]() Sealion Crest Key!!
Sealion Crest Key!!
- Defeat the skeletons in the two hallways (J7-8) and (J8-9). The two hallways are each lined with 6 Skeletons. The Skeletons don't aggro or link, and are weak, but if anyone attacks Keremet they will rush to aid him. Defeat all 12 Skeletons first, then pass through one of the doors at the end of the hall (K-8). Once they are defeated you have about 30 minutes before they respawn.
- If you don't want to, or if you forget, these 12 Skeletons are so weak that two Stonega II blasts from 2 BLM (or Banishga II from a WHM) will completely destroy them, and do some healthy damage to the NM.
The Fight
- Now you can kill Keremet, a Corse NM. Keremet is at the far side of the room. Wait for the taurus to wander to one side and then pull Keremet back through one of the doors into one of the hallways where the Skeletons were. Only one person should pull Keremet while the others wait in the hallway. This is a hard fight that should be taken seriously, but does not warrant the use of 2 hour skills.
- Keremet can be Silenced. He is highly resistant to stun, sleep, and Blizzard spells.
- Like all Corses, Keremet can Charm members of your party with the Danse Macabre TP attack. Charmed party members MUST be slept. He has ice spikes which can be dispelled and an AoE silence move.
- A Beastmaster makes this fight much easier; a Blubber Eyes under Familiar does a lot of damage and pets are immune to Keremet's Charm. Two Blubber Eyes can duo Keremet.
- Kill Keremet and obtain the Sealion Crest Key. Give it to someone who doesn’t have either of the Coral Crest Keys.
Old Professor Mariselle
All quest steps below this point are mandatory to complete the mission.
- Head to (H-7) (second map) in the Sacrarium and find a door with two keyholes which you will have to trade the keys you have acquired to.
Both keys must be traded. ![]()
![]() Coral Crest Key first,
Coral Crest Key first, ![]()
![]() Sealion Crest Key second. When you get the text "<Player> is holding the lock open...", that is when the
Sealion Crest Key second. When you get the text "<Player> is holding the lock open...", that is when the ![]()
![]() Sealion Crest Key is traded. When the
Sealion Crest Key is traded. When the ![]()
![]() Coral Crest Key holder gets the message "<Player>'s hand has grown numb!" then it's too late to trade the
Coral Crest Key holder gets the message "<Player>'s hand has grown numb!" then it's too late to trade the ![]()
![]() Sealion Crest Key. make sure that whoever makes the first trade is ready to give a text signal i.e. "go" or "now" when you get the first text about the lock being opened.
Sealion Crest Key. make sure that whoever makes the first trade is ready to give a text signal i.e. "go" or "now" when you get the first text about the lock being opened.
- Small Keyhole = You trade the Coral Crest Key to this one.
- The Coral Crest Key WILL break after use, and if both are not trading at the same time.
- The person trading the Coral Crest Key will be immobilized until a moment after the "numb message".
- The person trading the
- The
- Large Keyhole = You trade the Sealion Crest Key to this one.
- The Sealion Crest Key DOES NOT break after use.
- A Macro for trading this key would be: [/item "Sealion Crest Key" <stnpc>] (or <t>)
- The
- Find and click on the Wooden Gate at (G-8) for a cutscene.
- Exit out of the locked door. If you do not have another Coral Crest Key, you can leave a member behind to open the door with the switch, however they will not be able to obtain a Reliquiarium Key.
- Old Professor Mariselle must be spawned from a ??? in one of the six classrooms, three on the north side of the area of Sacrarium you are in and three on the south side. Each has a ??? on a desk in each room. Check each ??? until you spawn the Ghost NM Old Professor Mariselle
Fomors In Sacrarium
Yes there are going to be quite a few Fomor that you encounter, and they will be a pain to deal with. To understand why it is important for this mission, read over this brief explanation.
- When you spawn Old Professor Mariselle he will be in the rooms that contain Fomor. This can be troublesome because the level of a player's Fomor Hate can determine how long the sound aggro range from Fomor can be. Which can unintentionally and consequently bring more uninvited guests to your party that you don't want to deal with. The level of Fomor Hate also determines how much damage their TP moves do which is another thing you don't want to worry about.
- Visit the article: Fomor Hate to find out how to reduce your hate level (if you want to bother).
Fighting Old Professor Mariselle
- DO NOT use Tractor, if you do then you will have to get the ??? and kill this NM again.
- He summons two Mariselle's Pupils soon after being spawned.
- The Mariselle's Pupils are weak. However, if you kill them, Old Professor Mariselle will summon more. They CANNOT be slept.
- Old Professor Mariselle casts Sleepga II and Silence, and uses Ghost abilities. He seems to have a fair bit of Regen, so constant damage is important.
- It's highly recommended to use Poison Potions to protect against his Sleepga spam.
- All three NMs will teleport around the room a couple of time during the fight (every ~20-30 seconds). Mariselle will "despawn" first, along with his two pupils, and then respawn randomly somewhere in the room (the pupils also spawn randomly, sometimes all three are far apart after a teleport). Even if pulled outside the room, it will respawn somewhere in the room again, so this way of avoiding Fomor aggro is not recommended, but will work if you have sufficient Refresh and Curing magic.
- If one of your party hasn't reset Fomor hate, you will have to clear the room first, as pulling Old Professor Mariselle out of the room does work, but can take a considerably long amount of time, and you will take extra damage as he casts on you from inside the room before coming forward.
- If everyone has reset their fomor hate, don’t use AoE abilities to avoid unwanted aggro.
- Ramuh can prove useful for this fight if you aren't clearing Fomor Hate because of Rolling Thunder's added damage to melee hits. Furthermore, if out in the open Thunderspark can Paralyze his pupils, however be sure there are no Fomors nearby because if they don't depop after his death then they are more likely to aggro you.
- Beastmaster, Puppetmaster, and Summoner are very useful for this fight because the pets will not lose hate and will continue to engage when Old Professor Mariselle teleports around. Which you can draw him back out again by calling your pet back.
- If the pet gets slept, this trick may not work so well.
After the Fight
- When you finally kill Old Professor Mariselle check the ??? again for the Reliquiarium Key. Any ??? on any of the desks in the rooms will allow you to obtain the Reliquiarium Key.
- Proceed back to the locked door and open it with your second Coral Crest Key and the original Sealion Crest Key, using the same method as before. Alternatively, simply have someone operate the switch on the other side.
- Click on the Wooden Gate again to end the mission.
- Once the cutscene is over, you will end up on the other side of the Wooden Gate, unable to open it from that side.
- Head back to Tavnazian Safehold to move on to the next mission: Slanderous Utterings.
Game Description
- Mission Orders
- Now that you have learned the Wyrmking's plan, you must travel to the fourth mothercrystal. Nag'molada has informed you where the stone lies. However, you will need the amulet you lent to Prishe before you are to make your way there.
Game Script and Cutscene Video
