(Moved to Discussion) |
(corrected article) |
||
| Line 58: | Line 58: | ||
[[Image:Sacrarium 2.png|thumb|Lower Map]] |
[[Image:Sacrarium 2.png|thumb|Lower Map]] |
||
---- |
---- |
||
| + | == Prep Tips! == |
||
| − | |||
| + | * Have everyone in the party read up on this mission. Understanding the various steps of a complicated mission will help prevent miscommunication and failure. If necessary, give members the link to this Wiki page if they can't find it themselves. It's ok to be a little bit assertive when setting this up, as failure means people lose a lot of time; [[Sacrarium]] is often a very time consuming investment. |
||
| + | * Consider getting a [[Coral Crest Key]]. Two [[Coral Crest Key|Coral Crest Keys]] and a [[Sealion Crest Key]] (dropped from [[Keremet]]) are required to get the entire party into the various rooms in [[Sacrarium]]. |
||
| + | ** Obtaining the [[Coral Crest Key|Coral Crest Keys]] beforehand will save a lot of time and hassle; one idea to accomplish this is by joining/forming a Subligar farming run in [[Sacrarium]] and lotting on the subsequent [[Coral Crest Key]] drops. This is beneficial because you will have time to lower your [[Fomor Hate]] before the actual mission. Farming the [[Coral Crest Key]] during the mission will raise the hate of everyone in the party, which will be counter-productive for anyone has previously lowered their fomor hate. |
||
| + | ** The [[Sealion Crest Key]] should be held by someone without a [[Coral Crest Key]]. The [[Coral Crest Key|Coral Crest Keys]] break upon use, so one person with both keys will not be able to open the door. Only 1 member is going to get the [[Sealion Crest Key]], so if that member leaves due to time constraint or party wipes, then you have to kill [[Keremet]] again to get another [[Sealion Crest Key]]. |
||
| + | * Consider lowering your [[Fomor Hate]]. This is so important as the [[Sacrarium]] mission takes a very long time, and your ability to walk through the [[Fomor]] without aggro, especially for the final NM fight, will help a lot. The combination of having a [[Coral Crest Key]], and lowest [[Fomor Hate]] when you do this mission can knock 1 hour off the overall time to complete the mission. |
||
| + | ** An additional benefit from lowering [[Fomor Hate]] is the many quest items dropped off the [[Lufaise Meadows]]/[[Misareaux Coast]] [[beastmen]], which will end up paying you for the time spent lowering your [[Fomor Hate]]. |
||
| + | * Bring Silent Oil (3-4). Nothing in [[Sacrarium]] requires the use of [[Invisible]] and there are only a few times where you will even need Sneak. It will speed up the process if you can sneak yourself instead of waiting for the mages to sneak you. The worst thing you can do is be the one who is hanging behind because your sneak wore off, or end up dying or getting other members killed because you aggro'd a mob. 3-4 Silent Oil is cheap enough for anyone's pocket to afford. |
||
| + | * Consider [[Poison Potion]] (3-4) for your fight with [[Old Professor Mariselle]]. He will use [[Sleepga]] very often and it will greatly increase your chances of success if you can keep damaging him while he attacks and teleports elsewhere in the room.. |
||
| + | * Bring [[Hi-Potion]] (5), [[Regen (Status Effect)|Regen]]-drinks and [[Refresh (Status Effect)|Refresh]]-drinks. The [[Old Professor Mariselle]] fight and location pose a tricky situation - having these consumable items will greatly increase your odds of success. The [[Regen (Status Effect)|Regen]]-drinks are also good because it would effectively counter-act the [[Poison Potion]] effect. [[Pear au Lait]] (1-2) works well for this, but even something as simple as [[Selbina Milk]](12) will be good if you keep using it when it wears off, as it will offer you HP restore when there is the short break in the fight when he teleports around the room. |
||
== Walkthrough == |
== Walkthrough == |
||
Revision as of 19:15, 13 May 2009
|
Ground Map
Lower Map
Prep Tips!
- Have everyone in the party read up on this mission. Understanding the various steps of a complicated mission will help prevent miscommunication and failure. If necessary, give members the link to this Wiki page if they can't find it themselves. It's ok to be a little bit assertive when setting this up, as failure means people lose a lot of time; Sacrarium is often a very time consuming investment.
- Consider getting a Coral Crest Key. Two Coral Crest Keys and a Sealion Crest Key (dropped from Keremet) are required to get the entire party into the various rooms in Sacrarium.
- Obtaining the Coral Crest Keys beforehand will save a lot of time and hassle; one idea to accomplish this is by joining/forming a Subligar farming run in Sacrarium and lotting on the subsequent Coral Crest Key drops. This is beneficial because you will have time to lower your Fomor Hate before the actual mission. Farming the Coral Crest Key during the mission will raise the hate of everyone in the party, which will be counter-productive for anyone has previously lowered their fomor hate.
- The Sealion Crest Key should be held by someone without a Coral Crest Key. The Coral Crest Keys break upon use, so one person with both keys will not be able to open the door. Only 1 member is going to get the Sealion Crest Key, so if that member leaves due to time constraint or party wipes, then you have to kill Keremet again to get another Sealion Crest Key.
- Consider lowering your Fomor Hate. This is so important as the Sacrarium mission takes a very long time, and your ability to walk through the Fomor without aggro, especially for the final NM fight, will help a lot. The combination of having a Coral Crest Key, and lowest Fomor Hate when you do this mission can knock 1 hour off the overall time to complete the mission.
- An additional benefit from lowering Fomor Hate is the many quest items dropped off the Lufaise Meadows/Misareaux Coast beastmen, which will end up paying you for the time spent lowering your Fomor Hate.
- Bring Silent Oil (3-4). Nothing in Sacrarium requires the use of Invisible and there are only a few times where you will even need Sneak. It will speed up the process if you can sneak yourself instead of waiting for the mages to sneak you. The worst thing you can do is be the one who is hanging behind because your sneak wore off, or end up dying or getting other members killed because you aggro'd a mob. 3-4 Silent Oil is cheap enough for anyone's pocket to afford.
- Consider Poison Potion (3-4) for your fight with Old Professor Mariselle. He will use Sleepga very often and it will greatly increase your chances of success if you can keep damaging him while he attacks and teleports elsewhere in the room..
- Bring Hi-Potion (5), Regen-drinks and Refresh-drinks. The Old Professor Mariselle fight and location pose a tricky situation - having these consumable items will greatly increase your odds of success. The Regen-drinks are also good because it would effectively counter-act the Poison Potion effect. Pear au Lait (1-2) works well for this, but even something as simple as Selbina Milk(12) will be good if you keep using it when it wears off, as it will offer you HP restore when there is the short break in the fight when he teleports around the room.
Walkthrough
- Note
- This walkthrough consists of two parts, one of which is skippable. The mission only requires that Old Professor Mariselle be defeated. The first part of the walkthrough deals with Keremet, an NM that drops a Sealion Crest Key. If the Coral Crest Keys have already been obtained and someone in the party already has a Sealion Crest Key, Keremet does not need to be defeated and the party can proceed straight to the locked door at (H-7).
- Speak with Justinius at (J-6) in third floor.
- Click on the Walnut Door at (K-7) upstairs next to Parelbriaux for a cutscene.
- Head to the Iron Gate in the northern part of Misareaux Coast (G-4) for a cutscene. After checking this, you will have access to Sacrarium.
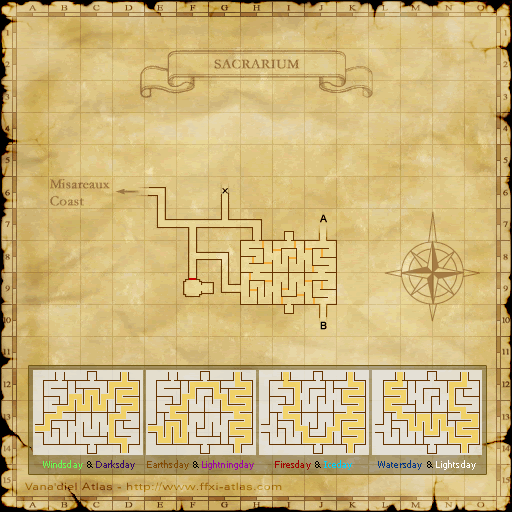
- Traverse the Sacrarium maze until you find the Fomor. Kill the Fomor until you get two Rare/Ex Coral Crest Keys.
- It is best if you obtain the Coral Crest Keys beforehand. You can do this mission with only one Coral Crest Key, but then it will be necessary to have an extra person to stay behind to operate the door, which means they will not be able to assist with the NM fight.
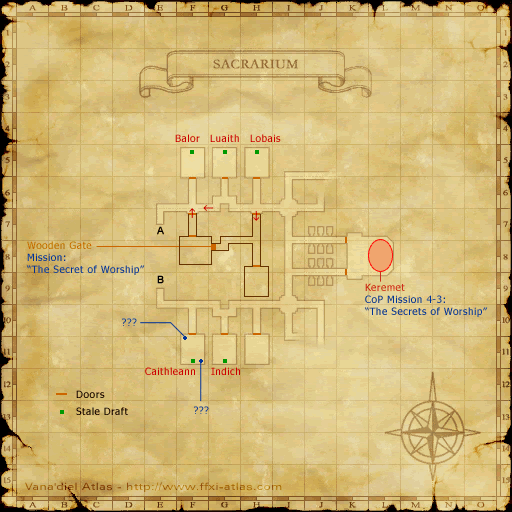
Keremet
- Defeat the skeletons in the two hallways (J7-8) and (J8-9). The two hallways are each lined with 6 Skeletons. The Skeletons don't aggro or link, and are weak, but if anyone attacks Keremet they will rush to aid him. Defeat all 12 Skeletons first, then pass through one of the doors at the end of the hall (K-8). Once they are defeated you have about 30 minutes before they respawn.
- Now you can kill Keremet, a Corse NM. Keremet is at the far side of the room. Wait for the taurus to wander to one side and then pull Keremet back through one of the doors into one of the hallways where the Skeletons were. Only one person should pull Keremet while the others wait in the hallway. This is a hard fight that should be taken seriously, but does not warrant the use of 2 hour skills.
- Keremet can be Silenced. He is highly resistant to stun, sleep, and Blizzard spells.
- Like all Corse, Keremet can Charm (Status Effect) members of your party with the Danse Macabre TP attack. Charmed party members MUST be slept. He has ice spikes which can be dispelled and an AoE silence move.
- A Beastmaster makes this fight much easier; a Blubber Eyes under Familiar does a lot of damage and pets are immune to Keremet's Charm. Two Blubber Eyes can duo Keremet.
- Kill Keremet and obtain the Sealion Crest Key (EX). Give it to someone who doesn’t have either of the Coral Crest Keys.
Old Professor Mariselle
Optional step, but recommended: Head back to Misareaux Coast and kill Orcs and Gigas to lower your Fomor Hate. Check your hate with Resauchamet at (J/K-6) of the upper floor of Tavnazian Safehold. Lower your Fomor Hate to level 1, where Resauchamet will tell you that you have a “good head start.” (If you have max hate, about 50 kills will lower it to level 1.)
- The final NM (Old Professor Mariselle) you fight will be inside a room full of Fomor. Unless you get lucky and Old Professor Mariselle follows you out to the hallway each time, where you can do a 20-30 second amount of damage before he teleports back into the room, then you will have to kill all the Fomor in the room first, which can be very hard to maintain given respawn times. The problem with this recommendation is that some player may have really high Fomor hate and the option of killing enough Beastmen to lower it may be more time investment than the party is able to give.
- Head to (H-7) in the Sacrarium and find a door at (H-7) with two keyholes: one SMALL KEYHOLE and one LARGE KEYHOLE. The first party member will trade the Coral Crest Key to the SMALL KEYHOLE; you will hear a click. The other party member will trade the Sealion Crest Key to the LARGE KEYHOLE; the door will then open, and the Coral Crest Key holder will be immobilized for a moment.
- You have a limited amount of time to trade the Sealion Crest Key after the Coral Crest Key has been traded, so make sure the key holders are both ready. (Both locks cannot be opened by a single person!) You will keep your Sealion Crest Key, but your Coral Crest Key will break. If the Sealion Crest Key isn't traded quickly enough, you will lose your opportunity to get the door open, and you will have to get another Coral Crest Key. If the Coral Crest Key holder gets the message "Your hand has grown numb," then it's too late to trade the Sealion Crest Key. The best thing to do is to have the Sealion Crest Key holder get to the "OK" to trade screen and wait for the Coral key holder to say when. (If it is a single tradable item you may use [/item "Sealion Crest Key" <stnpc>] and skip the trading step. Just have to make sure people have their spot highlighted and know how the macro works.)
- Find and click on the Wooden Gate at (G-8) for a cutscene.
- Exit out of the locked door. If you do not have another Coral Crest Key, you can leave a member behind to open the door with the switch, however they will not be able to obtain a Reliquiarium Key.
- Old Professor Mariselle must be spawned from a ??? in one of the six classrooms, three on the north side of the area of Sacrarium you are in and three on the south side. Each has a ??? on a desk in each room. Check each ??? until you spawn the Ghost NM Old Professor Mariselle
- He summons two Mariselle's Pupils soon after being spawned.
- Old Professor Mariselle casts Sleepga II and Silence, and uses Ghost abilities. He seems to have a fair bit of Regen, so constant damage is important.
- It's highly recommended to use Poison Potions to protect against his Sleepga spam.
- All three NMs will teleport around the room a couple of time during the fight (every ~20-30 seconds). Mariselle will "despawn" first, along with his two pupils, and then respawn randomly somewhere in the room (the pupils also spawn randomly, sometimes all three are far apart after a teleport). Even if pulled outside the room, it will respawn somewhere in the room again, so this way of avoiding Fomor aggro is not recommended, but will work if you have sufficient Refresh and Curing magic.
- If one of your party hasn't reset Fomor hate, you will have to clear the room first, as pulling Old Professor Mariselle out of the room does work, but can take a considerably long amount of time, and you will take extra damage as he casts on you from inside the room before coming forward.
- It's possible to have a summoned avatar, beastmaster pet, or automaton to draw him out after teleporting, as they will still have hate on him.
- If everyone has reset their fomor hate, don’t use AoE abilities to avoid unwanted aggro.
- The Mariselle's Pupils are weak. However, if you kill them, Old Professor Mariselle will summon more. They CANNOT be slept.
- DO NOT use Tractor, if you do then you will have to get the ??? and kill this NM again.
- Kill Old Professor Mariselle and check the ??? again for the Reliquiarium Key. Any ??? on any of the desks in the rooms will allow you to obtain the Reliquiarium Key.
- Proceed back to the locked door and open it with your second Coral Crest Key and the original Sealion Crest Key, using the same method as before. Alternatively, simply have someone operate the switch on the other side.
- Click on the Wooden Gate again to end the mission.
- Once the cutscene is over, you will end up on the other side of the Wooden Gate, unable to open it from that side.
Game Description
- Mission Orders
- Now that you have learned the Wyrmking's plan, you must travel to the fourth mothercrystal. Nag'molada has informed you where the stone lies. However, you will need the amulet you lent to Prishe before you are to make your way there.