mNo edit summary |
|||
| (48 intermediate revisions by 22 users not shown) | |||
| Line 15: | Line 15: | ||
| next = [[The Secrets of Worship]] |
| next = [[The Secrets of Worship]] |
||
| cutscenes = |
| cutscenes = |
||
| − | {{Mission/Cutscene|The Savage|[[Goblin Footprint]] |
+ | {{Mission/Cutscene|The Savage|[[Goblin Footprint]] {{Location|Misareaux Coast|K-10}}}} |
{{Mission/Cutscene|The Savage (pt.1)|[[Goblin Footprint]] [[Monarch Linn]]}} |
{{Mission/Cutscene|The Savage (pt.1)|[[Goblin Footprint]] [[Monarch Linn]]}} |
||
{{Mission/Cutscene|The Savage (pt.2)|[[Goblin Footprint]] [[Monarch Linn]]}} |
{{Mission/Cutscene|The Savage (pt.2)|[[Goblin Footprint]] [[Monarch Linn]]}} |
||
| − | {{Mission/Cutscene|The Savage|[[Latteaune]] |
+ | {{Mission/Cutscene|The Savage|[[Latteaune]] {{Location|Tavnazian Safehold|H-6}}}} |
}} |
}} |
||
== Walkthrough == |
== Walkthrough == |
||
| − | As of the 6/21/2010 patch, there is no longer a level restriction in [[Riverne - Site B01]]. The entire mission can be soloed/duoed by most jobs at level 75+. Please be aware that there are now high level enemies (VT-IT to lv 75+) in these areas so caution not to cause aggro is still advised. |
||
| − | Note: Although mistmelts are not required for this in uncapped fight, it makes it much faster. Without them he can stay up in the air for 3-5 minutes at a time dropping to earth for only a moment or too dragging this out needlessly. Optionally bring magic/range weapons that can hit from a distance. |
||
| + | ''Side note: A [[Further Founts|geomagnetic fount]] can be found just beyond where you enter Monarch Linn, although it's not as useful now that there's a [[Home Point]].'' |
||
| − | *Head to [[Riverne - Site B01|Riverne - Site #B01]] for a cut scene. |
||
| − | **You'll need a single [[Giant Scale]] to pass through an ''Unstable Displacement'' to get to Monarch Linn. |
||
| − | **If you are trying to head to [[Riverne - Site A01]] Before getting the cut scene, You have to get the cutscene and warp to [[Riverne - Site B01]] first. {{Verification}} |
||
| ⚫ | |||
| − | **Going back and to the #A01 Side of [[Monarch Linn]] doesn't work. |
||
| − | *Enter the BCNM and fight [[Ouryu]]. |
||
| ⚫ | |||
| − | **'''Note:''' Normal buffs wear off when entering the BCNM - food will stay. |
||
| ⚫ | |||
| − | *You'll return at the exit for [[Monarch Linn]] and can either come back to the entrance of [[Monarch Linn]] or exit out. |
||
| − | *Head back to [[Tavnazian Safehold]] and talk to [[Justinius]](J-6) again for a cutscene. |
||
| + | * Head to [[Riverne - Site B01|Riverne - Site #B01]] via the ''Dilapidated Gate'' at ({{Location Tooltip|area=Misareaux Coast|pos=F-7}}) of [[Misareaux Coast]] for a cutscene. |
||
| ⚫ | |||
| + | ** You can go to the [[Riverne - Site A01|Riverne - Site #A01]] [[Home Point]] and use [[Escape]], exit through the gate and then re-enter to get the cutscene. |
||
| ⚫ | |||
| ⚫ | |||
| − | :*His TP attacks: |
||
| + | ** Enter the first Spatial Displacement. |
||
| ⚫ | |||
| + | ** The [[Wyverns]] in this area drop [[Giant Scale]]s. You will need one to reach Monarch Linn, two if you want to activate the geomagnetic fount. Be careful of the Blazedrakes, as they will sight aggro at any level. |
||
| − | :::*'''[[Absolute Terror]]''': [[Terror]]izes the target for a few seconds, making them unable to do anything. |
||
| + | ** Travel westward to the Unstable Displacement at ({{Location Tooltip|area=Riverne - Site B01|pos=G-7}})/({{Location Tooltip|area=Riverne - Site B01|pos=H-8}}) and trade a Giant Scale to it. Continue northwest to the Spatial Displacement at ({{Location Tooltip|area=Riverne - Site B01|pos=F-6}}). |
||
| ⚫ | |||
| + | *** To unlock the geomagnetic fount, continue southwest and enter the Spatial Displacement at the tip of ({{Location Tooltip|area=Riverne - Site B01|pos=E-7}}), then trade your second Giant Scale to the Unstable Displacement in front of you, then continue south through the next Spatial Displacement until you find the Stone Monument. The fount is just behind it. |
||
| ⚫ | |||
| + | ** Enter the Spatial Displacement on the southeast side of ({{Location Tooltip|area=Riverne - Site B01|pos=E-7}}). Monarch Linn is just ahead. |
||
| ⚫ | |||
| + | * Enter the battlefield for '''The Savage'''. {{testimonials}} |
||
| ⚫ | |||
| + | * After defeating Ouryu, head to [[Tavnazian Safehold]] ([[Home Point]] #3) and talk to [[Justinius]] at ({{Location Tooltip|area=Tavnazian Safehold|map=Map 2|pos=J-6}}) on the upper level for a cutscene. |
||
| ⚫ | |||
| ⚫ | |||
| ⚫ | |||
| − | :::*[[Ouryu]] has very high evasion when in the air. |
||
| − | ::*'''[[Touchdown]]''': Not based on TP, used when he lands (though not if a [[Mistmelt]] was used to ground him). [[AoE]] magic damage (element unknown, ~140 each). |
||
| − | :*His spells: |
||
| ⚫ | |||
| ⚫ | |||
| ⚫ | |||
| ⚫ | |||
| ⚫ | |||
| − | *He alternates between flying and standing every two minutes. |
||
| ⚫ | |||
| − | *He will regenerate to full health if your party wipes. |
||
| − | *Bring [[Ouryu]] to the ground with [[Mistmelt]], which is obtained from the quest [[Fly High]]. You can also buy them at the [[Auction House]] in section Materials/Goldsmithing. |
||
| − | **Being earth-based, Ouryu has an extremely high resistance to Stun in all its forms. [[Leg Sweep]], [[Head Butt]] and the [[Stun]] spell all appear to have no effect. |
||
| ⚫ | |||
| − | '''Testimonials with Level Cap removed''': |
||
| + | '''This battlefield is no longer level capped. Any solo-friendly job setup can handle Ouryu with ease. If you are attempting this at a lower level, it is recommended to bring 2-6 [[Mistmelt]]s. These can be obtained via the [[Fly High]] quest.''' |
||
| − | |||
| − | Please see (and use) the [[Talk:The_Savage|discussion page]] for testimonials. |
||
| + | * Buffs will wear off upon entry. |
||
| ⚫ | |||
| ⚫ | |||
| ⚫ | |||
| ⚫ | |||
| + | * Alternates from being on the ground and in the air. The maximum duration of each phase is two minutes. |
||
| ⚫ | |||
| + | ** '''While Ouryu is in the air, all melee attacks will miss.''' |
||
| + | *** [[Dragoon]] Jump attacks will still connect. |
||
| + | *** If you are using [[Curing Waltz]] as your primary heal source, it is wise to keep your TP high in preparation for his flight mode. |
||
| + | ** [[Mistmelt]] can be used to temporarily force Ouryu back to the ground. |
||
| + | * Ouryu has an extremely high resistance against Stun effects. |
||
| + | * Special Attacks: |
||
| ⚫ | |||
| + | *** '''[[Absolute Terror]]''': Inflicts [[Terror]], halting all actions until it wears. |
||
| ⚫ | |||
| ⚫ | |||
| ⚫ | |||
| ⚫ | |||
| ⚫ | |||
| ⚫ | |||
| ⚫ | |||
| + | *** '''[[Touchdown]]''': Area attack dealing magical damage. Used when landing if a [[Mistmelt]] was not used. |
||
| + | ** Magic: |
||
| ⚫ | |||
| ⚫ | |||
| ⚫ | |||
| ⚫ | |||
| + | * You'll return to the entrance of [[Monarch Linn]]. The Spatial Displacement will let you return to Riverne, or warp you straight to [[Misareaux Coast]]. |
||
| + | **If you return to Riverne, you can use the [[Home Point]] there. |
||
{{Mission/Description |
{{Mission/Description |
||
| Line 73: | Line 75: | ||
{{spoiler2}} |
{{spoiler2}} |
||
| − | |||
| − | == Game Script and cutscene video == |
||
| − | [http://files.filefront.com/COP+4+2+The+Savagewmv/;9843847;/fileinfo.html COP 4-2 Video] |
||
Revision as of 12:08, 8 December 2019
| Mission Name | The Savage |
|---|---|
| Number | PM4-2 |
| Title Granted | Mist Melter Nag'molada's Underling |
| Items Needed | Giant Scale |
| Reward | 1500 EXP |
| ← Previous Mission | Next Mission → |
|---|---|
| Sheltering Doubt | The Secrets of Worship |
| Replay Cutscenes | |
|---|---|
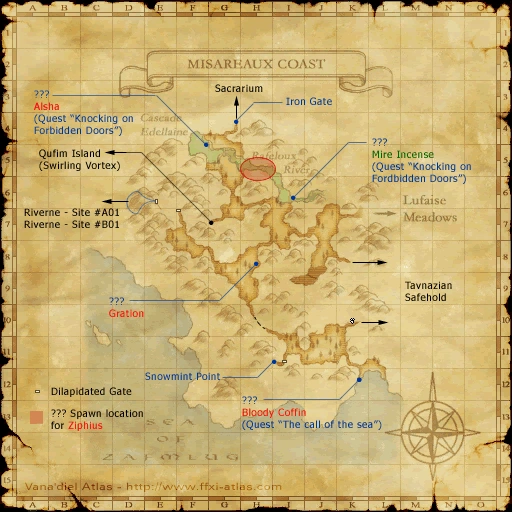
| The Savage | Goblin Footprint Misareaux Coast (K-10) |
| The Savage (pt.1) | Goblin Footprint Monarch Linn |
| The Savage (pt.2) | Goblin Footprint Monarch Linn |
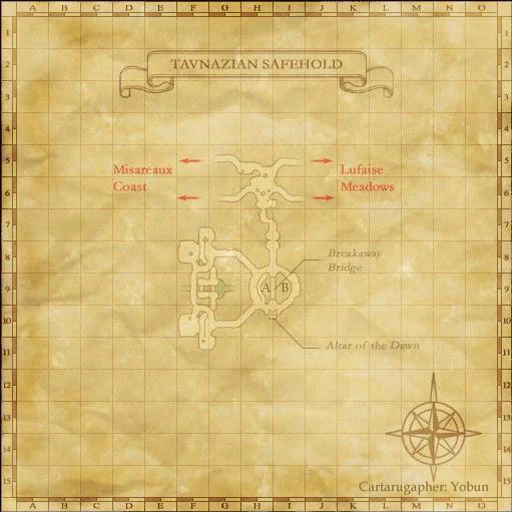
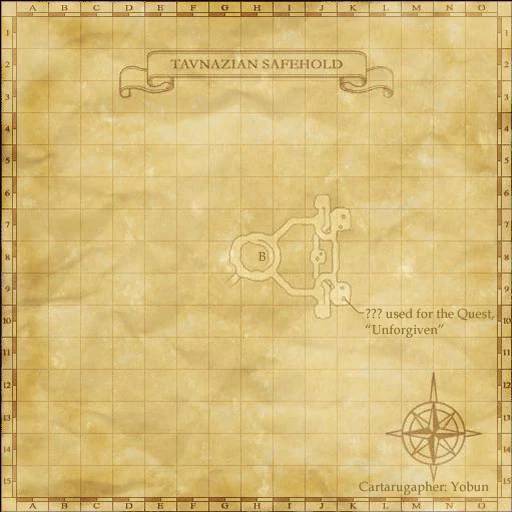
| The Savage | Latteaune Tavnazian Safehold (H-6) |
Walkthrough
Side note: A geomagnetic fount can be found just beyond where you enter Monarch Linn, although it's not as useful now that there's a Home Point.
- Head to Riverne - Site #B01 via the Dilapidated Gate at (F-7) of Misareaux Coast for a cutscene.
- You can go to the Riverne - Site #A01 Home Point and use Escape, exit through the gate and then re-enter to get the cutscene.
- Proceed to Monarch Linn.
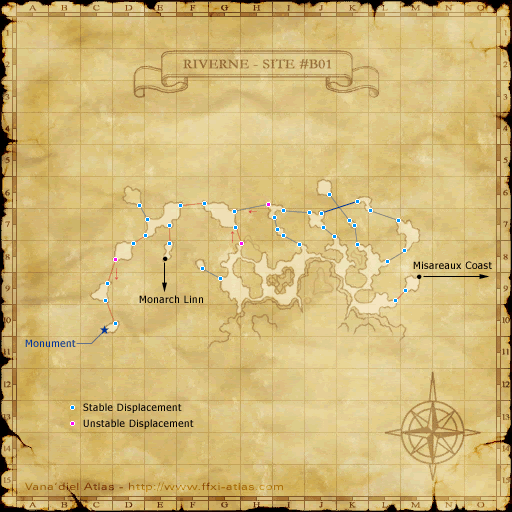
- Enter the first Spatial Displacement.
- The Wyverns in this area drop Giant Scales. You will need one to reach Monarch Linn, two if you want to activate the geomagnetic fount. Be careful of the Blazedrakes, as they will sight aggro at any level.
- Travel westward to the Unstable Displacement at (G-7)/(H-8) and trade a Giant Scale to it. Continue northwest to the Spatial Displacement at (F-6).
- To unlock the geomagnetic fount, continue southwest and enter the Spatial Displacement at the tip of (E-7), then trade your second Giant Scale to the Unstable Displacement in front of you, then continue south through the next Spatial Displacement until you find the Stone Monument. The fount is just behind it.
- Enter the Spatial Displacement on the southeast side of (E-7). Monarch Linn is just ahead.
- Enter the battlefield for The Savage. (see testimonials)
- After defeating Ouryu, head to Tavnazian Safehold (Home Point #3) and talk to Justinius at (J-6) on the upper level for a cutscene.
Ouryu
This battlefield is no longer level capped. Any solo-friendly job setup can handle Ouryu with ease. If you are attempting this at a lower level, it is recommended to bring 2-6 Mistmelts. These can be obtained via the Fly High quest.
- Buffs will wear off upon entry.
- The time limit for this fight is 30 minutes.
- Ouryu is immune to earth-based effects and spells.
- Ouryu will give up at about 30% health, meaning you need to inflict approximately 6000 points of damage.
- Can use Invincible at about 75% - 95% HP.
- Alternates from being on the ground and in the air. The maximum duration of each phase is two minutes.
- On the ground, Ouryu's attacks deal physical damage. In the air they deal earth elemental damage, and ignore shadow images, Invincible and any form of physical damage reduction.
- While Ouryu is in the air, all melee attacks will miss.
- Dragoon Jump attacks will still connect.
- If you are using Curing Waltz as your primary heal source, it is wise to keep your TP high in preparation for his flight mode.
- Mistmelt can be used to temporarily force Ouryu back to the ground.
- Ouryu has an extremely high resistance against Stun effects.
- Special Attacks:
- On the ground:
- Absolute Terror: Inflicts Terror, halting all actions until it wears.
- Geotic Breath: Cone Attack dealing Earth damage.
- Horrid Roar: Single target attack with a Dispel effect removing up to 15 buffs, including food. Also resets enmity.
- Spike Flail: Area attack dealing physical damage. Used only if someone behind it has hate. Absorbed by shadow images.
- Typhoon Wing: Frontal area attack dealing physical damage and inflicting Blindness.
- In the air:
- Magic:
- On the ground:
- After defeating Ouryu for the first time, your title will become Mist Melter.
- You'll return to the entrance of Monarch Linn. The Spatial Displacement will let you return to Riverne, or warp you straight to Misareaux Coast.
- If you return to Riverne, you can use the Home Point there.
Game Description
- Mission Orders
- Ulmia is determined to know the truth, and is ready to revisit Bahamut to learn it. Enlist the aid of Tenzen and Justinius to help you find Ulmia before something terrible occurs.