(→Guides) |
mNo edit summary Tag: Visual edit |
||
| (34 intermediate revisions by 26 users not shown) | |||
| Line 1: | Line 1: | ||
[[category:Missions]][[Category:San d'Oria Missions]] |
[[category:Missions]][[Category:San d'Oria Missions]] |
||
[[de:San d'Oria-Mission 5-1]] |
[[de:San d'Oria-Mission 5-1]] |
||
| + | {{Mission |
||
| − | {|cellpadding="5" width="100%" |
||
| + | | name = The Ruins of Fei'Yin |
||
| − | |width="70%" valign="top"| |
||
| + | | number = 5-1 |
||
| − | {|border="0" width="80%" cellpadding="0" cellspacing="3" |
||
| + | | npc = Any [[San d'Orian Gate Guard]] |
||
| − | |valign="top" BGCOLOR="#ceffc7"| '''Mission Name:''' |
||
| + | | requirements = |
||
| − | |valign="top" BGCOLOR="#deffd9"| The Ruins of Fei'Yin |
||
| + | | level = Uncapped |
||
| − | |- |
||
| + | | title = Archmage Assassin |
||
| − | |valign="top" BGCOLOR="#ceffc7"| '''Start NPC:''' |
||
| + | | reward = Rank points |
||
| − | |valign="top" BGCOLOR="#deffd9"| Any [[San d'Orian Gate Guard]] |
||
| + | | items = {{KeyItem}}[[New Fei'Yin Seal]]<br>{{KeyItem}}[[Burnt Seal]] |
||
| − | |- |
||
| + | | repeatable = |
||
| − | |valign="top" BGCOLOR="#ceffc7"| '''Requirements:''' |
||
| + | | parent = |
||
| − | |valign="top" BGCOLOR="#deffd9"| '''Mission:''' [[Magicite (San d'Oria)|4-1]] |
||
| + | | children = |
||
| − | |- |
||
| + | | previous = [[Magicite (San d'Oria)|Magicite]] |
||
| − | |valign="top" BGCOLOR="#ceffc7"| '''Suggested Level:''' |
||
| + | | next = [[The Shadow Lord]] |
||
| − | |valign="top" BGCOLOR="#deffd9"| 50 |
||
| + | | cutscenes = |
||
| − | |- |
||
| + | {{Mission/Cutscene|The Ruins of Fei'Yin (pt.1)|[[Chaloutte]] [[Chateau d'Oraguille]] (I-9)}} |
||
| − | |valign="top" BGCOLOR="#ceffc7"| '''Title:''' |
||
| + | {{Mission/Cutscene|The Rank 5 Mission|[[Goblin Footprint]] [[Fei'Yin]] (F-11)}} |
||
| − | |valign="top" BGCOLOR="#deffd9"| Archmage Assassin |
||
| + | {{Mission/Cutscene|The Rank 5 Mission|[[Goblin Footprint]] [[Qu'Bia Arena]]}} |
||
| − | |- |
||
| + | {{Mission/Cutscene|The Ruins of Fei'Yin (pt.2)|[[Chaloutte]] [[Chateau d'Oraguille]] (I-9)}} |
||
| − | |valign="top" BGCOLOR="#ceffc7"| '''Repeatable:''' |
||
| + | {{Mission/Cutscene|The Ruins of Fei'Yin (pt.3)|[[Chaloutte]] [[Chateau d'Oraguille]] (I-9)}} |
||
| − | |valign="top" BGCOLOR="#deffd9"| No |
||
| + | }} |
||
| − | |- |
||
| − | |valign="top" BGCOLOR="#ceffc7"| '''Reward:''' |
||
| − | |valign="top" BGCOLOR="#deffd9"| Rank 5-2 |
||
| − | |- |
||
| − | |valign="top" BGCOLOR="white"| |
||
| − | |valign="top" BGCOLOR="white"| |
||
| − | |- |
||
| − | |valign="top" BGCOLOR="#ceffc7"| '''Previous Mission:''' |
||
| − | |valign="top" BGCOLOR="#deffd9"| [[Magicite (San d'Oria)|Magicite]] |
||
| − | |- |
||
| − | |valign="top" BGCOLOR="#ceffc7"| '''Next Mission:''' |
||
| − | |valign="top" BGCOLOR="#deffd9"| [[The Shadow Lord]] |
||
| − | |- |
||
| − | |valign="top" BGCOLOR="white"| |
||
| − | |valign="top" BGCOLOR="white"| |
||
| − | |- |
||
| − | |valign="top" BGCOLOR="white"| '''Replay Cutscene''' |
||
| − | |valign="top" BGCOLOR="white"| |
||
| − | |- |
||
| − | |valign="top" BGCOLOR="#ceffc7"| '''The Ruins of Fei'Yin (pt.1)''' |
||
| − | |valign="top" BGCOLOR="#deffd9"| [[Chaloutte]] [[Chateau d'Oraguille]] (I-9) |
||
| − | |- |
||
| − | |valign="top" BGCOLOR="#ceffc7"| '''The Rank 5 Mission''' |
||
| − | |valign="top" BGCOLOR="#deffd9"| [[Goblin Footprint]] [[Fei'Yin]] (F-11) |
||
| − | |- |
||
| − | |valign="top" BGCOLOR="#ceffc7"| '''The Rank 5 Mission''' |
||
| − | |valign="top" BGCOLOR="#deffd9"| [[Goblin Footprint]] [[Qu'Bia Arena]] |
||
| − | |- |
||
| − | |valign="top" BGCOLOR="#ceffc7"| '''The Ruins of Fei'Yin (pt.2)''' |
||
| − | |valign="top" BGCOLOR="#deffd9"| [[Chaloutte]] [[Chateau d'Oraguille]] (I-9) |
||
| − | |- |
||
| − | |valign="top" BGCOLOR="#ceffc7"| '''The Ruins of Fei'Yin (pt.3)''' |
||
| − | |valign="top" BGCOLOR="#deffd9"| [[Chaloutte]] [[Chateau d'Oraguille]] (I-9) |
||
| − | |- |
||
| − | |} |
||
| − | |width="30%" valign="top"| |
||
| − | __TOC__ |
||
| − | |} |
||
| − | ---- |
||
| − | === Walkthrough === |
||
| − | :''Note: If you've started the Aht Urhgan Mission 5: Confessions of Royalty, you must complete that Aht Urhgan mission before you can speak to Halver to obtain the [[Key Item]]: [[New Fei'Yin Seal]].'' |
||
| − | *Go to [[Chateau d'Oraguille]]; you will get a cutscene upon entering. |
||
| − | :*If you wish to change your [[allegiance]] at an [[Immigration NPC]], you must view this cutscene first. You will now be allowed to change nations. |
||
| − | *After the cutscene go to the Gate Guard and accept the mission, then return and speak to [[Halver]] and he will award you the [[Key Item]]: [[New Fei'Yin Seal]]. |
||
| − | :*'''Note - this mission cannot be completed without the New Fei'Yin Seal.''' |
||
| − | *Form a level 50+ party. You may use anyone from any nation currently on [[Mission]] 5-1, as it is the same for all 3 nations. |
||
| − | :*'''This fight is capped at level 50. All gear above the level cap will be [[Level Sync|synced]] down to 50.''' |
||
| − | :* Even if you've done this mission before with another nation, '''you must be''' on this mission or higher in your ''current'' nation to get in (otherwise, you will see "A mysterious force is sealing the platform."). {{verification}} |
||
| − | *The location of [[Fei'Yin]] is in the northeast corner of [[Beaucedine Glacier]]. Upon entering [[Fei'Yin]] your party will encounter another cutscene involving [[Zeid]] and [[Lion]]. |
||
| − | *Upon entering, head east towards (K-8). At (K-8) you will see 2 [[:category:dolls|dolls]]. There is a cermet gate on the east wall. Click on this gate and you will zone into [[Qu'Bia Arena]]. The majority of the mobs in [[Fei'Yin]] detect by sound, but there are several mobs that also aggro to magic, so [[Silent Oil]] is recommended. |
||
| − | *The boss is the skeleton [[Archlich Taber'quoan]], assisted by several minions. Once the archlich is defeated, the battle ends. |
||
| − | :*Buffs wear upon entering the battlefield. |
||
| − | :*You have 15 minutes to win this battlefield event. |
||
| − | :*The Archlich spawns along with two [[Ancient Sorcerer]]s (which hit for around 20 DMG to a 75 level Synced BRD using [[Tavnazian Taco]]). |
||
| − | :*The [[Ancient Warrior]]s will keep spawning no matter what, normally in sets of two (one skeleton followed shortly by the other). |
||
| − | :*[[Archlich Taber'quoan]] is a [[BLM]] type skeleton with [[Sleepga II]] and [[Freeze]], and will use the two-hour ability [[Manafont]] at some point. |
||
| − | ::*The use of [[Poison Potion]]s is recommended to prevent being slept during the fight. |
||
| − | :*He is susceptible to most enfeebles including [[Silence]]. |
||
| − | :*The skeletons can easily be slept by a BLU's [[Sheep Song]], WHM's [[Repose]], or BRD's [[Lullaby]]. |
||
| − | :*The [[Great Sword]] [[Weapon Skill]] [[Shockwave]] is very useful against the minions, but you want to kite the minions not kill them. '''This tactic is dangerous.''' |
||
| − | :*Was able to one shot the [[Ancient Warrior]]s as RDM/WHM with [[Banish]] and did about 78 points of damage each with [[Divine Magic]] at level 108. |
||
| − | *After defeating [[Archlich Taber'quoan]], a cutscene will take place. At the end of the cutscene, you will receive the [[Key Item]]: [[Burnt Seal]]. |
||
| − | *Report back to [[Halver]]. |
||
| − | == |
+ | == Walkthrough == |
| + | ''Note: If you've started the Aht Urhgan Mission 5: Confessions of Royalty, you must complete that Aht Urhgan mission before you can speak to Halver to obtain the [[Key Item]]: [[New Fei'Yin Seal]].'' |
||
| − | :*Confirmed with MNK/NIN and RDM/WHM duo. (Jan. 7, 2010) |
||
| − | ::*MNK starts the battle by killing the two minions followed by engaging the Archlich. (Hundred Fist can be used to take out the two minions if you wish.) |
||
| − | ::*As the repops run up the hall switch target, one attack will suffice to kill them off. Store TP for use on the Archlich. (Autotarget is a huge help here for auto targeting the archlich once the repop dies.) |
||
| − | ::*RDM debuffs the archlich and keeps the mnk alive and free of status effects. If needed a banish will kill off the repops. |
||
| − | ::*MNK used a meat kabob rdm used mp boosting food. Other than that no items are needed for this fight. If you want to be extra safe though a couple yag drinks for the RDM would do it but altogether not needed. |
||
| − | :*Confirmed with PLD/BLU, BLU/NIN, and WHM/BLM. |
||
| − | ::*PLD engaged Archlich while BLU and WHM took out the two flanking minions. The minions that spawn after that are considerably weaker. Ignored the weak minions as they continuously re-spawn. |
||
| − | ::*MP Drinks will definitely prove useful. WHM also used a few ethers. |
||
| − | :*Confirmed with well geared RDM/DRG, RDM/WAR, BLU/NIN or BLU/DRG |
||
| − | ::* Use defense food and mp drinks (ethers and hi-pots too for emergencies). Merits help but not required. |
||
| − | ::* Begin the fight by killing the first minions and then focus on the lich, kill new minions as they spawn. |
||
| − | :*Successful strategy: 50THF 50DRK 50RDM 50BLM 46WHM 45PLD. DRK ran in first to get aggro from the addons. THF & PLD ran in to attack Archlich. BLM helped DRK kill the addons. RDM kept Archlich dispelled and silenced. Do not attempt to sleepga addons. By the end of the fight, all members still had a decent amount of HP & MP. Good Luck! |
||
| − | :*Confirmed with MNK/NIN, WHM/BLM, and BLM/WHM. |
||
| − | ::*MNK fought Archlich and used [[Spinning Attack]] everytime he had TP. BLM used tier I -aga's on Archlich to wipe minions that the MNK didn't get. The WHM was gearless and Elvaan. The BLM took turns healing while WHM rested. No 2 hours were used for win. |
||
| − | :*Confirmed with PLD/WAR, DRG/BLU, WHM/BLM, BLM/RDM. |
||
| − | ::DRG tanks Archlich while PLD kills all lesser skeletons. BLM nukes while WHM keeps the DRG alive. After skeletons have been dispatched in the main room (Circle Blade will one-shot them), PLD stands in the hallway and kills additional spawns. Very easy win. |
||
| − | :*Confirmed with PLD/BLU, MNK/NIN, and RDM/WHM. |
||
| − | :: All 3 wore [[Level Sync]] gear. PLD and MNK both eat [[Tavnazian Taco | Tavnazian Tacos]]. PLD engages first, and MNK 2HRs the initial adds. Both adds start with [[Ice Spikes]], so a [[Dispel]] or constant [[Paralyna]] is required. After the initial adds are dead, concentrate on the Archlich. MNK uses [[Spinning Attack]] when the Warrior adds run to the circle. Barring anything unexpected, the Archlich should go down without much of a fight. |
||
| − | :*Confirmed with PLD/WAR, BLU/NIN, and BLM/WHM (7/8/09) |
||
| − | :: PLD ran in first to attract aggro, voked the Archlich and proceeded to attack one of the skeleton mages. BLU ran in right after and dispelga'd and sheep song'd the both of them. All three of us worked to take out the mages, one by one. BLU Bludgeoned, BLM nuked and banished all skeletons. Once initial adds were dead, PLD and BLU worked to meele the Archlich while BLM kept PLD paralyna'd, and Archlich silenced and banished. Circle blade and -aga nukes took care of the respawning adds. All 3 used 2HRs in order to put out enough damage to kill it. MP management was the biggest issue, would have been easy if we brought some Ethers or Yag Drinks. |
||
| − | :*Confirmed with BLU50/25NIN, SAM50/25DNC, and 41WHM/20BLM. |
||
| − | :: All 3 wore our regular gear, before level sync, (65BLU, 58SAM, 41WHM.)Sushi for the BLU and Meat Mithkabob for the SAM |
||
| − | :: Buffed up Shellra II Protectra II Reraise Refueling Utsusemi while the SAM Meditated. Sam Engaged first running up and attacking the Arch Lich, BLU ran up and Sheep Songed, which was partially resisted. Head Butted when AoE Sleepga or other AoE spells were used by Arch Lich, the minnions were mostly ingnored as the second Sheep Song and the rest went unresisted for the rest of the battle. No 2-Hours or Yag Drinks were used as it was a dry run. BLU and WHM ran out of MP at about 5% of Arch Liches HP, didnt prove to be a problem with only 2 Curing Waltz needed before Arch Lich died. Moderately Easy fight, trioable by most when including a BLU. |
||
| − | :*Confirmed with BLU/NIN PLD/WAR RDM/WHM (10/26/09) |
||
| − | :: Wore our regular Gears, AF for the PLD and BLU and moderate gear for the RDM[52 -before entry]. No food was consumed ::upon entry, BLU was refreshed and took both BLM adds at the start, Blunt spell damage spells like Bludgeon, Smite of ::Rage, Battle Dance, and Headbutt are recommended, RDM keeps BLU and Paladin up with refresh and occasional cures. BLU ::finished off BLMs then jumped to the boss while AoEing the small warrior adds down with Grandslam, Circleblade, Battle ::Dance, Smite of Rage etc. Fight went off without a hitch, paralysis made things slightly difficult for PLD to hold hate ::once BLU joined the main boss, but no other issues beyond that. |
||
| − | ---- |
||
| + | #{{Location Tooltip|area=Northern San d'Oria|text=Northern San d'Oria (I-7)|pos=I-7}} - Enter [[Chateau d'Oraguille]] for a cutscene. |
||
| − | ===Game Description=== |
||
| + | #*If you wish to change your [[allegiance]] at an [[Immigration NPC]], you must view this cutscene first to be allowed to change nations. |
||
| − | :;Mission Orders:This mission involves travelling to [[Fei'Yin]], located on the [[Beaucedine Glacier]]. Visit [[Chateau d'Oraguille]] to learn more. |
||
| + | #[[San d'Oria]] - Go to a Gate Guard and accept the mission. |
||
| − | ---- |
||
| + | #{{Location Tooltip|area=Northern San d'Oria|text=Northern San d'Oria (I-7)|pos=I-7}} - Return to [[Halver]] to obtain a {{KeyItem}}[[New Fei'Yin Seal]]. |
||
| + | #*'''Note - this mission cannot be completed without the New Fei'Yin Seal.''' |
||
| + | #Enter [[Fei'Yin]] for a cutscene involving [[Zeid]] and [[Lion]]. |
||
| + | #*Path to reach Fei'Yin for the first time: {{Location Tooltip|area=East Ronfaure|text=East Ronfaure (K-4)|pos=K-4}} > {{Location Tooltip|area=Ranguemont Pass|text=Ranguemont Pass (L-4)|pos=L-4}} > {{Location Tooltip|area=Beaucedine Glacier|text=Beaucedine Glacier (J-4)|pos=J-4}} |
||
| + | #**Ranguemont Pass has tight walls so you most likely need sneak/invis if you're a low-level. |
||
| + | #**Beaucedine to Fei'Yin walking tips: after exiting Ranguemont, |
||
| + | #***head north to Tower (2) |
||
| + | #***don't go up to tower (4) but keep going east to find a thin ridge that goes north |
||
| + | #***Go north along the ridge and find and go down a slope |
||
| + | #***Go south to find another down slope |
||
| + | #***Go north past tower (5) to eventually reach Fei'Yin. |
||
| + | #{{Location Tooltip|area=Fei'Yin|text=Fei'Yin (K-8)|pos=K-8}} - Upon entering head east. You will see 2 [[:category:dolls|dolls]]. There is a cermet gate on the east wall. Click on this gate to enter [[Qu'Bia Arena]]. |
||
| + | #*The majority of the monsters in [[Fei'Yin]] detect by sound, but there are several monsters that also aggro to magic, so [[Silent Oil]] is recommended. |
||
| + | #*If you have been here before and checked the [[Home Point]] outside of the BCNM area, you can just teleport here. |
||
| + | #Win the battle (see below) to obtain {{KeyItem}}[[Burnt Seal]]. |
||
| + | #*Form a level 50+ party. You may use anyone from any nation currently on [[Mission]] 5-1, as it is the same for all 3 nations. |
||
| + | #**'''There is no longer a level 50 cap on this mission.''' |
||
| + | #** Even if you've done this mission before with another nation, '''you must be''' on this mission or higher in your ''current'' nation to help others (otherwise, you will see "A mysterious force is sealing the platform."). {{verification}} |
||
| + | #Report back to [[Halver]]. |
||
| + | #* (Optional) Talk to Prince [[Trion]] for an additional cut scene. |
||
| + | #* (Optional) Talk to [[Rahal]] and [[Curilla]] for additional dialogue. If you have not received [[Trust: Curilla]] yet, you may get this dialogue first. Also, if you haven't completed [[The General's Secret]], [[Curilla]] may refuse to give you the additonal dialogue until [[The General's Secret]] is completed. |
||
| + | ===The Battle=== |
||
| + | *The boss is the skeleton [[Archlich Taber'quoan]], assisted by several minions. |
||
| + | **Once the archlich is defeated, the battle ends. |
||
| + | *Buffs wear upon entering the battlefield. |
||
| + | *You have 15 minutes to win this battlefield event. |
||
| + | *The Archlich spawns along with two [[Ancient Sorcerer]]s. |
||
| + | *The [[Ancient Warrior]]s keep spawning no matter what, normally in sets of two (one skeleton followed shortly by the other). |
||
| + | *[[Archlich Taber'quoan]] is a [[BLM]] skeleton with [[Sleepga II]], [[Paralyze]] and [[Freeze]], and uses [[Manafont]] at some point. |
||
| + | **The use of [[Poison Potion]]s is recommended to prevent being slept during the fight. |
||
| + | *He is susceptible to most enfeebling effects including [[Silence]]. |
||
| + | *The skeletons can easily be slept by a BLU's [[Sheep Song]], WHM's [[Repose]], or BRD's [[Lullaby]]. |
||
| + | *The [[Great Sword]] [[Weapon Skill]] [[Shockwave]] is very useful against the minions. |
||
| + | *{{testimonials}} |
||
| + | *After defeating [[Archlich Taber'quoan]], you receive a cutscene and a {{KeyItem}}[[Burnt Seal]]. |
||
| − | ===Game Script=== |
||
| − | {{spoiler3 |
||
| − | | spoiler = |
||
| − | ====<u>[[Chateau d'Oraguille]]</u>==== |
||
| − | [[Curilla]] : Hello, <Player Name>. You've rushed back from [[Jeuno]] upon hearing the news, right? Well, we've taken care of those bandits already.<br> |
||
| − | [[Curilla]] : Well, [[Halver]] is exaggerating again, with talk of a botched assassination. What could he mean by the king falling unconscious? Surely he is not calling adventurers to the chateau over such nonsense!<br> |
||
| − | [[Curilla]] : Such brigands cannot stand before the might of the Temple Knights! His whisperings dishonor our nations. Do you not agree?<br> |
||
| + | {{Mission/Description |
||
| − | ''The door to the Grand Hall opens and the King emerges.''<br> |
||
| + | | orders = This mission involves travelling to [[Fei'Yin]], located on the [[Beaucedine Glacier]]. Visit [[Chateau d'Oraguille]] to learn more. |
||
| + | }} |
||
| + | {{spoiler2}} |
||
| − | [[Destin]] : [[Curilla]]? Are you there?<br> |
||
| − | [[Curilla]] : Yes, Your Majesty!<br> |
||
| − | [[Destin]] : Ah, very good. Your leadership was exemplary, as always. Thanks to you, I may focus on my duties. <br> |
||
| − | [[Curilla]] : You are too kind, Your Majesty.<br> |
||
| − | [[Destin]] : However, [[Curilla]], there seems to be something you overlooked.<br> |
||
| − | [[Curilla]] : Your Majesty?<br> |
||
| − | [[Destin]] : During the uproar, someboday made off with the talisman!<br> |
||
| − | |||
| − | ''Halver approaches.''<br> |
||
| − | |||
| − | [[Halver]] : The talisman, Your Majesty? Not the one that keeps the Shadow Lord imprisoned!<br> |
||
| − | [[Destin]] : The very one. We were visited by an infiltrator while our eyes were on the brigands.<br> |
||
| − | [[Curilla]] : So, the intruders were but a decoy...<br> |
||
| − | [[Destin]] : I suspected them so.<br> |
||
| − | [[Halver]] : And who might know of the talisman's existence, even among San d'Orians? Your Majesty, I fear someone bent on bringing the Shadow Lord back from his exile did this!<br> |
||
| − | [[Destin]] : But before we track down this infiltrator, first must we thwart their sinister plot. Halver, let us decide on a plan of action.<br> |
||
| − | [[Destin]] : [[Curilla]], be not disheartened; by no means was this your fault. Call off the alert, and return to you regular duties.<br> |
||
| − | [[Destin]] : Well, <Player Name>, your help is needed yet again. [[Halver]] will convey my orders soon enough... Remembers, you have our thanks!<br> |
||
| − | |||
| − | ''[[Destin]] returns to the Grand Hall leaving [[Halver]] and [[Curilla]] with you.''<br> |
||
| − | |||
| − | [[Halver]] : We shall being immediate discussion on a policy for action. <Player Name>, you must work on improving your skills and equipments.<br> |
||
| − | [[Halver]] : Speak naugh of the attempt on the king's life, nor of this business with the Shadow Lord, lest panic grip the kingdom!<br><br> |
||
| − | |||
| − | |||
| − | ====<u>Gate, [[San d'Oria]]</u>==== |
||
| − | [[San d'Orian Gate Guard]] : There you are! I've been looking for you. Monarlais [[Halver]] requests your presence at the chateau immediately.<br> |
||
| − | [[San d'Orian Gate Guard]] : It sounds as if this is a fairly important mission. I need not remind you that you should take care to properly equip yourself before embarking on this journey.<br> |
||
| − | |||
| − | ''You accept the mission.''<br> |
||
| − | |||
| − | [[San d'Orian Gate Guard]] : I'm not sure what it's about, but you'd best make hast. The monarlais is not to be kept waiting!<br><br> |
||
| − | |||
| − | ====<u>[[Chateau d'Oraguille]]</u>==== |
||
| − | [[Halver]] : We've come to a decision at last, <Player Name>. We will send an expedition to the accursed Northlands.<br> |
||
| − | [[Halver]] : It will go to the ancient ruins of [[Fei'Yin]], northeast of the [[Beaucedine Glacier]]. Of course, you'll be going, too.<br> |
||
| − | [[Halver]] : The ruins are those of a city build by an ancient civilization that we believe was more advanced than our own.<br> |
||
| − | [[Halver]] : The race that lived there called themselves the [[Zilart]]. We have found similar ruins in [[Cape Teriggan]] to the south.<br> |
||
| − | [[Halver]] : Amazingly they both remain, though they were build long ago. It is as if some unseen force defies time to protect them.<br> |
||
| − | [[Halver]] : Once, thirty years ago, an international expedition was sent to the Northlands. They were to uncover the secret of the [[Zilart]]'s power.<br> |
||
| − | [[Halver]] : They returned empty-handed. We need you to head to the [[Beaucedine Glacier]] and scour the ruins of [[Fei'Yin]] yourself.<br> |
||
| − | [[Halver]] : The ruins are overrun with fiends, you know. We captured it from the [[Shadow Lord]] twenty years agao at the cost of many lives.<br> |
||
| − | [[Halver]] : We set a seal on the ruined coliseum to strengthen the barrier of the Northlands from the inside.<br> |
||
| − | [[Halver]] : You must find it, and use this new seal to strengthen its magic if necessary.<br> |
||
| − | [[Halver]] : Yes, I'm concerned about the Shadow Lord's return. But if the border falls and the nether beasts pass into our realm, all in this world will fall to ruin.<br> |
||
| − | |||
| − | ''You obtain a [[New Fei'Yin Seal]].''<br><br> |
||
| − | |||
| − | ====<u>[[Fei'Yin]]</u>==== |
||
| − | ''Upon entering [[Fei'Yin]] you see [[Lion]] and [[Zeid]] talking.''<br><br> |
||
| − | |||
| − | [[Zeid]] : Thrity years ago, the three nations--[[Windurst]], [[Bastok]], and [[San d'Oria]]--sent an expedition to investigate this cursed land.<br> |
||
| − | [[Zeid]] : The [[Galka]] swordsman [[Raogrimm]], the [[Hume]] monk [[Cornelia]], the [[Hume]] warrior [[Ulrich]]...<br> |
||
| − | [[Zeid]] : The [[Elvaan]] knight [[Francmage]], the [[Tarutaru]] white mage [[Iru-Kuiru]], and the [[Mithra]] ranger [[Yow Rabntah]] were the members of the expedition.<br> |
||
| − | [[Zeid]] : All of them great heroes of their people. But they had to cut the expedition short when an accident claimed two of their group.<br> |
||
| − | [[Zeid]] : [[Raogrimm]] and [[Cornelia]] were the ones who died in the accident. The others are said to have suffered violent deaths themselves after their return.<br> |
||
| − | [[Zeid]] : Perhaps they had awakened the curse that was said to be buried in this land... They may have called forth the ancient bane.<br> |
||
| − | [[Lion]] : The ancient bane... The Shadow of Darkness--an image of the [[Shadow Lord]]--told us...that our kinds were the ones that had awakened him.<br> |
||
| − | [[Lion]] : That he would spread the bane that will destroy [[Vana'diel]] from our cowardice, rage, envy, arrogance, and apathy...<br> |
||
| − | [[Zeid]] : His image? I see...<br> |
||
| − | [[Zeid]] : "The great bane will devour the fair land of [[Vana'diel]]..."<br> |
||
| − | [[Zeid]] : "The ancient seal will be broken, awakening nightmares of ages past."<br> |
||
| − | [[Zeid]] : "The blood of the innocents will soak the earth, and the world will fall into fear and despair."<br> |
||
| − | [[Lion]] : "But as one bright star shines through the clouds at night, and as one song rings clear above the roar of beasts, we hold to one hope in these darkest of times."<br> |
||
| − | [[Lion]] : That they will come, with the wisdom of ages and the strength of thousands, to deliver us from our plight. We await the awakening of the Warriors of the Crystal."<br> |
||
| − | [[Lion]] : That's an old song... It's called "The Warriors of the Crystal," isn't it?<br> |
||
| − | [[Zeid]] : Just an old wives' tale. I don't know why I mentioned it. I must go. I do not expect to find much, but something troubles me...<br> |
||
| − | |||
| − | ''[[Zeid]] departs down the hallway...'' |
||
| − | |||
| − | ''Upon winning the battle, [[Zeid]] appears...'' |
||
| − | |||
| − | [[Zeid]] : You fight well...but you should learn to pace yourself. Battles are won by those who can still swing their swords at the end of the day.<br> |
||
| − | [[Zeid]] : I am curious. What are you doing here? The beastmen have been acting strangely...were you asked to spy on them?<br> |
||
| − | [[Zeid]] : The seal of the Northlands? Ah, that thing those [[Tarutaru]] did at the end of the Great War...<br> |
||
| − | [[Zeid]] : I have seen no signs of it. It must have already been broken. Hmph. I wish I could see the look on your superiors' faces when they find out.<br> |
||
| − | [[Zeid]] : You say you have brought another seal? You should not have bothered, as they are useless.<br> |
||
| − | [[Zeid]] : Who am I? I am just a wandering knight. I do not care what the beastmen do--nor should you.<br> |
||
| − | [[Zeid]] : The [[Shadow Lord]] was killed twenty years ago and that is a fact. These rumors of him returning are just plain nonsense.<br> |
||
| − | [[Zeid]] : But Castle Zvahl is also called the Crossroad of Fates... And yet, it cannot be.<br><br> |
||
| − | |||
| − | ''You obtain the key item [[Burnt Seal]].''<br><br> |
||
| − | |||
| − | ====<u>[[Chateau d'Oraguille]]</u>==== |
||
| − | [[Halver]] : Why, welcome back, <Player Name>. I'm sure the lords of both knightly orders would like to hear your report right away.<br> |
||
| − | |||
| − | ''[[Curilla]] and [[Rahal]] gather to hear your report.''<br> |
||
| − | |||
| − | [[Halver]] : So, the seal of [[Fei'Yin]] is broken... We must face the prospect of nether beast laying siege this land, as did they two decades past.<br> |
||
| − | [[Curilla]] : Peculiar have been their actions of late, and now this... We must act swiftly.<br> |
||
| − | [[Rahal]] : Yes, but our obligation to the alliance denies unilateral deployment to lands abroad. Were not the Northlands reduced to askes in wars of old?<br> |
||
| − | [[Curilla]] : This does not bode well. Vigilantly we watched that land, and still this comes to pass!<br> |
||
| − | [[Rahal]] : Yes, I am afraid you are right. Our eyes were on the comings and goings of the Orcs, ignorant of the greater threat.<br> |
||
| − | [[Halver]] : And how should we explain this to our allies? [[San d'Oria]] cannot become the laughingstock of the civilized world!<br> |
||
| − | |||
| − | ''Prince [[Trion]] enters the conversation...''<br> |
||
| − | |||
| − | [[Trion]] : Are such words even necessary?<br> |
||
| − | [[Halver]] : Prince Trion!<br> |
||
| − | [[Trion]] : Before they hit us, let us hit them. A bold strike would hamper their momentum.<br> |
||
| − | [[Halver]] : But, my prince! By sending troops into the Norhtlands, we expose ourselves to a certain degree of diplomatic liability...<br> |
||
| − | [[Trion]] : Liability!? Fools! Are you all blind to this peril? The enemy approaches while we bicker!<br> |
||
| − | [[Rahal]] : Yes, Prince [[Trion]]... However, we should involve the king and Prince [[Pieuje]] in this decision.<br> |
||
| − | [[Trion]] : [[Curilla]], do you share the opinion of [[Halver]] and [[Rahal]]?<br> |
||
| − | [[Curilla]] : Yes, my prince. We know not the enemy's numbers. I believer the peril of rushing headlong into battle would be too great.<br> |
||
| − | [[Curilla]] : Indeed, word of the [[Shadow Lord]]'s return was brought to us by adventurers, and is as yet unconfirmed.<br> |
||
| − | [[Curilla]] : And if it did happen to be true, all the knights of [[San d'Oria]] would not be enough. We must confer with the alliance, my prince!<br> |
||
| − | [[Trion]] : Hmph. So be it! All this talk of diplomatic liability... There are people we must defend, and an enemy we must defeat. Naught matters but that simple truth!<br> |
||
| − | [[Trion]] : In such times, where could [[Pieuje]] be going?<br> |
||
| − | |||
| − | ''[[Trion]] departs...''<br> |
||
| − | |||
| − | [[Curilla]] : Prince [[Trion]]...<br> |
||
| − | |||
| − | ''[[Curilla]] and [[Rahal]] depart...''<br> |
||
| − | |||
| − | [[Halver]] : Hmm... We must make haste and decide upon policy for our kingdom. At any rate, the exploration of [[Fei'Yin]] is complete.<br> |
||
| − | [[Halver]] : Much time may be needed before we reach a conclusion. Rest and prepare for other expeditions. And thank you for your dutiful service.<br> |
||
| − | |||
| − | }} |
||
Latest revision as of 03:58, 28 November 2021
| Mission Name | The Ruins of Fei'Yin |
|---|---|
| Number | 5-1 |
| Start NPC | Any San d'Orian Gate Guard |
| Level | Uncapped |
| Title Granted | Archmage Assassin |
| Items Needed | |
| Reward | Rank points |
| ← Previous Mission | Next Mission → |
|---|---|
| Magicite | The Shadow Lord |
| Replay Cutscenes | |
|---|---|
| The Ruins of Fei'Yin (pt.1) | Chaloutte Chateau d'Oraguille (I-9) |
| The Rank 5 Mission | Goblin Footprint Fei'Yin (F-11) |
| The Rank 5 Mission | Goblin Footprint Qu'Bia Arena |
| The Ruins of Fei'Yin (pt.2) | Chaloutte Chateau d'Oraguille (I-9) |
| The Ruins of Fei'Yin (pt.3) | Chaloutte Chateau d'Oraguille (I-9) |
Walkthrough
Note: If you've started the Aht Urhgan Mission 5: Confessions of Royalty, you must complete that Aht Urhgan mission before you can speak to Halver to obtain the Key Item: New Fei'Yin Seal.
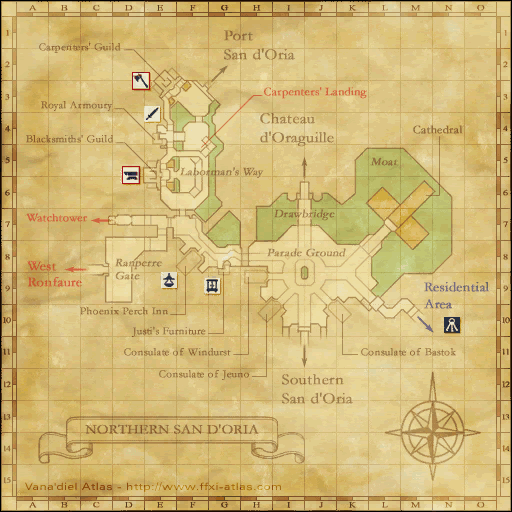
- Northern San d'Oria (I-7) - Enter Chateau d'Oraguille for a cutscene.
- If you wish to change your allegiance at an Immigration NPC, you must view this cutscene first to be allowed to change nations.
- San d'Oria - Go to a Gate Guard and accept the mission.
- Northern San d'Oria (I-7) - Return to Halver to obtain a
 New Fei'Yin Seal.
- Note - this mission cannot be completed without the New Fei'Yin Seal.
- Enter Fei'Yin for a cutscene involving Zeid and Lion.
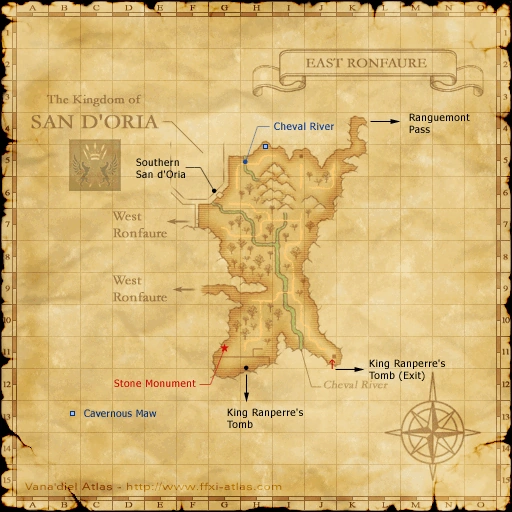
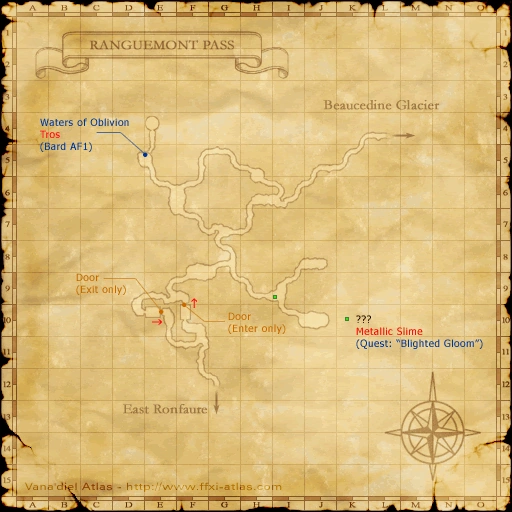
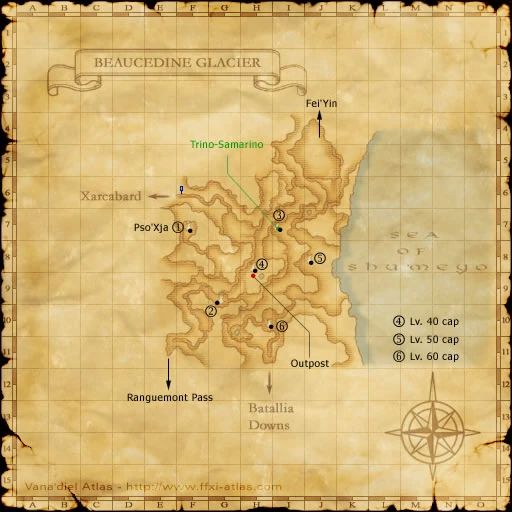
- Path to reach Fei'Yin for the first time: East Ronfaure (K-4) > Ranguemont Pass (L-4) > Beaucedine Glacier (J-4)
- Ranguemont Pass has tight walls so you most likely need sneak/invis if you're a low-level.
- Beaucedine to Fei'Yin walking tips: after exiting Ranguemont,
- head north to Tower (2)
- don't go up to tower (4) but keep going east to find a thin ridge that goes north
- Go north along the ridge and find and go down a slope
- Go south to find another down slope
- Go north past tower (5) to eventually reach Fei'Yin.
- Path to reach Fei'Yin for the first time: East Ronfaure (K-4) > Ranguemont Pass (L-4) > Beaucedine Glacier (J-4)
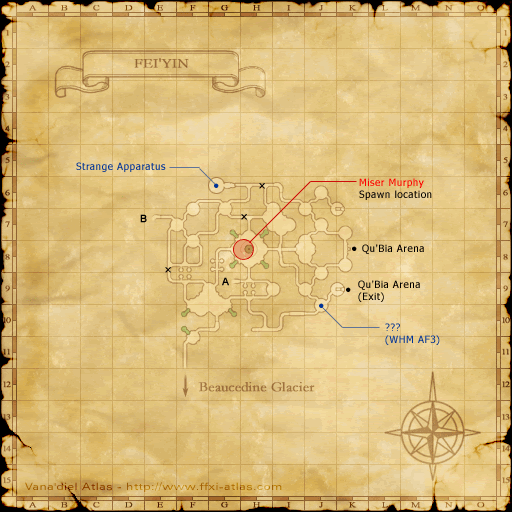
- Fei'Yin (K-8) - Upon entering head east. You will see 2 dolls. There is a cermet gate on the east wall. Click on this gate to enter Qu'Bia Arena.
- The majority of the monsters in Fei'Yin detect by sound, but there are several monsters that also aggro to magic, so Silent Oil is recommended.
- If you have been here before and checked the Home Point outside of the BCNM area, you can just teleport here.
- Win the battle (see below) to obtain Burnt Seal.
- Form a level 50+ party. You may use anyone from any nation currently on Mission 5-1, as it is the same for all 3 nations.
- There is no longer a level 50 cap on this mission.
- Even if you've done this mission before with another nation, you must be on this mission or higher in your current nation to help others (otherwise, you will see "A mysterious force is sealing the platform.").
- Form a level 50+ party. You may use anyone from any nation currently on Mission 5-1, as it is the same for all 3 nations.
- Report back to Halver.
- (Optional) Talk to Prince Trion for an additional cut scene.
- (Optional) Talk to Rahal and Curilla for additional dialogue. If you have not received Trust: Curilla yet, you may get this dialogue first. Also, if you haven't completed The General's Secret, Curilla may refuse to give you the additonal dialogue until The General's Secret is completed.
The Battle
- The boss is the skeleton Archlich Taber'quoan, assisted by several minions.
- Once the archlich is defeated, the battle ends.
- Buffs wear upon entering the battlefield.
- You have 15 minutes to win this battlefield event.
- The Archlich spawns along with two Ancient Sorcerers.
- The Ancient Warriors keep spawning no matter what, normally in sets of two (one skeleton followed shortly by the other).
- Archlich Taber'quoan is a BLM skeleton with Sleepga II, Paralyze and Freeze, and uses Manafont at some point.
- The use of Poison Potions is recommended to prevent being slept during the fight.
- He is susceptible to most enfeebling effects including Silence.
- The skeletons can easily be slept by a BLU's Sheep Song, WHM's Repose, or BRD's Lullaby.
- The Great Sword Weapon Skill Shockwave is very useful against the minions.
- (see testimonials)
- After defeating Archlich Taber'quoan, you receive a cutscene and a Burnt Seal.
Game Description
- Mission Orders
- This mission involves travelling to Fei'Yin, located on the Beaucedine Glacier. Visit Chateau d'Oraguille to learn more.