No edit summary |
|||
| (2 intermediate revisions by 2 users not shown) | |||
| Line 7: | Line 7: | ||
<!-- [[File:|300px|center]] --> |
<!-- [[File:|300px|center]] --> |
||
| Connections = |
| Connections = |
||
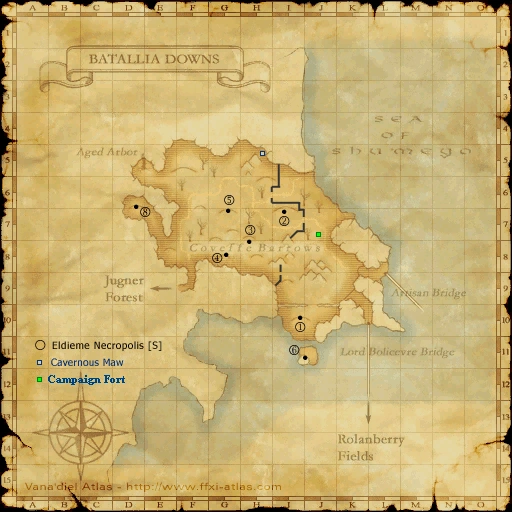
| − | [[Batallia Downs (S)]] at multiple locations; the Braziers located on main floor at H-7 and H-9 can teleport you out to [[Batallia Downs (S)]] J-10 |
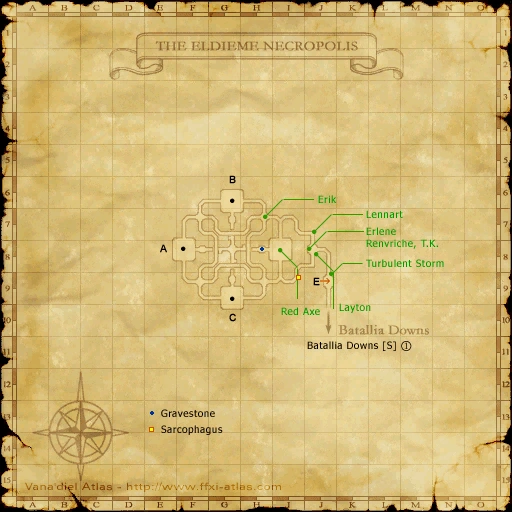
+ | *[[Batallia Downs (S)]] at multiple locations; the Braziers located on main floor at {{Location Tooltip|area=The Eldieme Necropolis (S)|map=Map 1|pos=H-7}} and {{Location Tooltip|area=The Eldieme Necropolis (S)|map=Map 1|pos=H-9}} can teleport you out to [[Batallia Downs (S)]] {{Location Tooltip|area=Batallia Downs (S)|pos=J-10}} |
| + | *[[Survival Guide]]: {{Location Tooltip|area=The Eldieme Necropolis (S)|map=Map 1|pos=J-9}} |
||
| − | |||
| Stats = {{Escape}} {{Tractor}} |
| Stats = {{Escape}} {{Tractor}} |
||
| Region = The Norvallen Front |
| Region = The Norvallen Front |
||
| − | | Weather = {{ |
+ | | Weather = {{Element|Earth}} {{Element|Ice}} |
| HELM = None |
| HELM = None |
||
| Type = Dungeon |
| Type = Dungeon |
||
| + | | Maps = |
||
| + | {{Zone Tooltip Map|Map 1}} |
||
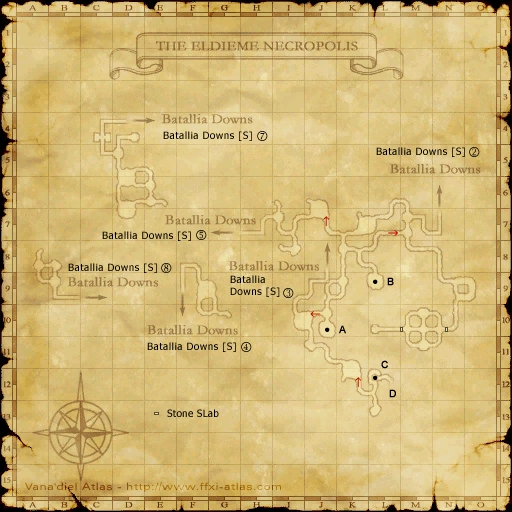
| + | {{Zone Tooltip Map|Map 2}} |
||
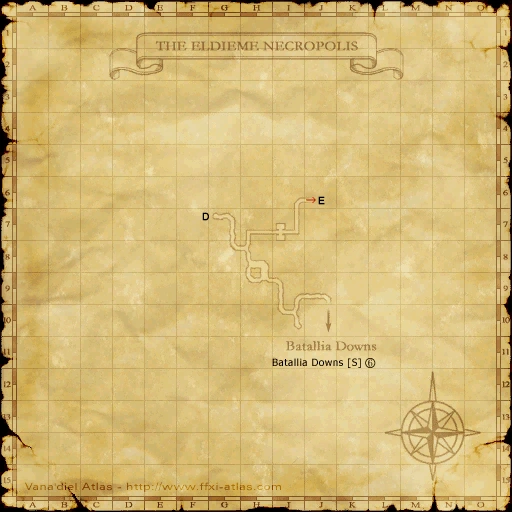
| + | {{Zone Tooltip Map|Map 3}} |
||
| Map Acquisition = [[Map of the Eldieme Necropolis|Purchase]] |
| Map Acquisition = [[Map of the Eldieme Necropolis|Purchase]] |
||
| Expansion = [[Wings of the Goddess]] |
| Expansion = [[Wings of the Goddess]] |
||
| Requirements = None |
| Requirements = None |
||
| Restrictions = None |
| Restrictions = None |
||
| + | | BGM = |
||
| − | | Notes = There are blank name slates that show up on widescan around G-9 - their use is unknown. |
+ | | Notes = There are blank name slates that show up on widescan around {{Location Tooltip|area=The Eldieme Necropolis (S)|map=Map 1|pos=G-9}} - their use is unknown. |
*The "Gates" here do not operate as they do in [[The Eldieme Necropolis]]. The switches to open and close these gates are barred by a magical barrier. |
*The "Gates" here do not operate as they do in [[The Eldieme Necropolis]]. The switches to open and close these gates are barred by a magical barrier. |
||
*Following the Nov. 10, 2009 update all the doors without a magical barrier are permanently open.}} |
*Following the Nov. 10, 2009 update all the doors without a magical barrier are permanently open.}} |
||
| Line 25: | Line 30: | ||
{{TableQuestHeader}} |
{{TableQuestHeader}} |
||
| − | {{TableQuestLine |Name=A Little Knowledge| Type= Job: [[Scholar]]| Starter= [[Erlene]]| Zone= [[The Eldieme Necropolis (S)]]| Coordinates= J-8}} |
+ | {{TableQuestLine |Name=A Little Knowledge| Type= Job: [[Scholar]]| Starter= [[Erlene]]| Zone= [[The Eldieme Necropolis (S)]]| Coordinates={{Location Tooltip|area=The Eldieme Necropolis (S)|map=Map 1|pos=J-8}}}} |
| − | {{TableQuestLine |Name= |
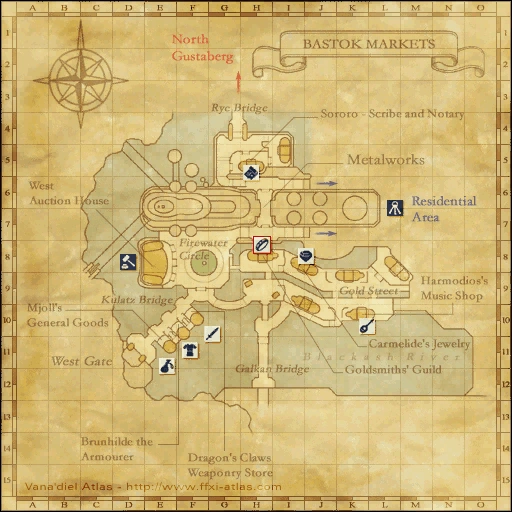
+ | {{TableQuestLine |Name=Beneath the Mask | Type=Nation| Starter=[[Gentle Tiger (S)]]| Zone=[[Bastok Markets (S)]]| Coordinates={{Location Tooltip|area=Bastok Markets (S)|pos=H-6}}}} |
| − | {{TableQuestLine |Name= |
+ | {{TableQuestLine |Name=Burden of Suspicion| Type=Nation| Starter= [[Gentle Tiger (S)]]| Zone= [[Bastok Markets (S)]]| Coordinates={{Location Tooltip|area=Bastok Markets (S)|pos=H-6}}}} |
| − | {{TableQuestLine |Name= |
+ | {{TableQuestLine |Name=Downward Helix| Type= [[SCH]] AF2| Starter= [[Erlene]]| Zone= [[The Eldieme Necropolis (S)]]| Coordinates={{Location Tooltip|area=The Eldieme Necropolis (S)|map=Map 1|pos=J-8}}}} |
| − | {{TableQuestLine |Name= |
+ | {{TableQuestLine |Name=Lost in Translocation| Type= Map | Starter= [[Thorben]]| Zone= [[Batallia Downs (S)]]| Coordinates={{Location Tooltip|area=Batallia Downs (S)|pos=J-10}}}} |
| − | {{TableQuestLine |Name= |
+ | {{TableQuestLine |Name= On Sabbatical| Type= [[SCH]] AF1| Starter= [[Erlene]]| Zone= [[The Eldieme Necropolis (S)]]| Coordinates={{Location Tooltip|area=The Eldieme Necropolis (S)|map=Map 1|pos=J-8}}}} |
| − | {{TableQuestLine |Name= |
+ | {{TableQuestLine |Name=Seeing Blood-red| Type= [[SCH]] AF3| Starter= [[Erlene]]| Zone= [[The Eldieme Necropolis (S)]]| Coordinates={{Location Tooltip|area=The Eldieme Necropolis (S)|map=Map 1|pos=J-8}}}} |
| − | {{TableQuestLine |Name= |
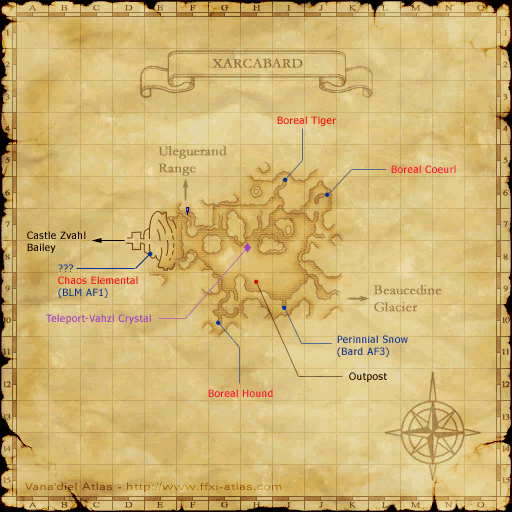
+ | {{TableQuestLine |Name=Survival of the Wisest | Type=[[Genkai]] (SCH)| Starter= [[Professor Schultz|Schultz]]| Zone=[[Xarcabard]]| Coordinates={{Location Tooltip|area=Xarcabard|pos=G-8}}}} |
| − | {{TableQuestLine |Name= |
+ | {{TableQuestLine |Name=Requiem for the Departed| Type= Spell Scroll| Starter= [[Heptachiond]] | Zone= [[The Eldieme Necropolis (S)]]| Coordinates={{Location Tooltip|area=The Eldieme Necropolis (S)|map=Map 1|pos=H-8}}}} |
{{TableMissionHeader}} |
{{TableMissionHeader}} |
||
| − | {{TableMissionLine |Name= Back to the Beginning| Nation= [[Wings of the Goddess Missions|Wings of the Goddess]]| Starter= |
+ | {{TableMissionLine |Name= Back to the Beginning| Nation= [[Wings of the Goddess Missions|Wings of the Goddess]]| Starter= | Zone= | Coordinates= }} |
{{TableQuestFooter}} |
{{TableQuestFooter}} |
||
| Line 52: | Line 57: | ||
{{TableNPCHeader}} |
{{TableNPCHeader}} |
||
| − | {{TableNPCLine | Name= [[Amaliya, C.A.]]| Coordinates= I-8| Type= [[Campaign Arbiter]]}} |
+ | {{TableNPCLine | Name= [[Amaliya, C.A.]]| Coordinates={{Location Tooltip|area=The Eldieme Necropolis (S)|map=Map 1|pos=I-8}}| Type= [[Campaign Arbiter]]}} |
| − | {{TableNPCLine | Name= [[Erik]]| Coordinates= H-7| Type= }} |
+ | {{TableNPCLine | Name= [[Erik]]| Coordinates={{Location Tooltip|area=The Eldieme Necropolis (S)|map=Map 1|pos=H-7}}| Type= }} |
| − | {{TableNPCLine | Name= [[Erlene]]| Coordinates= J-8| Type= Quest NPC}} |
+ | {{TableNPCLine | Name= [[Erlene]]| Coordinates={{Location Tooltip|area=The Eldieme Necropolis (S)|map=Map 1|pos=J-8}}| Type= Quest NPC}} |
| − | {{TableNPCLine | Name= [[Heptachiond]]| Coordinates= H-8| Type=Quest Giver}} |
+ | {{TableNPCLine | Name= [[Heptachiond]]| Coordinates={{Location Tooltip|area=The Eldieme Necropolis (S)|map=Map 1|pos=H-8}}| Type=Quest Giver}} |
| − | {{TableNPCLine | Name= [[Layton]]| Coordinates= J-8| Type=[[Standard Merchant]]}} |
+ | {{TableNPCLine | Name= [[Layton]]| Coordinates={{Location Tooltip|area=The Eldieme Necropolis (S)|map=Map 1|pos=J-8}}| Type=[[Standard Merchant]]}} |
| − | {{TableNPCLine | Name= [[Lennart]]| Coordinates= J-7| Type=[[Item Deliverer]]}} |
+ | {{TableNPCLine | Name= [[Lennart]]| Coordinates={{Location Tooltip|area=The Eldieme Necropolis (S)|map=Map 1|pos=J-7}}| Type=[[Item Deliverer]]}} |
| − | {{TableNPCLine | Name= [[Red Axe]]| Coordinates= I-8| Type= }} |
+ | {{TableNPCLine | Name= [[Red Axe]]| Coordinates={{Location Tooltip|area=The Eldieme Necropolis (S)|map=Map 1|pos=I-8}}| Type= }} |
| − | {{TableNPCLine | Name= [[Renvriche, T.K.]]| Coordinates= J-8| Type= [[Campaign Arbiter]]}} |
+ | {{TableNPCLine | Name= [[Renvriche, T.K.]]| Coordinates={{Location Tooltip|area=The Eldieme Necropolis (S)|map=Map 1|pos=J-8}}| Type= [[Campaign Arbiter]]}} |
| − | {{TableNPCLine | Name= [[Turbulent Storm]]| Coordinates= J-9| Type= Quest NPC}} |
+ | {{TableNPCLine | Name= [[Turbulent Storm]]| Coordinates={{Location Tooltip|area=The Eldieme Necropolis (S)|map=Map 1|pos=J-9}}| Type= Quest NPC}} |
{{TableNPCFooter}} |
{{TableNPCFooter}} |
||
| Line 79: | Line 84: | ||
{{TableMobLine-Regular| Name=Earth Elemental | Spawn=''During dusty weather'' | Lvl=70 | Drop=[[Earth Cluster]] | Steal= | Family=Elementals | NumSpawns=2 | Note=A, M }} |
{{TableMobLine-Regular| Name=Earth Elemental | Spawn=''During dusty weather'' | Lvl=70 | Drop=[[Earth Cluster]] | Steal= | Family=Elementals | NumSpawns=2 | Note=A, M }} |
||
| − | {{TableMobLine-Regular| Name=Eastern Spriggan | Spawn=<!-- how to spawn it --> | Lvl=66-69| Drop=<!-- items it drops --> | Steal=<!-- items you can steal --> | Family= |
+ | {{TableMobLine-Regular| Name=Eastern Spriggan | Spawn=<!-- how to spawn it --> | Lvl=66-69| Drop=<!-- items it drops --> | Steal=<!-- items you can steal --> | Family=Shadows | NumSpawns=8 | Note=A, L, H, HP }} |
{{TableMobLine-Regular| Name=Gazer | Spawn=<!-- how to spawn it --> | Lvl=63-65| Drop=<!-- items it drops --> | Steal=<!-- items you can steal --> | Family=Hecteyes | NumSpawns=9 | Note=A, H }} |
{{TableMobLine-Regular| Name=Gazer | Spawn=<!-- how to spawn it --> | Lvl=63-65| Drop=<!-- items it drops --> | Steal=<!-- items you can steal --> | Family=Hecteyes | NumSpawns=9 | Note=A, H }} |
||
| Line 101: | Line 106: | ||
{{TableMobLine-Regular| Name=Lost Soul | Spawn=<!-- how to spawn it --> | Lvl=65-69| Drop=<!-- items it drops --> | Steal=<!-- items you can steal --> | Family=Skeletons | NumSpawns=39 | Note=A, H, HP }} |
{{TableMobLine-Regular| Name=Lost Soul | Spawn=<!-- how to spawn it --> | Lvl=65-69| Drop=<!-- items it drops --> | Steal=<!-- items you can steal --> | Family=Skeletons | NumSpawns=39 | Note=A, H, HP }} |
||
| − | {{TableMobLine-Regular| Name=Northern Spriggan | Spawn=<!-- how to spawn it --> | Lvl=66-69| Drop=<!-- items it drops --> | Steal=<!-- items you can steal --> | Family= |
+ | {{TableMobLine-Regular| Name=Northern Spriggan | Spawn=<!-- how to spawn it --> | Lvl=66-69| Drop=<!-- items it drops --> | Steal=<!-- items you can steal --> | Family=Shadows | NumSpawns=10 | Note=A, L, H, HP }} |
{{TableMobLine-Regular| Name=Orcish Brawler | Spawn=<!-- how to spawn it --> | Lvl=68-71| Drop=[[Bottled Pixie]] <br> [[Scholar's Testimony]]| Steal=[[Gold Beastcoin]] | Family=Orcs | NumSpawns=4 | Note=A, S, L }} |
{{TableMobLine-Regular| Name=Orcish Brawler | Spawn=<!-- how to spawn it --> | Lvl=68-71| Drop=[[Bottled Pixie]] <br> [[Scholar's Testimony]]| Steal=[[Gold Beastcoin]] | Family=Orcs | NumSpawns=4 | Note=A, S, L }} |
||
| Line 113: | Line 118: | ||
{{TableMobLine | color=#d5d9ff| Name=Revenant | Spawn=<!-- how to spawn it --> | Lvl=68-70| Drop=<!-- items it drops --> | Steal=<!-- items you can steal --> | Family=Ghosts | NumSpawns=18 | Note=A, L, H, HP }} |
{{TableMobLine | color=#d5d9ff| Name=Revenant | Spawn=<!-- how to spawn it --> | Lvl=68-70| Drop=<!-- items it drops --> | Steal=<!-- items you can steal --> | Family=Ghosts | NumSpawns=18 | Note=A, L, H, HP }} |
||
| − | {{TableMobLine-Regular| Name=Southern Spriggan | Spawn=<!-- how to spawn it --> | Lvl=66-69| Drop=<!-- items it drops --> | Steal=<!-- items you can steal --> | Family= |
+ | {{TableMobLine-Regular| Name=Southern Spriggan | Spawn=<!-- how to spawn it --> | Lvl=66-69| Drop=<!-- items it drops --> | Steal=<!-- items you can steal --> | Family=Shadows | NumSpawns=5 | Note=A, L, H, HP }} |
{{TableMobLine | color=#d5d9ff|| Name=War Smilodon | Spawn=<!-- how to spawn it --> | Lvl=61-64 | Drop=<!-- items it drops --> | Steal=<!-- items you can steal --> | Family=Tigers | NumSpawns=27 | Note=A, S }} |
{{TableMobLine | color=#d5d9ff|| Name=War Smilodon | Spawn=<!-- how to spawn it --> | Lvl=61-64 | Drop=<!-- items it drops --> | Steal=<!-- items you can steal --> | Family=Tigers | NumSpawns=27 | Note=A, S }} |
||
| − | {{TableMobLine | color=#d5d9ff|| Name=Western Spriggan | Spawn=<!-- how to spawn it --> | Lvl=66-69 | Drop=<!-- items it drops --> | Steal=<!-- items you can steal --> | Family= |
+ | {{TableMobLine | color=#d5d9ff|| Name=Western Spriggan | Spawn=<!-- how to spawn it --> | Lvl=66-69 | Drop=<!-- items it drops --> | Steal=<!-- items you can steal --> | Family=Shadows | NumSpawns=8 | Note=A, L, H, HP }} |
{{TableMobFooter-Regular}} |
{{TableMobFooter-Regular}} |
||
Revision as of 04:28, 22 May 2020
|
Table of Contents
|
Zone Information
| ||||||||||||||||||||||||||||||
|
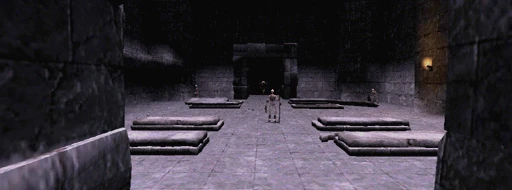
Description
Located just outside Jeuno The Eldieme Necropolis was used during the War as an emergency supply base for Bastok. It also served as an emergency shelter against the constant Beastmen attacks for refugees after security concerns caused the Duchy to seal its borders. | |||||||||||||||||||||||||||||||
|
Connections
|
Involved in Quests/Missions
| Quest | Type | Starter | Location |
|---|---|---|---|
| A Little Knowledge | Job: Scholar | Erlene | The Eldieme Necropolis (S) J-8 |
| Beneath the Mask | Nation | Gentle Tiger (S) | Bastok Markets (S) H-6 |
| Burden of Suspicion | Nation | Gentle Tiger (S) | Bastok Markets (S) H-6 |
| Downward Helix | SCH AF2 | Erlene | The Eldieme Necropolis (S) J-8 |
| Lost in Translocation | Map | Thorben | Batallia Downs (S) J-10 |
| On Sabbatical | SCH AF1 | Erlene | The Eldieme Necropolis (S) J-8 |
| Seeing Blood-red | SCH AF3 | Erlene | The Eldieme Necropolis (S) J-8 |
| Survival of the Wisest | Genkai (SCH) | Schultz | Xarcabard G-8 |
| Requiem for the Departed | Spell Scroll | Heptachiond | The Eldieme Necropolis (S) H-8 |
| Mission | Nation | Starter | Location |
| Back to the Beginning | Wings of the Goddess |
NPCs Found Here
| Name | Location | Type |
|---|---|---|
| Amaliya, C.A. | I-8 | Campaign Arbiter |
| Erik | H-7 | |
| Erlene | J-8 | Quest NPC |
| Heptachiond | H-8 | Quest Giver |
| Layton | J-8 | Standard Merchant |
| Lennart | J-7 | Item Deliverer |
| Red Axe | I-8 | |
| Renvriche, T.K. | J-8 | Campaign Arbiter |
| Turbulent Storm | J-9 | Quest NPC |
Notorious Monsters Found Here
| Name | Level | Drops | Steal | Family | Spawns | Notes
|
|---|---|---|---|---|---|---|
| Ethniu
|
Wolfram Steel | Fomors | 1 |
A, T(H), HP
| ||
| Laelaps
|
Aptant: Haelan | Hounds | 1 |
A, H, HP
| ||
| Tethra
|
Wolfram Steel | Fomors | 1 |
A, T(H), HP
|
|
HP = Detects Low HP; M = Detects Magic; Sc = Follows by Scent; T(S) = True-sight; T(H) = True-hearing JA = Detects job abilities; WS = Detects weaponskills; Z(D) = Asleep in Daytime; Z(N) = Asleep at Nighttime; A(R) = Aggressive to Reive participants |
Regular Monsters Found Here
|
HP = Detects Low HP; M = Detects Magic; Sc = Follows by Scent; T(S) = True-sight; T(H) = True-hearing JA = Detects job abilities; WS = Detects weaponskills; Z(D) = Asleep in Daytime; Z(N) = Asleep at Nighttime; A(R) = Aggressive to Reive participants |
Event Monsters Found Here
Campaign: Royal Army of San d'Oria, Orcish Hosts, Dark Kindred
| Name | Family | Spawns | Notes |
|---|---|---|---|
Ellylldan
|
Djinn | 1 | |
Orcish Transporter
|
Orcs | 1 | A, L, S, Sc |
|
HP = Detects Low HP; M = Detects Magic; Sc = Follows by Scent; T(S) = True-sight; T(H) = True-hearing JA = Detects job abilities; WS = Detects weaponskills; Z(D) = Asleep in Daytime; Z(N) = Asleep at Nighttime; A(R) = Aggressive to Reive participants |