No edit summary |
|||
| (23 intermediate revisions by 15 users not shown) | |||
| Line 1: | Line 1: | ||
[[category:Missions]][[Category:Rise of the Zilart Missions]][[fr:Zilart Mission 16]][[de:Zilart-Mission 16]] |
[[category:Missions]][[Category:Rise of the Zilart Missions]][[fr:Zilart Mission 16]][[de:Zilart-Mission 16]] |
||
{{disambig3|[[Celestial Nexus]]}} |
{{disambig3|[[Celestial Nexus]]}} |
||
| + | |||
{{Mission |
{{Mission |
||
| name = The Celestial Nexus |
| name = The Celestial Nexus |
||
| Line 15: | Line 16: | ||
| next = [[Awakening]] |
| next = [[Awakening]] |
||
| cutscenes = |
| cutscenes = |
||
| + | {{Mission/Cutscene|The Celestial Nexus (pt.1-3)|[[Goblin Footprint]] [[The Celestial Nexus]]}} |
||
}} |
}} |
||
| + | |||
| ⚫ | |||
| ⚫ | |||
| ⚫ | |||
| ⚫ | |||
| ⚫ | |||
| + | |||
| + | |||
== Walkthrough == |
== Walkthrough == |
||
This is a 6 player fight, '''not''' an alliance fight. Time limit is 30 min. |
This is a 6 player fight, '''not''' an alliance fight. Time limit is 30 min. |
||
| + | :''If you have already obtained it, the fastest way to reach to the fight is via [[Home Point]] of [[The Shrine of Ru'Avitau]], which warps you to the entrance of the [[Celestial Nexus]]. |
||
| − | '''Note #1:''' Magic aggro inside of [[Shrine of Ru'Avitau]] so everyone will need [[Prism Powder]]s and [[Silent Oil]]s, or the [[ninjutsu]] equivalent: [[Shinobi-Tabi]] and [[Sanjaku-Tenugui]], respectively. [[Spectral Jig]] will also work, if a player is [[Dancer]] main job or support job.<br /> |
||
| ⚫ | '''Note |
||
| ⚫ | '''Note:''' Someone might need to open the yellow door so that everyone can get past the door. The simplest Monolith to reach to open this yellow door is at {{Location Tooltip|area=The Shrine of Ru'Avitau|map=Map 1|pos=H-10}} of map 2 of the [[Shrine of Ru'Avitau]], accessed from the "main" entrance from [[Ru'Aun Gardens]] (straight north from entrance from [[Hall of the Gods]]). |
||
| ⚫ | |||
| + | |||
| ⚫ | |||
| ⚫ | |||
| ⚫ | |||
| ⚫ | |||
| ⚫ | |||
| ⚫ | |||
| ⚫ | |||
*Use [[Silent Oil]]s and head south to a room with 2 [[Dark Elemental]]s. |
*Use [[Silent Oil]]s and head south to a room with 2 [[Dark Elemental]]s. |
||
*You no longer need sneak from here. But you will need Invisible for the Golems ([[Aura Statue]]s) all the rest of the way. |
*You no longer need sneak from here. But you will need Invisible for the Golems ([[Aura Statue]]s) all the rest of the way. |
||
| − | *Head either east or west and follow the corridors till you come to another room with 2 [[Dark Elemental]]s at H-10. |
+ | *Head either east or west and follow the corridors till you come to another room with 2 [[Dark Elemental]]s at {{Location Tooltip|area=The Shrine of Ru'Avitau|map=Map 2|id=elementals|pos=H-10}}. |
| − | *Head north and then down the stairs to the [[Celestial Nexus]] at H-9. |
+ | *Head north and then down the stairs to the [[Celestial Nexus]] at {{Location Tooltip|area=The Shrine of Ru'Avitau|map=Map 2|pos=H-9}}. |
** There are 4 total doors in the [[Celestial Nexus]] all with the same name; one after another. The fourth door is the final door and leads into the BC. Do not open this (the fourth door with the sirens in the room) door until you are ready to begin the BC. There is no actual Burning Circle to stand on to enter. |
** There are 4 total doors in the [[Celestial Nexus]] all with the same name; one after another. The fourth door is the final door and leads into the BC. Do not open this (the fourth door with the sirens in the room) door until you are ready to begin the BC. There is no actual Burning Circle to stand on to enter. |
||
| − | *Group up with your party if you have not already and enter the |
+ | *Group up with your party if you have not already and enter the battlefield. Once you enter, you cannot flee from the battle. |
** If you ''do'' need to leave, just die. After being kicked from the BC you will reappear at the entrance of the [[Celestial Nexus]]. If you wipe, you will not go to [[Hall of the Gods]]. |
** If you ''do'' need to leave, just die. After being kicked from the BC you will reappear at the entrance of the [[Celestial Nexus]]. If you wipe, you will not go to [[Hall of the Gods]]. |
||
** Buffs WILL wear off upon entry. |
** Buffs WILL wear off upon entry. |
||
*Watch the final cutscene and prepare to battle [[Eald'narche]], who has two forms. |
*Watch the final cutscene and prepare to battle [[Eald'narche]], who has two forms. |
||
| − | + | **You will not lose Experience Points for dying in this fight. |
|
===1st Form === |
===1st Form === |
||
| Line 47: | Line 58: | ||
** '''[[Phase Shift]]''': [[Distance|30']] [[AoE]] physical damage (~600-1300), [[Stun (Status Effect)|Stun]], [[Bind (Status Effect)|Bind]], absorbed by [[Utsusemi]] |
** '''[[Phase Shift]]''': [[Distance|30']] [[AoE]] physical damage (~600-1300), [[Stun (Status Effect)|Stun]], [[Bind (Status Effect)|Bind]], absorbed by [[Utsusemi]] |
||
*** Used at around 66%, 33% and 1% HP, getting stronger with each use. |
*** Used at around 66%, 33% and 1% HP, getting stronger with each use. |
||
| − | *** '''Phase Shift''' takes away 2 shadows |
+ | *** '''Phase Shift''' takes away 2 shadows. |
*[[Eald'narche]] - invulnerable to all attacks until the [[Exoplates]] are defeated. |
*[[Eald'narche]] - invulnerable to all attacks until the [[Exoplates]] are defeated. |
||
| Line 65: | Line 76: | ||
** He will teleport at the spot where you reappear after the CS within about 20-30 seconds. So be prepared to kite or not have anyone rest after the CS. |
** He will teleport at the spot where you reappear after the CS within about 20-30 seconds. So be prepared to kite or not have anyone rest after the CS. |
||
** He teleports around, similar to the [[Ark Angel TT]]. Kiting can be difficult as he often casts [[Bindga]]. |
** He teleports around, similar to the [[Ark Angel TT]]. Kiting can be difficult as he often casts [[Bindga]]. |
||
| + | ** Has a [[Fast Cast I|Fast Cast]] effect on AM. |
||
** In addition to Bindga, he casts all ancient magic and [[Sleepga II]]. {{verification}} |
** In addition to Bindga, he casts all ancient magic and [[Sleepga II]]. {{verification}} |
||
** He has a very high melee resistance that will cut damage by about 75%. |
** He has a very high melee resistance that will cut damage by about 75%. |
||
| ⚫ | |||
| − | *** All Tier II Ancient Magic damages this form of Eald'narche for 850~. Keep your tank alive and a BLM with Tier II Ancient Magic can kill Eald'narche on his/her own. Two BLMs can rapidly destroy him with a barrage of AM2. |
||
| − | *** A [[Summoner]] can one shot this form with capped Avatar Magic Accuracy/Attack Merits, as well as using an [[Astral Pot]], by using the [[Astral Flow]] ability that matches the game day. |
||
| − | *** Recommended [[Summoner]] conserves [[MP]] during Part I to avoid [[AoE]] and do more damage in Part II. Also, when [[Eald'narche]] starts warping around the battlefield, keep pet out and at [[Summoner]]. Pet will immediately engage him when he appears, giving the party a temporary pet tank and the [[Summoner]] a chance to get away. |
||
| ⚫ | |||
** He also uses these special attacks: |
** He also uses these special attacks: |
||
*** '''[[Vortex]]''': [[Distance|20'(?)]] [[AoE]] low damage (~100), [[Terror]] and [[Bind (Status Effect)|Bind]], absorbed by [[Utsusemi]] |
*** '''[[Vortex]]''': [[Distance|20'(?)]] [[AoE]] low damage (~100), [[Terror]] and [[Bind (Status Effect)|Bind]], absorbed by [[Utsusemi]] |
||
| Line 78: | Line 87: | ||
* Drink [[Poison Potion]]s and consider stunning some spells. |
* Drink [[Poison Potion]]s and consider stunning some spells. |
||
| ⚫ | |||
| − | * This battlefield becomes very easy if all players sub Ninja (including mages). [[Utsusemi]] can negate a lot of the damaging TP attacks and spells. |
||
| − | |||
| ⚫ | |||
| − | |||
| − | |||
| ⚫ | |||
| ⚫ | |||
| ⚫ | |||
| ⚫ | |||
| ⚫ | |||
| Line 93: | Line 93: | ||
| orders = The fate of Vana'diel awaits you in the Celestial Nexus! |
| orders = The fate of Vana'diel awaits you in the Celestial Nexus! |
||
}} |
}} |
||
| + | |||
| + | {{spoiler2}} |
||
Revision as of 13:12, 10 December 2019
Were you looking for Celestial Nexus?
| Mission Name | The Celestial Nexus |
|---|---|
| Number | ZM16 |
| Title Granted | Burier of the Illusion |
| ← Previous Mission | Next Mission → |
|---|---|
| The Sealed Shrine | Awakening |
| Replay Cutscenes | |
|---|---|
| The Celestial Nexus (pt.1-3) | Goblin Footprint The Celestial Nexus |
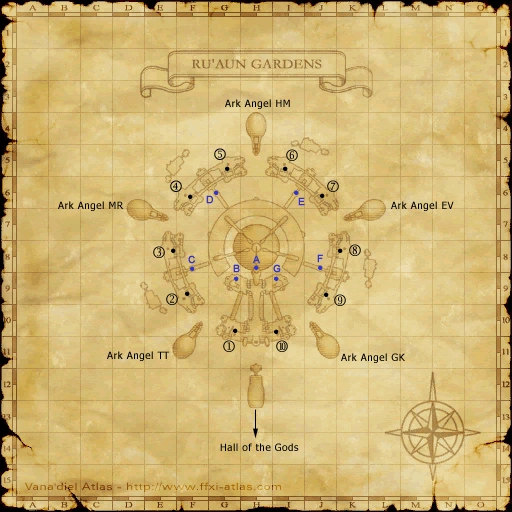
Ru'aun Gardens Connections
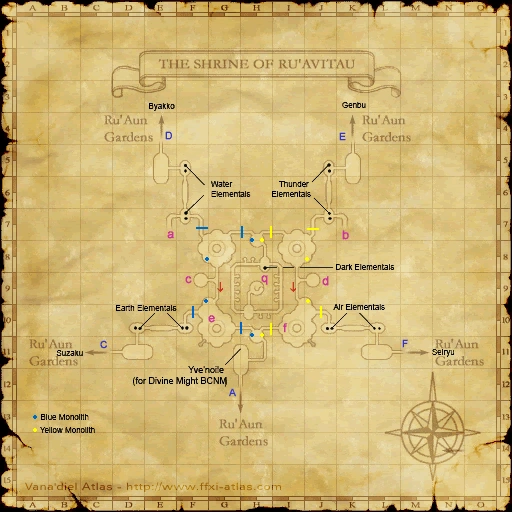
Shrine of Ru'Avitau 1
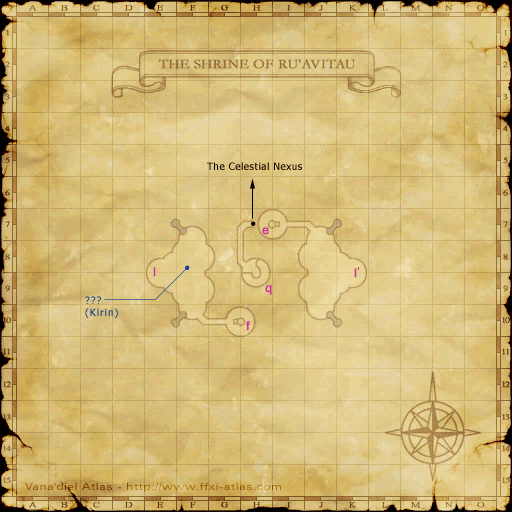
Shrine of Ru'Avitau 2


Shrine of Ru'Avitau 3

Shrine of Ru'Avitau 4
Walkthrough
This is a 6 player fight, not an alliance fight. Time limit is 30 min.
- If you have already obtained it, the fastest way to reach to the fight is via Home Point of The Shrine of Ru'Avitau, which warps you to the entrance of the Celestial Nexus.
Note: Someone might need to open the yellow door so that everyone can get past the door. The simplest Monolith to reach to open this yellow door is at H-10 of map 2 of the Shrine of Ru'Avitau, accessed from the "main" entrance from Ru'Aun Gardens (straight north from entrance from Hall of the Gods).
- Head to I-6 in Ru'Aun Gardens (near Genbu's island) and enter Shrine of Ru'Avitau Map 2.
- Sneak up here.
- Head south and follow the path to J-7 past the first yellow door. Note: It is highly possible the door will be closed, so you will probably need someone to open yellow beforehand.
- Then head west past the second yellow door to the control room with 2 monoliths at H-7.
- Use Silent Oils and head south to a room with 2 Dark Elementals.
- You no longer need sneak from here. But you will need Invisible for the Golems (Aura Statues) all the rest of the way.
- Head either east or west and follow the corridors till you come to another room with 2 Dark Elementals at H-10.
- Head north and then down the stairs to the Celestial Nexus at H-9.
- There are 4 total doors in the Celestial Nexus all with the same name; one after another. The fourth door is the final door and leads into the BC. Do not open this (the fourth door with the sirens in the room) door until you are ready to begin the BC. There is no actual Burning Circle to stand on to enter.
- Group up with your party if you have not already and enter the battlefield. Once you enter, you cannot flee from the battle.
- If you do need to leave, just die. After being kicked from the BC you will reappear at the entrance of the Celestial Nexus. If you wipe, you will not go to Hall of the Gods.
- Buffs WILL wear off upon entry.
- Watch the final cutscene and prepare to battle Eald'narche, who has two forms.
- You will not lose Experience Points for dying in this fight.
1st Form
- When trying to establish hate, try using your enmity tools on Eald'narche instead of the Exoplates.
- Orbitals x 2 - have ~130hp and if defeated; they are resummoned quickly. Lullaby works rarely (detector mobs are very resistant, but not entirely immune to it), but Sleep is recommended due to being vastly more reliable.
- Exoplates - the armor surrounding Eald'narche. It has about 10000 HP. It does not do melee attacks. Special attacks:
- Cronos Sling: Cone Attack physical damage (~300-600), absorbed by Utsusemi (2 shadows)
- Gaea Stream: Single target(?) damage (~200), absorbed by Utsusemi
- Uranos Cascade: AoE physical damage (~200-400), absorbed by Utsusemi
- Phase Shift: 30' AoE physical damage (~600-1300), Stun, Bind, absorbed by Utsusemi
- Used at around 66%, 33% and 1% HP, getting stronger with each use.
- Phase Shift takes away 2 shadows.
- Eald'narche - invulnerable to all attacks until the Exoplates are defeated.
- He uses ancient magic and Sleepga II.
- Head Butt works well at stopping his ancient magic.
- Once the Exoplates are gone, he will have only about 2000 HP.
- Suggested strategy - have melee use 2 hour specials to quickly dispose of the Exoplates, while mages stay far enough to avoid being hit by Phase Shift. Sleep the Orbitals as they're not worth attacking. After the Exoplates are gone it only takes a few hits to get Eald'narche to his second form. There is very little time to rest before the second form. Consequently, after the Exoplates are killed, do not immediately attack Eald'narche but rest and recover HP, MP, status (and raise weakness if need be) before finishing off the first stage of the fight.
- Eald'narche can EASILY be tanked with /NIN by anyone with a strong hate tool (Provoke, Flash, Ninjustu spam, etc). Keep haste up on tanker.
- Try to avoid doing anything to Eald'narche until the Exoplates are gone; in particular, pull the Orbitals away before using Sleepga. Let your tank get initial aggro and then tank that way.
- Note that if all the frontliners do not have Utsusemi, burning down the Exoplates quickly as advised above will result in a lot of damage (and likely death) due to Phase Shift spam (which is triggered by Exoplates HP). A wiser approach in such a situation would be to do damage until just before triggering a Phase Shift, then have all melees turn around. Heal up, do damage to trigger the Phase Shift, recover from it, and proceed, repeating for each of the three Phase Shifts.
- In the event of a wipe, don't Reraise; you will get aggro wherever you are on the battlefield.
2nd Form
- Second form of Eald'narche is still pretty weak (~2500 HP).
- He will teleport at the spot where you reappear after the CS within about 20-30 seconds. So be prepared to kite or not have anyone rest after the CS.
- He teleports around, similar to the Ark Angel TT. Kiting can be difficult as he often casts Bindga.
- Has a Fast Cast effect on AM.
- In addition to Bindga, he casts all ancient magic and Sleepga II.

- He has a very high melee resistance that will cut damage by about 75%.
His melee attacks are extremely fast, almost as fast as a Monk's Hundred Fists.
- He also uses these special attacks:
- Vortex: 20'(?) AoE low damage (~100), Terror and Bind, absorbed by Utsusemi
- Stellar Burst: AoE low damage (~100) and Silence, absorbed by Utsusemi
- Omega Javelin: Single target damage (~150) and Petrification, absorbed by Utsusemi
- Tanking is hard, hate seems to move around randomly. It is best to damage him as quickly as possible.
- He also uses these special attacks:
- Drink Poison Potions and consider stunning some spells.
After the final cutscene, you will appear in the Hall of the Gods.
Game Description
- Mission Orders
- The fate of Vana'diel awaits you in the Celestial Nexus!