mNo edit summary |
|||
| (47 intermediate revisions by 12 users not shown) | |||
| Line 2: | Line 2: | ||
{{Zone Infobox |
{{Zone Infobox |
||
| ToC = |
| ToC = |
||
| − | [[#Involved in Quests/Missions|Quests/Missions]] • [[# |
+ | [[#Involved in Quests/Missions|Quests/Missions]] • [[#treasure coffer|Treasure Coffer]] • [[#fishing|Fishing]] • [[#weather|Weather]] • [[#NPCs Found Here|NPCs]] • [[#Notorious Monsters Found Here|Notorious Monsters]] • [[#Regular Monsters Found Here|Regular Monsters]] • [[#Event Monsters Found Here|Event Monsters]] |
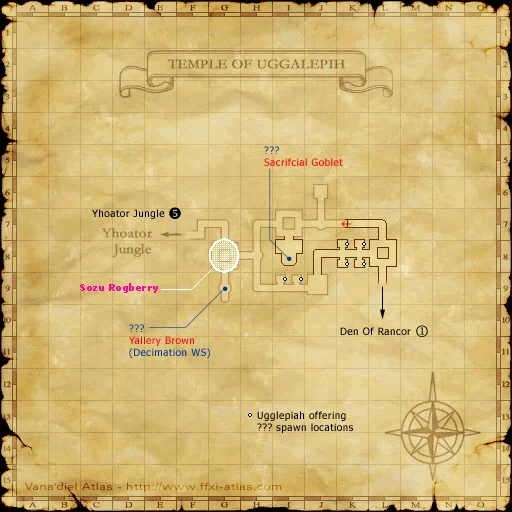
| Description = An ancient temple to the evil deity Uggalepih, built in the isolated depths of the [[Yhoator Jungle|jungle]] on the eastern portion of [[Elshimo Island]]. The structure itself has fallen into ruin, and the roots of nearby trees are slowly consuming its walls. |
| Description = An ancient temple to the evil deity Uggalepih, built in the isolated depths of the [[Yhoator Jungle|jungle]] on the eastern portion of [[Elshimo Island]]. The structure itself has fallen into ruin, and the roots of nearby trees are slowly consuming its walls. |
||
| Line 10: | Line 10: | ||
| Connections = |
| Connections = |
||
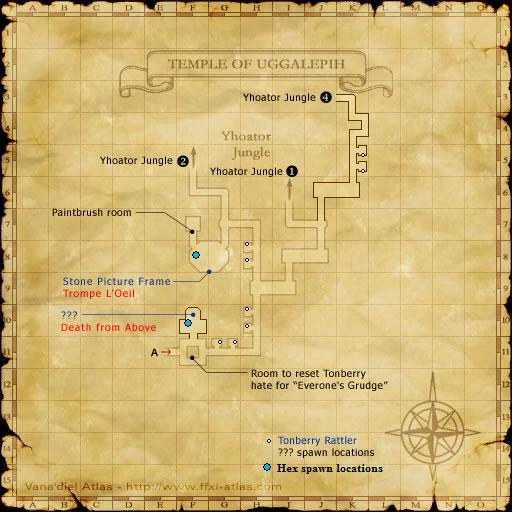
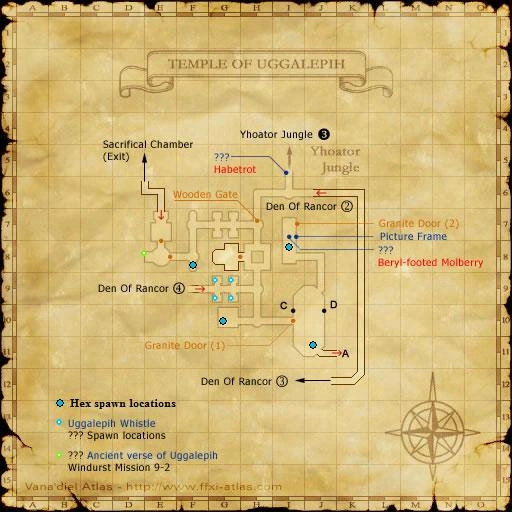
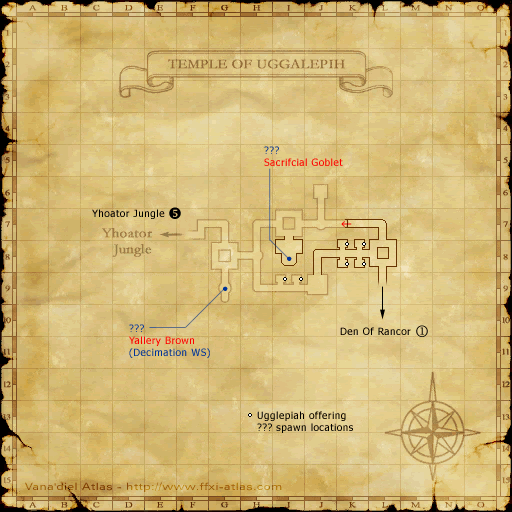
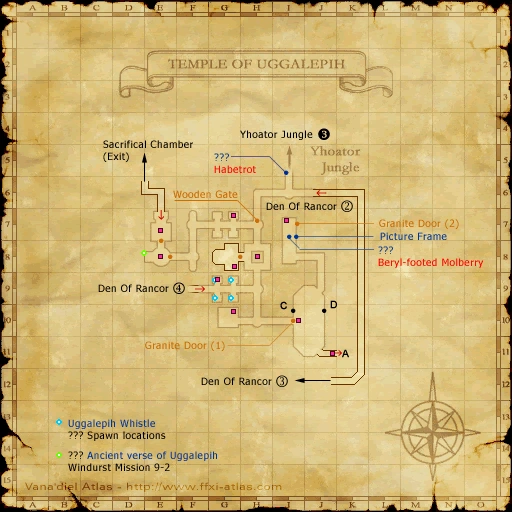
| + | *Escapes to: [[Yhoator Jungle]]: ({{Location Tooltip|area=Yhoator Jungle|pos=J-11}}), [[Yhoator Jungle]]: {{Location Tooltip|area=Temple of Uggalepih|map=Map 3|pos=F-7}}, [[Den of Rancor]]: {{Location Tooltip|area=Temple of Uggalepih|map=Map 3|pos=L-9}}, [[Sacrificial Chamber]] {{Tooltip-Connection-Map|map=TempleofUggalepih2.png|blip=GreenBlip|text=E-6|x=28.51|y=35.35}} |
||
| − | Escapes to: [[Yhoator Jungle]]: (J-11) |
||
| + | *[[Survival Guide]]: ({{Location Tooltip|area=Temple of Uggalepih|map=Map 1|pos=F-6}}) |
||
| − | [[Yhoator Jungle]]: {{Tooltip-Connection-Map|map=TempleofUggalepih1.png|blip=GreenBlip|text=J-3|x=65.03|y=19.72}}, {{Tooltip-Connection-Map|map=TempleofUggalepih1.png|blip=GreenBlip|text=I-6|x=56.25|y=38.08}}, {{Tooltip-Connection-Map|map=TempleofUggalepih1.png|blip=GreenBlip|text=F-5|x=37.69|y=30.85}}, {{Tooltip-Connection-Map|map=TempleofUggalepih2.png|blip=GreenBlip|text=I-5|x=56.64|y=31.05}}, {{Tooltip-Connection-Map|map=TempleofUggalepih3.png|blip=GreenBlip|text=F-7|x=35.35|y=45.89}}{{spc}} |
||
| + | *After completing [[Further Founts]] - [[Selbina]], [[Mhaura]], [[Rabao]], [[Norg]] will warp TO ({{Location Tooltip|area=Temple of Uggalepih|map=Map 2|pos=G-8}}) on Map 2 (before [[Temple Guardian]]) |
||
| − | [[Den of Rancor]]: {{Tooltip-Connection-Map|map=TempleofUggalepih2.png|blip=GreenBlip|text=I-12|x=62.89|y=74.60}}, {{Tooltip-Connection-Map|map=TempleofUggalepih2.png|blip=GreenBlip|text=F-9|x=36.71|y=56.44}}, {{Tooltip-Connection-Map|map=TempleofUggalepih2.png|blip=GreenBlip|text=I-7|x=58.00|y=43.75}}, {{Tooltip-Connection-Map|map=TempleofUggalepih3.png|blip=GreenBlip|text=L-9|x=35.15|y=45.89}}{{spc}} |
||
| − | [[Sacrificial Chamber]]: {{Tooltip-Connection-Map|map=TempleofUggalepih2.png|blip=GreenBlip|text=E-6|x=28.51|y=35.35}} |
||
| Stats = {{Tractor}} {{Fellow}} {{Escape}} |
| Stats = {{Tractor}} {{Fellow}} {{Escape}} |
||
| Region = Elshimo Uplands |
| Region = Elshimo Uplands |
||
| Type = Dungeon |
| Type = Dungeon |
||
| + | | Maps = |
||
| − | | Map Acquisition = Treasure Coffer |
||
| + | {{Zone Tooltip Map|Map 1}} |
||
| + | {{Zone Tooltip Map|Map 2}} |
||
| + | {{Zone Tooltip Map|Map 3}} |
||
| + | {{Zone Tooltip Map|Map 4}} |
||
| + | | Map Acquisition = [[Uggalepih Coffer Key]] or [[Map of Temple of Uggalepih|Purchase]] |
||
| Restrictions = None |
| Restrictions = None |
||
| + | | BGM = None |
||
| − | | Requirements = [[Airship pass for Kazham]] |
+ | | Requirements = [[Airship pass for Kazham]] or [[The Beginning]] |
| − | | Expansion = Rise of the Zilart |
+ | | Expansion = Rise of the Zilart |
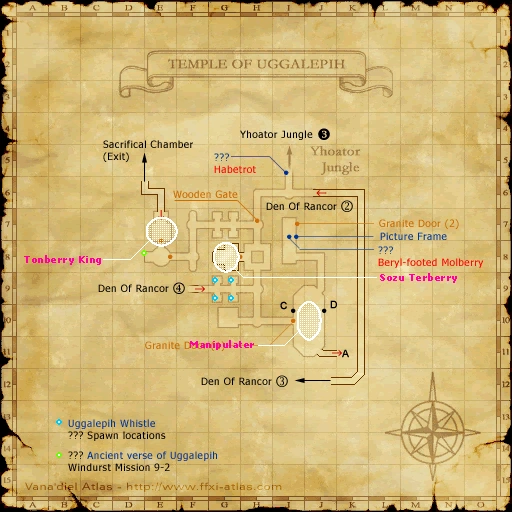
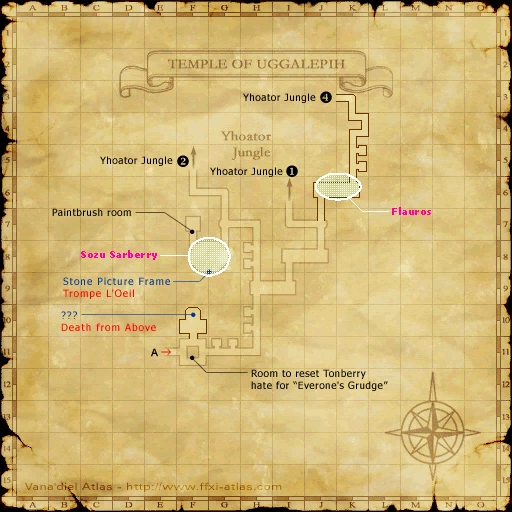
| Notes = [[Temple of Uggalepih/Maps#Map 2|Granite Door (1)]] is opened by defeating the [[Temple Guardian]]. [[Temple of Uggalepih/Maps#Map 2|Granite Door (2)]] is opened with the [[Paintbrush of Souls]]. Door to the "Paintbrush room" is opened with a [[Uggalepih Key]]. |
| Notes = [[Temple of Uggalepih/Maps#Map 2|Granite Door (1)]] is opened by defeating the [[Temple Guardian]]. [[Temple of Uggalepih/Maps#Map 2|Granite Door (2)]] is opened with the [[Paintbrush of Souls]]. Door to the "Paintbrush room" is opened with a [[Uggalepih Key]]. |
||
}} |
}} |
||
| Line 28: | Line 33: | ||
{{TableQuestHeader}} |
{{TableQuestHeader}} |
||
| − | {{TableQuestLine |Name= |
+ | {{TableQuestLine |Name= A Question of Taste| Type= General| Starter= [[Jakoh Wahcondalo]]| Zone= [[Kazham]]| Coordinates= J-9}} |
| − | {{TableQuestLine |Name= |
+ | {{TableQuestLine |Name= Axe the Competition| Type= [[:Category:Weapon Skills|Weaponskill]]| Starter= [[Brutus]]| Zone= [[Upper Jeuno]]| Coordinates= G-7}} |
| − | {{TableQuestLine |Name= |
+ | {{TableQuestLine |Name= Beam Me Up... No, Not There!| Type=General| Starter= [[Anastase]]| Zone= [[Ru'Lude Gardens]]| Coordinates=G-9}} |
| − | {{TableQuestLine |Name= |
+ | {{TableQuestLine |Name= Borghertz's Calling Hands| Type= [[SMN]] [[:Category:Artifact Armor|AF]]| Starter= [[Guslam]]| Zone= [[Upper Jeuno]]| Coordinates= H-8}} |
| − | {{TableQuestLine |Name= |
+ | {{TableQuestLine |Name=Borghertz's Loyal Hands| Type= [[SAM]] [[:category:Artifact Armor|AF]]| Starter=[[Guslam]]| Zone=[[Upper Jeuno]]| Coordinates=H-8}} |
{{TableQuestLine |Name= Everyone's Grudge| Type= Tonberry Hate| Starter= [[Magephaud]]| Zone= [[Norg]]| Coordinates= I-8}} |
{{TableQuestLine |Name= Everyone's Grudge| Type= Tonberry Hate| Starter= [[Magephaud]]| Zone= [[Norg]]| Coordinates= I-8}} |
||
| Line 42: | Line 47: | ||
{{TableQuestLine |Name= Everyone's Grudging| Type= General| Starter= [[Jakoh Wahcondalo]]| Zone= [[Kazham]]| Coordinates= J-9}} |
{{TableQuestLine |Name= Everyone's Grudging| Type= General| Starter= [[Jakoh Wahcondalo]]| Zone= [[Kazham]]| Coordinates= J-9}} |
||
| − | {{TableQuestLine |Name= |
+ | {{TableQuestLine |Name= Further Founts| Type=General| Starter= [[Anastase]]| Zone= [[Ru'Lude Gardens]]| Coordinates=G-9}} |
| − | {{TableQuestLine |Name= |
+ | {{TableQuestLine |Name= Knight Stalker| Type= [[DRG]] [[:category:Artifact Armor|AF]]| Starter= [[Rahal]]| Zone= [[Chateau d'Oraguille]]| Coordinates= H-9}} |
{{TableQuestLine |Name= Paintbrush of Souls| Type= Key Item| Starter= ---| Zone= ---| Coordinates= }} |
{{TableQuestLine |Name= Paintbrush of Souls| Type= Key Item| Starter= ---| Zone= ---| Coordinates= }} |
||
| + | |||
| + | {{TableQuestLine |Name= The Opo-opo and I| Type= General| Starter= [[Lulupp]]| Zone= [[Kazham]]| Coordinates= G-7}} |
||
| + | |||
| + | {{TableQuestLine |Name= VW Op. 054: Elshimo List| Type= [[Voidwatch]]| Starter= [[Hildegard]]| Zone= [[Kazham]]| Coordinates= {{Location Tooltip|area=Kazham|pos=F-9}}}} |
||
| + | |||
| + | {{TableQuestLine |Name= You Call That a Knife?| Type= General| Starter= [[Mhebi Juhbily]]| Zone= [[Kazham]]| Coordinates= I-10}} |
||
{{TableMissionHeader}} |
{{TableMissionHeader}} |
||
| Line 59: | Line 70: | ||
{{TableMissionLine |Name = Sisters in Arms| Nation= [[A Shantotto Ascension]]| Starter= [[Aldo]]| Zone= [[Lower Jeuno]]| Coordinates= J-8 }} |
{{TableMissionLine |Name = Sisters in Arms| Nation= [[A Shantotto Ascension]]| Starter= [[Aldo]]| Zone= [[Lower Jeuno]]| Coordinates= J-8 }} |
||
| + | |||
| + | {{TableMissionLine |Name = The Cursed Temple| Nation= [[Rhapsodies of Vana'diel Missions|Rhapsodies 2-6-5]]| Starter= ---| Zone= ---| Coordinates= }} |
||
| + | |||
| + | {{TableMissionLine |Name = Wisdom of Our Forefathers| Nation= [[Rhapsodies of Vana'diel Missions|Rhapsodies 2-6-6]]| Starter= ---| Zone= ---| Coordinates= }} |
||
{{TableQuestFooter}} |
{{TableQuestFooter}} |
||
==Other Information== |
==Other Information== |
||
| − | {| border="0" width="100%" cellpadding="5" cellspacing="2" |
||
{{Zone Section Header|coffer}} |
{{Zone Section Header|coffer}} |
||
{{:{{PAGENAME}}/Treasure Coffer}} |
{{:{{PAGENAME}}/Treasure Coffer}} |
||
| + | <br> |
||
{{Zone Section Header|fishing}} |
{{Zone Section Header|fishing}} |
||
{{:{{PAGENAME}}/Fishing}} |
{{:{{PAGENAME}}/Fishing}} |
||
| + | <br> |
||
{{Zone Section Header|weather}} |
{{Zone Section Header|weather}} |
||
{{:{{PAGENAME}}/Weather}} |
{{:{{PAGENAME}}/Weather}} |
||
==Individual Training== |
==Individual Training== |
||
| − | {|border="0" width="100%" cellpadding="5" cellspacing="2" |
+ | {| border="0" width="100%" cellpadding="5" cellspacing="2" |
| − | |- |
+ | |- bgcolor="#ffdead" |
| − | ! width="161"|Area of Book |
+ | ! width="161" |Area of Book |
| − | ! width="25"|Pg |
+ | ! width="25" |Pg |
| − | ! width="40"|Tgt. Level |
+ | ! width="40" |Tgt. Level |
| − | ! width="40"|Max Level |
+ | ! width="40" |Max Level |
| − | ! width="150"|Mobs to Fight |
+ | ! width="150" |Mobs to Fight |
| − | ! width="40"|XP/Gil |
+ | ! width="40" |XP/Gil |
| − | ! width="40"|Tabs |
+ | ! width="40" |Tabs |
| − | |- |
+ | |- bgcolor="#FFD7D7" |
| − | |rowspan="6"|[[Temple of Uggalepih]] |
+ | | rowspan="6" |[[Temple of Uggalepih]] |
|1 |
|1 |
||
|51~57 |
|51~57 |
||
| Line 91: | Line 107: | ||
|1450-2900 |
|1450-2900 |
||
|145-290 |
|145-290 |
||
| − | |- |
+ | |- bgcolor="#FFD7D7" |
|2 |
|2 |
||
|51~57 |
|51~57 |
||
| Line 100: | Line 116: | ||
|???-??? |
|???-??? |
||
|???-??? |
|???-??? |
||
| − | |- |
+ | |- bgcolor="#FFD7D7" |
|3 |
|3 |
||
|51~57 |
|51~57 |
||
| Line 109: | Line 125: | ||
|???-??? |
|???-??? |
||
|???-??? |
|???-??? |
||
| − | |- |
+ | |- bgcolor="#FFD7D7" |
|4 |
|4 |
||
|61~63 |
|61~63 |
||
| Line 118: | Line 134: | ||
|1630-3260 |
|1630-3260 |
||
|163-326 |
|163-326 |
||
| − | |- |
+ | |- bgcolor="#FFD7D7" |
|5 |
|5 |
||
|61~67 |
|61~67 |
||
| Line 127: | Line 143: | ||
|1650-3300 |
|1650-3300 |
||
|165-330 |
|165-330 |
||
| − | |- |
+ | |- bgcolor="#FFD7D7" |
|6 |
|6 |
||
|61~68 |
|61~68 |
||
| − | | |
+ | |99 |
| |
| |
||
*3 [[:Category:Tonberries|Tonberries family]] |
*3 [[:Category:Tonberries|Tonberries family]] |
||
*3 [[Iron Maiden]]s |
*3 [[Iron Maiden]]s |
||
| + | |1660 |
||
| − | |???-??? |
||
| + | |166 |
||
| − | |???-??? |
||
|} |
|} |
||
{| border="0" width="100%" cellpadding="0" cellspacing="1" |
{| border="0" width="100%" cellpadding="0" cellspacing="1" |
||
| − | |- |
+ | |- |
! style="background:#A58D63;" colspan="2" align="center" | Brown Casket |
! style="background:#A58D63;" colspan="2" align="center" | Brown Casket |
||
! style="background:#63C4DC;" colspan="2" align="center" | Blue Casket |
! style="background:#63C4DC;" colspan="2" align="center" | Blue Casket |
||
| − | |- |
+ | |- |
! style="background:#A58D63;" width="20%" | Item |
! style="background:#A58D63;" width="20%" | Item |
||
| − | ! style="background:#A58D63;" width="5%" |
+ | ! style="background:#A58D63;" width="5%" | Abundance |
! style="background:#63C4DC;" width="20%" | Item |
! style="background:#63C4DC;" width="20%" | Item |
||
| − | ! style="background:#63C4DC;" width="5%" |
+ | ! style="background:#63C4DC;" width="5%" | Abundance |
| − | |- |
+ | |- |
| − | | style="background:#ECD2A5; padding-left:1em;" | |
+ | | style="background:#ECD2A5; padding-left:1em;" | [[Voiddust]] |
| − | | style="background:#ECD2A5; padding-left:1em;" | |
+ | | style="background:#ECD2A5; padding-left:1em;" | {{Drop Rate| 1|25}} |
| + | | style="background:#BBE6E6; padding-left:1em;" | [[Catholicon]]{{temp|nc}} |
||
| + | | style="background:#BBE6E6; padding-left:1em;" | {{Drop Rate| 1| 6}} |
||
| + | |- |
||
| + | | style="background:#ECD2A5; padding-left:1em;" | [[Pro-Ether +1]] |
||
| + | | style="background:#ECD2A5; padding-left:1em;" | {{Drop Rate| 3|25}} |
||
| + | | style="background:#BBE6E6; padding-left:1em;" | [[Hi-Potion +2]]{{temp|nc}} |
||
| + | | style="background:#BBE6E6; padding-left:1em;" | {{Drop Rate| 1| 6}} |
||
| + | |- |
||
| + | | style="background:#ECD2A5; padding-left:1em;" | [[Phoenix Feather]] |
||
| + | | style="background:#ECD2A5; padding-left:1em;" | {{Drop Rate| 1|25}} |
||
| + | | style="background:#BBE6E6; padding-left:1em;" | [[Super Ether]]{{temp|nc}} |
||
| + | | style="background:#BBE6E6; padding-left:1em;" | {{Drop Rate| 2| 6}} |
||
| + | |- |
||
| + | | style="background:#ECD2A5; padding-left:1em;" | [[Gold Thread]] |
||
| + | | style="background:#ECD2A5; padding-left:1em;" | {{Drop Rate| 1|25}} |
||
| + | | style="background:#BBE6E6; padding-left:1em;" | [[Pamama au Lait]]{{temp|nc}} |
||
| + | | style="background:#BBE6E6; padding-left:1em;" | {{Drop Rate| 1| 6}} |
||
| + | |- |
||
| + | | style="background:#ECD2A5; padding-left:1em;" | [[X-Potion +1]] |
||
| + | | style="background:#ECD2A5; padding-left:1em;" | {{Drop Rate| 3|25}} |
||
| + | | style="background:#BBE6E6; padding-left:1em;" | [[Catholicon]]{{temp|nc}} |
||
| + | | style="background:#BBE6E6; padding-left:1em;" | {{Drop Rate| 1| 6}} |
||
| + | |- |
||
| + | | style="background:#ECD2A5; padding-left:1em;" | [[Bascinet]] |
||
| + | | style="background:#ECD2A5; padding-left:1em;" | {{Drop Rate| 1|25}} |
||
| + | | style="background:#BBE6E6; padding-left:1em;" | [[Prism Powder]]{{temp|nc}} |
||
| + | | style="background:#BBE6E6; padding-left:1em;" | {{Drop Rate| 1| 6}} |
||
| + | |- |
||
| + | | style="background:#ECD2A5; padding-left:1em;" | [[Silk Pumps]] |
||
| + | | style="background:#ECD2A5; padding-left:1em;" | {{Drop Rate| 1|25}} |
||
| + | | style="background:#BBE6E6; padding-left:1em;" | <!-- Item Name --> |
||
| + | | style="background:#BBE6E6; padding-left:1em;" | <!-- Abundance --> |
||
| + | |- |
||
| + | | style="background:#ECD2A5; padding-left:1em;" | [[Darksteel Sollerets]] |
||
| + | | style="background:#ECD2A5; padding-left:1em;" | {{Drop Rate| 2|25}} |
||
| + | | style="background:#BBE6E6; padding-left:1em;" | <!-- Item Name --> |
||
| + | | style="background:#BBE6E6; padding-left:1em;" | <!-- Abundance --> |
||
| + | |- |
||
| + | | style="background:#ECD2A5; padding-left:1em;" | [[Cobalt Cell]] |
||
| + | | style="background:#ECD2A5; padding-left:1em;" | {{Drop Rate| 1|25}} |
||
| + | | style="background:#BBE6E6; padding-left:1em;" | <!-- Item Name --> |
||
| + | | style="background:#BBE6E6; padding-left:1em;" | <!-- Abundance --> |
||
| + | |- |
||
| + | | style="background:#ECD2A5; padding-left:1em;" | [[Xanthus Cell]] |
||
| + | | style="background:#ECD2A5; padding-left:1em;" | {{Drop Rate| 1|25}} |
||
| + | | style="background:#BBE6E6; padding-left:1em;" | <!-- Item Name --> |
||
| + | | style="background:#BBE6E6; padding-left:1em;" | <!-- Abundance --> |
||
| + | |- |
||
| + | | style="background:#ECD2A5; padding-left:1em;" | [[Rubicund Cell]] |
||
| + | | style="background:#ECD2A5; padding-left:1em;" | {{Drop Rate| 1|25}} |
||
| style="background:#BBE6E6; padding-left:1em;" | <!-- Item Name --> |
| style="background:#BBE6E6; padding-left:1em;" | <!-- Item Name --> |
||
| style="background:#BBE6E6; padding-left:1em;" | <!-- Abundance --> |
| style="background:#BBE6E6; padding-left:1em;" | <!-- Abundance --> |
||
|- |
|- |
||
| − | | style="background:#ECD2A5; padding-left:1em;" | |
+ | | style="background:#ECD2A5; padding-left:1em;" | [[Power Cooler]] |
| − | | style="background:#ECD2A5; padding-left:1em;" | |
+ | | style="background:#ECD2A5; padding-left:1em;" | {{Drop Rate| 1|25}} |
| style="background:#BBE6E6; padding-left:1em;" | <!-- Item Name --> |
| style="background:#BBE6E6; padding-left:1em;" | <!-- Item Name --> |
||
| style="background:#BBE6E6; padding-left:1em;" | <!-- Abundance --> |
| style="background:#BBE6E6; padding-left:1em;" | <!-- Abundance --> |
||
|- |
|- |
||
| − | | style="background:#ECD2A5; padding-left:1em;" | |
+ | | style="background:#ECD2A5; padding-left:1em;" | [[Ebony Log]] |
| − | | style="background:#ECD2A5; padding-left:1em;" | |
+ | | style="background:#ECD2A5; padding-left:1em;" | {{Drop Rate| 2|25}} |
| style="background:#BBE6E6; padding-left:1em;" | <!-- Item Name --> |
| style="background:#BBE6E6; padding-left:1em;" | <!-- Item Name --> |
||
| style="background:#BBE6E6; padding-left:1em;" | <!-- Abundance --> |
| style="background:#BBE6E6; padding-left:1em;" | <!-- Abundance --> |
||
|- |
|- |
||
| − | | style="background:#ECD2A5; padding-left:1em;" | |
+ | | style="background:#ECD2A5; padding-left:1em;" | [[Darksteel Bolt Heads]] |
| − | | style="background:#ECD2A5; padding-left:1em;" | |
+ | | style="background:#ECD2A5; padding-left:1em;" | {{Drop Rate| 2|25}} |
| style="background:#BBE6E6; padding-left:1em;" | <!-- Item Name --> |
| style="background:#BBE6E6; padding-left:1em;" | <!-- Item Name --> |
||
| style="background:#BBE6E6; padding-left:1em;" | <!-- Abundance --> |
| style="background:#BBE6E6; padding-left:1em;" | <!-- Abundance --> |
||
|- |
|- |
||
| − | | style="background:#ECD2A5; padding-left:1em;" | |
+ | | style="background:#ECD2A5; padding-left:1em;" | [[Reishi Mushroom]] |
| − | | style="background:#ECD2A5; padding-left:1em;" | |
+ | | style="background:#ECD2A5; padding-left:1em;" | {{Drop Rate| 1|25}} |
| style="background:#BBE6E6; padding-left:1em;" | <!-- Item Name --> |
| style="background:#BBE6E6; padding-left:1em;" | <!-- Item Name --> |
||
| style="background:#BBE6E6; padding-left:1em;" | <!-- Abundance --> |
| style="background:#BBE6E6; padding-left:1em;" | <!-- Abundance --> |
||
|- |
|- |
||
| − | | style="background:#ECD2A5; padding-left:1em;" | |
+ | | style="background:#ECD2A5; padding-left:1em;" | [[Hi-Ether +1]] |
| − | | style="background:#ECD2A5; padding-left:1em;" | |
+ | | style="background:#ECD2A5; padding-left:1em;" | {{Drop Rate| 1|25}} |
| style="background:#BBE6E6; padding-left:1em;" | <!-- Item Name --> |
| style="background:#BBE6E6; padding-left:1em;" | <!-- Item Name --> |
||
| style="background:#BBE6E6; padding-left:1em;" | <!-- Abundance --> |
| style="background:#BBE6E6; padding-left:1em;" | <!-- Abundance --> |
||
|- |
|- |
||
| − | | style="background:#ECD2A5; padding-left:1em;" | |
+ | | style="background:#ECD2A5; padding-left:1em;" | [[Hi-Potion +1]] |
| − | | style="background:#ECD2A5; padding-left:1em;" | |
+ | | style="background:#ECD2A5; padding-left:1em;" | {{Drop Rate| 2|25}} |
| style="background:#BBE6E6; padding-left:1em;" | <!-- Item Name --> |
| style="background:#BBE6E6; padding-left:1em;" | <!-- Item Name --> |
||
| style="background:#BBE6E6; padding-left:1em;" | <!-- Abundance --> |
| style="background:#BBE6E6; padding-left:1em;" | <!-- Abundance --> |
||
|- |
|- |
||
| − | | style="background:#ECD2A5; padding-left:1em;" | |
+ | | style="background:#ECD2A5; padding-left:1em;" | [[Darksteel Ore]] |
| − | | style="background:#ECD2A5; padding-left:1em;" | |
+ | | style="background:#ECD2A5; padding-left:1em;" | {{Drop Rate| 1|25}} |
| style="background:#BBE6E6; padding-left:1em;" | <!-- Item Name --> |
| style="background:#BBE6E6; padding-left:1em;" | <!-- Item Name --> |
||
| style="background:#BBE6E6; padding-left:1em;" | <!-- Abundance --> |
| style="background:#BBE6E6; padding-left:1em;" | <!-- Abundance --> |
||
|- |
|- |
||
| − | | style="background:#ECD2A5; padding-left:1em;" | |
+ | | style="background:#ECD2A5; padding-left:1em;" | [[Darksteel Breeches]] |
| − | | style="background:#ECD2A5; padding-left:1em;" | |
+ | | style="background:#ECD2A5; padding-left:1em;" | {{Drop Rate| 1|25}} |
| style="background:#BBE6E6; padding-left:1em;" | <!-- Item Name --> |
| style="background:#BBE6E6; padding-left:1em;" | <!-- Item Name --> |
||
| style="background:#BBE6E6; padding-left:1em;" | <!-- Abundance --> |
| style="background:#BBE6E6; padding-left:1em;" | <!-- Abundance --> |
||
|- |
|- |
||
| − | | style="background:#ECD2A5; padding-left:1em;" | |
+ | | style="background:#ECD2A5; padding-left:1em;" | [[Gold Ore]] |
| − | | style="background:#ECD2A5; padding-left:1em;" | |
+ | | style="background:#ECD2A5; padding-left:1em;" | {{Drop Rate| 2|25}} |
| style="background:#BBE6E6; padding-left:1em;" | <!-- Item Name --> |
| style="background:#BBE6E6; padding-left:1em;" | <!-- Item Name --> |
||
| style="background:#BBE6E6; padding-left:1em;" | <!-- Abundance --> |
| style="background:#BBE6E6; padding-left:1em;" | <!-- Abundance --> |
||
|- |
|- |
||
| − | | style="background:#ECD2A5; padding-left:1em;" | |
+ | | style="background:#ECD2A5; padding-left:1em;" | [[Boneworker's torque]] |
| − | | style="background:#ECD2A5; padding-left:1em;" | |
+ | | style="background:#ECD2A5; padding-left:1em;" | {{Drop Rate| 1|25}} |
| style="background:#BBE6E6; padding-left:1em;" | <!-- Item Name --> |
| style="background:#BBE6E6; padding-left:1em;" | <!-- Item Name --> |
||
| style="background:#BBE6E6; padding-left:1em;" | <!-- Abundance --> |
| style="background:#BBE6E6; padding-left:1em;" | <!-- Abundance --> |
||
|- |
|- |
||
| − | | style="background:#ECD2A5; padding-left:1em;" | |
+ | | style="background:#ECD2A5; padding-left:1em;" | [[Wyvern Skin]] |
| − | | style="background:#ECD2A5; padding-left:1em;" | |
+ | | style="background:#ECD2A5; padding-left:1em;" | {{Drop Rate| 1|25}} |
| style="background:#BBE6E6; padding-left:1em;" | <!-- Item Name --> |
| style="background:#BBE6E6; padding-left:1em;" | <!-- Item Name --> |
||
| style="background:#BBE6E6; padding-left:1em;" | <!-- Abundance --> |
| style="background:#BBE6E6; padding-left:1em;" | <!-- Abundance --> |
||
|- |
|- |
||
| − | | style="background:#ECD2A5; padding-left:1em;" | |
+ | | style="background:#ECD2A5; padding-left:1em;" | [[Ground Wasabi]] |
| − | | style="background:#ECD2A5; padding-left:1em;" | |
+ | | style="background:#ECD2A5; padding-left:1em;" | {{Drop Rate| 1|25}} |
| style="background:#BBE6E6; padding-left:1em;" | <!-- Item Name --> |
| style="background:#BBE6E6; padding-left:1em;" | <!-- Item Name --> |
||
| style="background:#BBE6E6; padding-left:1em;" | <!-- Abundance --> |
| style="background:#BBE6E6; padding-left:1em;" | <!-- Abundance --> |
||
Revision as of 08:08, 6 December 2019
|
Table of Contents
|
Zone Information
| ||||||||||||||||||||||||||||||||||
|
Description
An ancient temple to the evil deity Uggalepih, built in the isolated depths of the jungle on the eastern portion of Elshimo Island. The structure itself has fallen into ruin, and the roots of nearby trees are slowly consuming its walls. Locals dare not approach the temple of Uggalepih. It is referred to as a temple of hatred, since it is occupied by the small but brutal beastmen known as the Tonberries. Travelers who accidentally stray into the area tell horrifying tales of cursed chanting that resonates from the depths of the earth. 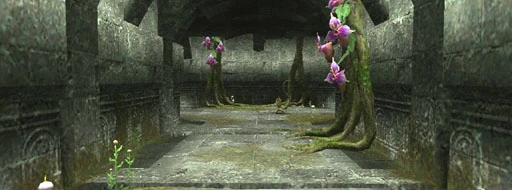 | |||||||||||||||||||||||||||||||||||
|
Connections
|
Involved in Quests/Missions

Other Information
[ edit ]
| Item | Abundance |
|---|---|
| Gil: 7320 - 14400 (??? Gil)More data needed |
|
| Map of the Temple of Uggalepih | Received if not previously obtained |
| Evoker's Doublet | Received with quest active |
| Myochin Domaru | Received with quest active |
| Painite | |
| Chrysoberyl | |
| Fluorite | |
| Moonstone | |
| Zircon | |
| Sunstone | |
|
Treasure Maps | |
[ edit ]
| Fish | Cap | Body of Water |
|---|---|---|
| Crayfish |
7 | All |
| Rusty Leggings |
0 | |
|
Fishing Maps | ||
[ edit ]
| Possible Weather | Weather Reporter |
|---|---|
|
Elemental Maps | |
Individual Training
| Area of Book | Pg | Tgt. Level | Max Level | Mobs to Fight | XP/Gil | Tabs |
|---|---|---|---|---|---|---|
| Temple of Uggalepih | 1 | 51~57 | ? | 1450-2900 | 145-290 | |
| 2 | 51~57 | ? | ???-??? | ???-??? | ||
| 3 | 51~57 | ? | ???-??? | ???-??? | ||
| 4 | 61~63 | ? | 1630-3260 | 163-326 | ||
| 5 | 61~67 | ? | 1650-3300 | 165-330 | ||
| 6 | 61~68 | 99 | 1660 | 166 |
| Brown Casket | Blue Casket | ||
|---|---|---|---|
| Item | Abundance | Item | Abundance |
| Voiddust | (???%) | Catholicon |
(???%) |
| Pro-Ether +1 | (???%) | Hi-Potion +2 |
(???%) |
| Phoenix Feather | (???%) | Super Ether |
(???%) |
| Gold Thread | (???%) | Pamama au Lait |
(???%) |
| X-Potion +1 | (???%) | Catholicon |
(???%) |
| Bascinet | (???%) | Prism Powder |
(???%) |
| Silk Pumps | (???%) | ||
| Darksteel Sollerets | (???%) | ||
| Cobalt Cell | (???%) | ||
| Xanthus Cell | (???%) | ||
| Rubicund Cell | (???%) | ||
| Power Cooler | (???%) | ||
| Ebony Log | (???%) | ||
| Darksteel Bolt Heads | (???%) | ||
| Reishi Mushroom | (???%) | ||
| Hi-Ether +1 | (???%) | ||
| Hi-Potion +1 | (???%) | ||
| Darksteel Ore | (???%) | ||
| Darksteel Breeches | (???%) | ||
| Gold Ore | (???%) | ||
| Boneworker's torque | (???%) | ||
| Wyvern Skin | (???%) | ||
| Ground Wasabi | (???%) | ||
NPCs Found Here
| Name | Location | Type |
|---|---|---|
| Cook Balberry | ||
| Cook Fulberry | ||
| Cook Minberry | ||
| Cook Solberry | ||
| Chef Nonberry | G-10 | Quest NPC |
| Patissier Linberry | G-10 | |
| Plongeur Monberry | G-10 | |
| Tonberry Priest | F-11 |
Notorious Monsters Found Here
|
HP = Detects Low HP; M = Detects Magic; Sc = Follows by Scent; T(S) = True-sight; T(H) = True-hearing JA = Detects job abilities; WS = Detects weaponskills; Z(D) = Asleep in Daytime; Z(N) = Asleep at Nighttime; A(R) = Aggressive to Reive participants |
Regular Monsters Found Here
|
HP = Detects Low HP; M = Detects Magic; Sc = Follows by Scent; T(S) = True-sight; T(H) = True-hearing JA = Detects job abilities; WS = Detects weaponskills; Z(D) = Asleep in Daytime; Z(N) = Asleep at Nighttime; A(R) = Aggressive to Reive participants |
Event Monsters Found Here
| Name | Family | Spawns | Notes |
|---|---|---|---|
Cleuvarion M Resoaix
|
Shadows | 1 | A, L, H, HP |
Mimic
|
Mimics | ||
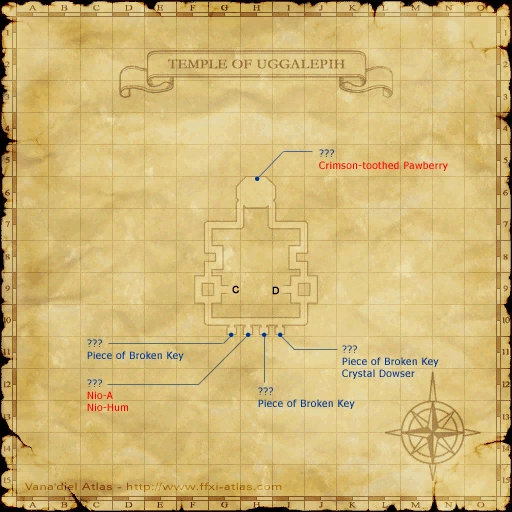
Nio-A
|
Dolls | 1 | A, L, M |
Nio-Hum
|
Dolls | 1 | A, L, M |
Rompaulion S Citalle
|
Shadows | 1 | A, L, H, HP |
Trompe L'Oeil
|
Golems | 1 | A, S, M |
Yallery Brown
|
Saplings | 1 | A, L, H |
|
HP = Detects Low HP; M = Detects Magic; Sc = Follows by Scent; T(S) = True-sight; T(H) = True-hearing JA = Detects job abilities; WS = Detects weaponskills; Z(D) = Asleep in Daytime; Z(N) = Asleep at Nighttime; A(R) = Aggressive to Reive participants |