m (→Drop Chart) |
|||
| (28 intermediate revisions by 17 users not shown) | |||
| Line 9: | Line 9: | ||
**Chest drops on these six floors seem to be affected by moon phase and [[Treasure Hunter]]. {{verification}} |
**Chest drops on these six floors seem to be affected by moon phase and [[Treasure Hunter]]. {{verification}} |
||
**The seventh floor just has the final Items chest. |
**The seventh floor just has the final Items chest. |
||
| ⚫ | |||
| ⚫ | |||
| ⚫ | |||
| ⚫ | |||
| ⚫ | |||
| ⚫ | |||
| ⚫ | |||
| ⚫ | |||
*The gate to the next level opens with the first kill. |
*The gate to the next level opens with the first kill. |
||
*Drops AF+1 materials for: BLU, BRD, BST, DRK, MNK, NIN, PUP, RDM, SAM, SCH, SMN, WAR, WHM. |
*Drops AF+1 materials for: BLU, BRD, BST, DRK, MNK, NIN, PUP, RDM, SAM, SCH, SMN, WAR, WHM. |
||
| Line 34: | Line 28: | ||
|- BGCOLOR=#e6e6ef |
|- BGCOLOR=#e6e6ef |
||
|align=left width=5%|[[Benedict Silk]] ([[White Mage|WHM]]) |
|align=left width=5%|[[Benedict Silk]] ([[White Mage|WHM]]) |
||
| − | |{{Abundance| 0| |
+ | |{{Abundance| 0|31}} |
| − | |{{Abundance| 2| |
+ | |{{Abundance| 2|29}} |
| − | |{{Abundance| 0| |
+ | |{{Abundance| 0|28}} |
| − | |{{Abundance| 0| |
+ | |{{Abundance| 0|31}} |
| − | |{{Abundance| 0| |
+ | |{{Abundance| 0|18}} |
| − | |{{Abundance| |
+ | |{{Abundance| 3|21}} |
| − | |{{Abundance| 0| |
+ | |{{Abundance| 0|29}} |
|- BGCOLOR=#e6e6ef |
|- BGCOLOR=#e6e6ef |
||
|align=left width=5%|[[Brilliantine]] ([[Scholar|SCH]]) |
|align=left width=5%|[[Brilliantine]] ([[Scholar|SCH]]) |
||
| − | |{{Abundance| 0| |
+ | |{{Abundance| 0|30}} |
| − | |{{Abundance| 0| |
+ | |{{Abundance| 0|29}} |
| − | |{{Abundance| 4| |
+ | |{{Abundance| 4|28}} |
| − | |{{Abundance| 0| |
+ | |{{Abundance| 0|31}} |
| − | |{{Abundance| 1| |
+ | |{{Abundance| 1|18}} |
| − | |{{Abundance| 0| |
+ | |{{Abundance| 0|21}} |
| − | |{{Abundance| 0| |
+ | |{{Abundance| 0|29}} |
|- BGCOLOR=#e6e6ef |
|- BGCOLOR=#e6e6ef |
||
|align=left width=5%|[[Cobalt Mythril Sheet|Cbl. Myth. Sheet]] ([[Dragoon|DRG]]) |
|align=left width=5%|[[Cobalt Mythril Sheet|Cbl. Myth. Sheet]] ([[Dragoon|DRG]]) |
||
| − | |{{Abundance| 0| |
+ | |{{Abundance| 0|30}} |
| − | |{{Abundance| 0| |
+ | |{{Abundance| 0|29}} |
| − | |{{Abundance| 0| |
+ | |{{Abundance| 0|28}} |
| − | |{{Abundance| 0| |
+ | |{{Abundance| 0|31}} |
| − | |{{Abundance| 0| |
+ | |{{Abundance| 0|18}} |
| − | |{{Abundance| 0| |
+ | |{{Abundance| 0|21}} |
| − | |{{Abundance| 0| |
+ | |{{Abundance| 0|29}} |
|- BGCOLOR=#e6e6ef |
|- BGCOLOR=#e6e6ef |
||
|align=left width=5%|[[Chameleon Yarn]] ([[Ranger|RNG]]) |
|align=left width=5%|[[Chameleon Yarn]] ([[Ranger|RNG]]) |
||
| − | |{{Abundance| 0| |
+ | |{{Abundance| 0|30}} |
| − | |{{Abundance| 0| |
+ | |{{Abundance| 0|29}} |
| − | |{{Abundance| 0| |
+ | |{{Abundance| 0|28}} |
| − | |{{Abundance| 0| |
+ | |{{Abundance| 0|31}} |
| − | |{{Abundance| 0| |
+ | |{{Abundance| 0|18}} |
| − | |{{Abundance| 0| |
+ | |{{Abundance| 0|21}} |
| − | |{{Abundance| 0| |
+ | |{{Abundance| 0|29}} |
|- BGCOLOR=#e6e6ef |
|- BGCOLOR=#e6e6ef |
||
|align=left width=5%|[[Coiled Yarn]] ([[Bard|BRD]]) |
|align=left width=5%|[[Coiled Yarn]] ([[Bard|BRD]]) |
||
| − | |{{Abundance| |
+ | |{{Abundance| 6|30}} |
| − | |{{Abundance| |
+ | |{{Abundance| 5|29}} |
| − | |{{Abundance|15| |
+ | |{{Abundance|15|28}} |
| − | |{{Abundance| 0| |
+ | |{{Abundance| 0|31}} |
| − | |{{Abundance| 0| |
+ | |{{Abundance| 0|18}} |
| − | |{{Abundance| |
+ | |{{Abundance| 2|21}} |
| − | |{{Abundance| 1| |
+ | |{{Abundance| 1|29}} |
|- BGCOLOR=#e6e6ef |
|- BGCOLOR=#e6e6ef |
||
|align=left width=5%|[[Dark Orichalcum]] ([[Dark Knight|DRK]]) |
|align=left width=5%|[[Dark Orichalcum]] ([[Dark Knight|DRK]]) |
||
| − | |{{Abundance| 0| |
+ | |{{Abundance| 0|30}} |
| − | |{{Abundance| 2| |
+ | |{{Abundance| 2|29}} |
| − | |{{Abundance| 0| |
+ | |{{Abundance| 0|28}} |
| − | |{{Abundance| |
+ | |{{Abundance| 4|31}} |
| − | |{{Abundance| 0| |
+ | |{{Abundance| 0|18}} |
| − | |{{Abundance| 0| |
+ | |{{Abundance| 0|21}} |
| − | |{{Abundance| 0| |
+ | |{{Abundance| 0|29}} |
|- BGCOLOR=#e6e6ef |
|- BGCOLOR=#e6e6ef |
||
|align=left width=5%|[[Diabolic Silk]] ([[Black Mage|BLM]]) |
|align=left width=5%|[[Diabolic Silk]] ([[Black Mage|BLM]]) |
||
| − | |{{Abundance| 0| |
+ | |{{Abundance| 0|30}} |
| − | |{{Abundance| 0| |
+ | |{{Abundance| 0|29}} |
| − | |{{Abundance| 0| |
+ | |{{Abundance| 0|28}} |
| − | |{{Abundance| 0| |
+ | |{{Abundance| 0|31}} |
| − | |{{Abundance| 0| |
+ | |{{Abundance| 0|18}} |
| − | |{{Abundance| 0| |
+ | |{{Abundance| 0|21}} |
| − | |{{Abundance| 0| |
+ | |{{Abundance| 0|29}} |
|- BGCOLOR=#e6e6ef |
|- BGCOLOR=#e6e6ef |
||
|align=left width=5%|[[Ecarlate Cloth]] ([[Warrior|WAR]]) |
|align=left width=5%|[[Ecarlate Cloth]] ([[Warrior|WAR]]) |
||
| − | |{{Abundance| 7| |
+ | |{{Abundance| 7|30}} |
| − | |{{Abundance| |
+ | |{{Abundance| 4|29}} |
| − | |{{Abundance| 0| |
+ | |{{Abundance| 0|28}} |
| − | |{{Abundance| 4| |
+ | |{{Abundance| 4|31}} |
| − | |{{Abundance| |
+ | |{{Abundance| 5|18}} |
| − | |{{Abundance| 0| |
+ | |{{Abundance| 0|21}} |
| − | |{{Abundance| |
+ | |{{Abundance| 4|29}} |
|- BGCOLOR=#e6e6ef |
|- BGCOLOR=#e6e6ef |
||
|align=left width=5%|[[Filet Lace]] ([[Dancer|DNC]]) |
|align=left width=5%|[[Filet Lace]] ([[Dancer|DNC]]) |
||
| − | |{{Abundance| 0| |
+ | |{{Abundance| 0|30}} |
| − | |{{Abundance| 0| |
+ | |{{Abundance| 0|29}} |
| − | |{{Abundance| 0| |
+ | |{{Abundance| 0|28}} |
| − | |{{Abundance| 0| |
+ | |{{Abundance| 0|31}} |
| − | |{{Abundance| 0| |
+ | |{{Abundance| 0|18}} |
| − | |{{Abundance| 0| |
+ | |{{Abundance| 0|21}} |
| − | |{{Abundance| 0| |
+ | |{{Abundance| 0|29}} |
|- BGCOLOR=#e6e6ef |
|- BGCOLOR=#e6e6ef |
||
|align=left width=5%|[[Glittering Yarn]] ([[Summoner|SMN]]) |
|align=left width=5%|[[Glittering Yarn]] ([[Summoner|SMN]]) |
||
| − | |{{Abundance| |
+ | |{{Abundance| 6|30}} |
| − | |{{Abundance| 0| |
+ | |{{Abundance| 0|29}} |
| − | |{{Abundance| 0| |
+ | |{{Abundance| 0|28}} |
| − | |{{Abundance| |
+ | |{{Abundance| 3|31}} |
| − | |{{Abundance| 3| |
+ | |{{Abundance| 3|18}} |
| − | |{{Abundance| |
+ | |{{Abundance|10|21}} |
| − | |{{Abundance| |
+ | |{{Abundance| 6|29}} |
|- BGCOLOR=#e6e6ef |
|- BGCOLOR=#e6e6ef |
||
|align=left width=5%|[[Luminian Thread]] ([[Blue Mage|BLU]]) |
|align=left width=5%|[[Luminian Thread]] ([[Blue Mage|BLU]]) |
||
| − | |{{Abundance| |
+ | |{{Abundance| 5|30}} |
| − | |{{Abundance| 0| |
+ | |{{Abundance| 0|29}} |
| − | |{{Abundance| |
+ | |{{Abundance| 7|28}} |
| − | |{{Abundance| 0| |
+ | |{{Abundance| 0|31}} |
| − | |{{Abundance| |
+ | |{{Abundance| 6|18}} |
| − | |{{Abundance| 0| |
+ | |{{Abundance| 0|21}} |
| − | |{{Abundance| |
+ | |{{Abundance|10|29}} |
|- BGCOLOR=#e6e6ef |
|- BGCOLOR=#e6e6ef |
||
|align=left width=5%|[[Pantin Wire]] ([[Puppetmaster|PUP]]) |
|align=left width=5%|[[Pantin Wire]] ([[Puppetmaster|PUP]]) |
||
| − | |{{Abundance| 0| |
+ | |{{Abundance| 0|30}} |
| − | |{{Abundance| |
+ | |{{Abundance| 4|29}} |
| − | |{{Abundance| 0| |
+ | |{{Abundance| 0|28}} |
| − | |{{Abundance| 1| |
+ | |{{Abundance| 1|31}} |
| − | |{{Abundance| 0| |
+ | |{{Abundance| 0|18}} |
| − | |{{Abundance| 0| |
+ | |{{Abundance| 0|21}} |
| − | |{{Abundance| 0| |
+ | |{{Abundance| 0|29}} |
|- BGCOLOR=#e6e6ef |
|- BGCOLOR=#e6e6ef |
||
|align=left width=5%|[[Plaited Cord]] ([[Ninja|NIN]]) |
|align=left width=5%|[[Plaited Cord]] ([[Ninja|NIN]]) |
||
| − | |{{Abundance| 0| |
+ | |{{Abundance| 0|30}} |
| − | |{{Abundance| 0| |
+ | |{{Abundance| 0|29}} |
| − | |{{Abundance| 1| |
+ | |{{Abundance| 1|28}} |
| − | |{{Abundance| |
+ | |{{Abundance| 4|31}} |
| − | |{{Abundance| 1| |
+ | |{{Abundance| 1|18}} |
| − | |{{Abundance| |
+ | |{{Abundance| 4|21}} |
| − | |{{Abundance| 0| |
+ | |{{Abundance| 0|29}} |
|- BGCOLOR=#e6e6ef |
|- BGCOLOR=#e6e6ef |
||
|align=left width=5%|[[Ruby Silk Thread]] ([[Red Mage|RDM]]) |
|align=left width=5%|[[Ruby Silk Thread]] ([[Red Mage|RDM]]) |
||
| − | |{{Abundance| |
+ | |{{Abundance| 4|30}} |
| − | |{{Abundance| |
+ | |{{Abundance|17|29}} |
| − | |{{Abundance| 0| |
+ | |{{Abundance| 0|28}} |
| − | |{{Abundance| 4| |
+ | |{{Abundance| 4|31}} |
| − | |{{Abundance| 1| |
+ | |{{Abundance| 1|18}} |
| − | |{{Abundance| 4| |
+ | |{{Abundance| 4|21}} |
| − | |{{Abundance| 2| |
+ | |{{Abundance| 2|29}} |
|- BGCOLOR=#e6e6ef |
|- BGCOLOR=#e6e6ef |
||
|align=left width=5%|[[Scarlet Odoshi]] ([[Samurai|SAM]]) |
|align=left width=5%|[[Scarlet Odoshi]] ([[Samurai|SAM]]) |
||
| − | |{{Abundance| 4| |
+ | |{{Abundance| 4|30}} |
| − | |{{Abundance| |
+ | |{{Abundance| 5|29}} |
| − | |{{Abundance| |
+ | |{{Abundance| 3|28}} |
| − | |{{Abundance| |
+ | |{{Abundance|17|31}} |
| − | |{{Abundance| 0| |
+ | |{{Abundance| 0|18}} |
| − | |{{Abundance| 4| |
+ | |{{Abundance| 4|21}} |
| − | |{{Abundance| |
+ | |{{Abundance| 5|29}} |
|- BGCOLOR=#e6e6ef |
|- BGCOLOR=#e6e6ef |
||
|align=left width=5%|[[Silkworm Thread]] ([[Corsair|COR]]) |
|align=left width=5%|[[Silkworm Thread]] ([[Corsair|COR]]) |
||
| − | |{{Abundance| 0| |
+ | |{{Abundance| 0|30}} |
| − | |{{Abundance| 0| |
+ | |{{Abundance| 0|29}} |
| − | |{{Abundance| 0| |
+ | |{{Abundance| 0|28}} |
| − | |{{Abundance| 0| |
+ | |{{Abundance| 0|31}} |
| − | |{{Abundance| 0| |
+ | |{{Abundance| 0|18}} |
| − | |{{Abundance| 0| |
+ | |{{Abundance| 0|21}} |
| − | |{{Abundance| 0| |
+ | |{{Abundance| 0|29}} |
|- BGCOLOR=#e6e6ef |
|- BGCOLOR=#e6e6ef |
||
|align=left width=5%|[[Smalt Leather]] ([[Beastmaster|BST]]) |
|align=left width=5%|[[Smalt Leather]] ([[Beastmaster|BST]]) |
||
| − | |{{Abundance| 0| |
+ | |{{Abundance| 0|30}} |
| − | |{{Abundance| 0| |
+ | |{{Abundance| 0|29}} |
| − | |{{Abundance| 2| |
+ | |{{Abundance| 2|28}} |
| − | |{{Abundance| 0| |
+ | |{{Abundance| 0|31}} |
| − | |{{Abundance| 1| |
+ | |{{Abundance| 1|18}} |
| − | |{{Abundance| 0| |
+ | |{{Abundance| 0|21}} |
| − | |{{Abundance| 0| |
+ | |{{Abundance| 0|29}} |
|- BGCOLOR=#e6e6ef |
|- BGCOLOR=#e6e6ef |
||
|align=left width=5%|[[Snowy Cermet]] ([[Paladin|PLD]]) |
|align=left width=5%|[[Snowy Cermet]] ([[Paladin|PLD]]) |
||
| − | |{{Abundance| 0| |
+ | |{{Abundance| 0|30}} |
| − | |{{Abundance| 0| |
+ | |{{Abundance| 0|29}} |
| − | |{{Abundance| 0| |
+ | |{{Abundance| 0|28}} |
| − | |{{Abundance| 0| |
+ | |{{Abundance| 0|31}} |
| − | |{{Abundance| 0| |
+ | |{{Abundance| 0|18}} |
| − | |{{Abundance| 0| |
+ | |{{Abundance| 0|21}} |
| − | |{{Abundance| 0| |
+ | |{{Abundance| 0|29}} |
|- BGCOLOR=#e6e6ef |
|- BGCOLOR=#e6e6ef |
||
|align=left width=5%|[[Supple Skin]] ([[Thief|THF]]) |
|align=left width=5%|[[Supple Skin]] ([[Thief|THF]]) |
||
| − | |{{Abundance| 0| |
+ | |{{Abundance| 0|30}} |
| − | |{{Abundance| 0| |
+ | |{{Abundance| 0|29}} |
| − | |{{Abundance| 0| |
+ | |{{Abundance| 0|28}} |
| − | |{{Abundance| 0| |
+ | |{{Abundance| 0|31}} |
| − | |{{Abundance| 0| |
+ | |{{Abundance| 0|18}} |
| − | |{{Abundance| 0| |
+ | |{{Abundance| 0|21}} |
| − | |{{Abundance| 0| |
+ | |{{Abundance| 0|29}} |
|- BGCOLOR=#e6e6ef |
|- BGCOLOR=#e6e6ef |
||
|align=left width=5%|[[Utopian Gold Thread|Ut. Gold Thread]] ([[Monk|MNK]]) |
|align=left width=5%|[[Utopian Gold Thread|Ut. Gold Thread]] ([[Monk|MNK]]) |
||
| − | |{{Abundance| 0| |
+ | |{{Abundance| 0|30}} |
| − | |{{Abundance| 0| |
+ | |{{Abundance| 0|29}} |
| − | |{{Abundance| 0| |
+ | |{{Abundance| 0|28}} |
| − | |{{Abundance| 0| |
+ | |{{Abundance| 0|31}} |
| − | |{{Abundance| |
+ | |{{Abundance| 2|18}} |
| − | |{{Abundance| |
+ | |{{Abundance| 1|21}} |
| − | |{{Abundance| 0| |
+ | |{{Abundance| 0|29}} |
|- BGCOLOR=#e6e6ef |
|- BGCOLOR=#e6e6ef |
||
|align=left width=5%|[[Metal Chip]] |
|align=left width=5%|[[Metal Chip]] |
||
| Line 220: | Line 214: | ||
| - |
| - |
||
| - |
| - |
||
| − | |{{Abundance| |
+ | |{{Abundance|3|28}} |
|- BGCOLOR=#e6e6ef |
|- BGCOLOR=#e6e6ef |
||
|align=left width=5%|[[Emerald Chip]] |
|align=left width=5%|[[Emerald Chip]] |
||
| Line 241: | Line 235: | ||
** [[Barparalyzra]] and [[Barblizzara]] for Roar |
** [[Barparalyzra]] and [[Barblizzara]] for Roar |
||
** Around 10,000 HP |
** Around 10,000 HP |
||
| − | * Items chest has 4-7 [[Ancient Beastcoin]]s and 1 [[:Category:Artifact Armor +1|AF+1]] item (BRD, RDM, SAM, SMN, WAR, BLU, ?) |
+ | * Items chest has 4-7 [[Ancient Beastcoin]]s and 0-1 [[:Category:Artifact Armor +1|AF+1]] item (BRD, RDM, SAM, SMN, WAR, BLU, ?) |
<br clear=all> |
<br clear=all> |
||
| Line 302: | Line 296: | ||
** Defeat them all to spawn the final chest, with the [[Emerald Chip]] sometimes [[Metal Chip]], 6-7 [[Ancient Beastcoin]]s and 1 [[:Category:Artifact Armor +1|AF+1]] item (BRD, SAM, WAR, SMN, RDM, BLU ?) |
** Defeat them all to spawn the final chest, with the [[Emerald Chip]] sometimes [[Metal Chip]], 6-7 [[Ancient Beastcoin]]s and 1 [[:Category:Artifact Armor +1|AF+1]] item (BRD, SAM, WAR, SMN, RDM, BLU ?) |
||
| + | ===Testimonials=== |
||
| − | |||
| + | *Easy solo by 99THF/DNC in RoE gear full clear |
||
| − | |||
| + | *Soloable by a well geared BLU90/NIN, use evasion set to get shadows up [[User:Draylo|Draylo]] 21:06, August 26, 2011 (UTC) |
||
| − | |||
| + | *Cleared by BLU90/NIN and NIN90/DNC with 5-6 time chests --{{User:dibble/Sig}} 08:02, April 28, 2011 (UTC) |
||
| − | |||
| ⚫ | |||
| − | |||
| ⚫ | |||
| − | |||
| ⚫ | |||
| − | |||
| ⚫ | |||
| − | |||
| ⚫ | |||
| − | |||
| ⚫ | |||
| − | |||
| + | *Finished with 36 mins to Spare with Brd/whm,whm/rdm,rdm/sch,mnk/nin,thf/nin we zoomed through it and no deaths or any problems. |
||
| − | |||
| + | *BST99/DNC49 cleared solo killing almost every mob. Skipped the room with six mandys in it. Used FaithfulFalcorr with Run Wild on the last batch of birds. |
||
| − | |||
| + | *Easily soloable by 99BLU/RDM |
||
| − | |||
| + | *Solo 99 NIN/DNC, killed every mob except the room with the six mandys. 5 time chests with about 20 min to spare. Be careful on the last floor as all six birds link. |
||
| − | |||
| − | |||
| − | |||
{{Limbus Notes}} |
{{Limbus Notes}} |
||
Revision as of 13:35, 11 March 2018
- Temenos - Western Tower is a subsection of the Temenos zone in the Limbus region.
- It is reached via the Teleport-Holla crag entrance to Al'Taieu.
- Cosmo-Cleanse and White Card key items are required for entry.
- Monsters on the first six floors drop an average of two chests per floor; you can open them at any time.
- Over the six floors, on average there will be four Time (15 minutes), four Restore and four Items chests; there can be more or less.
- Luck plays a very important role in this Limbus area; depending on Time chest drops you can finish with 45 minutes left or run out of time halfway.
- Chest drops on these six floors seem to be affected by moon phase and Treasure Hunter.

- The seventh floor just has the final Items chest.
- The mobs can be "pet pulled" (e.g., Carbuncle).
- The gate to the next level opens with the first kill.
- Drops AF+1 materials for: BLU, BRD, BST, DRK, MNK, NIN, PUP, RDM, SAM, SCH, SMN, WAR, WHM.
- Typical Ancient Beastcoin yield: 45-66
- Reward for completion: Emerald Chip
Drop Chart
| Item (Job) | Floor 1 | Floor 2 | Floor 3 | Floor 4 | Floor 5 | Floor 6 | Floor 7 |
| Benedict Silk (WHM) | |||||||
| Brilliantine (SCH) | |||||||
| Cbl. Myth. Sheet (DRG) | |||||||
| Chameleon Yarn (RNG) | |||||||
| Coiled Yarn (BRD) | |||||||
| Dark Orichalcum (DRK) | |||||||
| Diabolic Silk (BLM) | |||||||
| Ecarlate Cloth (WAR) | |||||||
| Filet Lace (DNC) | |||||||
| Glittering Yarn (SMN) | |||||||
| Luminian Thread (BLU) | |||||||
| Pantin Wire (PUP) | |||||||
| Plaited Cord (NIN) | |||||||
| Ruby Silk Thread (RDM) | |||||||
| Scarlet Odoshi (SAM) | |||||||
| Silkworm Thread (COR) | |||||||
| Smalt Leather (BST) | |||||||
| Snowy Cermet (PLD) | |||||||
| Supple Skin (THF) | |||||||
| Ut. Gold Thread (MNK) | |||||||
| Metal Chip | - | - | - | - | - | - | |
| Emerald Chip | - | - | - | - | - | - | (100%) |
First Floor
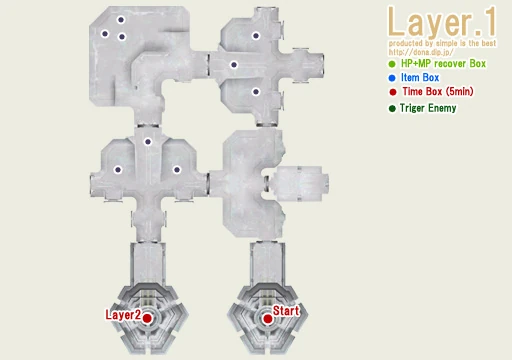
- Enemies: Enhanced Tiger x9 (Tigers)
- ~5/9 drop an Ancient Beastcoin.
- Linking (sight & sound)
- Barparalyzra and Barblizzara for Roar
- Around 10,000 HP
- Items chest has 4-7 Ancient Beastcoins and 0-1 AF+1 item (BRD, RDM, SAM, SMN, WAR, BLU, ?)
Second Floor
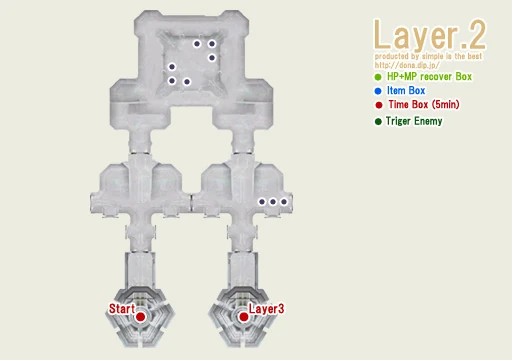
- Enemies: Enhanced Mandragora x9 (Mandragora)
- ~4/9 drop an Ancient Beastcoin.
- Linking (sound)
- Around 10,000 HP
- Mages stand well back and/or use Poison Potions to avoid Dream Flower.
- Range is 15"
- Items chest has 5-6 Ancient Beastcoins and 1-2 AF+1 items (BRD, RDM, DRK, SAM, BST, WHM, WAR, PUP, ?)
- Mandies in the north section wander around randomly and can be single pulled.
- Mandies by the exit in the southeast march back and forth all together and can be easily avoided.
Third Floor
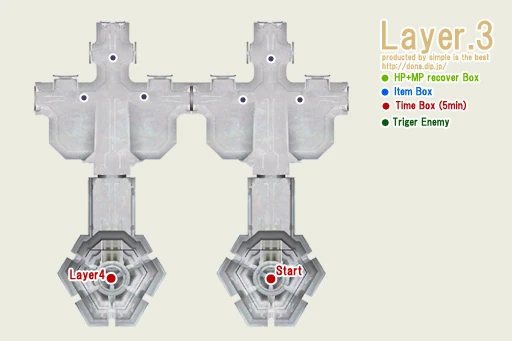
- Enemies: Enhanced Beetle x6 (Beetles)
- Linking (sight)
- ~4/6 drop an Ancient Beastcoin.
- Around 10,000 HP
- Items chest has 4-7 Ancient Beastcoins and 1-2 AF+1 items (BRD, SAM, RDM, WAR, BST, WHM, SMN, NIN, DRK, BLU, PUP, SCH, ?)
Fourth Floor
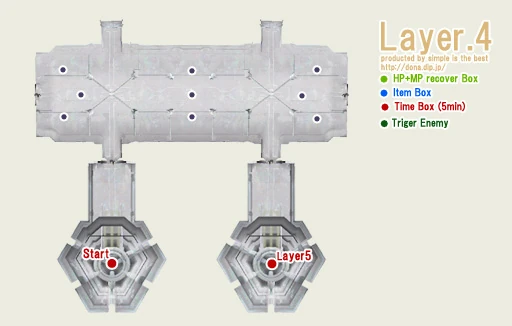
- Enemies: Enhanced Lizard x9 (Lizards)
- Linking (sound)
- ~7/9 drop an Ancient Beastcoin.
- Barfira for Fireball
- Items chest has 4-6 Ancient Beastcoins and 1-2 AF+1 items (SAM, BST, WAR, RDM, MNK, DRK, SMN, NIN, PUP ?)
Fifth Floor
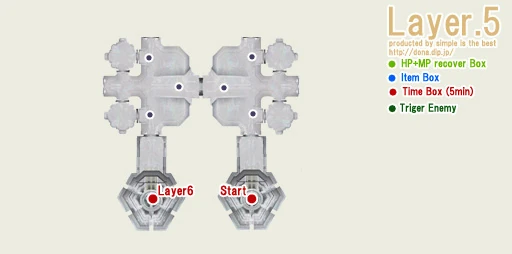
- Enemies: Enhanced Slime x6 (Slimes)
- Linking (sound)
- ~2/6 drop an Ancient Beastcoin.
- Barwatera might help with Fluid Spread
- Items chest has 6-8 Ancient Beastcoins and 1-2 AF+1 items (WAR, BST, WHM, SMN, MNK, RDM, BRD, NIN, BLU, ?)
- A small, melee-heavy group may want to kill the first slime and then skip to the next level.
- The slimes can move if you die. My WHM and I died on the porter to the next floor, took about 5-6 minutes, but the slimes moved.
Sixth Floor
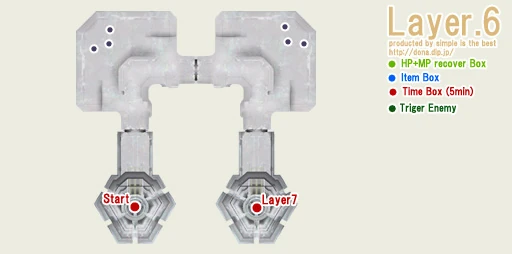
- Enemies: Enhanced Pugil x6 (Pugils)
- Linking (sound), can be pulled with Carbuncle.
- ~3/6 drop an Ancient Beastcoin.
- Barwatera for Water Ball
- Items chest has 6-7 Ancient Beastcoins and 1-2 AF+1 item (SMN, WAR, WHM, BRD, NIN, MNK, RDM, DRK, SAM, ?)
Seventh Floor

- Enemies: Enhanced Vulture x6 (Birds)
- When pulled all 6 link, unless pulled with Carbuncle.
- ~4/6 drop an Ancient Beastcoin.
- Defeat them all to spawn the final chest, with the Emerald Chip sometimes Metal Chip, 6-7 Ancient Beastcoins and 1 AF+1 item (BRD, SAM, WAR, SMN, RDM, BLU ?)
Testimonials
- Easy solo by 99THF/DNC in RoE gear full clear
- Soloable by a well geared BLU90/NIN, use evasion set to get shadows up Draylo 21:06, August 26, 2011 (UTC)
- Cleared by BLU90/NIN and NIN90/DNC with 5-6 time chests ---- dibble 08:02, April 28, 2011 (UTC)
- A party of 3 strong DD/NIN, 1 BRD, 1 RDM, 1 BLM can complete this area pretty consistently.
- 5 people (pld/nin, mnk/nin, blm/whm, rdm/dnc, whm/smn) have cleared this completely taking 4 time chests.
- Use 2-hours at will to speed up killing as much as possible; there are no bosses, and there will be plenty of Restore chests.
- 5 people (blu/nin, sam/dnc, sam/nin, brd, and whm/smn) have cleared this completely as well.
- 4 people (mnk/nin, rdm/whm, blm/whm, brd/whm) have cleared this by skipping floors as needed and getting time chests.
- A balanced alliance of 12 can easily defeat every mob on all floors with plenty of time remaining.
- Finished with 36 mins to Spare with Brd/whm,whm/rdm,rdm/sch,mnk/nin,thf/nin we zoomed through it and no deaths or any problems.
- BST99/DNC49 cleared solo killing almost every mob. Skipped the room with six mandys in it. Used FaithfulFalcorr with Run Wild on the last batch of birds.
- Easily soloable by 99BLU/RDM
- Solo 99 NIN/DNC, killed every mob except the room with the six mandys. 5 time chests with about 20 min to spare. Be careful on the last floor as all six birds link.
| Limbus | |
|---|---|
| Apollyon | |
| Temenos | |
| Rewards | |
| NPCs | |