No edit summary |
|||
| (45 intermediate revisions by 15 users not shown) | |||
| Line 1: | Line 1: | ||
| + | [[Category:Transportation]] |
||
| − | Floating survival guides are available in certain where [[Outpost Teleportation]] is possible as well as a few other areas. These targets allow you to teleport between [[Outpost]]s and other {{PAGENAME}} locations. |
||
| + | {{TOCright}} |
||
| + | [[File:Survival_Guide.jpg|thumb|left]] |
||
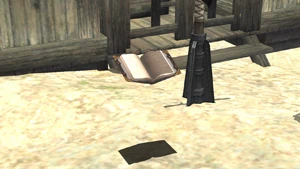
| + | Survival Guides are floating black books which have been placed by the [[Adventurers' Mutual Aid Network]] to provide teleportation services. They are located at all [[Outpost]]s in [[Conquest]] areas as well as a number of other locations. In dungeon areas, the guides are typically located at the main entrance. They appear on maps with a special [[File:Survival Guide Icon.jpg]] icon. |
||
| − | You must speak to each |
+ | You must speak to each {{PAGENAME}} to register it. Then you may teleport to previously registered guides for 1000 gil per trip base price (decreasing as you finish Rhapsodies of Vana'diel missions) or 50 tabs (or completely free when [[Thrifty Transit]] is active). The {{PAGENAME}} teleportation service operates independent of [[Outpost Teleportation]]. |
| − | *Survival guides are registered separately from outposts. |
||
| + | {| border="0" cellpadding="0" cellspacing="0" width="70%" |
||
| − | ==Nation {{PAGENAME}}s== |
||
| + | | valign="top" width="50%" | |
||
| − | *[[Bastok Mines]] (I-9) |
||
| − | *[[Northern San d'Oria]] (E-8) |
||
| − | *[[Port Windurst]] (B-5) |
||
| − | *[[Ru'Lude Gardens]] (I-10) |
||
| + | ==The Middle Lands== |
||
| − | ==Original Outposts with {{PAGENAME}}s== |
||
| + | {| cellspacing="3" width="100%" |
||
| − | *[[West Sarutabaruta]] - H-6 |
||
| − | *[[West Ronfaure]] |
||
| − | *[[North Gustaberg]] - D-10 |
||
| − | *[[Valkurm Dunes]] - H-8 |
||
| − | *[[Buburimu Peninsula]] |
||
| − | *[[Jugner Forest]] |
||
| − | *[[Pashhow Marshlands]] |
||
| − | *[[Meriphataud Mountains]] |
||
| − | *[[Beaucedine Glacier]] - H-9 |
||
| − | *[[Xarcabard]] - H-9 |
||
| − | *[[Qufim Island]] - In front of [[Lower Delkfutt's Tower]] |
||
| + | | style="border:1px solid gray; padding-left:1em;" bgcolor="#fff3f3" valign="top" width="33%" | |
||
| − | ==Outland Outposts with {{PAGENAME}}s== |
||
| − | + | ===[[Bastok|The Republic of Bastok]]=== |
|
| + | <!--* [[Bastok Markets]]-->Done |
||
| − | *[[Eastern Altepa Desert]] |
||
| − | *[[ |
+ | * [[Bastok Mines]] (I-9) |
| + | <!--* [[Metalworks]]--> |
||
| − | *[[Yuhtunga Jungle]] |
||
| − | *[[ |
+ | <!--* [[Port Bastok]]--> |
| + | | style="border:1px solid gray; padding-left:1em;" bgcolor="#fff3f3" valign="top" width="33%" | |
||
| − | ==Conquest Flags with {{PAGENAME}}s== |
||
| + | ===[[San d'Oria|The Kingdom of San d'Oria]]=== |
||
| − | *[[Ru'Aun Gardens]] (H-11) |
||
| + | <!--* [[Chateau d'Oraguille]]--> |
||
| − | *[[Lufaise Meadows]] (E-8) |
||
| − | *[[ |
+ | * [[Northern San d'Oria]] (E-8) |
| + | <!--* [[Port San d'Oria]]--> |
||
| + | <!--* [[Southern San d'Oria]]--> |
||
| + | | style="border:1px solid gray; padding-left:1em;" bgcolor="#fff3f3" valign="top" width="33%" | |
||
| − | ==Other Areas== |
||
| + | ===[[Windurst|The Federation of Windurst]]=== |
||
| − | *[[Bostaunieux Oubliette]] (I-6) |
||
| − | *[[ |
+ | <!--* [[Heavens Tower]]--> |
| − | *[[ |
+ | * [[Port Windurst]] (B-5) |
| − | *[[ |
+ | <!--* [[Windurst Walls]]--> |
| − | *[[ |
+ | <!--* [[Windurst Waters]]--> |
| + | <!--* [[Windurst Woods]]--> |
||
| + | |- |
||
| − | [[Category:Transportation]] |
||
| + | |||
| + | | style="border:1px solid gray; padding-left:1em;" bgcolor="#fff3f3" valign="top" width="33%" | |
||
| + | ===[[Jeuno|The Grand Duchy of Jeuno]]=== |
||
| + | <!--* [[Port Jeuno]]--> |
||
| + | <!--* [[Lower Jeuno]]--> |
||
| + | <!--* [[Upper Jeuno]]--> |
||
| + | * [[Ru'Lude Gardens]] (I-10) |
||
| + | |||
| + | | style="border: 1px solid gray; padding-left:1em;" bgcolor="#fff3f3" valign="top" width="33%" | |
||
| + | ===[[Tavnazian Marquisate]]=== |
||
| + | * [[Tavnazian Safehold]] (H-6) |
||
| + | |||
| + | | style="border: 1px solid gray; padding-left:1em;" bgcolor="#E3E6FF" valign="top" width="33%" | |
||
| + | ===[[Aragoneu]]=== |
||
| + | * [[Castle Oztroja]] (F-8) |
||
| + | * [[Garlaige Citadel]] (G-7) |
||
| + | * [[Meriphataud Mountains]] (E-5) |
||
| + | * [[Sauromugue Champaign]] (J-10) |
||
| + | <!--* [[Altar Room]]--> |
||
| + | <!--* [[Attohwa Chasm]]--> |
||
| + | <!--* [[Boneyard Gully]]--> |
||
| + | |||
| + | |- |
||
| + | |||
| + | | style="border: 1px solid gray; padding-left:1em;" bgcolor="#E3E6FF" valign="top" width="33%" | |
||
| + | |||
| + | ===[[Derfland]]=== |
||
| + | * [[Beadeaux]] (E-7) |
||
| + | * [[Crawlers' Nest]] (M-8) |
||
| + | * [[Pashhow Marshlands]] (K-6) |
||
| + | * [[Rolanberry Fields]] (G-6) |
||
| + | <!--* [[Qulun Dome]]--> |
||
| + | |||
| + | | style="border: 1px solid gray; padding-left:1em;" bgcolor="#E3E6FF" valign="top" width="33%" | |
||
| + | ===[[Elshimo Lowlands]]=== |
||
| + | * [[Kazham]] (G-9) |
||
| + | * [[Norg]] (H-9) |
||
| + | * [[Sea Serpent Grotto]] (M-3) |
||
| + | * [[Yuhtunga Jungle]] (G-11) |
||
| + | |||
| + | | style="border: 1px solid gray; padding-left:1em;" bgcolor="#E3E6FF" valign="top" width="33%" | |
||
| + | ===[[Elshimo Uplands]]=== |
||
| + | * [[Temple of Uggalepih]] (F-6) (Map 1) |
||
| + | * [[Yhoator Jungle]] (I-8) |
||
| + | * [[Ifrit's Cauldron]] (K-9) Map 4 |
||
| + | <!--* [[Cloister of Flames]]--> |
||
| + | <!--* [[Cloister of Tides]]--> |
||
| + | <!--* [[Den of Rancor]]--> |
||
| + | <!--* [[Sacrificial Chamber]]--> |
||
| + | |||
| + | |- |
||
| + | |||
| + | | style="border: 1px solid gray; padding-left:1em;" bgcolor="#E3E6FF" valign="top" width="33%" | |
||
| + | ===[[Fauregandi]]=== |
||
| + | * [[Beaucedine Glacier]] (H-9) |
||
| + | * [[Ranguemont Pass]] (F-11) |
||
| + | <!--* [[Cloister of Frost]]--> |
||
| + | <!--* [[Fei'Yin]]--> |
||
| + | <!--* [[Pso'Xja]]--> |
||
| + | <!--* [[Qu'Bia Arena]]--> |
||
| + | <!--* [[The Shrouded Maw]]--> |
||
| + | |||
| + | | style="border: 1px solid gray; padding-left:1em;" bgcolor="#E3E6FF" valign="top" width="33%" | |
||
| + | ===[[Gustaberg]]=== |
||
| + | * [[Dangruf Wadi]] (K-10) |
||
| + | * [[Korroloka Tunnel]] (C-9) Map 2 |
||
| + | * [[North Gustaberg]] (D-10) |
||
| + | * [[Zeruhn Mines]] (I-7) |
||
| + | <!--* [[Palborough Mines]]--> |
||
| + | <!--* [[South Gustaberg]]--> |
||
| + | <!--* [[Waughroon Shrine]]--> |
||
| + | <!--* [[Zeruhn Mines]]--> |
||
| + | |||
| + | | style="border: 1px solid gray; padding-left:1em;" bgcolor="#E3E6FF" valign="top" width="33%" | |
||
| + | ===[[Kolshushu]]=== |
||
| + | * [[Bibiki Bay]] (H-7) |
||
| + | * [[Buburimu Peninsula]] (E-7) |
||
| + | * [[Labyrinth of Onzozo]] (G-11) |
||
| + | * [[Maze of Shakhrami]] (C-9) |
||
| + | * [[Tahrongi Canyon]] (G-4) |
||
| + | <!--* [[Bibiki Bay - Purgonorgo Isle]]--> |
||
| + | <!--* [[Manaclipper]]--> |
||
| + | <!--* [[Mhaura]]--> |
||
| + | |||
| + | |- |
||
| + | |||
| + | | style="border: 1px solid gray; padding-left:1em;" bgcolor="#E3E6FF" valign="top" width="33%" | |
||
| + | ===[[Kuzotz]]=== |
||
| + | * [[Eastern Altepa Desert]] (F-10) |
||
| + | * [[Rabao]] (G-11) |
||
| + | * [[Western Altepa Desert]] (K-7) |
||
| + | <!--* [[Cloister of Tremors]]--> |
||
| + | <!--* [[Chamber of Oracles]]--> |
||
| + | <!--* [[Quicksand Caves]]--> |
||
| + | |||
| + | | style="border: 1px solid gray; padding-left:1em;" bgcolor="#E3E6FF" valign="top" width="33%" | |
||
| + | ===[[Li'Telor]]=== |
||
| + | * [[Ro'Maeve]] (H-6) |
||
| + | * [[The Sanctuary of Zi'Tah]] (H-9) |
||
| + | * [[Dragon's Aery]] (F-9) |
||
| + | <!--* [[The Boyahda Tree]]--> |
||
| + | <!--* [[Cloister of Storms]]--> |
||
| + | <!--* [[Hall of the Gods]]--> |
||
| + | |||
| + | | style="border: 1px solid gray; padding-left:1em;" bgcolor="#E3E6FF" valign="top" width="33%" | |
||
| + | ===[[Movalpolos]]=== |
||
| + | * [[Oldton Movalpolos]] (F-10) |
||
| + | <!--* [[Mine Shaft|Mine Shaft #2716]]--> |
||
| + | <!--* [[Newton Movalpolos]]--> |
||
| + | |||
| + | |- |
||
| + | |||
| + | <!-- |
||
| + | |BGCOLOR="#E3E6FF" width="33%" valign="top" style="border: 1px solid gray; padding-left:1em;"| |
||
| + | ===[[Lumoria]]=== |
||
| + | * [[Al'Taieu]] |
||
| + | * [[The Garden of Ru'Hmet]] |
||
| + | * [[Grand Palace of Hu'Xzoi]] |
||
| + | * [[Empyreal Paradox]] |
||
| + | --> |
||
| + | |||
| + | | style="border: 1px solid gray; padding-left:1em;" bgcolor="#E3E6FF" valign="top" width="33%" | |
||
| + | ===[[Norvallen]]=== |
||
| + | * [[Batallia Downs]] (H-5) |
||
| + | * [[Carpenters' Landing]] (J-10) |
||
| + | * [[Davoi]] (J-7) |
||
| + | * [[The Eldieme Necropolis]] (J-9) |
||
| + | * [[Jugner Forest]] (I-8) |
||
| + | <!--* [[Monastic Cavern]]--> |
||
| + | <!--* [[Phanauet Channel]]--> |
||
| + | |||
| + | | style="border: 1px solid gray; padding-left:1em;" bgcolor="#E3E6FF" valign="top" width="33%" | |
||
| + | ===[[Qufim]]=== |
||
| + | * [[Lower Delkfutt's Tower]] (H-10) |
||
| + | * [[Qufim Island]] (G-6) |
||
| + | * [[Behemoth's Dominion]] (L-9) |
||
| + | <!--* [[Middle Delkfutt's Tower]]--> |
||
| + | <!--* [[Stellar Fulcrum]]--> |
||
| + | <!--* [[Upper Delkfutt's Tower]]--> |
||
| + | |||
| + | | style="border: 1px solid gray; padding-left:1em;" bgcolor="#E3E6FF" valign="top" width="33%" | |
||
| + | ===[[Ronfaure]]=== |
||
| + | * [[Bostaunieux Oubliette]] (I-6) Map 2 |
||
| + | * [[Fort Ghelsba]] (F-8) |
||
| + | * [[King Ranperre's Tomb]] (G-5) |
||
| + | * [[West Ronfaure]] (G-9) |
||
| + | <!--* [[Ghelsba Outpost]]--> |
||
| + | <!--* [[Horlais Peak]]--> |
||
| + | <!--* [[Yughott Grotto]]--> |
||
| + | |||
| + | |- |
||
| + | |||
| + | | style="border: 1px solid gray; padding-left:1em;" bgcolor="#E3E6FF" valign="top" width="33%" | |
||
| + | ===[[Sarutabaruta]]=== |
||
| + | * [[Inner Horutoto Ruins]] (I-7) |
||
| + | * [[Toraimarai Canal]] (F-5) |
||
| + | * [[West Sarutabaruta]] (H-6) |
||
| + | <!--* [[Balga's Dais]]--> |
||
| + | <!--* [[East Sarutabaruta]]--> |
||
| + | <!--* [[Full Moon Fountain]]--> |
||
| + | <!--* [[Giddeus]]--> |
||
| + | <!--* [[Outer Horutoto Ruins]]--> |
||
| + | |||
| + | | style="border: 1px solid gray; padding-left:1em;" bgcolor="#E3E6FF" valign="top" width="20%" | |
||
| + | ===[[Tavnazian Archipelago]]=== |
||
| + | * [[Lufaise Meadows]] (E-8) |
||
| + | * [[Misareaux Coast]] (G-7) |
||
| + | * [[Phomiuna Aqueducts]] (J-10) |
||
| + | * [[Sacrarium]] (E-7) |
||
| + | <!--* [[Monarch Linn]]--> |
||
| + | <!--* [[Riverne - Site A01|Riverne - Site #A01]]--> |
||
| + | <!--* [[Riverne - Site B01|Riverne - Site #B01]]--> |
||
| + | <!--* [[Sealion's Den]]--> |
||
| + | |||
| + | | style="border: 1px solid gray; padding-left:1em;" bgcolor="#E3E6FF" valign="top" width="20%" | |
||
| + | ===[[Tu'Lia]]=== |
||
| + | * [[Ru'Aun Gardens]] (H-12) |
||
| + | <!--* [[Celestial Nexus]]--> |
||
| + | <!--* [[La'Loff Amphitheater]]--> |
||
| + | <!--* [[Shrine of Ru'Avitau]]--> |
||
| + | <!--* [[Ve'Lugannon Palace]]--> |
||
| + | |||
| + | |- |
||
| + | |||
| + | | style="border: 1px solid gray; padding-left:1em;" bgcolor="#E3E6FF" valign="top" width="20%" | |
||
| + | ===[[Valdeaunia]]=== |
||
| + | * [[Castle Zvahl Baileys]] (J-8) |
||
| + | * [[Xarcabard]] (H-9) |
||
| + | <!--* [[Bearclaw Pinnacle]]--> |
||
| + | <!--* [[Castle Zvahl Keep]]--> |
||
| + | <!--* [[Throne Room]]--> |
||
| + | <!--* [[Uleguerand Range]]--> |
||
| + | |||
| + | | style="border: 1px solid gray; padding-left:1em;" bgcolor="#E3E6FF" valign="top" width="20%" | |
||
| + | ===[[Vollbow]]=== |
||
| + | * [[Cape Teriggan]] (G-8) |
||
| + | * [[Gustav Tunnel]] (K-7) |
||
| + | * [[Kuftal Tunnel]] (H-9) |
||
| + | * [[Valley of Sorrows]] (F-8) |
||
| + | <!--* [[Cloister of Gales]]--> |
||
| + | |||
| + | | style="border: 1px solid gray; padding-left:1em;" bgcolor="#E3E6FF" valign="top" width="20%" | |
||
| + | ===[[Zulkheim]]=== |
||
| + | * [[Gusgen Mines]] (H-9) |
||
| + | * [[Konschtat Highlands]] (G-3) |
||
| + | * [[La Theine Plateau]] (M-8) |
||
| + | * [[Ordelle's Caves]] (G-3) |
||
| + | * [[Valkurm Dunes]] (H-7) |
||
| + | <!--* [[Selbina]]--> |
||
| + | |||
| + | |} |
||
| + | |||
| + | ==The Aradjiah Continent== |
||
| + | {| cellspacing="3" width="100%" |
||
| + | |||
| + | | style="border: 1px solid gray; padding-left:1em;" bgcolor="#E3E6FF" valign="top" width="33%" | |
||
| + | ===<font color="blue">[[The Empire of Aht Urhgan|West. Aht Urhgan]]</font>=== |
||
| + | * [[Aht Urhgan Whitegate]] (L-8) |
||
| + | <!--* [[Al Zahbi]]--> |
||
| + | |||
| + | | style="border: 1px solid gray; padding-left:1em;" bgcolor="#E3E6FF" valign="top" width="33%" | |
||
| + | ===[[Mamool Ja Savagelands]]=== |
||
| + | * [[Wajaom Woodlands]] (C-8) |
||
| + | * [[Mamook]] (J-7) Map 1 |
||
| + | * [[Aydeewa Subterrane]] (H-10) Map 2 |
||
| + | <!--* [[Jade Sepulcher]]--> |
||
| + | <!--* [[Mamool Ja Training Grounds]]--> |
||
| + | |||
| + | |BGCOLOR="#E3E6FF" width="33%" valign="top" style="border: 1px solid gray; padding-left:1em;"| |
||
| + | ===[[Arrapago Islands]]=== |
||
| + | * [[Nashmau]] (G-8) |
||
| + | * [[Arrapago Reef]] (H-11) Map 1 |
||
| + | * [[Caedarva Mire]] (G-6) Map 2 |
||
| + | <!--* [[Hazhalm Testing Grounds]]--> |
||
| + | <!--* [[Ilrusi Atoll]]--> |
||
| + | <!--* [[Leujaoam Sanctum]]--> |
||
| + | <!--* [[Periqia]]--> |
||
| + | <!--* [[Talacca Cove]]--> |
||
| + | <!--* [[The Ashu Talif]]--> |
||
| + | |||
| + | |- |
||
| + | |||
| + | |BGCOLOR="#E3E6FF" width="33%" valign="top" style="border: 1px solid gray; padding-left:1em;"| |
||
| + | ===[[Halvung Territory]]=== |
||
| + | * [[Halvung]] (N-5) Map 1 |
||
| + | <!-- * [[Lebros Cavern]] --> |
||
| + | <!-- * [[Mount Zhayolm]] --> |
||
| + | <!-- * [[Navukgo Execution Chamber]] --> |
||
| + | |||
| + | |||
| + | <!-- |
||
| + | |BGCOLOR="#E3E6FF" width="33%" valign="top" style="border: 1px solid gray; padding-left:1em;"| |
||
| + | ===[[Ruins of Alzadaal]]=== |
||
| + | * [[Alzadaal Undersea Ruins]] |
||
| + | * [[Nyzul Isle]] |
||
| + | * [[Silver Sea Remnants]] |
||
| + | * [[Arrapago Remnants]] |
||
| + | * [[Bhaflau Remnants]] |
||
| + | * [[Zhayolm Remnants]] |
||
| + | --> |
||
| + | |||
| + | <!-- |
||
| + | |BGCOLOR="#E3E6FF" width="33%" valign="top" style="border: 1px solid gray; padding-left:1em;"| |
||
| + | ===[[West Aht Urhgan]]=== |
||
| + | * [[Aht Urhgan Whitegate]] |
||
| + | * [[Al Zahbi]] |
||
| + | * [[Bhaflau Thickets]] |
||
| + | * [[The Colosseum]] |
||
| + | --> |
||
| + | |||
| + | |} |
||
| + | |||
| + | ==The Shadowreign Era== |
||
| + | {| cellspacing="3" width="100%" |
||
| + | | style="border: 1px solid gray; padding-left:1em;" bgcolor="#E3E6FF" valign="top" width="33%" | |
||
| + | ===[[The Aragoneu Front]]=== |
||
| + | <!--* [[Castle Oztroja (S)]]--> |
||
| + | * [[Garlaige Citadel (S)]] (G-7) |
||
| + | * [[Meriphataud Mountains (S)]] (L-8) |
||
| + | * [[Sauromugue Champaign (S)]] (K-11) |
||
| + | | style="border: 1px solid gray; padding-left:1em;" bgcolor="#E3E6FF" valign="top" width="33%" | |
||
| + | ===[[The Derfland Front]]=== |
||
| + | <!--* [[Beadeaux (S)]]--> |
||
| + | * [[Crawlers' Nest (S)]] (M-8) |
||
| + | * [[Pashhow Marshlands (S)]] (K-11) |
||
| + | * [[Rolanberry Fields (S)]] (I-14) |
||
| + | * [[Vunkerl Inlet (S)]] (E-7) |
||
| + | | style="border: 1px solid gray; padding-left:1em;" bgcolor="#E3E6FF" valign="top" width="33%" | |
||
| + | ===[[The Fauregandi Front]]=== |
||
| + | * [[Beaucedine Glacier (S)]] (G-7) |
||
| + | |- |
||
| + | | style="border: 1px solid gray; padding-left:1em;" bgcolor="#E3E6FF" valign="top" width="33%" | |
||
| + | ===[[The Gustaberg Front]]=== |
||
| + | * [[Bastok Markets (S)]] (G-4) |
||
| + | * [[Grauberg (S)]] (L-4) |
||
| + | * [[North Gustaberg (S)]] (F-7) |
||
| + | <!--* [[Ruhotz Silvermines]]--> |
||
| + | | style="border: 1px solid gray; padding-left:1em;" bgcolor="#E3E6FF" valign="top" width="33%" | |
||
| + | ===[[The Norvallen Front]]=== |
||
| + | * [[Batallia Downs (S)]] (F-9) |
||
| + | * [[The Eldieme Necropolis (S)]] (J-9) |
||
| + | <!--* [[La Vaule (S)]]--> |
||
| + | * [[Jugner Forest (S)]] (G-11) |
||
| + | | style="border: 1px solid gray; padding-left:1em;" bgcolor="#E3E6FF" valign="top" width="33%" | |
||
| + | ===[[The Ronfaure Front]]=== |
||
| + | * [[East Ronfaure (S)]] (J-11) |
||
| + | <!--* [[Everbloom Hollow]]--> |
||
| + | * [[Southern San d'Oria (S)]] (K-10) |
||
| + | |- |
||
| + | | style="border: 1px solid gray; padding-left:1em;" bgcolor="#E3E6FF" valign="top" width="33%" | |
||
| + | ===[[The Sarutabaruta Front]]=== |
||
| + | * [[Fort Karugo-Narugo (S)]] (I-5) |
||
| + | <!--* [[Ghoyu's Reverie]]--> |
||
| + | * [[Windurst Waters (S)]] (F-5) |
||
| + | * [[West Sarutabaruta (S)]] (I-5) |
||
| + | <!--|BGCOLOR="#E3E6FF" width="20%" valign="top" style="border: 1px solid gray; padding-left:1em;"| |
||
| + | ===[[The Threshold]]=== |
||
| + | *[[Walk of Echoes]] |
||
| + | *[[Provenance]]--> |
||
| + | | style="border: 1px solid gray; padding-left:1em;" bgcolor="#E3E6FF" valign="top" width="33%" | |
||
| + | ===[[The Valdeaunia Front]]=== |
||
| + | <!--* [[Xarcabard (S)]]--> |
||
| + | * [[Castle Zvahl Baileys (S)]] (J-8) |
||
| + | <!--* [[Castle Zvahl Keep (S)]]--> |
||
| + | <!--* [[Throne Room (S)]]--> |
||
| + | |} |
||
| + | |} |
||
| + | ==Adoulin Isles== |
||
| + | {| cellspacing="3" width="24%" |
||
| + | | style="border: 1px solid gray; padding-left:1em;" bgcolor="#E3E6FF" valign="top" width="33%" | |
||
| + | ===[[Adoulin]]=== |
||
| + | * [[Eastern Adoulin]] (H-11) |
||
| + | <!--* [[Western Adoulin]]--> |
||
| + | |} |
||
Revision as of 20:09, 1 March 2020
Survival Guides are floating black books which have been placed by the Adventurers' Mutual Aid Network to provide teleportation services. They are located at all Outposts in Conquest areas as well as a number of other locations. In dungeon areas, the guides are typically located at the main entrance. They appear on maps with a special ![]() icon.
icon.
You must speak to each Survival Guide to register it. Then you may teleport to previously registered guides for 1000 gil per trip base price (decreasing as you finish Rhapsodies of Vana'diel missions) or 50 tabs (or completely free when Thrifty Transit is active). The Survival Guide teleportation service operates independent of Outpost Teleportation.
Adoulin Isles
Adoulin
|