| NOTICE: | This article is currently undergoing construction by a single editor or group of editors. Please do not edit or delete this article until this banner is removed or in absence of discussion. | |
| This Article is a Community Guide |
|---|
| Guides exist as a community effort to help fellow players navigate the game. Opinions and strategies in their content may vary from editor to editor, but feel free to add new or correct out of date information. Guides are subject to the same editing standards of other FFXIclopedia articles. |
Windurst[]
~~Under Construction~~

| Please check the talk page before editing, thank you. |

The Flag of the Federation
Welcome to Windurst![]
| Welcome one and all to the bountiful, majestic land that is Windurst. Windurst is the only nation on the Mindartian continent, and is primarily the home of the Tarutaru and a select group of Mithra. Windurst has a long colorful history of being a nation filled with users of magical lore, having the Horutoto Ruins situated just outside being a key factor in their magical development.
In Windurst you'll find an abundance of materials, quests and information to get you started on a long and healthy path as an adventurer, and although rather ill-equipped for the more melee of jobs, Windurst is mage central! and a better place for a mage to start there is not! Windurstians are primarily known for their intelligence and democracy, having a federation made up of 5 ministries, but that doesn't mean these people don't bicker, far from it! there is constantly squabbles and tom-foolery a-foot, ripe for an adventurer such as yourself to give these people a hand. |
Maps[]
City of Windurst[]Maps are important to your adventurers, allowing you to mark important areas, keep tabs on where to go and even help you find your party members in the area. Before venturing too far, it would be best to at least get a Map of the Windurst Area from Pehki Machumaht at (H-11) in Windurst Woods. The map for the Windurst Waters section is divided into the North and South sections. Sarutabaruta Regions[]To the East and West of the city of Windurst lies the Sarutabaruta savanna. A grassland teeming with wildlife and beastmen including the Goblins and nefarious Yagudo. Although Windurst claims to have a peace pact with these beastmen, do not be fooled! The pact does not extend to travelers in the region. Check the monster section below for details before engaging these opponents! |
")
")
")
")
")
")
")
Quests[]
| So you've just arrived in Windurst and you want to get to know the lay of the land. The perfect way to find your feet is by making a reputation for yourself. Here are a few helpful quests to get your started, along with some for when you find your feet and want to take on tougher enemies, for their rich bounty.
Remember, all quests will give you a slight (or sometimes considerable) increase in reputation (or 'Fame'), the more fame you have, the more complex quests you can take on for much richer rewards!
|
Adventuring[]
Leveling[]As you first venture into the Sarutabaruta regions, you'll very quickly encounter monsters. These take the shape of anything from local wild life to roaming Beastmen who will attack you on sight. For the earlier levels, it is wise to remain close to the gates while engaging monsters. The safest measure you have to estimate if a monster is too strong is the Check command, which presents a relative estimate of how powerful your opponent is to you. "Too weak" will not give any experience, but will provide the items. "Easy prey" and "decent" challenges are acceptable challenges. "Even" challenges are equal in power to you. They can be defeated if you are fully rested. From there on, monsters are "Tough", "Very Tough" and "Incredibly Tough". Although it is possible to defeat these under certain conditions, the safest course of action is to avoid these particular monster varieties. As you level, these monsters grow progressively easier and drop in their challenge estimate. If you cannot fight a monster at your level, run away and return once you have leveled. As hit points drop, it would be a wise idea to settle down in a safe corner away from any aggressive monsters and heal in order to recuperate expended HP and MP, bringing you back up to strength again. When you level however, HP and MP is restored. Don't worry about forming parties for a while, once you've achieved level 11, partying will become a major part of the game. Earning Gil[]Money is essential to arming yourself and learning the latest spells available. Thus said, the ways of earning money are not always clear. The easiest method to begin earning gil is by performing quests. Many of these are repeatable, and can be used to generate fast, though small, amounts of cash. For information on quests, see the tables below. Another method for earning money is identical to leveling. Certain monsters, Yagudo and Goblins which inhabit the region, carry gil on hand and drop it the moment they're defeated. Many monsters drop goods which can be stacked and sold at the Auction House for a tidy sum. This method of gil earning is called farming, and it is the daily bread of almost all new and intermediate adventurers. A third method involves using the conquest system. Each nation is attempting to gain control of regions, and they do so with the help of adventurers. To do this, you'll need to seek one of the following people for a Signet: In Windurst Woods, speak to Harara, W.W. at (K-10) and request a Signet. In Windurst Waters, find Puroiko-Maiko, W.W. at (G-5). In Port Windurst, speak to Milma-Hapilma, W.W. at (B-4). This enchantment lets an adventurer gather Conquest Points and crystals when defeating monsters. These points can be used to purchase federation equipment for use or to sell, and can earn some decent money for new adventurers fairly quickly. For a more in depth explanation, check out the Conquest Points page. |
Monster Data (Sarutabaruta)[]
| Info here |
Guilds[]
| Info here |
Equipment[]
|
Once your character achieves level 11 with any job, it would be a good time to venture out to the Valkurm Dunes in order to begin partying, gaining levels and performing the subjob quest. Before going however, it is often considered polite to go with the following minimal equipment. By having at least decent gear available makes the chores of parties easier. The best place to get most of these will be the Auction House. However, magic shops can sometimes offer the same spells for lower prices. Mages should also come prepared with the next few levels worth of spells to learn the moment they level. Come prepared for the next step of the journey!
|
The Road to Valkurm Dunes[]
|
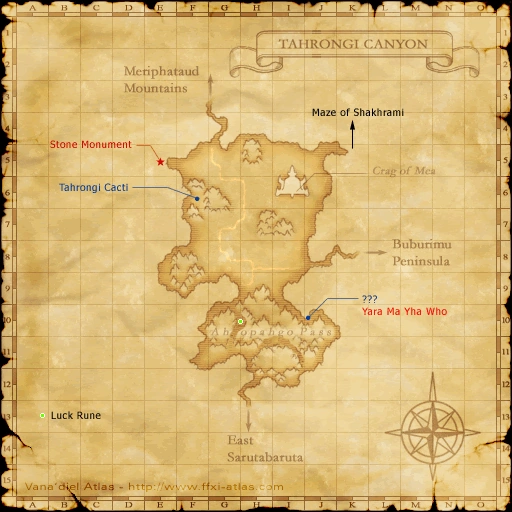 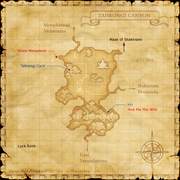 Tahrongi Canyon Map  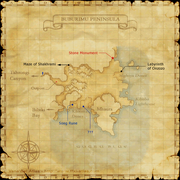 Buburimu Peninsula Map |