This is a copy of last year's guide! Add info as it comes!!!
Event Schedule
The Starlight Celebration will commence at 12:00 a.m. on Thursday, December 18, 2014, (PST) and come to a close at 7:00 a.m. on Wednesday, December 31, 2014 (PST).
Introduction
All your previous Starlight Celebration games are back again, from moogle finding gifts in your mog house to the Smilebringer's town to town teleports! And don't forget the three national mini-games!
New This Year
The Mini-Games
The mini-games offer the following prizes:
Win any of the minigames once to recieve the Dream Mittens; win a second time to recieve the Dream Mittens +1. Then equip the Dream Mittens +1 and win the advanced version of the minigame in each nation to receive the parts for the Orchestrion along the music sheet key items.
Windurst: Job Guessing Game
- Rokor-Makor in Windurst Woods (K-12)
This game is basically a version of the game Mastermind, but instead of guessing the order of colored pegs you are guessing the Tarutaru's job.
- If you are playing the advanced mode and actually wish to complete it within your lifetime, it is highly recommended you refer to this link and fill in the correct parameters to have the program find the answer for you: Mastermind Solver.
- Prizes on Hard Mode:
San d'Oria: Find the Difference
- Estiliphire in Southern San d'Oria (H-9)
In this game, you are shown 2 short movies. You must find the differences between them. The differences can be quite minute, so look closely.
- Tip: If you are having problems finding the differences, record the scenes on your smartphone (or oCam on PC) so you can review the footage. There is no time limit on answering once the scenes are over.
- Prizes on Hard Mode
Bastok: Shell Game
- Klaas in Port Bastok (K-8)
This game is guessing the location of a chocobo in a set of chests that are mixed around. It is basically a shell game.
- Tip: If you are having problems following the chocobo, record the shuffle on your smartphone (or oCam on PC) so you can review the footage. There is no time limit on answering once the shuffle is over.
- Prizes of Hard Mode
Making your Orchestrion
Once you have all 3 parts, combine them with an Earth crystal to create your Orchestrion.
- Seems this is a low-level synth: skill-up was obtained with 0 Alchemy.
Goblin Gift-Grabbers!
A few Goblins haven't quite grasped the spirit of the Starlight Celebration and have mistaken other people's presents for their own! The MHMU is on the lookout for these precious gifts, but needs you to join the search and help set things straight. Simply talk to one of the moogles at the following locations to start saving the holiday season. Chase Down those Goblins and get the presents back from them. Make sure to bring a Mogsack full of Goblin Chocolate and Jewels and Beastmen coins to coerce those thieving Goblin Merrymaker into giving the presents back!If the Goblins seem a bit too stingy, talk to a moogle again for a hint or two.
- Northern San d'Oria (J-9)
- Bastok Markets (G-8)
- Windurst Waters (F-9 North)
Leg Armor & Leafkin Boppers :
To start this mini-game, first talk to a moogle in Northern San d'Oria (J-9), Bastok Markets (G-8), or Windurst Waters (F-9 North) who will tell you about the Goblins stealing everyone's presents.
There are three segments where you need to avoid detection by goblins, take care!
- After speaking to the moogle, find a Goblin Merrymaker and trade it a Goblin Chocolate. This will get them to trust you. Let your Goblin wander around for a while talking to him. You don't have to wait until he stops; just keep spamming talk. Eventually the Goblin will hand over a blue present, red present or green present Key item. If when talking to him the dialogue begins with "No no no" you must trade him another chocolate until he finds the present. Speaking to the Goblins without trading them a chocolate will cause them to occasionally cast Bind or Gravity on you. It is possible to get the present key item without trading Goblin Chocolate however it might take longer due to having spells cast on you. If you get the "No no no" dialogue, you will have to wait to talk to a goblin until the spell wears off, or the same amount of time even if no spell is cast.
- Once you receive a present Key item, make your way back to the moogle avoiding any Goblins you see on the way. If a Goblin gets too close to you they'll steal the present and you will have to start over again.
- (HINT) Take advantage of the new Home Point warps. There's always the risk a goblin might be there when you land, but it is a good alternative to dodging them across the entire zone.
- The Moogle will tell you who the present is from. It's possible it can be any NPC in either section of Windurst Waters. Go talk to that NPC, again avoid the Goblins or they will steal your present.
- The NPC will tell you what NPC the present is for, so now find that NPC, avoiding the Goblins one more time so they don't steal your present and make you start all over again.
- Once you've delivered the present to its rightful recipient, go back and talk to the last NPC to confirm its delivery.
- Now run back to the moogle to claim your reward!
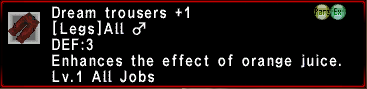
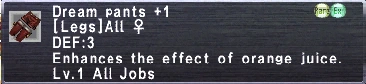
The first completion rewards NQ leg armor. Repeating a second time while wearing your Dream pants yields the +1 leg armor.
Repeating a third time yields Leafkin Bopper and the fourth time Leafkin Bopper +1.
Repeating the process while already in possesion of Dream Trousers/Pants, Dream Trousers+1/Pants+1, and Leafkin Bopper/+1 will yield Republic Stables Medal, Kingdom Stables Collar, or Federation Stables Scarf. Continued repetition after obtaining all of the above will yield Black Pudding and other holiday themed treats.
Legs Males DEF:2 LV 1 All Jobs

Legs Males DEF:3 Enhances the effect of orange juice. LV 1 All Jobs
Legs Females DEF:2 LV 1 All Jobs

Legs Females DEF:3 Enhances the effect of orange juice. LV 1 All Jobs
Wreaths:
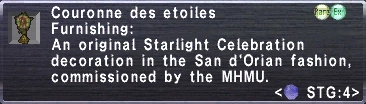
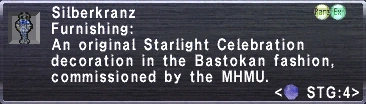
As for the Couronne des Etoiles, Silberkranz, and Leafberry Wreath, you run around and trade one of the Goblins either "Beastmen Bills" (possibly any variety of beastmen coins) or a gem ("Bedazzling Bijoux", as the moogles put it.) You may have to try different goblins since only one of them actually has the wreath. Please note that it will only take the beastcoin/gem if you obtain the furnishing.
Confirmed jewels:
Confirmed beastcoins:
From San d'Oria
From Bastok
From Windurst
Event Vendors
Did You Get Your Holiday Shopping Done? There are moogle event vendors located in the major midland cities of Vana'diel for the duration of the event. Now selling at new low low prices!
Locations:
- Northern San d'Oria (D-8)
- Bastok Mines (H-8)
- Windurst Waters (north side) (G-10)
Vendor Items:
- Popstar 40g
- Brilliant Snow 40g
- Sparkling Hand 25g
- Air Rider 100g
- Cracker 8g
- Twinkle Shower 25g
- Little Comet 25g
- Snowman Knight 10,000g
- Snowman Miner 10,000g
- Snowman Mage 10,000g
- Snowman Cap 10,000g
- Janus Guard 10,000g
- Gyokuto Obi 10,000g
- Dream Hat 10,000g
- San d'Orian Tree 10,000g
- Bastokan Tree 10,000g
- Windurstian Tree 10,000g
- Kadomatsu 5,000g
- Okadomatsu 10,000g New Wares!
- Tsukubaneita 10,000g New Wares!
Making your Frosty Cap

Synthesize a Snowman Cap and 1 Brilliant Snow firework with an Earth Crystal.
Presents in Exchange for Destructive Behavior!
Go to one of the starter areas outside the cities and smash the "Astral Boxes" to receive food items and gift token key items. Locations:
- West Ronfaure / East Ronfaure
- North Gustaberg / South Gustaberg
- West Sarutabaruta / East Sarutabaruta

Astral Box
Destroy the smallest size box to receive a Bell-themed gift token (this is not always 100%, so you may have to destroy a number of boxes). If you destroy a large Astral Box, a smaller Astral box may appear in its place.
- Note: Boxes are resistant to magic. Meleeing would be quicker even for a BLM.
The boxes may also drop other holiday items, such as:

Smallest Box Size compared to Mithra
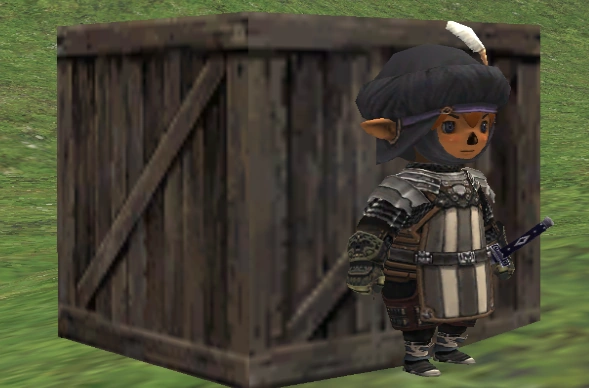

Smallest Astral Box compared to small Tarutaru
- Your Moogle can also "find" these items from a Dream Stocking, Dream Coffer or Dream Platter furnishing placed in your Mog House.
If you are in a party, and a party member destroys the smallest-size box and receives a Bell-themed gift token, everyone else in the party will also receive it. The other drops from the Astral Boxes are placed into the treasure pool.
The two smallest sizes are somewhat similar. The smallest box is slightly taller than a small Tarutaru, while the 2nd smallest is slightly taller than a large Tarutaru.
Dream Robe +1
To obtain the Dream Robe +1 you first need to have the normal quality item Dream Robe. This NQ item will drop from any box. Only when in possession of the Dream Robe you can turn in a Bell-themed gift token at the Moogle to obtain the HQ version. You may need to repeat this mini-quest several times. Before you turn-in your key item to the Moogle, you must first have the NQ in your possession before you can obtain the HQ. There is also a possibility to obtain a Dream Bell from the Moogle. Note that, as with other event items, the game only checks your personal inventory, mog safe, mog storage, mog locker, and mog satchel to determine whether you already have acquired an item. Event items stored with a storage NPC don't count as being in your possession, so you may obtain them again. It's best to retrieve all items out of NPC storage to ensure you aren't getting duplicates.
-If you have a gift token from the previous year's event and your Dream Robe is in event item storage, you may get one from the token. You may want to be sure to withdraw your robe before talking to any moogles if this is the case.
Lend the Moogles a Capable Adventurer's Hand!
Locations:
- Southern San d'Oria (H-9) / Northern San d'Oria (J-8)
- Bastok Markets (G-8) / Bastok Mines (I-8)
- Windurst Woods (H-11) / Windurst Waters (north side) (F-9)
There are two games here: one involves giving gifts to NPCs, the second involves trading cards with fellow adventurers! Both games yield food items, furnishings, and the gift token key items. You will only be able to do these mini-quests once per Vana'diel day (after 0:00 hours, Vana'diel time).
Gifts to NPCs
Talk to a Moogle to receive 4 holiday presents, and the names of 4 NPCs to deliver them to - these presents are not items in your inventory or key items, merely talking to the NPCs will give them the present. (Be advised that you can't change areas until completing all deliveries and reporting back to the starter Moogle.)
The Moogles are located in the following locations:
- Windurst Waters (north side) (F-9)
- Southern San d'Oria (H-9)
- Bastok Mines (I-8) front of auction house
The names of the NPCs are:
- Honoi-Gomoi (South) (E-7) upstairs in the Trader's Home
- Kenapa-Keppa(South) (J-9) inside the Rhinostery
- Angelica (North) (F-10) second floor above the Rarab Tail Hostelry (Door "Hostelry Room #1")
- Kayeel-Payeel(North) (G-7) behind the Optistery
- Tall Mountain(J-7) near the Alchemist's Guild
- Tami (J-8) in front of the VCS
- Virnage(I-5) inside Bat Lair's Inn in the far room
- Christina (I-9) across from the moogle near the chocobo stables
After delivering the presents, talk the the starter Moogle again. You will receive a reward and a Snow-Themed Gift Token and either 10 random fireworks or other holiday items.
Holiday Item Rewards
- Dream Boots (+1) are normally gotten from the Adventurer Holiday Card trading game below, if they are possible prizes from this, it is very rare so don't expect them.
- Gift tokens can be traded to Moogles for prizes (see below).
Exchange cards with other Adventurers
Step 1: Speak to a start moogle in one of the following locations to receive a Cassiopeia Card:
- Northern San d'Oria (J-8)
- Windurst Woods (H-11)
- Bastok Markets (G-8)
Step 2: Trade this card to another player of the specific sex and race as instructed by the Moogle.
- Note: If party member and you are in the same zone, you will receive matching cards.
Step:3 That player then trades the Cassiopeia Card to the Moogle, receiving a Perseus Card signed with the name of the person they got the card from (ie. you) and a gift (event food, HQ crystals, Dream Boots).
Step 4: Then trade the Perseus Card back to you, and you trade it to the Moogle for a gift (usually the Dream Boots) and a Star-Themed Gift Token.
- Be Sure the player understands they are to trade the Perseus Card back to you.
- if you trade successfully, unsuccessfully or drop a card the moogle will not give you another one the same game day.
The Gift of a Child's Laughter! (Smilebringers)
Locations:
- Northern San d'Oria (J-9)
- Bastok Mines (I-9)
- Windurst Waters (north side) (F-5)
- To begin, you will need a Dream Hat or Dream Hat +1. The NQ version can be purchased from the moogle vendors in Port Bastok, Windurst Waters, and Northern San d'Oria if you don't already have one.
- Next, talk to a Smilebringer to receive a Kiddie Present. You will obtain one present in this manner every Vana'diel day. (You must accept the present before you may receive teleport options.)
- Smilebringer locations are as follows:
- Charmealaut - Northern San d'Oria (J-9)
- Atagei-Portagei - Windurst Waters (north)(F-5)
- Christina - Bastok Mines (I-9)
- Trade the kiddie presents to children anywhere in the city while wearing your Dream Hat/Dream Hat +1 to increase your holiday fame. Fireworks (gained from the other games, or purchased at Moogle vendors) will also increase holiday fame, but to a lesser extent, thus requiring more to be traded. Fireworks from other events, such as Muteppo, will not be accepted by the children.
- Some Locations of Children
- Ailbeche right next to the smilebringer, for Northern San d'Oria
- Infront of the Cooking Guild for Windurst Waters (north)
- Valeri northeast of the smilebringer for Bastok Mines, next to the Home Point.
- Some Locations of Children
- If you talk to the smilebringers again, they will tell you your holiday fame level as well as give you the option to teleport directly to another city.
- You will lose an amount of holiday fame every time you use this teleport service. This fame may be replenished in the same manner as above.
- Once you have full fame, you cannot trade any fireworks to the children, thus enabling you to know when you can obtain the Dream Hat +1.
- Fame level messages in ascending order:
- "You've done some good. You just need to give a little extra effort!"
- "You have done fairly well. Keep it up!"
- "You have given the children much joy! You make a good smilebringer."
- "You have brought smile upon smile to the children! Excellent work!"
- "You have the children bursting with glee! Stupendous job!"
- "The children love you! Even I think you're great!"
TO MAX OUT: Give one Child a Present from the Smile Bringer, and then hand out 20 Fireworks (One child will stop accepting them after 14, but you wont be maxed so give the other child the other 6) [DONE IN WINDURST]
Dream Hat +1
To obtain the Dream Hat +1, put any of the City trees (bought from the Dream Hat vendor) in your Mog House. You will need to max your Holiday Children fame (highest fame from smilebringer will be "The children love you. Even I think you're Great!").
After meeting the above conditions, talk to your Moogle, who will give you a Special Present. Go outside your Mog House and use the present from your inventory and you will get the Dream Hat +1 in your inventory. Note: Waiting until after Japanese Midnight may or may not be required, refer to Discussion page for details.
What to do with Gift Tokens
Speak to a Moogle with the gift token in your possession. You must not have a Cassiopeia Card in your inventory.
The moogles are found in the following locations:
- Windurst Waters near exit to West Sarutabaruta
- Windurst Woods near exit to East Sarutabaruta
- Southern San d'Oria (K-9)
- Northern San d'Oria (D-8)
- Bastok Markets in front of the fountain.
- Bastok Mines (I-9), next to Christina.
|
Snow-themed tokens will give you one of the following items (random): |
Star-themed tokens will give you one of the following items (random): |
Bell-themed tokens will give you one of the following items (random): |
Dream Bell +1
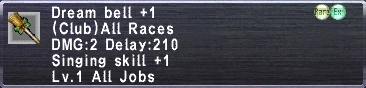
Speak to any of the above moogles with a Dream Bell, a Bell-themed gift token, a Star-Themed Gift Token, and a Snow-Themed Gift Token in your inventory/key items. You'll be given a choice to trade in all 3 tokens or a single token. Choose all 3 to get the Dream Bell or Dream Bell +1. Notes: - You will get a NQ Dream Bell if you do not already have one in your inventory. - After obtaining the Dream Bell +1, on subsequent trades of all 3 Tokens, you will receive 1 of each of the following: Candy Cane, Candy Ring, and a Roast Turkey.
- You receive gifts automatically when talking to one of these Moogles with one or two gift tokens in your possession.
- The Dream Bell and Dream Bell +1 can use the /bell however you need to enable the sound in order to hear it via /bellsw
- By default /bellsw is off
- The Dream Bells and Lady Bells (Lady's are not from this event) can actually play 25 different notes. See Command/bell for full notes list, their commands, and multiple songs already macro'd out.
Smilebringer Boot Camp
This mini-game is a race on foot. Run and talk to each smile helper checkpoint and return to the smilebringer to complete the race. Smile helpers are marked on your map upon starting the race. Beat the time limit and win a prize.
Prizes:
Starter NPCs
- East Sarutabaruta (G-11) - Whispering Tortoise - Just outside Leviathan's Gate
- Batallia Downs (K-8) - Acacia - Just outside Upper Jeuno exit
- South Gustaberg (I-7) - Wandering Cloud - Just west of Bastok Markets exit
Locations & Time Limits
Beginner
|
Intermediate
|
Advanced
|
Note
- There are no level restrictions. Monsters in the zone will aggro you under normal circumstances.
- The smile helpers will give you flee effect when spoken to.
- You can not receive flee again from the same smile helper.
- Leave enough smile helpers between checkpoints so that you don't lose your flee effect. This is very important if you want the fastest time.
- If you do not arrive at the smile helper before your flee effect wears off (30 seconds), they will sometimes not give you flee again until you have reached the next smile helper.
- You do not have to beat the fastest time, only the initial smilebringer fastest time.
- If you lose the flee effect your chances of completing the run within the initial smile bringer fastest time is nil.
- You can use the flee effect given by smile helpers (from previous runs) to get a head start on your next run. All movement speed enhancing abilities and spells and gear do take effect.
- Advanced run tip: Troubadour+Mazurka, Chocobo Jigs and/or THF Flee macros help a lot.
- There are no prerequisite items to get the Snow Bunny Hat +1. You do not have to receive the NQ Snow Bunny Hat first.
- There is no extra reward for beating all 3 fastest times of each tier. Repeated attempts give basic rewards.
- Two of the NPCs in Advanced areas will move, but will still be targetable and within range of the marker.
- Advanced run tip: With the new Wide Scan for all jobs, choose the wandering NPC you have the hardest time finding to track since only 1 can be tracked at a time.
Moogles vs. Goblins?!
You heard the Moogles! Grab your Caver's shovels and saddle up; it's time to trample those Goblins in a race to the cards! Search high and low for the Overturned Soil outside of the nation cities in order to unearth the cards of fortune! But don't forget to bring your friends, because for every extra party member you have, you'll find +1 random card in each spot they've been hidden! Once you've gotten the right cards, return to the Moogles to reap your merry holiday bounty!
The moogles are found in the following locations:
- Windurst Waters near exit to West Sarutabaruta
- Windurst Woods near exit to East Sarutabaruta
- Southern San d'Oria (K-9)
- Northern San d'Oria (D-8)
- Bastok Markets in front of the fountain.
- Bastok Mines (I-9), next to Christina.
- They are next to the token moogles
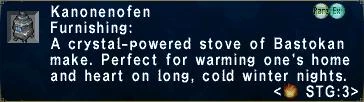
Card Combinations
Trade in the following cards combos to the event Moogle for the corresponding rewards and gifts!
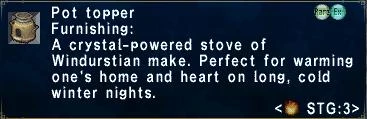
Initial Three
The initial three combo bestows upon you a fantastical new stove (one from Bastok, San d'Oria and Windurst!) for your cozy Moghouse! Just in time for the cold, Winter nights too!
From Bastok:
From San d'Oria
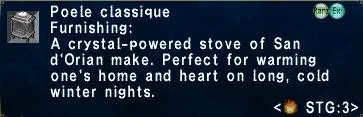
From Windurst:
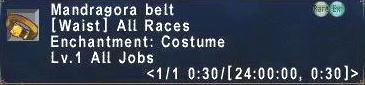
Secondary Three
The secondary three combo adds a dazzling new belt with audacious, mooglerific motif to your already-festive raiment (they have mystic transformation abilities too)! Wear it while you help your friends for a +2 to your "In Your Face Goblins!" job trait!
From Bastok:
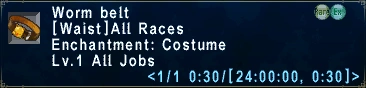
From San d'Oria
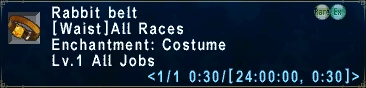
From Windurst:
Straight Seven
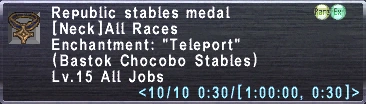
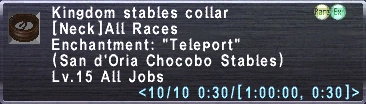
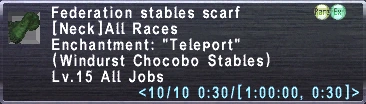
The straight seven combo is the ultimate combination you can make with the cards of fortune, and for good reason too! Turning in all seven cards at once is going to score you a marvelous piece of attire that'll not only keep your neck warm against the frosty weather, but spirit you away to any one of the three starter nations within the blink of an eye!
~ Found all 7 cards in South Gustaberg. Moogle twice picked out 3 of the 7 cards and gave me the 2 Bastok items.. the belt and the furnishing and left the other 4 cards in my inventory. Only received the Stables Medal for Bastok after I had all 7 again and after I had the other 2 items for Bastok.
From Bastok:
From San d'Oria
From Windurst:
Cards
- Bishamon Card
- Benten Card
- Daikoku Card
- Ebisu Card
- Fukurokuju Card
- Hotei Card
- Jurojin Card
You can get all cards from one area. The Goblins will run towards where the cards are so following them can allow you to find the next card spawn area. However, because they are on chocobos, without movement speed (such as flee) you will quickly be left behind if they are running far away.
Additionally, each zone seems to have preferences for which cards drop with which frequency. At the time of writing the people I have been doing this with have not tested any zones outside of the initial 3 starter areas (Ronfaure, Gustaberg, and Sarutabaruta). Because of this, we are unsure if the cards dropped are affected by geographical ownership or based on Conquest ownership. However, since the 3 starter zones change hands only rarely this information will maintain its truth in most situations.
Ronfaure: High drop rates on Bishamon and Daikoku. Rare card was Benten card.
La Theine Plateau: High Daikoku, Bishomen, Hoten drop rates.
Jugner Forest: High Bishamon, Hoten, Jurojin, and Benten drop rates. VERY low Daikoku or others at all.
Gustaberg: High drop rates of Bishamon and Benten. Rare card was Daikoku.
Sarutabaruta: High drop rates of Benten and Daikoku. Rare card was Bishamon.
Because of this, it is efficient (especially if working towards the items with friends) to move between areas if you aren't having luck with the "rare cards" in a specific zone. Ebisu is rare everywhere!
"Overturned Soil"
Goblin Riders and Fablinix are in every area listed above and are competing with you to find "Overturned Soil." When they dig at one it will vanish, so be fast!
- Being in a party will increase cards dropped by "overturned soil" by the number of members.
- "Overturned soil" can occasionally spawn the Wayward Worm who will immediately cast Bind or Bindga.(Wayward worm can be attacked but not killed and does not attack but depops after spell is cast.)
- Although the goblins are on Chocobo , "Overturned soil" cannot be examined while on a mount.
- Movement speed of some type helps, as well as some way to erase bind if you get a worm. A pet, like Carbuncle, will auto-attack (but not kill the worm, as it can't be killed) and stop it from binding you. Also, having Wide Scan to track the Goblin Riders helps a lot.