| This Article is a Community Guide |
|---|
| Guides exist as a community effort to help fellow players navigate the game. Opinions and strategies in their content may vary from editor to editor, but feel free to add new or correct out of date information. Guides are subject to the same editing standards of other FFXIclopedia articles. |
As of 2014, Assault can now be entered by 1-6 players. Most players will take this opportunity to clear Assaults solo, but some are fairly difficult to complete alone. This guide will give concise, yet comprehensive, instructions on completing each Assault, as well as giving a recommended job/subjob combination, difficulty level, and number of players needed. Much of the fluff will be removed, as all players are assumed to be wearing iLevel 117+ equipment. Time limit is 30 minutes unless indicated otherwise.
With the May 14, 2015 update, several assaults have been adjusted.
Getting to Captain[]
When you clear an Assault for the first time, you will receive 5 Mercenary Rank points. By completing all 5 Assaults for your current Rank, you will get the 25 points necessary to complete the next Promotion quest, beginning with Promotion: Private First Class and ending with Promotion: First Lieutenant. Completing all 50 Assaults plus Nyzul Isle Investigation (at least once; reaching floor 100 is not necessary) will allow you to flag Promotion: Captain.
Rytaal will hold three Imperial Army I.D. Tags for you, refreshing them every 24 hours. You can hold onto one tag yourself, allowing you to stockpile up to four at a time. Once you reach Captain rank, Rytaal will hold four tags for you, increasing your total to five.
If you complete chapter 1 of Rhapsodies of Vana'diel and obtain the ![]() Rhapsody in Azure, new I.D. Tags will be issued every 10 minutes.
Rhapsody in Azure, new I.D. Tags will be issued every 10 minutes.
Filling your Memoires[]
If you are working towards obtaining a Mythic Weapon, you must complete An Imperial Heist and then flag Duties, Tasks, and Deeds. You will need to clear all 50 Assaults again, but before exiting, you must trade the appropriate book to the Rune of Release.
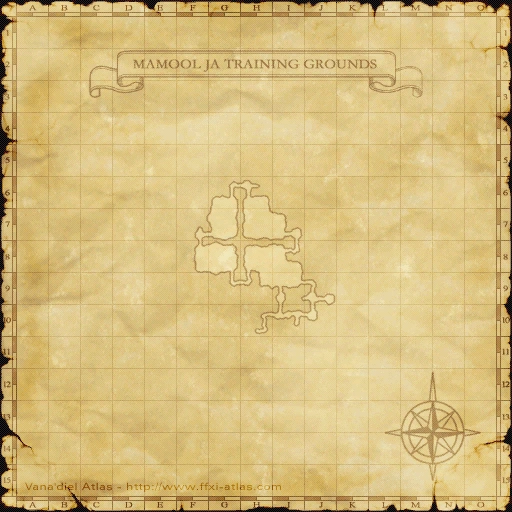
- Mamool Ja Training Grounds assault missions must be recorded in the Mamool Ja Journal.
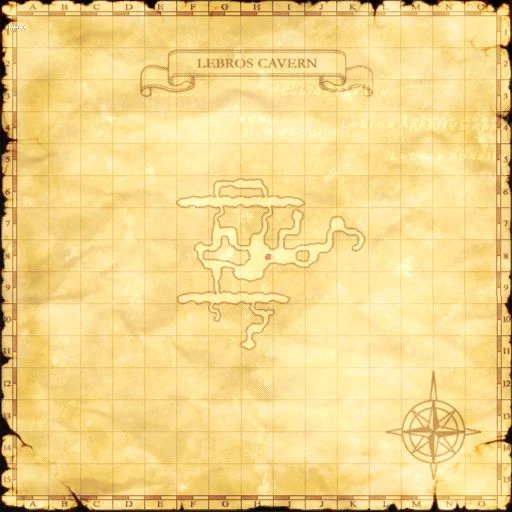
- Lebros Cavern assault missions must be recorded in the Lebros Chronicle.
- Leujaoam Sanctum assault missions must be recorded in the Leujaoam Log.
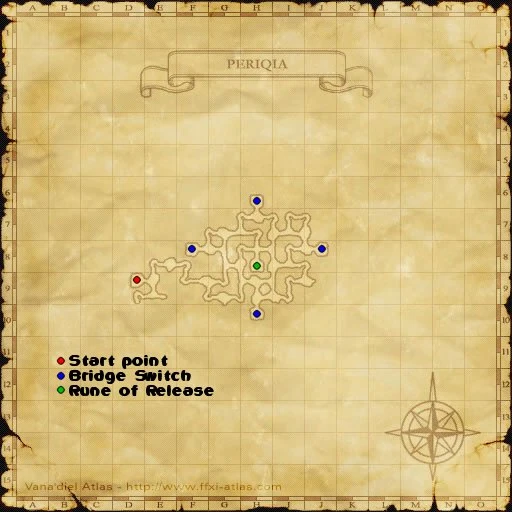
- Periqia assault missions must be recorded in the Periqia Diary.
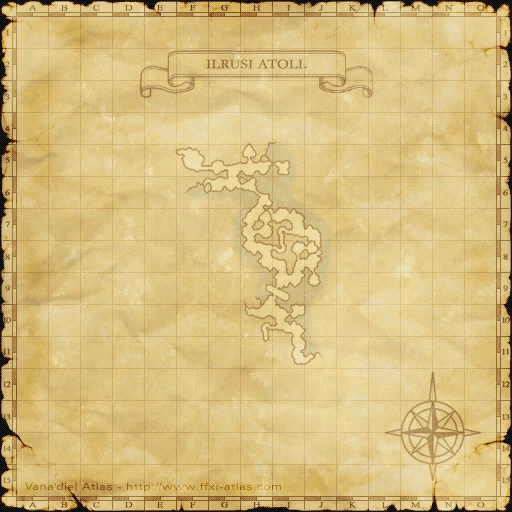
- Ilrusi Atoll assault missions must be recorded in the Ilrusi Ledger.
Quick Reference[]
Very Easy: No risk of failure.
Easy: Trivial gimmick to be aware of.
Difficult: Requires some preparation and attention.
Very Hard: Requires careful preparation, luck, and skill.
Private Second Class[]
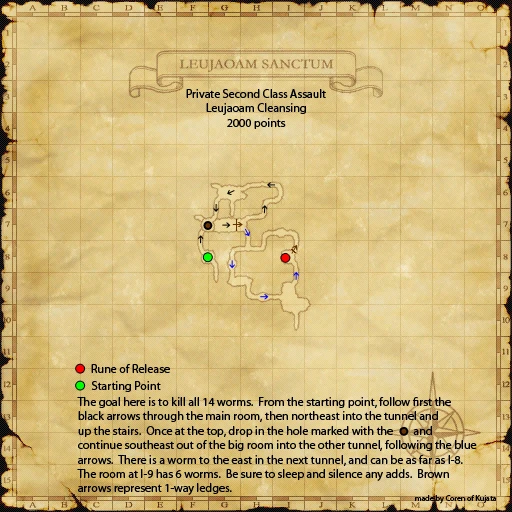
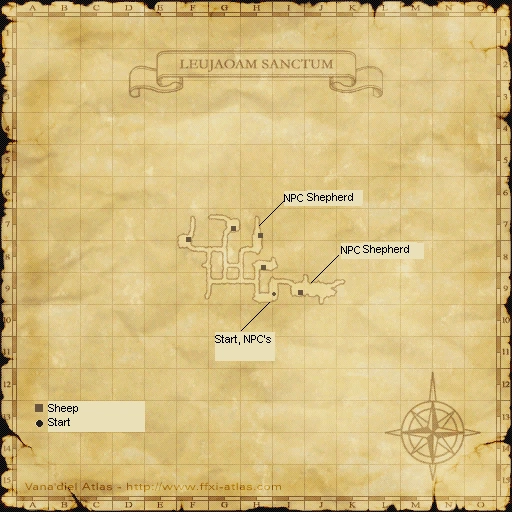
Leujaoam Cleansing[]
Solo Difficulty: Very Easy
Recommended Jobs: Any DD.
Objective: Kill all 14 Leujaoam Worms. Consult map.
- Rune of Release will spawn at (I-8), through the north tunnel.
My run: Cleared in 8:59 as DRG/SAM.
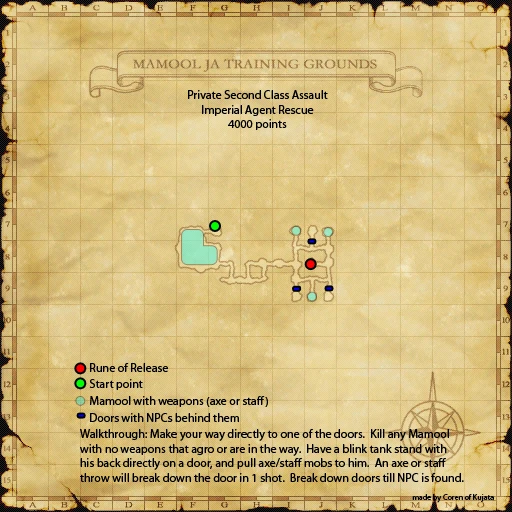
Imperial Agent Rescue[]
Solo Difficulty: Very Hard
Duo Difficulty: Easy
Recommended Jobs: Good healing, refresh, low evasion/parrying/shield, high defense. SCH/RDM, RDM/SCH, WHM/RDM.
Obtain a low-damage weapon and an armor set with no +evasion. For example, Orvail Armor Set.
As of May 14, 2015, Mamool Ja will use their TP abilities more frequently.
Objective: Find Brujeel.
- There are three gates in the N, SW, and SE corners, and Brujeel will be behind a random one.
- Lure a Mamool Ja to a gate and put yourself right up against it, so that any TP moves they use will hit the gate behind you. Do not allow a pet to gain enmity, as this will turn the mob.
- There are four weapon-wielding Mamool Ja in the pit, and three more in the cavern area in the NW, NE, and S corners. Avoid or kill the NIN-type Mamool Ja that do not have weapons.
- The gate will break when the gate is hit with Firespit 4 times, or once with Axe Throw or Staff Toss.
- Axe Throw and Staff Toss become unusable after the Mamool Ja loses its weapon, which occurs frequently (~20%) upon receiving a critical hit or weapon skill. If it loses its weapon, quickly kill it using black magic or your main weapon, and grab a new Mamool Ja from the NW, NE, or S corner if necessary.
- Being attacked by two or more mobs at a time may prevent you from checking the Pot Hatch. Kill quickly if this happens.
- Rune of Release will spawn at (J-8) in the middle.
My run: Failed as RNG/DNC. Did not anticipate the high likelihood of breaking weapons.
Failed as DRG/RDM. Wyvern often turned mobs, and could not dismiss without losing primary heal source.
Cleared in 11:31 as SCH/RDM. Two Mamools lost their weapons before Staff Toss was used; Brujeel was behind first gate. I believe I could have checked all three gates within the time given.
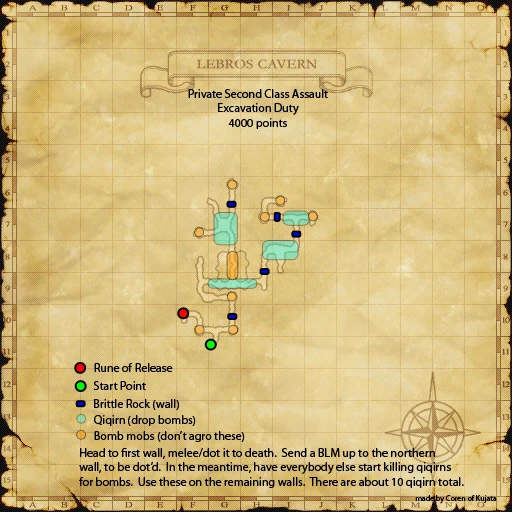
Excavation Duty[]
Solo Difficulty: Easy
Recommended Jobs: Treasure Hunter, high attack speed. THF/DNC, DNC/THF, NIN/DNC, MNK/DNC.
Objective: Break all 5 Brittle Rock walls.
- Damage against Brittle Rock caps at 20 from any source. Brittle Rock has roughly 2,325 HP.
- Anecdotes on main walkthrough indicate damage cap of 22.

- Maximize attack speed through Haste+, Dual Wield/Martial Arts, Double/Triple/Quadruple Attack, low-delay weapons, and buffs like Haste, Haste Samba, and Saber Dance. Box Step level 5 increases average damage by roughly 2 points. Food seems to have little to no effect.
- Alternatively, a /BLM can cast Bio II, Burn, Choke, and Shock, which together will inflict 17 damage per Tick. This strategy has not been tested solo.
- Anecdotes on main walkthrough indicate damage cap of 22.
- Kill Qiqirn to obtain Qiqirn Mine. To use them, attack a wall, use the Qiqirn Mine, and stay engaged until it detonates (10 seconds). Qiqirn Mine will destroy the wall instantly. Disengaging from the wall will waste the mine.
- Treasure Hunter may or may not increase Qiqirn Mine drop rate.
- Qiqirn Mine is not , so you can carry multiples.
- Causing a Volcanic Bomb to Self-Destruct near a wall has no effect.
- See map. After the first wall, destroy the northern wall next, then head southeast and destroy the final three.
- Rune of Release will spawn at (E-10). Use Invisible to avoid Bombs.
My run: Cleared in 19:05 as THF/DNC with Atoyac (97 DMG 200 Delay) and Aphotic Kukri (91 DMG 200 Delay), 25% Haste, 25+5% Dual Wield, 9% Double Attack, 16+2% Triple Attack, and Haste Samba. Base damage against walls was roughly 13-18, 14-20 after inflicting Box Step level 5, with critical hits of 18-20. Obtained two Qiqirn Mines, but probably could have destroyed all 5 walls without any drops.
Seagull Grounded[]

Solo Difficulty: Very Hard
Duo Difficulty: Easy
Recommended Jobs: Any DD with movement speed+, fast pulls, Flee. DRG/THF, MNK/THF, WAR/THF. SMN for maximum ease.
This Assault should not be attempted solo on a spotty internet connection.
Objective: Escort Excaliace to the end.
- Unlike normal escort missions he cannot be controlled, though his behavior is predictable.
- He will begin moving forward at 50% speed when you come within 10' of him. His path through the map is randomly set at the start of the Assault, and cannot be changed.
- There are about 30 invisible "checkpoints" along his path.
- If he arrives at a checkpoint and you are not within 10' of him, he will attempt to escape at 75% speed, heading back to the entrance. "Now's my chance!"
- If he returns to the entrance, you will fail the Assault.
- If you are within 5' of him at a checkpoint, he will stop. "Someone's been eating too much garlic..." Move more than 5' away and he will resume moving.
- It is useful to trigger as many "garlic" messages as you can to figure out where exactly his checkpoints are.
- If he is attempting to escape, coming to within 10' of him at his next checkpoint will stop him. "Damn..." Move more than 10' away and he will resume moving forward.
- If he arrives at a checkpoint and you are not within 10' of him, he will attempt to escape at 75% speed, heading back to the entrance. "Now's my chance!"
- In the first half, he will investigate one of each pair of rooms (three total). If the room is empty, he will move to the end, stay still for about 20 seconds and then resume moving.
- If there are mobs in the room, he will say "Over to you." and attempt to escape at 75% speed. He will continue doing this until the mobs are cleared.
- In the second half, he will choose either the West or East path. If a mob aggros him (i.e. if he sees or hears a mob) he will say "Wh-what the...!?" or "Uh-oh." or "H-help!!!" and begin fleeing at 100% speed. He cannot be stopped while fleeing. He will travel about two map squares backward until he gets tired <Pant>...<wheeze>..., and then stay still for about 40 seconds. If you do not reach him after he catches his breath, he will attempt to escape at 75% speed.
- Try to quickly kill any mobs that he flees from, or pull them back to his position. If pulling, be careful not to lose aggro; periodically attack it again while running. You will have some free time to kill the mob while Excaliace recovers, but if he recovers while the mob is nearby, he will flee again. However, this is preferable to him attempting to escape, as he will not stop in that case.
- When he reaches the SW corner of (H-9) he will pause for 20 seconds.
- When he reaches (F-11)/(G-12) the Rune of Release will spawn nearby.
- If you are attempting this with two or more players, assign one player to escort while the rest kill mobs, first in the three rooms and then in the two possible paths. Done correctly, he should never attempt to escape.
My run: Cleared in 29:01 as THF/DNC. It took three attempts to clear out a single crab room without letting him escape too far. Five mobs aggroed him on the West path, and he eventually fled all the way back to (H-6/7). My luck was fairly good; I give a less than 40% chance of success on any given solo attempt regardless of player skill.
Summoner's perspective: Going SMN makes this a LOT easier. Being able to target mobs from 20 yalms away combined with being able to stop him before he gets to mobs means you can snipe mobs with an avatar and he never has a chance to run away because they never get close to him. It was trivial. Highly recommend doing SMN due to the distance they have. Easy.
Golden Salvage[]
Solo Difficulty: Very Easy
Recommended Jobs: Any DD.
Objective: Find the treasure in a Cursed Chest.
- Out of 12 Cursed Chests scattered around the area, 11 will be Mimics. The other will contain the objective.
- Rune of Release will spawn at (H-7).
My run: Cleared in 14:02 as DRG/SAM. Objective was in the last possible spawn, forcing me to kill all 11 Mimics.
Private First Class[]
Orichalcum Survey[]
Solo Difficulty: Difficult
Duo Difficulty: Easy
Trio Difficulty: Very Easy
Recommended Jobs: Any DD with movement speed+, Flee.
This Assault is entirely luck-based. Difficulties given are based on testimony.
Objective: Retrieve an ![]() Orichalcum Ore for Mulwahah.
Orichalcum Ore for Mulwahah.
- Get a Pickaxe from Mulwahah at the start.
- Examine Mining Points to mine. If you break your Pickaxe, return to Mulwahah to get a new one.
- If a worm spawns, kill it and wait for its body to disappear.
- If the Mining Point disappears, move on and find another one.
- Consult map. There are two paths to explore: One going NE and wrapping around W then SE into a hole, and another going E/NE into a hole and then wrapping around SW, both returning to the start.
- Once the Orichalcum Ore is found, all Qiqirn will become aggressive to the ore carrier. Avoid them with Invisible, or kill/sleep them.
- After the ore carrier speaks to Mulwahah, the Rune of Release will spawn nearby.
My run: Failed once. Cleared in 21:25 as THF/DNC.
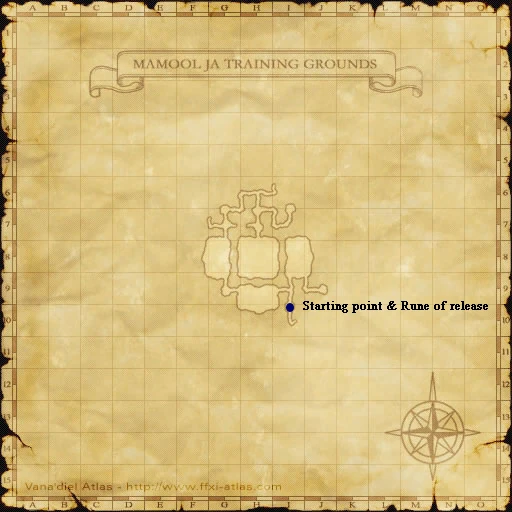
Preemptive Strike[]
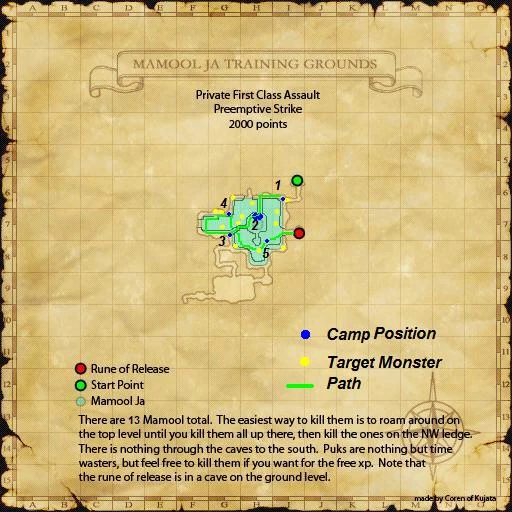
Solo Difficulty: Easy
Recommended Jobs: Any DD with mage sub or ranged attack (e.g. Pebble)
Objective: Kill all 13 Mamool Ja.
- Consult map. There are 4 Mamool Ja on the top level; kill or aggro those before jumping down, as there are no paths back up.
- Use Wide Scan to track down any mobs you may have missed. Mobs on the upper level can be pulled using magic or a ranged attack.
- Rune of Release will spawn at (I-7).
My run: Cleared in 17:02 as DRG/SAM. Killed 12 Mamools in 8 minutes, last Mamool was on the upper level. I would have certainly failed if I did not have Pebbles in my mog sack.
Lebros Supplies[]
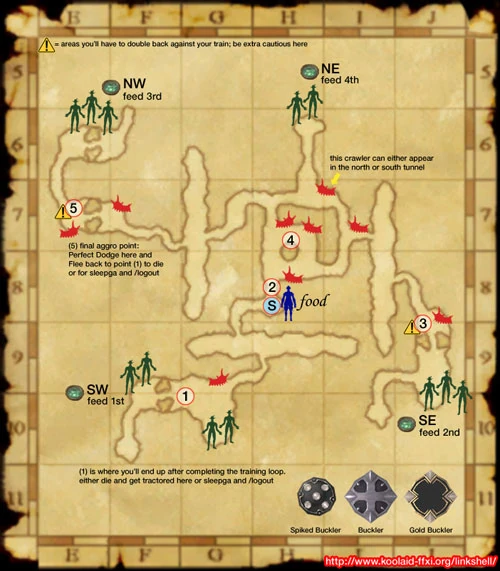

Solo Difficulty: Very Hard
Duo Difficulty: Difficult
Trio Difficulty: Easy
Recommended Jobs: Movement Speed+, Flee, AoE Sleep. BRD/THF if solo. In parties, THF, DNC/THF, and SMN/THF are acceptable.
As of May 14, 2015, a new item, ![]() Seafood Stewpot, has been added, which will fully feed all surrounding soldiers.
Seafood Stewpot, has been added, which will fully feed all surrounding soldiers.
Objective: Feed all 12 soldiers.
- You cannot use your own food items, as they will not work. You must get all food items as items from Yazuhma
- See map for their locations (2 WSW, 2 SSW, 3 NW, 2 N, 3 SE).
- When you start the Assault, and after feeding a soldier, talk to Yazuhma to receive a food item.
- Yazuhma can only speak to one player at a time. Quickly advance through the conversation to allow your partners to get their food.
- Each soldier requires 7 "points" of food to become full. Yazuhma will give you one of the following items at random:
- Seafood Stewpot: AoE 7 points
- Bison Steak: 5 points
- Coeurl Sub: 4 points
- Bison Jerky: 3 points
- Pea Soup: 2 points
- White Bread: 1 point
- In each group of 2-3 soldiers, each soldier will carry a unique buckler. This is an easy way to tell them apart. See legend on bottom-right of map.
- Speaking to a soldier while carrying a food item will give it to them, even if they are full.
- When speaking to a hungry soldier without food, they will say "Have you brought the provisions?"
- A hungry soldier, when fed, will say "Thank Zahak you're here. I was about to start eating my boots!"
- When speaking to a full soldier without food, they will say "There's nothing like a full belly to put the power back in your sword swing. I pity the next monster that crosses my path!"
- After feeding a group of soldiers, it is wise to make sure they all give you this message, especially if you are forgetful.
- A full soldier, when fed, will say "You brought more supplies? Well, you can never have too much..."
- When speaking to a hungry soldier without food, they will say "Have you brought the provisions?"
- Be sure all party members are familiar with the walkthrough for this Assault. The best strategy is to send each party member off to feed a different group, and then have them help others once they are finished. The sixth player should be sent to the NW group as it is the furthest away.
- Flee, Powder Boots, and Hermes Quencher boost movement speed to 200%. Flee effects will overwrite Quickening.
- Chocobo Mazurka, Chocobo Jig II, and Fleet Wind grant +25% movement speed on top of any bonus from equipment. They cannot be stacked with each other, however they will stack with Bolter's Roll. Apply one of these buffs in between Flee uses.
- Give Crimson Eruca a wide berth to avoid losing Quickening. If they are aggroed, kill or sleep them quickly (e.g. Horde Lullaby II).
- Chocobo Mazurka, Chocobo Jig II, and Fleet Wind grant +25% movement speed on top of any bonus from equipment. They cannot be stacked with each other, however they will stack with Bolter's Roll. Apply one of these buffs in between Flee uses.
- Rune of Release will spawn next to Yahzuma.
My run: Cleared in 20:57 with 6 players.
Post-update run: Cleared in 22:55 as BRD/THF with Shneddick Ring. Received 3 stewpots out of 15 food items, so it appears that the drop rate is the same as the other foods.
Requiem[]


Solo Difficulty: Very Easy
Recommended Jobs: Any DD, prefer blunt damage type. MNK/DNC.
Objective: Kill all the monsters.
- The south half has 6 Skeletons and 2 Ghosts. The north half has the same, plus 2 Doomeds.
- Rune of Release will spawn at (F-9).
My run: Cleared in 12:52 as MNK/WHM. Banish removes damage resistance from Undead, but only improved damage output by about 20%. Would have preferred Haste Samba.
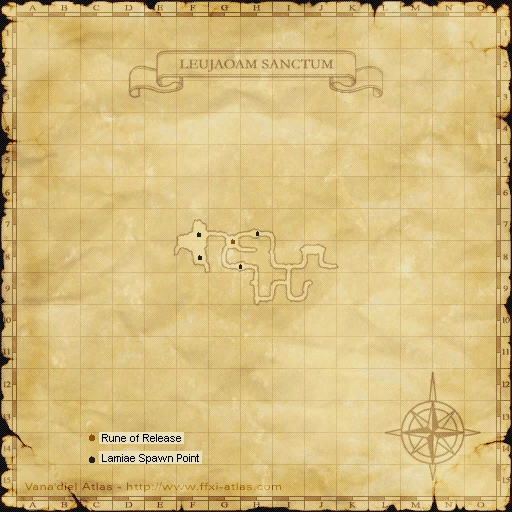
Lamia No.13[]
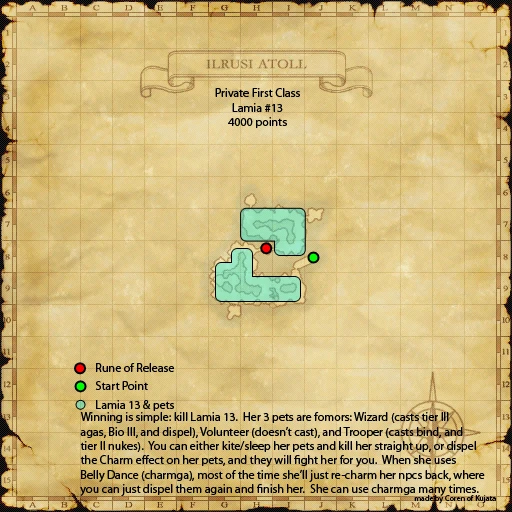
Solo Difficulty: Very Easy
Recommended Jobs: Any DD.
Objective: Kill Lamia No.13.
- Locate her on Wide Scan.
- Rune of Release will spawn at (H-8).
My run: Cleared in 2:15 as DRG/SAM.
Superior Private[]
Escort Professor Chanoix[]
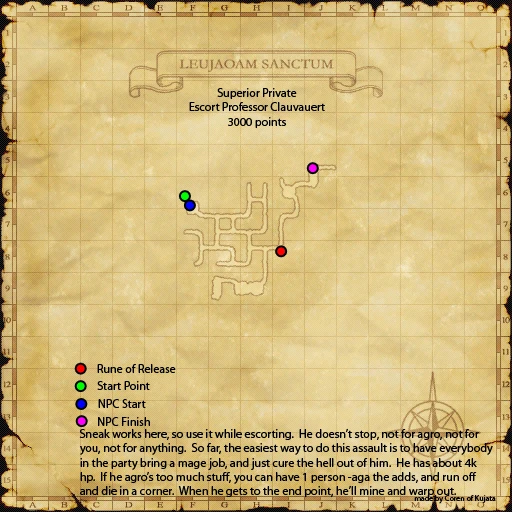

Solo Difficulty: Easy
Recommended Jobs: Any DD, prefer blunt damage type. MNK/DNC.
Objective: Protect Clavauert B Chanoix until he reaches the room at either (J-5) or (G-9).
- Chanoix wanders the cavern at random. At times he will pause for up to a minute, or switch directions. He will speak when he begins moving.
- The mobs in this area are Ghosts and Skeletons.
- Rune of Release will spawn at (I-8).
My run: Cleared in 11:52 as DRG/RDM.
Sagelord Elimination[]
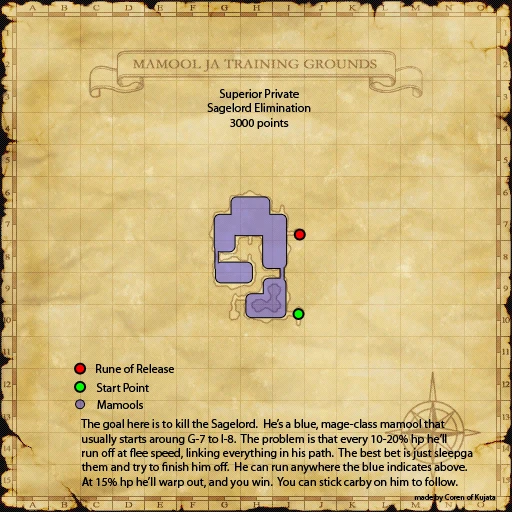
Solo Difficulty: Very Easy
Recommended Jobs: Any DD.
Objective: Kill Sagelord Molaal Ja.
- He can be located on Wide Scan.
- After losing 20% HP, he will use Warm-Up, and then run away at 200% speed. You can attack him once or twice while he is using Warm-Up.
- Mamool Ja Trainees that he passes will link to you.
- He will Warp out when he reaches 20% health.
- Rune of Release spawns at (I-7)
My run: Cleared in 6:13 as DRG/RDM.
Troll Fugitives[]
Solo Difficulty: Very Easy
Recommended Jobs: Any DD.
Objective: Kill all the Broken Troll Soldiers.
- Consult map.
- Rune of Release will spawn at (H-9).
My run: Cleared in 10:50 as DRG/RDM.
Saving Private Ryaaf[]
Solo Difficulty: Very Easy
Recommended Jobs: Any.
Objective: Locate Ryaaf, Balarahb, and Rhagmakah.
- There are 5 NPCs hunched over on top of the cages in each of the five rooms: North, West, South, East, and Center. Three of them will be target NPCs; the other two will be Fomor.
- Fomor NPCs will always be facing East, whereas all target NPCs (except one spawning in the East room) will be facing in the other directions.
- First check the North room. If the NPC is facing East, it is a Fomor.
- If you find Balarahb, check East and Center.
- If you find Rhagmakah, check West and Center.
- If you find Ryaaf, check South and East.
- If you find a Fomor, check the West room.
- If you find Balarahb, check South and Center.
- If you find Rhagmakah, check South and East.
- Rune of Release will spawn at (I-7).
My run: Cleared in 5:30 as DRG/RDM.
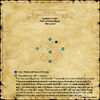
Extermination[]
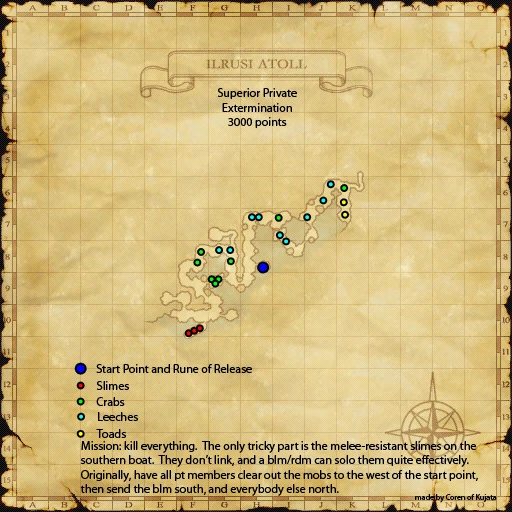
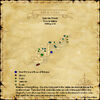
Solo Difficulty: Very Easy
Recommended Jobs: Any DD.
Objective: Kill all the monsters.
- Consult map.
- Rune of Release will spawn at (H-8).
My run: Cleared in 11:20 as DRG/RDM.
Lance Corporal[]
Shanarha Grass Conservation[]

Solo Difficulty: Very Easy
Recommended Jobs: Any DD.
Objective: Kill all 20 Coneys.
- They will all spawn in the starting room and gradually wander to the far north and far south rooms.
- Coneys will link to each other by sight. You can gather many together this way.
- After fighting for a short time (1-2 minutes) they will flee the battle. It is recommended to use AoE weapon skills or spells to finish them off quickly.
- It is possible to fail this Assault if they eat too many grassy spots.
- Rune of Release will spawn at (I-9).
My run: Cleared in 10:29 as DRG/RDM.
Breaking Morale[]
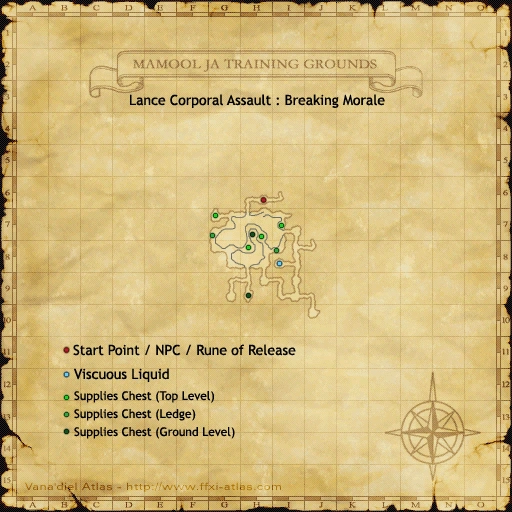
Solo Difficulty: Very Easy
Recommended Jobs: Any.
Time Limit: 15 minutes.
Objective: Find at least two items in chests around the map, and bring them back to Quhaaja.
- You can only carry one item at a time.
- The easiest chest to get is up the ramp to the left of where you exit the tunnel.
- The second easiest chest is directly south of the tunnel, behind a tree.
- If you are spotted by Mamool Ja Trainer, you will be teleported to the prison area, and any item you are carrying will be put back in the chest. You will find a pot of Viscous Liquid nearby, which will grant you a Mamool Ja Costume effect, which prevents Trainers from jailing you, but also applies -30 poison/tick and a slight movement speed debuff. It can be removed at any time.
- After giving Quhaaja at least two items, he will give you the option to "Give up." This will spawn the Rune of Release at (H-6).
My run: Cleared in 3:46 as DRG/RDM.
Evade and Escape[]
Solo Difficulty: Difficult
Duo Difficulty: Very Easy
Recommended Jobs: Movement Speed+, Flee, some DD capacity. BRD/THF if geared for DD, otherwise DNC/THF, THF, SMN/THF.
As of May 14, 2015, the time to activate all three switches has been raised from 3 minutes to 5.
Objective: Find the three switches in the area, and activate them within 5 minutes of each other.
- There are seven possible spawn locations. Check map.
- The easiest possible configuration is 2x W, 1x SW. This does not require any movement speed+.
- The hardest possible configuration is 1x NW, 1x NE, 1x SE. Using Flee, Chocobo Jig II, and Shneddick Ring, this path has been clocked at 4:10.
- There are three Dahaks patrolling the area. They have True Sight and will use Draw In if you move too far away. Seek out and kill all three before attempting the switches.
- They can be hard to kill on a non-DD job.
- Once you have confirmed the three switches' locations, figure out an optimal path between them. Use Flee, then when it wears use Chocobo Mazurka, Chocobo Jig II, or Fleet Wind.
- Rune of Release will spawn at (H-8).
My run: Failed as BRD/THF; Dahaks were too difficult to kill.
Cleared in 17:46 as DNC/THF. Using Powder Boots, took 2:10 to hit NE, SW, and SE switches.
Shooting Down the Baron[]
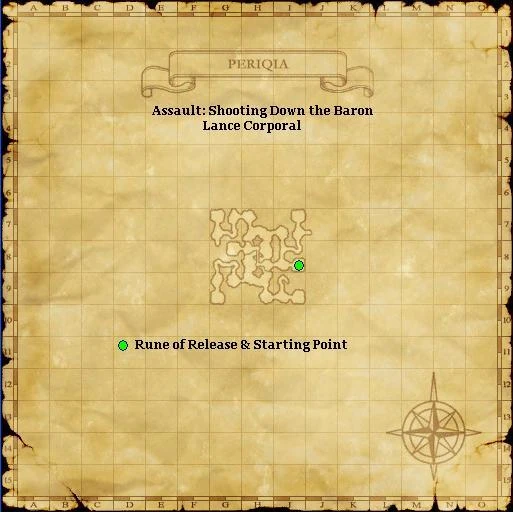

Solo Difficulty: Very Easy
Recommended Jobs: Any DD, prefer SMN, BST, or PUP.
Time Limit: 15 minutes.
Objective: Kill the Black Baron.
- He does not show up on Wide Scan.
- One of his possible TP moves will Warp him to a different location on the map. If he is killed quickly, he will not have a chance to do so.
- If he does warp, an avatar, beast, or automaton will track his new location.
- One of his possible TP moves will Warp him to a different location on the map. If he is killed quickly, he will not have a chance to do so.
- Rune of Release will spawn at (I-8).
My run: Cleared in 3:15 as SMN/SCH. Black Baron spawned at (H-7) and used two TP moves before dying. Did not Warp once.
Demolition Duty[]
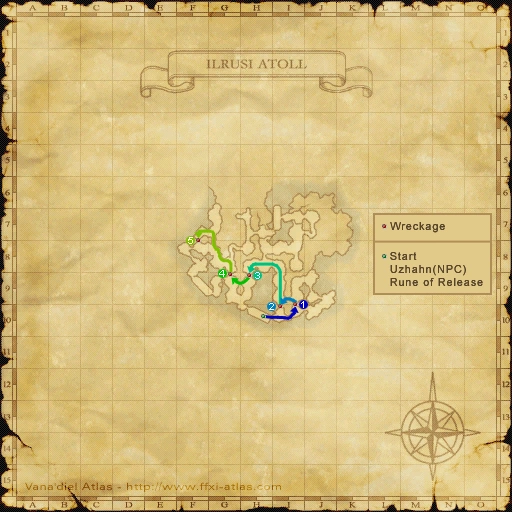
Solo Difficulty: Very Easy
Recommended Jobs: Any DD/RDM, DD/WHM. Alternately, AoE-damage jobs such as BLU, BLM, GEO, SMN.
Objective: Use the Demolition Automaton to destroy 5 barriers.
- Talk to Uzhahn at the start to cause the Automaton to follow you. See map.
- When the Automaton is close to a barrier, it will initiate demolition mode. Cast Haste on the Automaton to speed it up.
- After the Automaton uses a weapon skill, a Carrion Crab will spawn. The Crab will ignore you and attack the Automaton, dealing roughly 3% HP damage per hit.
- Barriers cannot be targeted, but will take half damage from AoE attacks. This can be done by luring an imp to the barrier and casting -ga/-ra spells.
- When all 5 barriers are destroyed, talk to Uzhahn again. The Rune of Release will spawn nearby.
My run: Cleared in 13:45 as DRG/RDM using only automaton.
Corporal[]
Counting Sheep[]
Solo Difficulty: Easy
Recommended Jobs: Any.
Time Limit: 15 minutes.
Objective: Hire a Qiqirn Shepherd to free Karakul trapped by ice.
- All items used in this Assault are . You cannot bring in an Imperial Gold Piece to win quickly.
- Qiqirn Mine Baron will give you a Pickaxe to be used at Mining Points.
- Ore that you mine up are , so you can only hold one of each at a time.
- Qiqirn Mine Baron will trade Imperial Bronze Piece for Copper Ore, Imperial Silver Piece for Silver Ore, and Imperial Gold Piece for Gold Ore.
- Ore that you mine up are
- Qiqirn Shepherd requires 1 Gold, 4 Silver, or 20 Bronze. Once you have hired him, he will follow you around.
- Examine the ice barrier at (I-9). It will take 1-4 mines to destroy it. After each mine, he may ask for a refreshment, but will not give up until the wall is destroyed.
- Qiqirn Greengrocer will give you a Sickle to be used at Harvesting Points.
- He will trade Date for Frost Turnip, Pamamas for Beaugreens, and Pamama au Lait for Snow Lily.
- Qiqirn Dealer offers to roll dice with him. You must wager 5 Bronze or 1 Silver to play. Victory will earn you 1 Gold.
- To win, you must beat the Dealer's score without exceeding 999. Each re-roll adds on to your previous.
- Dealer plays optimally. Playing against him is not recommended. There is reason to believe he cheats and never busts as well.
- Once you've examined a Karakul, the Rune of Release will spawn at the starting area.
My run: Cleared in 6:57 as BRD/THF. Obtained a copper ore and 3x silver ore. Each silver piece was used against Qiqirn Dealer; three failures. (737 vs 901, 20+814+933 vs 933, 785 vs 85+137+759) Then obtained gold ore. East wall required three mines; after first mine, Qiqirn Shepherd asked for Pamama Au Lait.
The Double Agent[]
Solo Difficulty: Very Easy
Recommended Jobs: Any.
Objective: Capture the traitor among the Qiqirn Spies.
- Upon being Questioned, Qiqirn will only give one message; often it will be unhelpful. Some Qiqirn will indicate the direction of the traitor, and if he is "very very close". The traitor will always lie.
- Attempting to Capture the wrong Qiqirn will reduce the Assault Points reward.
- To win quickly, simply attempt to Capture every Qiqirn, or Question enough to isolate which group the traitor is in first.
- Rune of Release will spawn at (I-9).
My run: Cleared in 8:20 as BRD/THF. Two spies pointed to the west group. In the west group, one said target was very close, other three were unhelpful. Falsely accused two.
Siegemaster Assassination[]


Solo Difficulty: Very Easy
Recommended Jobs: Any DD.
Objective: Kill Siegemaster Borgerlur.
- Kill Old Trolls until Siegemaster Borgerlur spawns.
- Rune of Release will spawn at (G-7).
My run: Cleared in 3:30 as DRG/RDM.
Building Bridges[]
Solo Difficulty: Difficult
Recommended Jobs: Movement speed+, Flee. BRD/THF, DNC/THF, THF/BRD.
Time Limit: 15 minutes.
Objective: Activate all four switches.
- The switches are located in the four rooms on each side of the map.
- NPC Lamiae will detect by True Sight and chase after you. If they get within 5', you will be teleported to the start.
- They do not show up on Wide Scan. If detected, you can often outrun them, but you may run into another Lamia. They will lose sight of you faster than normal mobs, especially if you take them out of their default patrol path.
- Hiding just around corners and behind pillars will often keep you out of sight while the Lamia passes you, due to their narrow sight cone. It is typically impossible to bypass Lamia in a hallway or curve.
- It is possible, but not recommended, to run past Lamia by interrupting your internet connection at strategic moments.
- Rune of Release will spawn at (H-8).
My run: Cleared in 11:08 as BRD/THF.
Searat Salvation[]
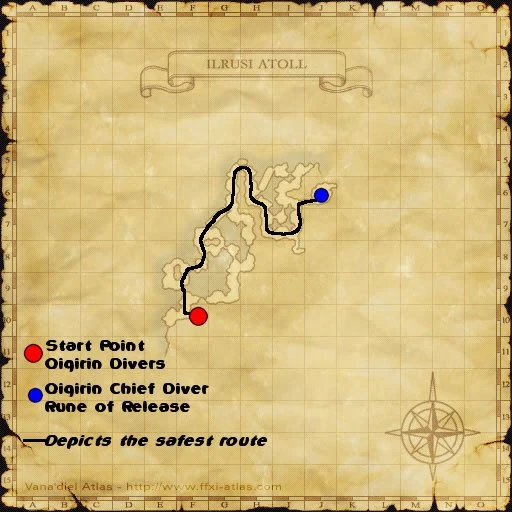
Solo Difficulty: Difficult
Recommended Jobs: Movement speed+, Flee. BRD/THF, DNC/THF, THF/BRD.
Time Limit: 15 minutes.
Objective: Guide the Qiqirn Divers to the Qiqirn Diver Chief at (J-6).
- Talk to all five Qiqirn to make them follow you. They will follow closely at about 112% speed. Only one Qiqirn is necessary to complete this Assault, so it is okay if you lose track of a few.
- Avoid the Giant Orobons that patrol the map. They are NPCs and cannot be attacked, and will ignore players.
- Unlike normal Orobons, these have long and narrow Sight aggro. If a Qiqirn aggros a Giant Orobon, they will give a message and begin fleeing to predetermined hiding spots located around the map.
- Talking to a fleeing or cowering Qiqirn will cause it to follow you again.
- After talking to Qiqirn Diver Chief with one or more Qiqirn nearby, Rune of Release will spawn.
My run: Cleared in 11:25 as BRD/THF. Aggroed one Orobon, lost one Qiqirn in the process.
Sergeant[]
Supplies Recovery[]
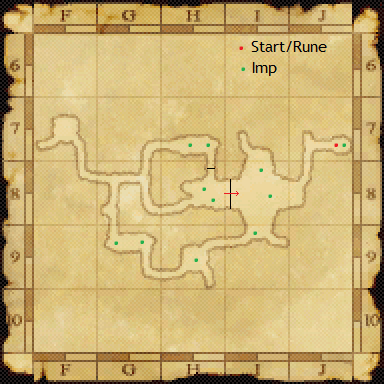
Solo Difficulty: Difficult (Item Level 119 Easy)
Recommended Jobs: Any DD, prefer piercing, Flee. DRG/THF, DNC/THF.
Objective: Kill Imps and retrieve more supply packages than the two BLU NPCs.
- Imps will spawn after you talk to Kuihlud. See map for spawn locations.
- If Gasharyad or Salimuhi take any offensive action against your target, you will not be able to get supplies from it. Even if you land the killing blow, they have a chance of getting supplies.
- One imp will spawn at the starting location. They will kill it in about 2 minutes, and then head for the nearest target, ignoring terrain.
- Immediately after talking to Kuihlud, use Flee and aggro the three imps in the main room, then go through the hallway to collect three more.
- Kill all six, and then head to the northmost room at (H-7). Most likely, the two BLUs will have killed the Imp at the start and the two Imps at (H-8), and may be working on one of the two Imps in the north room.
- After all 11 Imps have been killed, the mission will end. If you retrieved more packages than the BLUs, Rune of Release will spawn at (J-7).
My run: Failed as DRG/THF. Killed 7 imps, got 2 supplies vs 2.
Cleared in 7:30 as DNC/THF. Killed 7 imps, got 4 supplies vs 1.
Imperial Treasure Retrieval[]
Solo Difficulty: Very Easy
Recommended Jobs: Any.
Time Limit: 15 minutes.
Objective: Bring an item back to Zahakahm.
- There are 9 coffers in the area with an item in them. There are also 6 Mamool Ja NPCs running around, who will open coffers they find and take the items away.
- If you are carrying an item, and a Mamool Ja gets close to you, he will take the item and warp you back to the start.
- If a Mamool Ja is carrying an item and you talk to him, you will steal his item and warp him elsewhere.
- Rune of Release will spawn nearby.
My run: Cleared in 2:35 as THF/DNC.
Apkallu Breeding[]

Solo Difficulty: Easy
Recommended Jobs: Any.
Time Limit: 15 minutes.
Objective: Pair up a male Apkallu with his matching female partner.
- The Apkallu speak in morse code, using Quark and Squee. See the map for a translation guide, and locations for the females.
- Once you've grabbed a male, he will follow you at 75% speed. You must stay within 10' or he will lose track of you. He will continue following when you come within 5' of him.
- Speak to the female with the male nearby to make the match.
- Rune of Release will spawn at (I-8).
My run: Cleared in 8:15 as DRG/RDM.
Stop the Bloodshed[]
Solo Difficulty: Difficult
Recommended Jobs: Any DD.
Objective: Kill all 35 Augmented Chigoes.
- Like all Chigoes, they do not show up on Wide Scan, have visible nametags, or become targetable until you aggro them. Search very thoroughly all hallways, and the open area. In the rooms, be sure to check on top of, behind, and around the cages.
- They have roughly 1200 HP apiece. Like all Chigoes, they can be killed instantly with a critical hit, weapon skill, or damage-inducing job ability.
- AoE weapon skills like Circle Blade and Cyclone are useful.
- Instant-kill job abilities include (DNC) Quickstep, Violent Flourish, Wild Flourish, (DRG) Jump, High Jump, (DRK) Weapon Bash, (PLD) Shield Bash, and (SAM) Blade Bash.
- They have roughly 1200 HP apiece. Like all Chigoes, they can be killed instantly with a critical hit, weapon skill, or damage-inducing job ability.
- Chigoe Breeders patrol the area and will cast potent tier-IV spells. Keep your HP topped off.
- Rune of Release will spawn at (H-8) on the bridge.
My run: Cleared in 20:51 as DRG/RDM. On first sweep, missed one chigoe in the NW hall.
Apkallu Seizure[]
Solo Difficulty: Very Hard
Recommended Jobs: Any.
Do not attempt this Assault on a spotty internet connection.
Objective: Guide a Fairy Apkallu back to Clavauert B Chanoix.
- Fairy Apkallu can be located on Wide Scan. Kill all Kelp Pugils in the path.
- Examine ??? around the area to get a Hamsi.
- To capture a Fairy Apkallu: (Macro /bow and /welcome before you start)
- Place yourself directly in its path, and stop moving.
- Message: "The fairy apkallu is staring at you."
- /bow to it. Desired message: "The fairy apkallu seems to have let down its guard a bit."
- Immediately /welcome it. (Do not wait for the reaction message, the window to reply seems incredibly short/bugged)
- Desired message: "The fairy apkallu seems to like you."
- Immediately press enter/click the Apkallu to try and trade the Hamsi, if your attempts to bow/welcome were not successful you don't lose the Hamsi.
- Desired messages: "You give the Hamsi to the Fairy Apkallu." "You successfully capture the Fairy Apkallu!". Quickly position yourself behind the Apkallu and move to the escort phase.
- If you weren't successful, repeat the steps above.
- To escort a Fairy Apkallu:
- After capturing, you have roughly 3 seconds to get into position. The proper position is directly behind it, in melee striking range (i.e. a valid Sneak Attack position).
- It will begin moving towards Clavauert on a fixed path at 50% speed. When it turns, you must reposition yourself directly behind it.
- It is useful to stay locked-on.
- If at any point it sees you or another player, or you are out of position for more than 3 seconds, it will get scared and run all the way back to its spawn point.
- Be very cognizant of rock outcroppings in the path, as the apkallu will ignore terrain. You must escort it up the rock and then quickly run around and get back into position to continue.
- Once it reaches Clavauert, he will give a message, and the Rune of Release will spawn nearby.
My run: Cleared in 4:52 as DRG/RDM. Do not be deceived; I had the most practice during my initial Assault runs with a group.
Sergeant Major[]
Azure Experiments[]
Solo Difficulty: Easy
Recommended Jobs: Any DD with a ranged pull.
Objective: Test all four experimental tissues.
- Talk to Nareema to receive a status effect:
- A group of lamiae will then spawn. They can be seen on Wide Scan.
- The NE group can be pulled up the ledge, saving you a long walk around.
- Be careful not to allow Lamia Prosector to cast Ancient Magic while HP is reduced.
- After defeating a group, talk to Nareema again to receive a new tissue.
- After all four groups have been defeated, Rune of Release will spawn at (G-7).
My run: Cleared in 6:50 as DRG/RDM. Came very close to death when hit with Flood under the effects of raptor marrow.
Blitzkrieg[]
Solo Difficulty: Very Easy
Recommended Jobs: Any DD.
Objective: Kill 200 enemies.
- Each enemy has 300-500 HP and very low defense.
- Position yourself in a bottleneck, like the tunnel opening at (I-8), facing the center with auto-target turned on. Done properly, you should kill a monster roughly every 2 seconds without much effort.
- AoE weapon skills like Fell Cleave, Shockwave, Circle Blade or Cyclone are useful. BLUs have access to many AoE spells.
- After 200 kills, Rune of Release will spawn at (I-10).
My run: Cleared in 12:45 as WAR/DNC.
Wamoura Farm Raid[]
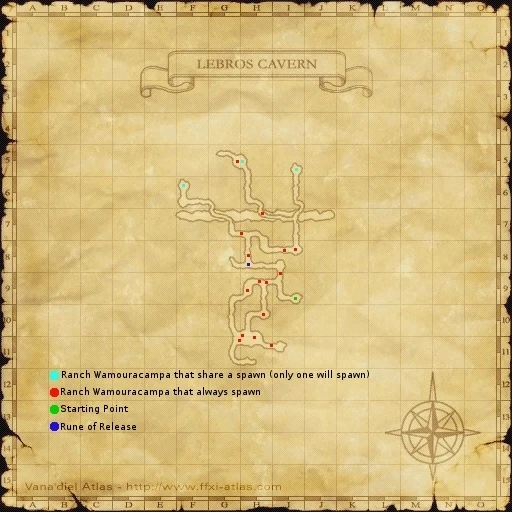
Solo Difficulty: Very Easy
Recommended Jobs: Any DD.
Objective: Kill all 16 Ranch Wamouracampas.
- After clearing the southern section, kill the mob(s) at (G-5). Using Wide Scan from this location can save you a trip down the long northern passages.
- After a certain amount of time, some will become Ranch Wamouras.
- Rune of Release will spawn at (H-8).
My run: Cleared in 12:15 as DRG/RDM.
Defuse the Threat[]
Solo Difficulty: Easy
Recommended Jobs: Movement Speed+. BRD/THF, DNC/THF, THF/BRD.
Objective: Defuse or detonate all 15 Qiqirn Mines, defusing at least one.
- They are scattered all throughout the zone. When you are within about 30' of one, you will get the message "The mine detector signals there may be something nearby." From this point you will have 30 seconds until detonation.
- About every two seconds you will receive a hint message.
- "Kachink.........": It is about 30' away.
- "Kachink......": It is about 20' away.
- "Kachink...": It is about 10' away.
- "Kachink!": It is about 3' away.
- When you are within 1', the Qiqirn Mine will appear and make a noise. Check the mine to defuse it.
- About every two seconds you will receive a hint message.
- Once you have defused at least one mine, run all around the zone to trigger all the remaining mines. Once all 15 mines are accounted for, Rune of Release will spawn at (H-9).
My run: Cleared in 9:58 as BRD/THF.
Lost and Found[]

Solo Difficulty: Difficult
Duo Difficulty: Easy
Recommended Jobs: Any.
Objective: Find the Eye of Zahak.
Talk to Tian Tian to make her follow you. If another party member talks to her, she will follow them.
- Stage 1: Find hints (Solo requires at least 2 hints to find the ring)
- Talking to Tian Tian will make her stop for 10-30 seconds while she surveys the area. She will attempt to locate the nearest ??? within about 25'. Her messages will go from "I don't think we'll find anything around here." (none in area) to "Yes!... it's very very close.".
- If she adds "But... I don't think this is it.", the nearby ??? is seaweed, which is useless and adds a Weight effect.
- If she adds "Oh! There is a frighteningly powerful energy in the air here!...", the nearby ??? will spawn a Crab.
- Tian Tian will continue locating the nearest ??? even if it is one you have already examined. Be sure you explore separate parts of the map.
- These messages cannot be used to locate the Eye of Zahak, only seaweed, crabs, or hints.
- If the ??? is not seaweed or a Crab, and you are "very very close," begin targeting around the area while walking slowly around. It will take a second or so for FFXI to update your location. The ??? will appear when you are within 1' of it, and disappear when you move away.
- Talking to Tian Tian will make her stop for 10-30 seconds while she surveys the area. She will attempt to locate the nearest ??? within about 25'. Her messages will go from "I don't think we'll find anything around here." (none in area) to "Yes!... it's very very close.".
- Stage 2: Find the ring
- From here you can ignore the first part of her dialogue and focus solely on her direction/distance information to locate the ring.
- Examining a hint ??? will add new messages to Tian Tian's divination regarding the Eye of Zahak's location.
- With one hint, she will say which player is closest to the Eye.
- By placing multiple players in different locations, you can use triangulation to determine its location.
- With two hints, she will say the direction the Eye is located in.
- A solo player can locate the Eye by triangulating from different locations.
- With three hints, she will give the distance as well.
- With one hint, she will say which player is closest to the Eye.
- Rune of Release will spawn at (I-9) on the ship.
My run: Cleared in 11:05 with 6 players.
Cleared in 22:20 as solo.
Chief Sergeant[]
Imperial Code[]


Solo Difficulty: Easy
Recommended Jobs: Any DD, prefer high attack speed. DNC, NIN, MNK, THF.
Keep Reraise active while in this Assault.
Objective: Kill Oko, Danzo, and Saizo, and retrieve the OGMA from the final body.
- Kusa in the area aggro by True Sight and HP and will link, and Kudagitsune aggro by Hearing and HP. High attack speed is useful for eliminating shadows from the three targets and the Kusa.
- Kudagitsune can use Perdition, causing instant K.O.
- The fastest order to kill them in is Saizo (I-8), Oko (G-8), then Danzo (H-8) up the stairs to the west.
- After killing the last target, check the ??? left behind. Rune of Release will spawn at (H-8) on the ground floor, directly under the hole next to Danzo.
My run: Cleared in 7:55 as DNC/THF.
Marids in the Mist[]
Solo Difficulty: Very Easy
Recommended Jobs: Any DD.
Objective: Kill or tranquilize all 8 Marids.
- There are two Marids per open area.
- Rune of Release will spawn at (I-9).
My run: Cleared in 8:52 as DNC/THF.
Egg Conservation[]
Solo Difficulty: Very Easy
Recommended Jobs: Any DD.
Objective: Kill the Qiqirn Egglers and protect the Apkallu females.
- Five Qiqirn at a time will slowly approach from the NW, SW, and E tunnels. They will ignore you and go straight for the Apkallu until attacked, at which time they behave like normal monsters. They will aggro Apkallu males, which do very little damage.
- As long as you continue pulling Qiqirn from the tunnels, or attack them as they come in, it is virtually impossible to fail this Assault.
- After killing 15 Qiqirn, Rune of Release will spawn at (I-8).
My run: Cleared in 13:02 as DNC/THF.
Operation: Snake Eyes[]
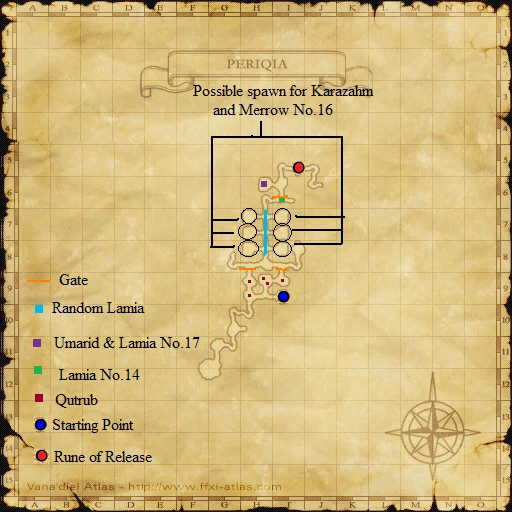
Solo Difficulty: Easy
Recommended Jobs: Any DD.
Objective: Rescue the two generals.
- Kill all five Qutrub at (H-9) and (I-9). The doors to the north will open.
- While running down the hallway, look into each room until you see Karazahm fighting Merrow No.16. Kill the Merrow.
- Kill Lamia No.14 (I-6) to unlock the door.
- Engage Umarid (H-6) but be very careful not to kill him. Lamia No.17 will spawn when he is below 50% health; kill her.
- It is recommended to remove stat-boosting armor pieces if you routinely do very high damage.
- Rune of Release will spawn at (I-5).
My run: Cleared in 7:40 as DRG/SAM. With Upukirex, Umarid took four hits to get to 21% and nearly died.
Deserter[]
Solo Difficulty: Very Easy
Recommended Jobs: Any DD.
Objective: Kill or disarm at least one Lamia.
- After doing so, speak to Raubahn (H-9) to abort the mission. Rune of Release will spawn nearby.
My run: Cleared in 2:20 as DRG/SAM. Killed one Lamia.
Second Lieutenant[]
Red Versus Blue[]


Solo Difficulty: Very Easy
Recommended Jobs: Any DD, Flee.
Objective: Defeat Raubahn.
- Talk to Shailham to spawn groups of enemy BLUs. You will begin with 8 assisting NPCs, who will protect Shailham. If Shailham dies, you will fail the Assault.
- Raubahn spawns at the top of (I-6). Ignore all enemies and go straight for him.
- When you defeat Raubahn, all enemies will despawn, and Rune of Release will spawn at (G-9).
My run: Cleared in 2:20 as DRG/THF.
Azure Ailments[]
Solo Difficulty: Difficult
Recommended Jobs: Good healing, refresh, low evasion/M.evasion/parrying/shield, high defense. WHM/RDM, SCH/RDM, RDM/SCH.
Obtain a low-damage weapon and an armor set with no item level. For example, Teal Saio Set.
As of May 14, 2015, the number of ailments needed has been reduced from 5 to 3.
Objective: Demonstrate three unique status ailments to Garjham.
- Amnesia: Inflicted by Qiqirn Huckster's Kibosh.
- Qiqirn Huckster is located on the upper levels of the W, S, and E areas.
- Bio: Spell cast by Poroggo.
- Poroggo is located in the SE and far N tunnels.
- Disease: Inflicted by Pit Lindwurm's Foul Breath.
- Pit Lindwurm is located in the E area.
- Slow: Inflicted by Huge Spider's Spider Web, Pit Lindwurm's Chomp Rush or Ripper Fang.
- Huge Spider is located in the W, S, and E areas.
- STR Down: Inflicted by Bugard's Awful Eye.
- Bugard is located in the W area.
- Attack Down: Inflicted by Leech's Acid Mist.
- Leech is located in the near N tunnels.
- Evasion Down: Inflicted by Slavering Lizard's Infrasonics.
- Slavering Lizard is located in the S area.
- While wearing your iLevel gear, buff up with Protect V, Shell V, Phalanx (II), Refresh (II), Sneak, Invisible. Pull the following enemies: 2x Pit Lindwurms (S room), 2x Lizards (S room), 2x Leech (N tunnel). Bring everyone back to the center room, so that you can quickly turn in status ailments as you receive them.
- Poroggos are not recommended due to their tendency to cast high-tier elemental magic and Charm.
- Bugards are not recommended due to their low attack speed and high damage.
- Mamool Ja Warders do not give any of the required status ailments. If you accidentally pulled any of them, kill them with black magic or your best weapon.
- Switch to your non-iLevel gear and low-damage weapon. If enemies appear to be hitting you for 0 damage, remove your Phalanx effect. Cast Haste and begin auto-attacking monsters that you have pulled 2 or more of. Be extremely cognizant of your HP and MP counts.
- Dia and Diaga deal very little damage but will quickly build enemy TP when spammed.
- Enemies will use TP abilities more often when they are under 25% HP.
- Staff weaponskill Spirit Taker will restore a large amount of MP.
- SCH can use Sublimation. Keep Light Arts active to maximize Cure potency.
- RDM can use Refresh II, /RDM Refresh. If you must use Convert be sure to equip your iLevel gear until you are out of the red.
- WHM should avoid Afflatus Solace, because Stoneskin effects prevent enemy TP gain.
- Once you have received a status ailment, disengage and turn it in to Garjham. After he records the data, switch to your iLevel gear and kill the monsters you no longer need.
My run: Failed as BRD/DNC. The idea was high attack speed, low evasion. Ran out of time due to not enough enemies engaged.
Failed twice as DRG/RDM. Died due to too many enemies.
Failed as DNC/RDM. Died due to too many enemies.
Cleared in 26:25 as SCH/RDM. Pulled two Qiqirn, one Lindwurm, two Spiders, one Leech, three Lizards, and two Mamool.
Cleared in 14:36 as SMN/RDM. Used Siren to tank 2-3 Lindwurms, Spiders, Leech, Lizards next to Garjham then switched to Teal Saio Set and used Assault(not Hysteric Assault) to get them all below 25% hp. All ailments you need besides Amnesia and Bio are cone effects so just stand there and spam Diaga after getting the monsters HP below 25%. Once you get one debuff use Hysteric Assault on the mobs you don't need anymore to heal Siren.
Operation: Black Pearl[]

Solo Difficulty: Difficult
Recommended Jobs: AoE black magic. BLM, GEO, mage/BLM.
Objective: Protect Kadjaya and Whyjham from incoming mobs.
- Three NPC guards are posted at the entrance to the hallways. They will die in one hit. If any mobs reach Kadjaya, you will fail the assault.
- Incoming mobs approach at 50% speed. Kill them with AoE magic. Most enemies will die to a single Stonega.
- Check the hallways with Wide Scan. It is generally safer to stay in the center so you are not caught off-guard or out of Wide Scan range.
- New waves will begin when you kill the slightly tougher Troll Combatants.
- After killing several trolls, an NPC will shout "What is this foul creature!? Guards, to my side immediately!" Jorporbor the Hellraker will spawn in one of the hallways and approach at 100% speed.
- Once you have pulled Jorporbor, be sure to continue killing approaching mobs with Stonega.
- When you have killed Jorporbor, all enemies will despawn, and Rune of Release will spawn nearby.
My run: Failed as DRG/SAM, mobs ignored me and I kept putting weapon away.
Cleared in 15:08 as SCH/BLM.
Wake the Puppet[]
Solo Difficulty: Easy
Recommended Jobs: Any DD.
Objective: Guide at least four automatons to Adeeha (H-8).
- The automatons are located in the four rooms at the edges of the map.
- /salute at the automaton to register as its escort. It will respond to targeted emotes given within 10'. You can only register one automaton at a time.
- It will not automatically follow you. /clap to make it move to your position.
- When you have reached Adeeha, /goodbye to make it shut down.
- /hurray will cause the automaton to attack any Wights that you engage.
- If the automaton stops and begins emoting, you must use the corresponding emote to return it to normal:
- Bowing: /kneel
- Pointing: /no
- Waving: /welcome
- Dancing: /joy
- Blushing: /doze
- Saluting: /praise
- Happy: /smile
- Confused: /slap
- Shocked: /comfort
- Praising: /blush
- Clapping: /angry
- Cheering: /psych
- Attack a Wight and pull it to an automaton. /salute and /hurray to the automaton to make it attack, then pull the Wight + automaton back to Adeeha. Once there, /goodbye at the automaton, and then kill the Wight, and it will shut down. This is far faster than the traditional method of using /clap every few feet.
- Automatons will aggro Wights, so if you encounter one on your path be sure to attack it too.
My run: Cleared in 16:15 as SCH/BLM.
Desperately Seeking Cephalopods[]

Solo Difficulty: Difficult
Recommended Jobs: Any DD.
Objective: Fish up an Orobon and extract an Ahtapot from it.
- Equip a fishing rod and lure/bait, preferably a strong rod.
- Qiqirn Pecheur will drop Willow Fishing Rod and Fly Lure.
- Locate one of the four NPCs fishing around the area, and begin fishing up monsters near them.
- They are located at (H-7), (G-8), (I-9) and (I-8). See map. You cannot cross from west to east via the north path at (H-7).
- After killing 4+ monsters, the NPC's dialogue will change from dismissal to disappointment. At this time, talk to each of the four NPCs until you find one that is excited.
- After killing a few more monsters near the excited NPC, their dialogue will change again. This will indicate the location of the Orobon.
- Technically an inlet describes a narrow passage through which water enters an enclosed area, like a bay or lagoon. However, the way the NPCs use "inlet" typically refers to a small indentation in the coast.
- Bhjaama:
- "inlet to the east": Indentation on the W side of (H-8), on the island.
- "inlet across from here. North edge of (G-9), north of Ulbuun.
- "the area near Ulbuun": The NE corner of (G-9).
- Walagarim:
- "a short distance to my right": Inlet on the middle-N side of (G/H-7).
- "little inlet behind me": Not far behind him, in the little inlet on the same side he is fishing. You should still be able to see Walagrim when fishing for the Orobon here. (H-7)
- "inlet all the way to the north": Inlet on the bridge between (G-6) and (H-6).
- "spot t' the left of me, yonder": S side of (H-7), beyond the bridge entrance but not across it.
- Zawahf:
- "inlet directly across from me": Indentation on the N side of (H-9).
- "I do not know what could be wrong": In the same area.
- "inlet behind me": Indentation at (H/I-7/8).
- Zshahda:
- "southern inlet": Inlet at SW corner of (I-9).
- "inlet across from here": Indentation at (I-8/9).
- "inlet to the left": Indentation on E side of (H-9).
- The Orobon may take a few tries to fish up. Once you have killed the Orobon, talk to Ulbuun (G-9). Rune of Release will spawn nearby.
My run: Cleared in 23:14 as DRG/RDM.
First Lieutenant[]
Bloody Rondo[]
Solo Difficulty: Easy
Recommended Jobs: Any self-healing DD.
Objective: Kill Count Dracula.
- He has high HP and 7 TP moves, some of which are troublesome.
- Nocturnal Servitude: Charm and costume effect, dismisses pets.
- Eternal Damnation: Gaze Doom effect. Turn your back to him if you see this move being readied. If it lands, use Cursna or Holy Water.
- Nosferatu's Kiss: AoE drain, TP drain, spawns a Cursed Doppelganger. Stun this move if possible.
- The Cursed Doppelganger copies your character, including gear, food, and buffs. If you are on a heavy-attack job, it can easily defeat you. Cursed Doppelganger has fairly low HP, so you should attempt to kill it immediately.
My run: Failed as DRG/RDM. Killed myself in 3 hits.
Cleared in 2:57 as DRG/RDM.
The Susanoo Shuffle[]
Solo Difficulty: Very Easy
Recommended Jobs: Any DD.
Objective: Kill Orochi.
- Uses Draw In upon being engaged.
My run: Cleared in 1:57 as DRG/RDM.
Better Than One[]
Solo Difficulty: Very Easy
Recommended Jobs: Any DD.
Objective: Kill Black Shuck.
- Every 25% HP it will howl and use an ability. While it is howling, it is immune to damage.
- Rune of Release will spawn in the room behind Black Shuck.
My run: Cleared in 2:04 as DRG/RDM.
The Price is Right[]
Solo Difficulty: Very Easy
Recommended Jobs: Any DD.
Objective: Kill King Goldemar.
My run: Cleared in 1:35 as DRG/RDM.
Bellerophon's Bliss[]
Solo Difficulty: Very Easy
Recommended Jobs: Any DD.
Objective: Kill Khimaira 14X.
My run: Cleared in 2:28 as DRG/RDM.