mNo edit summary |
|||
| Line 80: | Line 80: | ||
**[[Unlit Lantern]] is needed to access the [[Sacrificial Chamber]], trade them to the [http://wiki.ffxiclopedia.org/wiki/Den_of_Rancor/Maps#Map_1 Altar of Rancor on the first map (Flame of Rancor)] in E-5, you will need to light the four lanterns, so you can either use four time one lantern or use four differents lanterns if you have four members with [[Unlit Lantern]]. |
**[[Unlit Lantern]] is needed to access the [[Sacrificial Chamber]], trade them to the [http://wiki.ffxiclopedia.org/wiki/Den_of_Rancor/Maps#Map_1 Altar of Rancor on the first map (Flame of Rancor)] in E-5, you will need to light the four lanterns, so you can either use four time one lantern or use four differents lanterns if you have four members with [[Unlit Lantern]]. |
||
| − | ** There is a switch behind the door that allows you to let anyone in once inside |
+ | ** There is a switch behind the door that allows you to let anyone in once inside. |
---- |
---- |
||
| + | |||
===Game Description=== |
===Game Description=== |
||
:;Mission Orders: |
:;Mission Orders: |
||
Revision as of 03:03, 15 December 2009
|
|||||||||||||||||||||||||||
Walkthrough
- Proceed to the Temple of Uggalepih -> Den of Rancor -> Sacrificial Chamber
- Obtain 16 Key Item Tablets in Temple of Uggalepih and Den of Rancor.
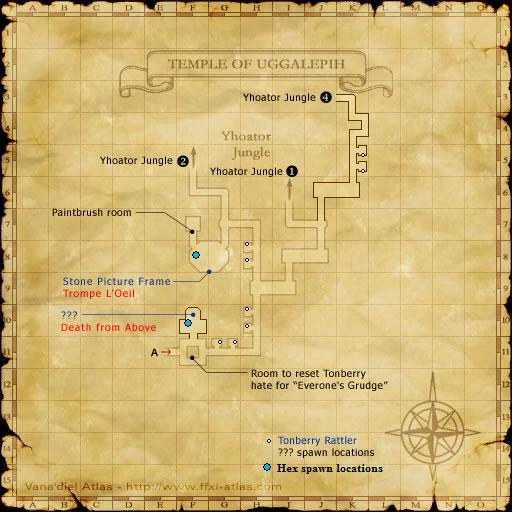
Temple of Uggalepih 1
- The hexes are optional but will make the next fight significantly easier by providing enhancements.
- Temple of Uggalepih: 2 on first map
- 3. Tablet of Hexes: Malice (F-10)
- 4. Tablet of Hexes: Deceit (F-8)
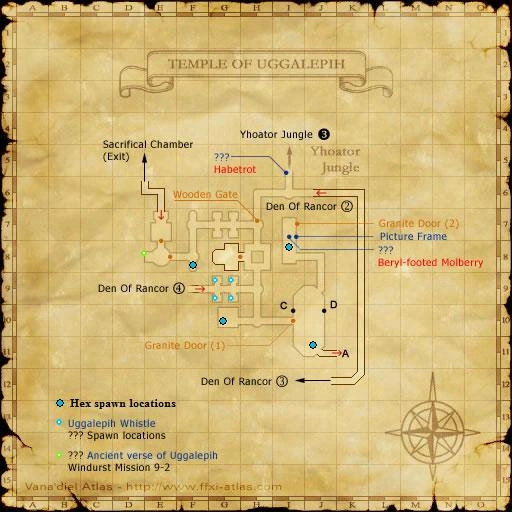
Temple of Uggalepih 2
- Temple of Uggalepih: 4 on second map
- 2. Tablet of Hexes: Envy (F-8)
- 1. Tablet of Hexes: Greed (G-10)
- 5. Tablet of Hexes: Pride (J-11)
- 6. Tablet of Hexes: Bale (I-8): Grants the effect of Barwater
- Temple of Uggalepih: 4 on second map
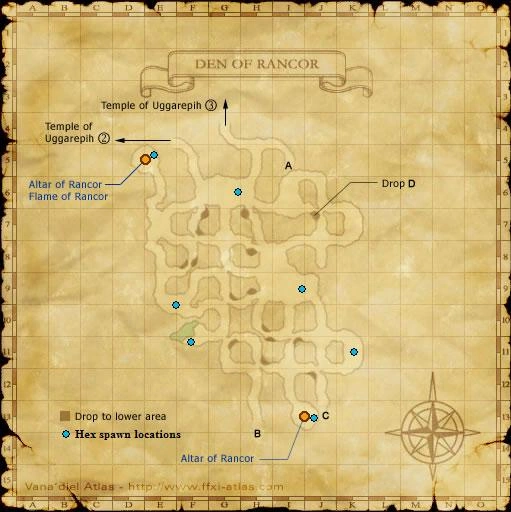
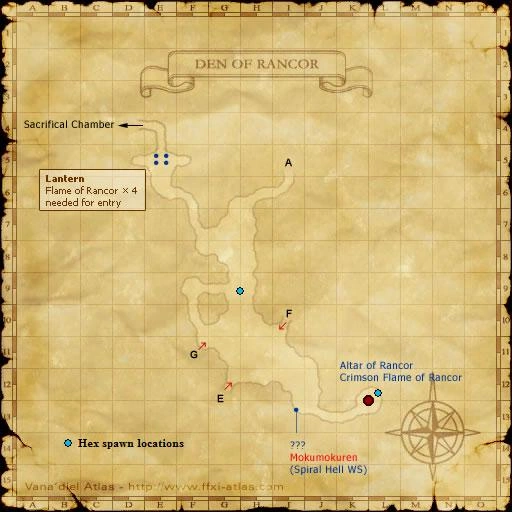
Den of Rancor 1
- Den of Rancor: 7 on first map
- Sorted in a zig-zag pattern that is the most efficient to pick them all up
- 13. Tablet of Hexes: Strife (H-6): Grants CHR + 150
- 8. Tablet of Hexes: Regret (E-5)
- 11. Tablet of Hexes: Dolor (J-9)
- 10. Tablet of Hexes: Agony (E-10)
- 12. Tablet of Hexes: Rancor (F-11)
- 9. Tablet of Hexes: Rage (K-11)
- 7. Tablet of Hexes: Despair (J-13)
- Den of Rancor: 1 on third map (exit from first map at B)
- Den of Rancor: 7 on first map
Den of Rancor 3
- 14. Tablet of Hexes: Penury (F-9): Grants HP x 3
- Den of Rancor: 2 on second map (fall through or exit at A or from 3rd map Exit E)
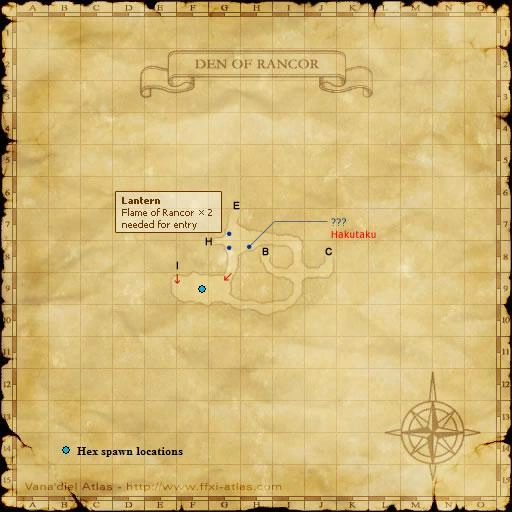
Den of Rancor 2
- 16. Tablet of Hexes: Death (L-13): Grants unweakened Reraise.
- 15. Tablet of Hexes: Blight (H-9): Grants MP x 3
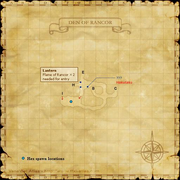
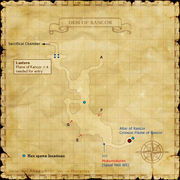
- Unlit Lantern is needed to access the Sacrificial Chamber, trade them to the Altar of Rancor on the first map (Flame of Rancor) in E-5, you will need to light the four lanterns, so you can either use four time one lantern or use four differents lanterns if you have four members with Unlit Lantern.
- There is a switch behind the door that allows you to let anyone in once inside.
Game Description
- Mission Orders
The two Shantottos have relocated their base of operation to the Sacrificial Chamber within the Temple of Uggalepih. Accompany Aldo and Professor Yoran-Oran there and put an end to this menace once and for all!