No edit summary |
|||
| Line 9: | Line 9: | ||
All the mobs in this Floor are Fomor, and can drop any of the Cells to unlock your abilities/stats. |
All the mobs in this Floor are Fomor, and can drop any of the Cells to unlock your abilities/stats. |
||
| + | The Fomors aggro to job abilities and low HP at 20'. They also aggro to sound. They do not link to other fomors except where noted. They link to Imps by sound; Imps link to Fomors by sight. Be careful when pulling from mixed groups of Fomors and Imps. |
||
| − | The Fomors blood aggro to low HP. |
||
The first room before choosing a path will contain a golden [[Armoury Crate]] with 10 cells that are deposited into the treasure pool upon opening. It is unclear whether the drops are random or fixed, but one crate contained the following: |
The first room before choosing a path will contain a golden [[Armoury Crate]] with 10 cells that are deposited into the treasure pool upon opening. It is unclear whether the drops are random or fixed, but one crate contained the following: |
||
| Line 23: | Line 23: | ||
*The first room has 1 Fomor. |
*The first room has 1 Fomor. |
||
*The Two Branches at F/G-8 each hold 4 Fomor and 4 Chests per room, total of 16. |
*The Two Branches at F/G-8 each hold 4 Fomor and 4 Chests per room, total of 16. |
||
| − | **The fomors always drop |
+ | **The fomors always drop 3-5 cells at random. |
| − | **The Chests seem to despawn once you aggro the "deeper" room |
||
*The last big room at G-10 has 6 Fomor all in a row, they will all link (sac pulls may be necessary) |
*The last big room at G-10 has 6 Fomor all in a row, they will all link (sac pulls may be necessary) |
||
**These Fomors are somewhat stronger than the other Fomors in the zone |
**These Fomors are somewhat stronger than the other Fomors in the zone |
||
***They need to be killed to proceed. |
***They need to be killed to proceed. |
||
| + | ***They have fixed drop types. The southernmost-monk drops 3 Magic cells. |
||
| − | ***They drops 3 cells of one type each. (Either HP, Weapons, Magic, SJ, body armor, or Abilities) |
||
**Upon killing all 6 of these Fomor, an NM [[Hammerblow Majanun]] spawns which can drop [[Hikazu Kabuto]] (low drop rate). |
**Upon killing all 6 of these Fomor, an NM [[Hammerblow Majanun]] spawns which can drop [[Hikazu Kabuto]] (low drop rate). |
||
| Line 35: | Line 34: | ||
*Two fomor per room after the first, each has a random chance of dropping a chest. |
*Two fomor per room after the first, each has a random chance of dropping a chest. |
||
**The fomor always drop 4-5 cells at random. |
**The fomor always drop 4-5 cells at random. |
||
| − | *The last room has 8 fomor, |
+ | *The last room has 8 fomor, stronger than those on the rest of the floor, with slightly more HP. |
**These fomor always drop 5 cells, 3 of one kind and 2 of another. You can get all of the most useful cells in this room. It is recommended to kill the Hume MNK first to expedite the rest of the room. |
**These fomor always drop 5 cells, 3 of one kind and 2 of another. You can get all of the most useful cells in this room. It is recommended to kill the Hume MNK first to expedite the rest of the room. |
||
***Hume MNK : Weapon x3, STR x2 |
***Hume MNK : Weapon x3, STR x2 |
||
| Line 66: | Line 65: | ||
'''NW''' -- The door to the teleport is locked and [[Deadpan Devilet]] must be killed to unlock it. |
'''NW''' -- The door to the teleport is locked and [[Deadpan Devilet]] must be killed to unlock it. |
||
| − | * [[Deadpan Devilet]] NM |
+ | * [[Deadpan Devilet]] NM. Drops 10 Cells. |
* [[Dekka]] Imp NM always drops [[Njord's Ledelsens]], can drop [[Enlil's Crackows]]. |
* [[Dekka]] Imp NM always drops [[Njord's Ledelsens]], can drop [[Enlil's Crackows]]. |
||
** Pops after [[Deadpan Devilet]] is killed at the north end of the room, opposite Deadpan's starting location. |
** Pops after [[Deadpan Devilet]] is killed at the north end of the room, opposite Deadpan's starting location. |
||
| Line 104: | Line 103: | ||
'''North Side''' |
'''North Side''' |
||
* [[Devilet]] -- must be killed in order to open the door to the central area. |
* [[Devilet]] -- must be killed in order to open the door to the central area. |
||
| + | ** Patrols the room at extreme speed. Does not aggro or link. |
||
| − | ** Moves at [[Flee]] speed, runs away after every ~30 seconds of fighting. |
||
| + | ** Deaggros and returns to patrolling after 10-15% damage has been dealt to it. |
||
** Does not regenerate HP after running away. |
** Does not regenerate HP after running away. |
||
| − | ** Links with [[Archaic Gear]] in the area. |
||
* [[Archaic Gear]] x8 |
* [[Archaic Gear]] x8 |
||
* [[Gyroscopic Gear]] NM (H-7) pops after clearing all [[Archaic Gear]]. |
* [[Gyroscopic Gear]] NM (H-7) pops after clearing all [[Archaic Gear]]. |
||
| Line 130: | Line 129: | ||
** Reinforcements: [[Haunt]], [[Garm]], [[Guard Skeleton]], [[Doom Mage]] |
** Reinforcements: [[Haunt]], [[Garm]], [[Guard Skeleton]], [[Doom Mage]] |
||
* [[Gyroscopic Gears]] NM pops after clearing all [[Archaic Gears]] and [[Archaic Gear]]. |
* [[Gyroscopic Gears]] NM pops after clearing all [[Archaic Gears]] and [[Archaic Gear]]. |
||
| − | ** Always drops [[Enyo's Mask]] |
+ | ** Always drops [[Enyo's Mask]], sometimes drops [[Deimos Cuisses]]{{verification}} |
| − | |||
<br clear=all> |
<br clear=all> |
||
| Line 164: | Line 162: | ||
* [[Long-Armed Chariot]] boss NM |
* [[Long-Armed Chariot]] boss NM |
||
** Uses normal [[:category:Chariots|Chariot]] attacks, plus '''Brainjack:''' [[Charm]] plus DoT for ~90 sec |
** Uses normal [[:category:Chariots|Chariot]] attacks, plus '''Brainjack:''' [[Charm]] plus DoT for ~90 sec |
||
| − | ** Often uses Brainjack |
+ | ** Often uses Brainjack several times in quick succession. |
** Can drop [[Phobos's Gauntlets]], [[Bodb's Cuffs]], [[Ea's Brais]], [[Tsukikazu Sune-Ate]], [[Freyr's Mask]], [[Freyr's Jerkin]] |
** Can drop [[Phobos's Gauntlets]], [[Bodb's Cuffs]], [[Ea's Brais]], [[Tsukikazu Sune-Ate]], [[Freyr's Mask]], [[Freyr's Jerkin]] |
||
<br /><br /><br /><br /> |
<br /><br /><br /><br /> |
||
Revision as of 00:28, 9 June 2007
- The Silver Sea Remnants are one of the areas of Salvage.
- A cage of Silver Sea Remnants Fireflies is given to all participating mercenaries who enter. They can be used to return to the Silver Sea Remnants section of the Alzadaal Undersea Ruins.
Silver Sea Remnants
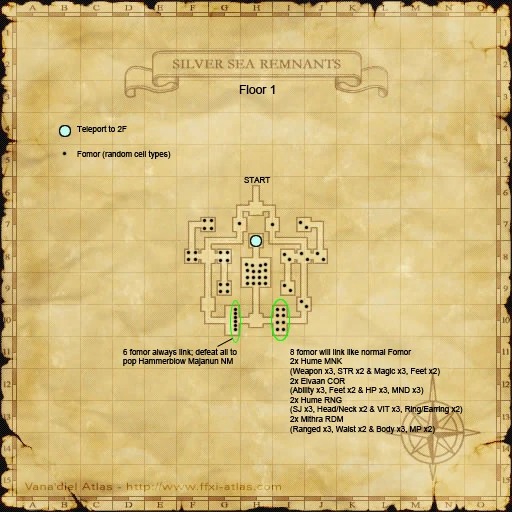
Map 1
First Floor
You must choose East or West when entering the area. The East path is significantly easier, but the West path has an NM.
All the mobs in this Floor are Fomor, and can drop any of the Cells to unlock your abilities/stats.
The Fomors aggro to job abilities and low HP at 20'. They also aggro to sound. They do not link to other fomors except where noted. They link to Imps by sound; Imps link to Fomors by sight. Be careful when pulling from mixed groups of Fomors and Imps.
The first room before choosing a path will contain a golden Armoury Crate with 10 cells that are deposited into the treasure pool upon opening. It is unclear whether the drops are random or fixed, but one crate contained the following:
West Path
- The first room has 1 Fomor.
- The Two Branches at F/G-8 each hold 4 Fomor and 4 Chests per room, total of 16.
- The fomors always drop 3-5 cells at random.
- The last big room at G-10 has 6 Fomor all in a row, they will all link (sac pulls may be necessary)
- These Fomors are somewhat stronger than the other Fomors in the zone
- They need to be killed to proceed.
- They have fixed drop types. The southernmost-monk drops 3 Magic cells.
- Upon killing all 6 of these Fomor, an NM Hammerblow Majanun spawns which can drop Hikazu Kabuto (low drop rate).
- These Fomors are somewhat stronger than the other Fomors in the zone
East Path
- The first room has 1 Fomor.
- Two fomor per room after the first, each has a random chance of dropping a chest.
- The fomor always drop 4-5 cells at random.
- The last room has 8 fomor, stronger than those on the rest of the floor, with slightly more HP.
- These fomor always drop 5 cells, 3 of one kind and 2 of another. You can get all of the most useful cells in this room. It is recommended to kill the Hume MNK first to expedite the rest of the room.
- Hume MNK : Weapon x3, STR x2
- Hume MNK : Magic x3, Feet x2
- Elvaan COR : Ability x3, Hand x2
- Elvaan COR : HP x3, MND x2
- Hume RNG : SJ x3, Head x2
- Hume RNG : VIT x3, Ring x2
- Mithra RDM : Ranged x3, Waist x2
- Mithra RDM : Body x3, MP x2
- These fomor always drop 5 cells, 3 of one kind and 2 of another. You can get all of the most useful cells in this room. It is recommended to kill the Hume MNK first to expedite the rest of the room.
Central Area
- 16 Fomors which constantly respawn
- They drop cells at less than 50% chance, but have very low HP (500?) and are weak.
- If you enter the room all of them will aggro you.
- The aggro boundary starts where the narrow hallway ends. Do not enter the room without sneak/invis. The aggro boundary ends where the narrow hallway begins before the door to the teleport (fomor will become stuck behind an invisible wall), so you can drop invis safely if you are directly next to the door.
- If you pass them with sneak/invis on, they will follow you but not attack, so you can gather them for -ga nuking.
- If you leave the room those that are too far away will stop following while those close to you will follow.
- If you pull one without entering the room it will not link with any other Fomor.
- Recommended to send 1 person to teleport and farm as much as you can before wiping and then warp
Silver Sea Remnants
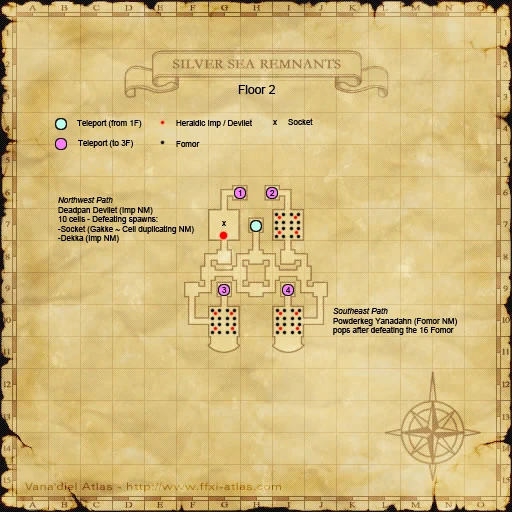
Map 2
Second Floor
- The SW path is reported to be the easiest.
- After opening one of the doors (SE, NW, NE, SW) the rest of the doors become sealed and unpassable.
- Fomors and imps links together.
NW -- The door to the teleport is locked and Deadpan Devilet must be killed to unlock it.
- Deadpan Devilet NM. Drops 10 Cells.
- Dekka Imp NM always drops Njord's Ledelsens, can drop Enlil's Crackows.
- Pops after Deadpan Devilet is killed at the north end of the room, opposite Deadpan's starting location.
- The socket to spawn Gakke is in this path, right behind Deadpan Devilet.
- There are 4 Armoury Crates in this path.
NE -- The door to the teleport is always unlocked.
- Heraldic Imp x4
- Ashu Talif Crew x16
SW -- The door to the teleport is always unlocked.
- Heraldic Imp x4
- Praecipitatio Cell x2
- Spissatus Cell x2
- Incus Cell x3
- Humilus Cell x3
- Cumulus Cell x2
- Duplicatus Cell x2
- Opacus Cell x2
- Pannus Cell x2
- Ashu Talif Crew x16
- Do not link with other Fomor
- Randomly drop medicine chests
SE -- The door to the teleport is locked and a particular Devilet must be killed to unlock it.
- Devilet x4
- Ashu Talif Crew x16
- Powderkeg Yanadahn RDM Fomor NM pops after clearing all fomor, always drops Hoshikazu Hakama.
- Armoury Crate x4
Silver Sea Remnants
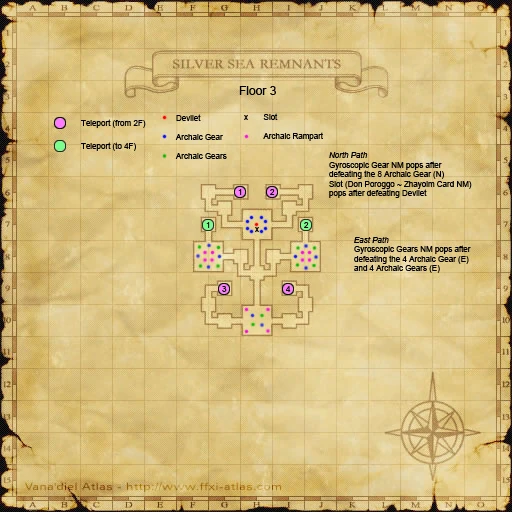
Map 3
Third Floor
Where you start on this level is determined by the teleporter you took on the second floor.
North Side
- Devilet -- must be killed in order to open the door to the central area.
- Patrols the room at extreme speed. Does not aggro or link.
- Deaggros and returns to patrolling after 10-15% damage has been dealt to it.
- Does not regenerate HP after running away.
- Archaic Gear x8
- Gyroscopic Gear NM (H-7) pops after clearing all Archaic Gear.
- Always drops Anu's Gages, sometimes drops Freya's Gloves.
- The slot to pop the Don Poroggo spawns at H-7 after the Devilet is defeated.
South Side -- The door to the central area is always unlocked.
- Archaic Gear x2
- Archaic Gears x2
- Archaic Rampart x4
- Reinforcements: Haunt, Garm, Guard Skeleton, Doom Mage
West Side -- The door to the teleport is always unlocked.
- Archaic Gear x4
- Archaic Gears x4
- Archaic Rampart x4
- Reinforcements: Haunt, Garm, Guard Skeleton, Doom Mage
East Side -- The door to the teleport is locked and a particular Archaic Rampart must be killed to unlock it.
- Archaic Gear x4
- Archaic Gears x4
- Archaic Rampart x4 -- the Rampart which unlocks the door to the teleporter is immobile.
- Reinforcements: Haunt, Garm, Guard Skeleton, Doom Mage
- Gyroscopic Gears NM pops after clearing all Archaic Gears and Archaic Gear.
- Always drops Enyo's Mask, sometimes drops Deimos Cuisses

- Always drops Enyo's Mask, sometimes drops Deimos Cuisses
Silver Sea Remnants
Map 4
Fourth Floor
The two sides seem similar, each has:
West Side -- the door to the teleporter is always open.
- Archaic Gear x2 per square room (8 total), roaming
- Archaic Gears x2 per square room (8 total), roaming
- Archaic Chariot (stationary in the rectangular room)
- Archaic Rampart x4 (stationary in the rectangular room)
- Reinforcements: Night Eft, Sand Lizard, Deinonychus
East Side -- the door to the teleporter is locked. The Archaic Chariot must be defeated in order to open it.
- 4 treasure chests spawn in each square room. Each treasure chest contains a single item at random. When taken, the chest will respawn with a new item.
- Archaic Gear x6 roam up and down the entire map in a pack on the east side.
- Archaic Gears x10 roam around the rectangular room
- Archaic Rampart x4 are stationary in the rectangular room
- Reinforcements: Night Eft, Sand Lizard, Deinonychus
- Archaic Chariot is stationary in the rectangular room. It links to gears. When killed, the teleporter door unlocks.
- Archaic Rampart spawns when the Archaic Rampart x4 are defeated
- Reinforcements: Citadel Chelonian NM, drops Nemain's Crown 100% of the time and rarely Hikazu Hara-Ate.
- If left unaggroed, the spawned Archaic Rampart will summon Citadel Chelonian without any provocation.

Silver Sea Remnants
Map 5
Fifth Floor
- Long-Armed Chariot boss NM
- Uses normal Chariot attacks, plus Brainjack: Charm plus DoT for ~90 sec
- Often uses Brainjack several times in quick succession.
- Can drop Phobos's Gauntlets, Bodb's Cuffs, Ea's Brais, Tsukikazu Sune-Ate, Freyr's Mask, Freyr's Jerkin
Equipment
Area Drop Theme
- Level 15 Armor (Salvage Route 1)
- Body Armor: Drops from the Don Poroggo (Slot NM).
- Other Armor: Common drop from NMs.
- Level 25 Armor (Salvage Route 3)
- Drops from boss (Long-Armed Chariot).
- Level 35 Armor (Salvage Route 2)
- Rare drop from NMs.
Availability
| Set | Tier 1 (Lv.15) | Tier 2 (Lv.25) | Tier 3 (Lv.35) | ||||||||||||
|---|---|---|---|---|---|---|---|---|---|---|---|---|---|---|---|
| Head | Body | Hands | Legs | Feet | Head | Body | Hands | Legs | Feet | Head | Body | Hands | Legs | Feet | |
| Ares | |||||||||||||||
| Skadi | |||||||||||||||
| Usukane | |||||||||||||||
| Marduk | |||||||||||||||
| Morrigan | |||||||||||||||
Locations
| Enemy Classification | Floor | Enemy Name | Set | Lv. | Item Name |
|---|---|---|---|---|---|
| NM Lv. 15 100% Lv. 35 Low Drop Rate |
1st | Hammerblow Majanun | Usukane | 35 | Hikazu Kabuto |
| 2nd | Dekka | Skadi | 15 | Njord's Ledelsens | |
| Marduk | 35 | Enlil's Crackows | |||
| Powderkeg Yanadahn | Usukane | 15 | Hoshikazu Hakama | ||
| Morrigan | 35 | Macha's Slops | |||
| 3rd N | Gyroscopic Gear | Marduk | 15 | Anu's Gages | |
| Skadi | 35 | Freya's Gloves | |||
| 3rd E | Gyroscopic Gears | Ares | 15 | Enyo's Mask | |
| 35 | Deimos's Cuisses | ||||
| 4th | Citadel Chelonian | Morrigan | 15 | Nemain's Crown | |
| Usukane | 35 | Hikazu Hara-Ate | |||
| Zhayolm Card NM 100% Drop |
3rd | Don Poroggo | Ares | 15 | Enyo's Breastplate |
| Morrigan | 15 | Nemain's Robe | |||
| Boss 2 drops, 100% |
5th | Long-Armed Chariot | Ares | 25 | Phobos's Gauntlets |
| Skadi | 25 | Freyr's Mask | |||
| 25 | Freyr's Jerkin | ||||
| Usukane | 25 | Tsukikazu Sune-Ate | |||
| Marduk | 25 | Ea's Brais | |||
| Morrigan | 25 | Bodb's Cuffs |
| Salvage | |
|---|---|
| Ruins of Alzadaal |
|
| Bosses | |
| Pathos of Alzadaal | |
| Rewards | |
| Other | |