m (→Drops) |
(→Drops) |
||
| Line 91: | Line 91: | ||
! Ancient Lockbox |
! Ancient Lockbox |
||
|- BGCOLOR=#e3e6ff align=center |
|- BGCOLOR=#e3e6ff align=center |
||
| − | | [[Hi-Ether Tank]] {{Drop Rate|0| |
+ | | [[Hi-Ether Tank]] {{Drop Rate|0|14}} |
|- BGCOLOR=#e3e6ff align=center |
|- BGCOLOR=#e3e6ff align=center |
||
| − | | [[Hi-Potion +2]] {{Drop Rate| |
+ | | [[Hi-Potion +2]] {{Drop Rate|12|14}} |
|- BGCOLOR=#e3e6ff align=center |
|- BGCOLOR=#e3e6ff align=center |
||
| − | | [[Hi-Potion +3]] {{Drop Rate|1| |
+ | | [[Hi-Potion +3]] {{Drop Rate|1|14}} |
|- BGCOLOR=#e3e6ff align=center |
|- BGCOLOR=#e3e6ff align=center |
||
| − | | [[Hi-Potion Tank]] {{Drop Rate|5| |
+ | | [[Hi-Potion Tank]] {{Drop Rate|5|14}} |
|- BGCOLOR=#e3e6ff align=center |
|- BGCOLOR=#e3e6ff align=center |
||
| − | | [[Reraiser]] {{Drop Rate|3| |
+ | | [[Reraiser]] {{Drop Rate|3|14}} |
|} |
|} |
||
| Line 105: | Line 105: | ||
{| width=100% |
{| width=100% |
||
|- BGCOLOR=#ffdead |
|- BGCOLOR=#ffdead |
||
| − | ! [[??? Bow]] {{Drop Rate| |
+ | ! [[??? Bow]] {{Drop Rate|8|14}} |
|- BGCOLOR=#e3e6ff align=center |
|- BGCOLOR=#e3e6ff align=center |
||
| − | | [[Crossbow +1]] {{Drop Rate| |
+ | | [[Crossbow +1]] {{Drop Rate|3|8}} |
|- BGCOLOR=#e3e6ff align=center |
|- BGCOLOR=#e3e6ff align=center |
||
| − | | [[Longbow +1]] {{Drop Rate|4| |
+ | | [[Longbow +1]] {{Drop Rate|4|8}} |
|- BGCOLOR=#e3e6ff align=center |
|- BGCOLOR=#e3e6ff align=center |
||
| − | | [[Culverin]] {{Drop Rate|1| |
+ | | [[Culverin]] {{Drop Rate|1|8}} |
|- BGCOLOR=#e3e6ff align=center |
|- BGCOLOR=#e3e6ff align=center |
||
| − | | [[Culverin +1]] {{Drop Rate|0| |
+ | | [[Culverin +1]] {{Drop Rate|0|8}} |
|- BGCOLOR=#e3e6ff align=center |
|- BGCOLOR=#e3e6ff align=center |
||
| − | | [[Storm Zamburak]] {{Drop Rate|0| |
+ | | [[Storm Zamburak]] {{Drop Rate|0|8}} |
|} |
|} |
||
| Line 121: | Line 121: | ||
{| width=100% |
{| width=100% |
||
|- BGCOLOR=#ffdead |
|- BGCOLOR=#ffdead |
||
| − | ! [[??? Box]] {{Drop Rate|6| |
+ | ! [[??? Box]] {{Drop Rate|6|14}} |
|- BGCOLOR=#e3e6ff align=center |
|- BGCOLOR=#e3e6ff align=center |
||
| [[Apple Mint]] {{Drop Rate|4|6}} |
| [[Apple Mint]] {{Drop Rate|4|6}} |
||
Revision as of 22:55, 5 December 2009
|
Enemies
| Monster | Level | Strengths | Weaknesses | Spawns |
Notes |
|---|---|---|---|---|---|
|
1 |
| |||
|
78-82 |
|
|
6 |
A, T(H), L | |
|
HP = Detects Low HP; M = Detects Magic; Sc = Follows by Scent; T(S) = True-sight; T(H) = True-hearing JA = Detects job abilities; WS = Detects weaponskills; Z(D) = Asleep in Daytime; Z(N) = Asleep at Nighttime; A(R) = Aggressive to Reive participants | |||||
Drops
|
|
|
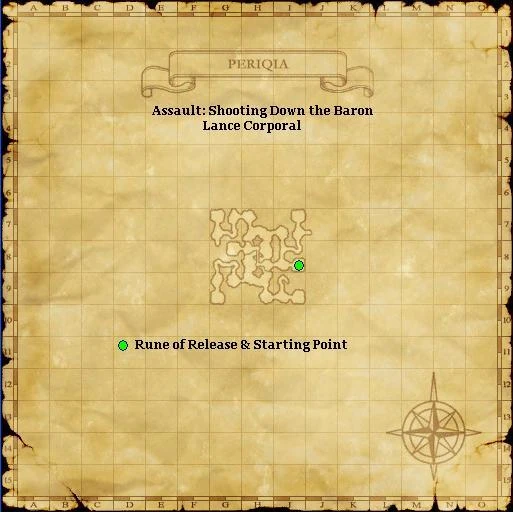
Walkthrough
Find and kill the Black Baron.
- You start out in the East part of the map in the room at (I-8).
- Go west and scout the area for the Black Baron. If you can't see it from the upper ledge, drop through the broken bridge and scout him out.
- He can spawn anywhere on the map.
- He does not show up on Widescan nor monster radar.
- Do not forget to scout the starting area as Black Baron may spawn just near your pop point but won't aggro you.
- It is faster to split to find Black Baron if he's not spotted near start, but take care with Pugils.
- Kill or Sleep any Periqia Pugils you happen to aggro along the way, but try your best to avoid them so you don't run out of time.
- They pugil have about 5000 HP.
- They perform all the usual pugil abilites.
- Aggro can not be lost by Deodorize, however, putting a pugil to sleep and running away a certain distance will deaggro them.
- When you find the Baron, proceed to kill him like you would any other Imp. Don't count on using your 2 hour abilities in a pinch since he spams amnesia and silence.
- He does not aggro.
- He has ~2-3x the HP of a regular imp.
- He performs all normal imp spells and abilities.
- He will warp around the zone every 15% or so. He will just disappear and reappear unclaimed. He will not regen HP.
- If you have an avatar or jug pet attacking him, it will follow him after warping. This is a nice way to track him down quickly and save time.
- When you have killed the Baron, the Rune of Release and Ancient Lockbox appear where you started.
Strategy
See Strategies.
Map
| Assault | |
|---|---|
| Leujaoam Missions | |
| Mamool Ja Missions | |
| Lebros Missions | |
| Periqia Missions | |
| Ilrusi Missions | |
| Nyzul Isle Missions | |
| Assault Point Rewards | |
| Nyzul Isle Rewards | |