(→Dropped From: Major edit: structure, order by level and race 1: Pugils 2: Sahagins 3: Mantas 4: NMs.......... my eyes are o.O right now) |
No edit summary |
||
| (25 intermediate revisions by 16 users not shown) | |||
| Line 1: | Line 1: | ||
| + | [[de:Shall-Muschel]]{{Item Sections}}<section begin="Item Image"/>{{Item Image|Shall shell.jpg|Shall Shell}}<section end="Item Image"/> |
||
| − | [[Category:Fishing]][[Category:Materials]] |
||
| − | __NOTOC__ |
||
| − | [[File:Shall shell.jpg|Shall Shell]] |
||
| − | {|cellpadding="5" width="100%" |
||
| − | |width="50%" valign="top"| |
||
==Statistics== |
==Statistics== |
||
| + | {{Item Statistics |
||
| − | '''Shall shell'''<br> |
||
| + | | type = Fish |
||
| − | ''This type of large oyster<br>attaches itself to reefs.'' |
||
| + | | icon id = 4484 |
||
| − | <br><br> |
||
| + | | description = This type of large oyster<br>attaches itself to reefs. |
||
| − | '''Stackable:''' 12 |
||
| + | | stackable = 12 |
||
| − | <br><br> |
||
| + | | eastern analog = Istiridye |
||
| − | '''Food Effects:''' (5 minutes, Mithra only[[Latent and Hidden Effects#Food-related Effects|*]]) |
||
| + | | effects = |
||
| − | *[[Dexterity|{{Color|Negative|Dexterity -5}}]] |
||
| + | *{{Effect|Negative|Dexterity|-5}} |
||
| − | *[[Vitality|{{Color|Positive|Vitality +4}}]] |
||
| − | * |
+ | *{{Effect|Positive|Vitality|+4}} |
| + | *{{Effect|Positive|Defense|+16.4%}} |
||
| − | <br> |
||
| + | }} |
||
| − | ''Western analog of [[Istiridye]].'' |
||
| − | |width="50%" valign="top"| |
||
==Other Uses== |
==Other Uses== |
||
| + | {{Used In |
||
| − | {{Guild Points Value|0|}} |
||
| + | | guild points value = {{Guild Points Value|0}} |
||
| − | <br><br> |
||
| − | + | | quest = The Real Gift |
|
| + | | quest 2 = Fisherman's Heart |
||
| − | <br><br> |
||
| + | | resale price = {{Resale Price|293|307}} |
||
| − | '''[[Resale Price]]:''' ~300 - 449 gil |
||
| + | | guild resale price = {{Guild Resale Price|337|450|guild=Fishing}} |
||
| − | |- |
||
| + | }} |
||
| − | |width="50%" valign="top"| |
||
==Synthesis Recipes== |
==Synthesis Recipes== |
||
| + | {{Synthesis Recipe|None}} |
||
| − | ''None'' |
||
| + | |||
| − | |width="50%" valign="top"| |
||
==Used in Recipes== |
==Used in Recipes== |
||
| + | *{{rl|Pearl|Bonecraft|19}} |
||
| − | *[[Celerity Salad]] - {{Craft|Cooking|(75)}} |
||
| − | * |
+ | *{{rl|Fish Mithkabob|Cooking|49}} |
| + | *{{rl|Celerity Salad|Cooking|75}} |
||
| − | *[[Pebble]] - {{Craft|Bonecraft|(19)}} |
||
| − | * |
+ | *{{rl|Senroh Skewer|Cooking|79}} |
| − | * |
+ | *{{rl|Piscator's Skewer|Cooking|79}} |
| − | * |
+ | *{{rl|Shallops Tropicale|Cooking|80}} |
| + | *{{rl|Pescatora|Cooking|83}} |
||
| − | |- |
||
| + | *{{rl|Seafood Stew|Cooking|87}} |
||
| − | |width="50%" valign="top"| |
||
| + | ==Desynthesis Recipes== |
||
| + | {{Synthesis Recipe|None}} |
||
| − | ==Desynthesis Recipe== |
||
| − | ''None'' |
||
| − | |width="50%" valign="top"| |
||
==Obtained from Desynthesis== |
==Obtained from Desynthesis== |
||
| − | * |
+ | *{{rl|None}} |
| + | |||
| − | |} |
||
==How to Obtain== |
==How to Obtain== |
||
{{AH|Food|Fish}} |
{{AH|Food|Fish}} |
||
| − | === |
+ | ===[[Mog Garden]]=== |
| + | *[[Coastal Fishing Net]] |
||
| − | :{| width="60%" cellpadding="2" cellspacing="2" |
||
| + | ===Guild Merchants=== |
||
| − | |BGCOLOR="#ffdead" colspan="3"|'''Price:''' Varies |
||
| + | {|class="ffxi-table wide-table" |
||
| − | |- BGCOLOR="#ffdead" |
||
| + | |class="ffxi-header" colspan="3"| '''Price:''' 1,350 - 8,784 gil |
||
| − | !width="30%"|Name |
||
| + | |- |
||
| − | !width="35%"|Location |
||
| − | !width=" |
+ | !width="30%"| Name |
| + | !width="35%"| Location |
||
| − | |- BGCOLOR="#e3e6ff" |
||
| + | !width="35%"| Type |
||
| − | |[[Mep Nhapopoluko]] |
||
| + | |- |
||
| − | |[[Bibiki Bay]] (H-7) |
||
| + | | [[Babubu]] |
||
| − | |[[Guild Merchant]] Open 1:00-18:00 |
||
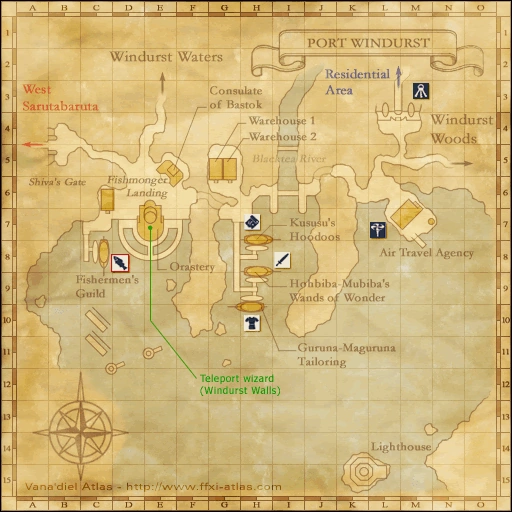
| + | | {{Location|Port Windurst|C-8}} |
||
| − | Closed Lightningday |
||
| + | | {{Merchant|Guild|Fishing|restocked = false}} |
||
| − | |- BGCOLOR="#e3e6ff" |
||
| + | |- |
||
| − | |[[Rajmonda]] |
||
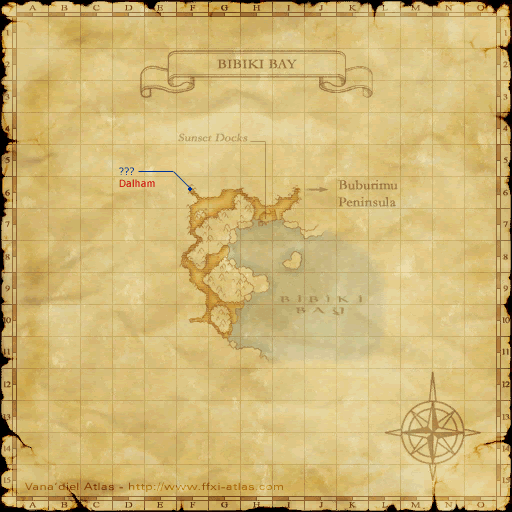
| + | | [[Mep Nhapopoluko]] |
||
| − | |[[Ship bound for Mhaura]] |
||
| + | | {{Location|Bibiki Bay|H-7}} |
||
| − | |[[Guild Merchant]] |
||
| + | | {{Merchant|Guild|Fishing|hours = 1:00-18:00}} |
||
| − | |- BGCOLOR="#e3e6ff" |
||
| + | |- |
||
| − | |[[Babubu]] |
||
| + | | [[Rajmonda]] |
||
| − | |[[Port Windurst]] (C-8) |
||
| + | | [[Ship bound for Selbina]] |
||
| − | |[[Guild Merchant]] Open 3:00-18:00 |
||
| + | | {{Merchant|Guild|Fishing}} |
||
| − | |- BGCOLOR="#e3e6ff" |
||
| − | |Availability may vary. |
||
|} |
|} |
||
| − | |||
===Fishing=== |
===Fishing=== |
||
| + | {{Fishing |
||
| − | :{| width="80%" cellspacing="3" cellpadding="4" |
||
| + | | skill cap = 53 |
||
| − | | style="background:#ffdead;" colspan="3"| '''Skill Cap:''' 53 |
||
| + | | size = small |
||
| − | |- style="background:#ffdead;" |
||
| + | | location = |
||
| − | ! width="30%" | Location |
||
| − | ! width="35%" | Bait |
||
| − | ! width="35%" | Rods |
||
| − | |- valign="top" style="background:#e3e6ff;" |
||
| − | | |
||
*[[Bibiki Bay - Purgonorgo Isle]] |
*[[Bibiki Bay - Purgonorgo Isle]] |
||
| − | *[[Buburimu Peninsula]] |
+ | *[[Buburimu Peninsula]] {{Fishing|Recommended}} |
*[[Cape Teriggan]] |
*[[Cape Teriggan]] |
||
| − | *[[ |
+ | *[[Sih Gates]] ''Map 2'' |
| + | *[[Valkurm Dunes]] {{Fishing|Recommended}} |
||
| − | | |
||
| + | | bait = |
||
| − | *[[Crayfish Ball]] |
||
| − | *[[ |
+ | *[[Crayfish Ball]] |
| + | *[[Robber Rig]] {{Fishing|Recommended}} |
||
*[[Rogue Rig]] |
*[[Rogue Rig]] |
||
| + | | rods = |
||
| − | | |
||
| − | *[[ |
+ | *[[Carbon Fishing Rod]] {{Fishing|May break}} |
| − | *[[ |
+ | *[[Composite Fishing Rod]] |
| − | *[[ |
+ | *[[Ebisu Fishing Rod]] {{Fishing|Recommended}} |
| − | *[[ |
+ | *[[Ebisu Fishing Rod +1]] {{Fishing|Recommended}} |
| − | *[[Halcyon Fishing Rod]] |
+ | *[[Halcyon Fishing Rod]] {{Fishing|Recommended}} |
*[[Hume Fishing Rod]] |
*[[Hume Fishing Rod]] |
||
| + | *[[Lu Shang's Fishing Rod]] {{Fishing|Recommended}} |
||
| − | <br> |
||
| + | *[[Lu Shang's Fishing Rod +1]] {{Fishing|Recommended}} |
||
| − | ''Will Possibly Break:'' |
||
| − | *[[ |
+ | *[[Mithran Fishing Rod]] |
| + | }} |
||
| − | |- |
||
| − | | style="background:#ffffff;" colspan="3"| * Recommended location/item for fishing setup. |
||
| − | |} |
||
===Chocobo Digging=== |
===Chocobo Digging=== |
||
| + | {|class="ffxi-table wide-table" |
||
| − | :{| width="40%" cellpadding="3" cellspacing="2" |
||
| + | |- |
||
| − | |- style="background:#ffdead;" |
||
| − | ! |
+ | !width="60%"| Zone |
| − | ! |
+ | !width="40%"| Abundance |
| + | |- |
||
| − | |- style="background:#e3e6ff;" valign="top" |
||
| + | | [[Buburimu Peninsula]] |
||
| − | | |
||
| + | | Rare |
||
| − | :[[Buburimu Peninsula]] |
||
| − | | |
+ | |- |
| + | | [[Valkurm Dunes]] |
||
| − | :Rare |
||
| + | | Rare |
||
| − | |- style="background:#e3e6ff;" valign="top" |
||
| + | |- class="ffxi-footer" |
||
| − | | |
||
| + | |align="center" colspan="2"| {{Chocobo Digging Notes}} |
||
| − | :[[Valkurm Dunes]] |
||
| − | | |
||
| − | :Rare |
||
|} |
|} |
||
===Clamming=== |
===Clamming=== |
||
| + | {|class="ffxi-table wide-table" |
||
| − | :{| width="40%" cellpadding="3" cellspacing="2" |
||
| + | |- |
||
| − | |- style="background:#ffdead;" |
||
| − | ! |
+ | !width="60%"| Zone |
| − | ! |
+ | !width="40%"| Abundance |
| + | |- |
||
| − | |- style="background:#e3e6ff;" valign="top" |
||
| + | | [[Bibiki Bay - Purgonorgo Isle]] |
||
| − | | |
||
| + | | Rare |
||
| − | :[[Bibiki Bay - Purgonorgo Isle]] |
||
| − | | |
||
| − | :Rare |
||
|} |
|} |
||
===Dropped From=== |
===Dropped From=== |
||
| − | + | {|width="50%" class="ffxi-table" |
|
| + | |- |
||
| − | |- style="background:#ffdead;" |
||
| − | ! |
+ | !width="30%"| Name |
| − | ! |
+ | !width="20%"| Level |
| − | ! |
+ | !width="50%"| Zone |
| + | |- |
||
| − | |- style="background:#e3e6ff;" valign="top" |
||
| − | |[[Pugil]] |
+ | | [[Pugil]] |
| − | | |
+ | |align="center"| 1 -5 |
| [[East Ronfaure]] |
| [[East Ronfaure]] |
||
| + | |- |
||
| − | |- style="background:#e3e6ff;" valign="top" |
||
| − | |[[Giddeus Pugil]] |
+ | | [[Giddeus Pugil]] |
| − | | |
+ | |align="center"| 2 - 5 |
| [[Giddeus]] |
| [[Giddeus]] |
||
| + | |- |
||
| − | |- style="background:#e3e6ff;" valign="top" |
||
| − | |[[Ghelsba Pugil]] |
+ | | [[Ghelsba Pugil]] |
| − | | |
+ | |align="center"| 3 - 6 |
| [[Ghelsba Outpost]] |
| [[Ghelsba Outpost]] |
||
| + | |- |
||
| − | |- style="background:#e3e6ff;" valign="top" |
||
| − | | |
+ | |rowspan="2"| [[Pug Pugil]] |
| − | | |
+ | |align="center"| 4 - 8 |
| [[East Sarutabaruta]] |
| [[East Sarutabaruta]] |
||
| + | |- |
||
| − | |- style="background:#e3e6ff;" |
||
| − | | |
+ | |align="center"| 8 - 10 |
| [[La Theine Plateau]] |
| [[La Theine Plateau]] |
||
| + | |- |
||
| − | |- style="background:#e3e6ff;" valign="top" |
||
| − | | |
+ | |rowspan="2"| [[Giant Pugil]] |
| − | | |
+ | |align="center"| 9 - 11 |
| [[Giddeus]] |
| [[Giddeus]] |
||
| + | |- |
||
| − | |- style="background:#e3e6ff;" |
||
| − | | |
+ | |align="center"| 10 - 20 |
| [[Phanauet Channel]] |
| [[Phanauet Channel]] |
||
| + | |- |
||
| − | |- style="background:#e3e6ff;" valign="top" |
||
| − | | |
+ | |rowspan="2"| [[Sea Pugil]] |
| − | | |
+ | |align="center"| 10 - 14 |
| [[Ship bound for Mhaura]] |
| [[Ship bound for Mhaura]] |
||
| + | |- |
||
| − | |- style="background:#e3e6ff;" |
||
| − | | |
+ | |align="center"| 10 - 20 |
| [[Ship bound for Mhaura]] |
| [[Ship bound for Mhaura]] |
||
| + | |- |
||
| − | |- style="background:#e3e6ff;" valign="top" |
||
| − | | |
+ | |rowspan="2"| [[Puffer Pugil]] |
| − | | |
+ | |align="center"| 14 - 16 |
| [[La Theine Plateau]] |
| [[La Theine Plateau]] |
||
| + | |- |
||
| − | |- style="background:#e3e6ff;" |
||
| − | | |
+ | |align="center"| 15 - 17 |
| [[Valkurm Dunes]] |
| [[Valkurm Dunes]] |
||
| + | |- |
||
| − | |- style="background:#e3e6ff;" valign="top" |
||
| − | |[[Land Pugil]] |
+ | | [[Land Pugil]] |
| − | | |
+ | |align="center"| 15 - 17 |
| [[La Theine Plateau]] |
| [[La Theine Plateau]] |
||
| + | |- |
||
| − | |- style="background:#e3e6ff;" valign="top" |
||
| − | |[[Ocean Pugil]] |
+ | | [[Ocean Pugil]] |
| − | | |
+ | |align="center"| 15 - 19 |
| [[Ship bound for Mhaura]] |
| [[Ship bound for Mhaura]] |
||
| + | |- |
||
| − | |- style="background:#e3e6ff;" valign="top" |
||
| − | |[[Sand Pugil]] |
+ | | [[Sand Pugil]] |
| − | | |
+ | |align="center"| 18 - 20 |
| [[North Gustaberg]] |
| [[North Gustaberg]] |
||
| + | |- |
||
| − | |- style="background:#e3e6ff;" valign="top" |
||
| − | |[[Pirate Pugil]] |
+ | | [[Pirate Pugil]] |
| − | | |
+ | |align="center"| 20 - 22 |
| [[Ship bound for Mhaura]] |
| [[Ship bound for Mhaura]] |
||
| + | |- |
||
| − | |- style="background:#e3e6ff;" valign="top" |
||
| − | | |
+ | |rowspan="2"| [[Beach Pugil]] |
| − | | |
+ | |align="center"| 23 - 25 |
| [[Valkurm Dunes]] |
| [[Valkurm Dunes]] |
||
| + | |- |
||
| − | |- style="background:#e3e6ff;" |
||
| − | | |
+ | |align="center"| 23 - 26 |
| [[Valkurm Dunes]] |
| [[Valkurm Dunes]] |
||
| + | |- |
||
| − | |- style="background:#e3e6ff;" valign="top" |
||
| − | |[[Shoal Pugil]] |
+ | | [[Shoal Pugil]] |
| − | | |
+ | |align="center"| 24 - 28 |
| [[Buburimu Peninsula]] |
| [[Buburimu Peninsula]] |
||
| + | |- |
||
| − | |- style="background:#e3e6ff;" valign="top" |
||
| − | | |
+ | |rowspan="9"| [[Greater Pugil]] |
| − | | |
+ | |align="center"| 25 - 27 |
| [[Korroloka Tunnel]] |
| [[Korroloka Tunnel]] |
||
| + | |- |
||
| − | |- style="background:#e3e6ff;" |
||
| − | | |
+ | |align="center"| 25 - 28 |
| [[Sanctuary of Zi'Tah]] |
| [[Sanctuary of Zi'Tah]] |
||
| + | |- |
||
| − | |- style="background:#e3e6ff;" |
||
| − | | |
+ | |align="center"| 28 - 30 |
| [[Qufim Island]] |
| [[Qufim Island]] |
||
| + | |- |
||
| − | |- style="background:#e3e6ff;" |
||
| − | | |
+ | |align="center"| 29 - 31 |
| [[Gusgen Mines]] |
| [[Gusgen Mines]] |
||
| + | |- |
||
| − | |- style="background:#e3e6ff;" |
||
| − | | |
+ | |align="center"| 30 - 32 |
| [[Korroloka Tunnel]] |
| [[Korroloka Tunnel]] |
||
| + | |- |
||
| − | |- style="background:#e3e6ff;" |
||
| − | | |
+ | |align="center"| 30 - 33 |
| [[Yhoator Jungle]] |
| [[Yhoator Jungle]] |
||
| + | |- |
||
| − | |- style="background:#e3e6ff;" |
||
| − | | |
+ | |align="center"| 32 - 34 |
| [[Beaucedine Glacier]] |
| [[Beaucedine Glacier]] |
||
| + | |- |
||
| − | |- style="background:#e3e6ff;" |
||
| − | | |
+ | |align="center"| 35 - 39 |
| [[Bibiki Bay - Purgonorgo Isle]] |
| [[Bibiki Bay - Purgonorgo Isle]] |
||
| + | |- |
||
| − | |- style="background:#e3e6ff;" |
||
| − | | |
+ | |align="center"| 35 - 39 |
| [[Manaclipper]] |
| [[Manaclipper]] |
||
| + | |- |
||
| − | |- style="background:#e3e6ff;" valign="top" |
||
| − | |[[Fatty Pugil]] |
+ | | [[Fatty Pugil]] |
| − | | |
+ | |align="center"| 25 - 35 |
| [[Manaclipper]] |
| [[Manaclipper]] |
||
| + | |- |
||
| − | |- style="background:#e3e6ff;" valign="top" |
||
| − | |[[Vepar]] |
+ | | [[Vepar]] |
| − | | |
+ | |align="center"| 32 - 34 |
| [[Beaucedine Glacier]] |
| [[Beaucedine Glacier]] |
||
| + | |- |
||
| − | |- style="background:#e3e6ff;" valign="top" |
||
| − | | |
+ | |rowspan="4"| [[Big Jaw]] |
| − | | |
+ | |align="center"| 35 - 37 |
| [[Sea Serpent Grotto]] |
| [[Sea Serpent Grotto]] |
||
| + | |- |
||
| − | |- style="background:#e3e6ff;" |
||
| − | | |
+ | |align="center"| 36 - 38 |
| [[Yhoator Jungle]] |
| [[Yhoator Jungle]] |
||
| + | |- |
||
| − | |- style="background:#e3e6ff;" |
||
| − | | |
+ | |align="center"| 37 - 39 |
| [[Beadeaux]] |
| [[Beadeaux]] |
||
| + | |- |
||
| − | |- style="background:#e3e6ff;" |
||
| − | | |
+ | |align="center"| 43 - 47 |
| [[Yhoator Jungle]] |
| [[Yhoator Jungle]] |
||
| + | |- |
||
| − | |- style="background:#e3e6ff;" valign="top" |
||
| − | |[[Jagil]] |
+ | | [[Jagil]] |
| − | | |
+ | |align="center"| 35 - 38 |
| [[Bibiki Bay - Purgonorgo Isle]] |
| [[Bibiki Bay - Purgonorgo Isle]] |
||
| + | |- |
||
| − | |- style="background:#e3e6ff;" valign="top" |
||
| − | | |
+ | |rowspan="5"| [[Makara]] |
| − | | |
+ | |align="center"| 35 - 38 |
| [[Yuhtunga Jungle]] |
| [[Yuhtunga Jungle]] |
||
| + | |- |
||
| − | |- style="background:#e3e6ff;" |
||
| − | | |
+ | |align="center"| 43 - 45 |
| [[Yhoator Jungle]] |
| [[Yhoator Jungle]] |
||
| + | |- |
||
| − | |- style="background:#e3e6ff;" |
||
| − | | |
+ | |align="center"| 46 - 49 |
| [[Gustav Tunnel]] |
| [[Gustav Tunnel]] |
||
| + | |- |
||
| − | |- style="background:#e3e6ff;" |
||
| − | | |
+ | |align="center"| 47 - 50 |
| [[Sanctuary of Zi'Tah]] |
| [[Sanctuary of Zi'Tah]] |
||
| + | |- |
||
| − | |- style="background:#e3e6ff;" |
||
| − | | |
+ | |align="center"| 49 - 52 |
| [[Toraimarai Canal]] |
| [[Toraimarai Canal]] |
||
| + | |- |
||
| − | |- style="background:#e3e6ff;" valign="top" |
||
| − | |[[Apsaras]] |
+ | | [[Apsaras]] |
| − | | |
+ | |align="center"| 41 - 42 |
| [[Beaucedine Glacier]] |
| [[Beaucedine Glacier]] |
||
| + | |- |
||
| − | |- style="background:#e3e6ff;" valign="top" |
||
| − | |[[Lancet Jagil]] |
+ | | [[Lancet Jagil]] |
| − | | |
+ | |align="center"| 42 - 43 |
| [[Bibiki Bay - Purgonorgo Isle]] |
| [[Bibiki Bay - Purgonorgo Isle]] |
||
| + | |- |
||
| − | |- style="background:#e3e6ff;" valign="top" |
||
| − | |[[Grotto Pugil]] |
+ | | [[Grotto Pugil]] |
| − | | |
+ | |align="center"| 44 - 47 |
| [[Sea Serpent Grotto]] |
| [[Sea Serpent Grotto]] |
||
| + | |- |
||
| − | |- style="background:#e3e6ff;" valign="top" |
||
| − | | |
+ | |rowspan="4"| [[Razorjaw Pugil]] |
| − | | |
+ | |align="center"| 50 - 53 |
| [[Yhoator Jungle]] |
| [[Yhoator Jungle]] |
||
| + | |- |
||
| − | |- style="background:#e3e6ff;" |
||
| − | | |
+ | |align="center"| 53 - 55 |
| [[Den of Rancor]] |
| [[Den of Rancor]] |
||
| + | |- |
||
| − | |- style="background:#e3e6ff;" |
||
| − | | |
+ | |align="center"| 57 - 60 |
| [[Sea Serpent Grotto]] |
| [[Sea Serpent Grotto]] |
||
| + | |- |
||
| − | |- style="background:#e3e6ff;" |
||
| − | | |
+ | |align="center"| 59 - 60 |
| [[Cape Teriggan]] |
| [[Cape Teriggan]] |
||
| + | |- |
||
| − | |- style="background:#e3e6ff;" valign="top" |
||
| − | |[[Canal Pugil]] |
+ | | [[Canal Pugil]] |
| − | | |
+ | |align="center"| 57 - 59 |
| [[Toraimarai Canal]] |
| [[Toraimarai Canal]] |
||
| + | |- |
||
| − | |- style="background:#e3e6ff;" valign="top" |
||
| − | |[[Sea Hog]] |
+ | | [[Sea Hog]] |
| − | | |
+ | |align="center"| 62 |
| [[Sea Serpent Grotto]] |
| [[Sea Serpent Grotto]] |
||
| + | |- |
||
| − | |- style="background:#e3e6ff;" valign="top" |
||
| − | | |
+ | |rowspan="6"| [[Stygian Pugil]] |
| − | | |
+ | |align="center"| 63 - 65 |
| [[Toraimarai Canal]] |
| [[Toraimarai Canal]] |
||
| + | |- |
||
| − | |- style="background:#e3e6ff;" |
||
| − | | |
+ | |align="center"| 63 - 65 |
| [[Den of Rancor]] |
| [[Den of Rancor]] |
||
| + | |- |
||
| − | |- style="background:#e3e6ff;" |
||
| − | | |
+ | |align="center"| 63 - 67 |
| [[Cape Teriggan]] |
| [[Cape Teriggan]] |
||
| + | |- |
||
| − | |- style="background:#e3e6ff;" |
||
| − | | |
+ | |align="center"| 64 - 66 |
| [[Kuftal Tunnel]] |
| [[Kuftal Tunnel]] |
||
| + | |- |
||
| − | |- style="background:#e3e6ff;" |
||
| − | | |
+ | |align="center"| 65 - 67 |
| [[Sea Serpent Grotto]] |
| [[Sea Serpent Grotto]] |
||
| + | |- |
||
| − | |- style="background:#e3e6ff;" |
||
| − | | |
+ | |align="center"| 73 - 76 |
| [[Den of Rancor]] |
| [[Den of Rancor]] |
||
| + | |- |
||
| − | |- style="background:#e3e6ff;" valign="top" |
||
| − | | |
+ | |rowspan="3"| [[Demonic Pugil]] |
| − | | |
+ | |align="center"| 65 - 67 |
| [[Boyahda Tree]] |
| [[Boyahda Tree]] |
||
| + | |- |
||
| − | |- style="background:#e3e6ff;" |
||
| − | | |
+ | |align="center"| 70 - 72 |
| [[Boyahda Tree]] |
| [[Boyahda Tree]] |
||
| + | |- |
||
| − | |- style="background:#e3e6ff;" |
||
| − | | |
+ | |align="center"| 73 - 76 |
| [[Gustav Tunnel]] |
| [[Gustav Tunnel]] |
||
| + | |- |
||
| − | |- style="background:#e3e6ff;" valign="top" |
||
| − | |[[Terror Pugil]] |
+ | | [[Terror Pugil]] |
| − | | |
+ | |align="center"| 66 - 70 |
| [[Cape Teriggan]] |
| [[Cape Teriggan]] |
||
| + | |- |
||
| − | |- style="background:#e3e6ff;" valign="top" |
||
| − | |[[Creek Sahagin]] |
+ | | [[Creek Sahagin]] |
| − | | |
+ | |align="center"| 34 - 38 |
| [[Yuhtunga Jungle]] |
| [[Yuhtunga Jungle]] |
||
| + | |- |
||
| − | |- style="background:#e3e6ff;" valign="top" |
||
| − | |[[River Sahagin]] |
+ | | [[River Sahagin]] |
| − | | |
+ | |align="center"| 34-38 |
| [[Yuhtunga Jungle]] |
| [[Yuhtunga Jungle]] |
||
| + | |- |
||
| − | |- style="background:#e3e6ff;" valign="top" |
||
| − | |[[Stream Sahagin]] |
+ | | [[Stream Sahagin]] |
| − | | |
+ | |align="center"| 34 - 38 |
| [[Yuhtunga Jungle]] |
| [[Yuhtunga Jungle]] |
||
| + | |- |
||
| − | |- style="background:#e3e6ff;" valign="top" |
||
| − | |[[Lake Sahagin]] |
+ | | [[Lake Sahagin]] |
| − | | |
+ | |align="center"| 36 - 39 |
| [[Sea Serpent Grotto]] |
| [[Sea Serpent Grotto]] |
||
| + | |- |
||
| − | |- style="background:#e3e6ff;" valign="top" |
||
| − | |[[Pond Sahagin]] |
+ | | [[Pond Sahagin]] |
| − | | |
+ | |align="center"| 36 - 39 |
| [[Sea Serpent Grotto]] |
| [[Sea Serpent Grotto]] |
||
| + | |- |
||
| − | |- style="background:#e3e6ff;" valign="top" |
||
| − | |[[Spring Sahagin]] |
+ | | [[Spring Sahagin]] |
| − | | |
+ | |align="center"| 36 - 39 |
| [[Sea Serpent Grotto]] |
| [[Sea Serpent Grotto]] |
||
| + | |- |
||
| − | |- style="background:#e3e6ff;" valign="top" |
||
| − | |[[Rivulet Sahagin]] |
+ | | [[Rivulet Sahagin]] |
| − | | |
+ | |align="center"| 41 - 48 |
| [[Sea Serpent Grotto]] |
| [[Sea Serpent Grotto]] |
||
| + | |- |
||
| − | |- style="background:#e3e6ff;" valign="top" |
||
| − | |[[Riparian Sahagin]] |
+ | | [[Riparian Sahagin]] |
| − | | |
+ | |align="center"| 44 - 48 |
| [[Sea Serpent Grotto]] |
| [[Sea Serpent Grotto]] |
||
| + | |- |
||
| − | |- style="background:#e3e6ff;" valign="top" |
||
| − | |[[Bog Sahagin]] |
+ | | [[Bog Sahagin]] |
| − | | |
+ | |align="center"| 52 - 59 |
| [[Sea Serpent Grotto]] |
| [[Sea Serpent Grotto]] |
||
| + | |- |
||
| − | |- style="background:#e3e6ff;" valign="top" |
||
| − | |[[Marsh Sahagin]] |
+ | | [[Marsh Sahagin]] |
| − | | |
+ | |align="center"| 52 - 59 |
| [[Sea Serpent Grotto]] |
| [[Sea Serpent Grotto]] |
||
| + | |- |
||
| − | |- style="background:#e3e6ff;" valign="top" |
||
| − | |[[Swamp Sahagin]] |
+ | | [[Swamp Sahagin]] |
| − | | |
+ | |align="center"| 52 - 59 |
| [[Sea Serpent Grotto]] |
| [[Sea Serpent Grotto]] |
||
| + | |- |
||
| − | |- style="background:#e3e6ff;" valign="top" |
||
| − | |[[Coastal Sahagin]] |
+ | | [[Coastal Sahagin]] |
| − | | |
+ | |align="center"| 62 - 72 |
| [[Sea Serpent Grotto]] |
| [[Sea Serpent Grotto]] |
||
| + | |- |
||
| − | |- style="background:#e3e6ff;" valign="top" |
||
| − | |[[Delta Sahagin]] |
+ | | [[Delta Sahagin]] |
| − | | |
+ | |align="center"| 62 - 72 |
| [[Sea Serpent Grotto]] |
| [[Sea Serpent Grotto]] |
||
| + | |- |
||
| − | |- style="background:#e3e6ff;" valign="top" |
||
| − | |[[Lagoon Sahagin]] |
+ | | [[Lagoon Sahagin]] |
| − | | |
+ | |align="center"| 62 - 72 |
| [[Sea Serpent Grotto]] |
| [[Sea Serpent Grotto]] |
||
| + | |- |
||
| − | |- style="background:#e3e6ff;" valign="top" |
||
| − | |[[Shore Sahagin]] |
+ | | [[Shore Sahagin]] |
| − | | |
+ | |align="center"| 62 - 72 |
| [[Sea Serpent Grotto]] |
| [[Sea Serpent Grotto]] |
||
| + | |- |
||
| − | |- style="background:#e3e6ff;" valign="top" |
||
| − | |[[Ocean Sahagin]] |
+ | | [[Ocean Sahagin]] |
| − | | |
+ | |align="center"| 75 |
| [[Sea Serpent Grotto]] |
| [[Sea Serpent Grotto]] |
||
| + | |- |
||
| − | |- style="background:#e3e6ff;" valign="top" |
||
| − | |[[Mamool Ja Diver]] |
+ | | [[Mamool Ja Diver]] |
| − | | |
+ | |align="center"| 75 - 76 |
| [[Mamook]] |
| [[Mamook]] |
||
| + | |- |
||
| − | |- style="background:#e3e6ff;" valign="top" |
||
| − | | |
+ | |rowspan="3"| [[Sea Monk]] |
| − | | |
+ | |align="center"| 21 - 29 |
| [[Ship bound for Mhaura]] |
| [[Ship bound for Mhaura]] |
||
| + | |- |
||
| − | |- style="background:#e3e6ff;" |
||
| − | | |
+ | |align="center"| 25 - 28 |
| [[Ship bound for Mhaura]] |
| [[Ship bound for Mhaura]] |
||
| + | |- |
||
| − | |- style="background:#e3e6ff;" |
||
| − | | |
+ | |align="center"| 32 - 35 |
| [[Korroloka Tunnel]] |
| [[Korroloka Tunnel]] |
||
| + | |- |
||
| − | |- style="background:#e3e6ff;" valign="top" |
||
| − | | |
+ | |rowspan="2"| [[Kraken]] |
| − | | |
+ | |align="center"| 37 - 38 |
| [[Qufim Island]] |
| [[Qufim Island]] |
||
| + | |- |
||
| − | |- style="background:#e3e6ff;" |
||
| − | | |
+ | |align="center"| 39 - 40 |
| [[Qufim Island]] |
| [[Qufim Island]] |
||
| + | |- |
||
| − | |- style="background:#e3e6ff;" valign="top" |
||
| − | |[[Colossal Calamari]] |
+ | | [[Colossal Calamari]] |
| − | | |
+ | |align="center"| 40 - 42 |
| [[Manaclipper]] |
| [[Manaclipper]] |
||
| + | |- |
||
| − | |- style="background:#e3e6ff;" valign="top" |
||
| − | |[[Flying Manta]] |
+ | | [[Flying Manta]] |
| − | | |
+ | |align="center"| 55 - 59 |
| [[Labyrinth of Onzozo]] |
| [[Labyrinth of Onzozo]] |
||
| + | |- |
||
| − | |- style="background:#e3e6ff;" valign="top" |
||
| − | |[[Peg Powler]] |
+ | | [[Peg Powler]] |
| − | | |
+ | |align="center"| 61 |
| [[Labyrinth of Onzozo]] |
| [[Labyrinth of Onzozo]] |
||
| + | |- |
||
| − | |- style="background:#e3e6ff;" valign="top" |
||
| − | | |
+ | |rowspan="3"| [[Kulshedra]] |
| − | | |
+ | |align="center"| 61 - 63 |
| [[Silver Sea route to Al Zahbi]] |
| [[Silver Sea route to Al Zahbi]] |
||
| + | |- |
||
| − | |- style="background:#e3e6ff;" |
||
| − | | |
+ | |align="center"| 61 - 63 |
| [[Silver Sea route to Nashmau]] |
| [[Silver Sea route to Nashmau]] |
||
| + | |- |
||
| − | |- style="background:#e3e6ff;" |
||
| − | | |
+ | |align="center"| 61 - 63 |
| [[Nyzul Isle]] |
| [[Nyzul Isle]] |
||
| + | |- |
||
| − | |- style="background:#e3e6ff;" valign="top" |
||
| − | | |
+ | |rowspan="3"| [[Devil Manta]] |
| − | | |
+ | |align="center"| 66 - 68 |
| [[Kuftal Tunnel]] |
| [[Kuftal Tunnel]] |
||
| + | |- |
||
| − | |- style="background:#e3e6ff;" |
||
| − | | |
+ | |align="center"| 66 - 69 |
| [[Sea Serpent Grotto]] |
| [[Sea Serpent Grotto]] |
||
| + | |- |
||
| − | |- style="background:#e3e6ff;" |
||
| − | | |
+ | |align="center"| 68 - 70 |
| [[Cape Teriggan]] |
| [[Cape Teriggan]] |
||
| + | |- class="bg-nm" |
||
| − | |- style="background:#ffd9d9;" valign="top" |
||
| − | |'''[[Swamfisk]] ([[NM]])''' |
+ | | '''[[Swamfisk]] ([[NM]])''' |
| − | | |
+ | |align="center"| 12 - 15 |
| [[East Ronfaure]] |
| [[East Ronfaure]] |
||
| + | |- class="bg-nm" |
||
| − | |- style="background:#ffd9d9;" valign="top" |
||
| − | |'''[[Blind Moby]] ([[NM]])''' |
+ | | '''[[Blind Moby]] ([[NM]])''' |
| − | | |
+ | |align="center"| 25 - 26 |
| [[Gusgen Mines]] |
| [[Gusgen Mines]] |
||
| + | |- class="bg-nm" |
||
| − | |- style="background:#ffd9d9;" valign="top" |
||
| − | |'''[[Sea Horror]] ([[NM]])''' |
+ | | '''[[Sea Horror]] ([[NM]])''' |
| − | | |
+ | |align="center"| 60 - 62 |
| [[Ship bound for Mhaura]] |
| [[Ship bound for Mhaura]] |
||
| + | |- class="bg-nm" |
||
| − | |- style="background:#ffd9d9;" valign="top" |
||
| − | |'''[[Worr the Clawfisted]] ([[NM]])''' |
+ | | '''[[Worr the Clawfisted]] ([[NM]])''' |
| − | | |
+ | |align="center"| 61 |
| [[Sea Serpent Grotto]] |
| [[Sea Serpent Grotto]] |
||
| + | |- class="bg-nm" |
||
| − | |- style="background:#ffd9d9;" valign="top" |
||
| − | |'''[[Mouu the Waverider]] ([[NM]])''' |
+ | | '''[[Mouu the Waverider]] ([[NM]])''' |
| − | | |
+ | |align="center"| 64 - 66 |
| [[Sea Serpent Grotto]] |
| [[Sea Serpent Grotto]] |
||
| + | |- class="bg-nm" |
||
| − | |- style="background:#ffd9d9;" valign="top" |
||
| − | |'''[[Voll the Sharkfinned]] ([[NM]])''' |
+ | | '''[[Voll the Sharkfinned]] ([[NM]])''' |
| − | | |
+ | |align="center"| 64 - 66 |
| [[Sea Serpent Grotto]] |
| [[Sea Serpent Grotto]] |
||
| + | |- class="bg-nm" |
||
| − | |- style="background:#ffd9d9;" valign="top" |
||
| '''[[Abyss Sahagin]] ([[NM]])''' |
| '''[[Abyss Sahagin]] ([[NM]])''' |
||
| − | | |
+ | |align="center"| 72 - 74 |
| [[Sea Serpent Grotto]] |
| [[Sea Serpent Grotto]] |
||
| + | |- class="bg-nm" |
||
| − | |- style="background:#ffd9d9;" valign="top" |
||
| − | |'''[[Lord of Onzozo]] ([[NM]])''' |
+ | | '''[[Lord of Onzozo]] ([[NM]])''' |
| − | | |
+ | |align="center"| 74 - 77 |
| [[Labyrinth of Onzozo]] |
| [[Labyrinth of Onzozo]] |
||
| + | |- class="bg-nm" |
||
| − | |- style="background:#ffd9d9;" valign="top" |
||
| − | |'''[[Charybdis]] ([[NM]])''' |
+ | | '''[[Charybdis]] ([[NM]])''' |
| − | | |
+ | |align="center"| 80 - 81 |
| [[Sea Serpent Grotto]] |
| [[Sea Serpent Grotto]] |
||
| + | |- |
||
| + | | [[Zoldeff Jagil]] |
||
| + | | align="center" | 102 - 103 |
||
| + | | [[Foret de Hennetiel]] |
||
| + | |- valign="top" |
||
| + | |[[Acerbic Jagil]] |
||
| + | | align="center" |102 - 104 |
||
| + | | [[Morimar Basalt Fields]] |
||
| + | |- valign="top" |
||
| + | |[[Dirtcaked Jagil]] |
||
| + | | align="center" |106 - 108 |
||
| + | | [[Marjami Ravine]] |
||
|} |
|} |
||
| − | ===BCNM=== |
+ | ===Battlefield ([[BCNM]])=== |
| − | + | {|width="60%" class="ffxi-table" |
|
| + | |- |
||
| − | |- style="background:#ffdead;" |
||
| − | ! |
+ | !width="30%"| Name |
| − | ! |
+ | !width="35%"| Zone |
| − | ! |
+ | !width="10%"| Level |
| + | !width="15%"| Time |
||
| − | |- style="background:#e3e6ff;" valign="top" |
||
| + | !width="10%"| Members |
||
| − | | [[Shooting Fish]] |
||
| − | | align="center" |
+ | |- align="center" |
| − | | [[ |
+ | |align="left"| [[Shooting Fish]] |
| + | |align="left"| [[Horlais Peak]] |
||
| + | | 20 |
||
| + | | 15 minutes |
||
| + | | 3 |
||
|} |
|} |
||
Revision as of 22:52, 8 November 2018

Statistics
Shall shell
This type of large oyster
attaches itself to reefs.
attaches itself to reefs.
Stackable: 12
See Istiridye for the eastern analog of this fish.
Other Uses
Guild Points Value: None
Resale Price: 293~307 gil
Guild Resale Price: 337~450 gil (Fishermans' Guild)
Synthesis Recipes
None
Used in Recipes
 19 Pearl
- 83 Pescatora
- 87 Seafood Stew
Desynthesis Recipes
None
Obtained from Desynthesis
- None
How to Obtain
Auction House Category: Food > Fish ![]()
Can be obtained as a random reward from the Gobbie Mystery Box Special Dial and similar sources.
Mog Garden
Guild Merchants
| Price: 1,350 - 8,784 gil | ||
| Name | Location | Type |
|---|---|---|
| Babubu | Port Windurst (C-8) | Fishermans' Guild
|
| Mep Nhapopoluko | Bibiki Bay (H-7) | Fishermans' Guild
|
| Rajmonda | Ship bound for Selbina | Fishermans' Guild
|
Fishing
| Skill Cap: 53 Size: Small (Something caught the hook!) | ||
| Location | Bait | Rods |
|---|---|---|
| * Recommended fishing setup. ● Fish may be too big. ● Fish may be too small. !! Line may snap. !!! Rod may break. | ||
Chocobo Digging
| Zone | Abundance |
|---|---|
| Buburimu Peninsula | Rare |
| Valkurm Dunes | Rare |
| ● = Requires Burrow ● = Requires Egg Helm ● = Requires Bore ● = Obtainable only at Night | |
Clamming
| Zone | Abundance |
|---|---|
| Bibiki Bay - Purgonorgo Isle | Rare |
Dropped From
Battlefield (BCNM)
| Name | Zone | Level | Time | Members |
|---|---|---|---|---|
| Shooting Fish | Horlais Peak | 20 | 15 minutes | 3 |