Ooka (Message Wall | contribs) No edit summary |
(→Drops) |
||
| Line 55: | Line 55: | ||
! Ancient Lockbox |
! Ancient Lockbox |
||
|- BGCOLOR=#e3e6ff align=center |
|- BGCOLOR=#e3e6ff align=center |
||
| − | | [[Hi-Potion +2]] {{Drop Rate| |
+ | | [[Hi-Potion +2]] {{Drop Rate|7|6}} |
|- BGCOLOR=#e3e6ff align=center |
|- BGCOLOR=#e3e6ff align=center |
||
| − | | [[Hi-Potion Tank]] {{Drop Rate|1| |
+ | | [[Hi-Potion Tank]] {{Drop Rate|1|5}} |
|- BGCOLOR=#e3e6ff align=center |
|- BGCOLOR=#e3e6ff align=center |
||
| − | | [[Reraiser]] {{Drop Rate| |
+ | | [[Reraiser]] {{Drop Rate|1|5}} |
|} |
|} |
||
| Line 66: | Line 66: | ||
{| width=100% |
{| width=100% |
||
|- BGCOLOR=#ffdead |
|- BGCOLOR=#ffdead |
||
| − | ! [[??? Dagger]] {{Drop Rate| |
+ | ! [[??? Dagger]] {{Drop Rate|5|6}} |
|- BGCOLOR=#e3e6ff align=center |
|- BGCOLOR=#e3e6ff align=center |
||
| − | | [[ |
+ | | [[Assassin's Jambiya]] {{Drop Rate|0|5}} |
|- BGCOLOR=#e3e6ff align=center |
|- BGCOLOR=#e3e6ff align=center |
||
| − | | [[ |
+ | | [[Hushed Dagger]] {{Drop Rate|1|5}} |
|- BGCOLOR=#e3e6ff align=center |
|- BGCOLOR=#e3e6ff align=center |
||
| − | | [[ |
+ | | [[Katars]] {{Drop Rate|0|5}} |
|- BGCOLOR=#e3e6ff align=center |
|- BGCOLOR=#e3e6ff align=center |
||
| − | | [[ |
+ | | [[Kyofu]] {{Drop Rate|3|5}} |
|- BGCOLOR=#e3e6ff align=center |
|- BGCOLOR=#e3e6ff align=center |
||
| − | | [[Ponderous Gully]] {{Drop Rate|0| |
+ | | [[Ponderous Gully]] {{Drop Rate|0|5}} |
|- BGCOLOR=#e3e6ff align=center |
|- BGCOLOR=#e3e6ff align=center |
||
| − | | [[ |
+ | | [[Ponderous Manoples]] {{Drop Rate|0|5}} |
|- BGCOLOR=#e3e6ff align=center |
|- BGCOLOR=#e3e6ff align=center |
||
| − | | [[ |
+ | | [[Spark Dagger]] {{Drop Rate|1|5}} |
|- BGCOLOR=#e3e6ff align=center |
|- BGCOLOR=#e3e6ff align=center |
||
| − | | [[ |
+ | | [[Tojaku]] {{Drop Rate|0|5}} |
|} |
|} |
||
| Line 88: | Line 88: | ||
{| width=100% |
{| width=100% |
||
|- BGCOLOR=#ffdead |
|- BGCOLOR=#ffdead |
||
| − | ! [[??? Box]] {{Drop Rate|1| |
+ | ! [[??? Box]] {{Drop Rate|1|6}} |
|- BGCOLOR=#e3e6ff align=center |
|- BGCOLOR=#e3e6ff align=center |
||
| − | | [[ |
+ | | [[Beetle Quiver]] {{Drop Rate|1|1}} |
|- BGCOLOR=#e3e6ff align=center |
|- BGCOLOR=#e3e6ff align=center |
||
| − | | [[ |
+ | | [[Black Ghost]] {{Drop Rate|0|1}} |
|- BGCOLOR=#e3e6ff align=center |
|- BGCOLOR=#e3e6ff align=center |
||
| − | | [[ |
+ | | [[Date]] {{Drop Rate|0|1}} |
|- BGCOLOR=#e3e6ff align=center |
|- BGCOLOR=#e3e6ff align=center |
||
| − | | [[ |
+ | | [[Istakoz]] {{Drop Rate|0|1}} |
|- BGCOLOR=#e3e6ff align=center |
|- BGCOLOR=#e3e6ff align=center |
||
| − | | [[ |
+ | | [[Lamian Armlet]] {{Drop Rate|0|1}} |
|- BGCOLOR=#e3e6ff align=center |
|- BGCOLOR=#e3e6ff align=center |
||
| − | | [[ |
+ | | [[Little Worm]] {{Drop Rate|0|1}} |
|- BGCOLOR=#e3e6ff align=center |
|- BGCOLOR=#e3e6ff align=center |
||
| − | | [[ |
+ | | [[Rusty Bucket]] {{Drop Rate|0|1}} |
|- BGCOLOR=#e3e6ff align=center |
|- BGCOLOR=#e3e6ff align=center |
||
| − | | [[ |
+ | | [[Silver Quiver]] {{Drop Rate|0|1}} |
|- BGCOLOR=#e3e6ff align=center |
|- BGCOLOR=#e3e6ff align=center |
||
| − | | [[Stone Quiver]] {{Drop Rate|0|1}} |
+ | | [[Stone Quiver]] {{Drop Rate|0|1}} |
|- BGCOLOR=#e3e6ff align=center |
|- BGCOLOR=#e3e6ff align=center |
||
| [[Willow Fishing Rod]] {{Drop Rate|0|1}} |
| [[Willow Fishing Rod]] {{Drop Rate|0|1}} |
||
Revision as of 14:10, 7 December 2008
|
Enemies
There are no enemies in this area per se.
Drops
|
|
|
Walkthrough
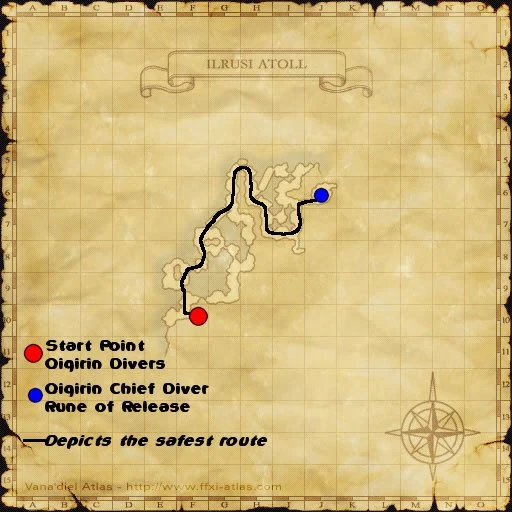
Escort at least 1 Qiqirn Diver to the Qiqirn Chief Diver located at (J-6). Escort all 5 divers for maximum points.
- You start at the south part of the map at (F-10).
- A little infront of you are five Qiqirn Divers who tell you that they need to get to their boss, the Qiqirn Chief Diver, who is located at (J-6).
- It is possible for one person to take all five of them at the same time but note that they will only follow who spoke to them first.
- Planted along the way are several NPC Giant Orobon's that roam erratically across set parts of the land. They have a fairly large agro range and will cause any Qiqirn Diver they see and 'aggro' to say "Aaahhh! Dooon't eeet meeee!" and run in a random direction.
- The Giant Orobons are sight aggro and, every now and again, will occasionally stop for a moment. It is possible to run behind them without the Qiqirn Divers becoming afraid and running away. They have long but very narrow line of sight detection, which makes it possible to slip through just to the side.
- The Giant Orobons ignore the PCs, and PCs cannot attack or use abilities on them.
- The Giant Orobons run at enhanced speed probably as fast as a raptor's and will chase any Qiqirn it "aggroes".
- Even if it is chasing a particular Qiqirn it has "aggroed", it will still "aggro" other Qiqirns it sees along the way. This is unlike usual party mechanics where the mob aggroes only its initial target.
- When seen, the Qiqirn Divers will run to certain designated hiding spots on the map. The hiding spot they choose depends on the direction they run upon aggro. Typically, they will hide in tunnels or in hiding spots on ships, where Orobon don't roam or see them.
- Qiqirn Divers have enhanced movement speed. Even while using Ninja Kyahan+1, being able to sufficiently catch up with them and stopping them with dialog is only possible by cutting corners and moving more efficiently than they could. Flee is very useful in catching up with them.
- It takes 1 dialogue to stop it and 1 more dialogue to get it to follow you again.
- Qiqirn tend to run in the opposite direction of an oncoming Orobon if trapped in a corridor. This can be used to your advantage if you are nearly trapped between two encroaching Orobon. Running intentionally into the Orobon coming up the rear can make the Qiqirn(s) run towards the end-point instead of away.
- Talk to the Qiqirn Chief Diver at the end and he will give a message of either there being more Qiqirn to escort or if you have brought everyone.
- A strong strategy is to have 1 person speak with all of the Qiqirn Diver and guide them.
- All other participants in the assault should trail behind the guide.
- If the guide gets aggro from a Giant Orobon, the other members are in a position to be able to intercept and recapture the Qiqirn Divers, saving time from having to find and recapture them.
Notes
- There is no "safe" route.
- Qiqirn Divers shows up on Widescan.
- Giant Orobons do not show up on Widescan.
EmbedVideo is missing a required parameter.
Map
| Assault | |
|---|---|
| Leujaoam Missions | |
| Mamool Ja Missions | |
| Lebros Missions | |
| Periqia Missions | |
| Ilrusi Missions | |
| Nyzul Isle Missions | |
| Assault Point Rewards | |
| Nyzul Isle Rewards | |