| Line 25: | Line 25: | ||
|{{Abundance|0|6}} |
|{{Abundance|0|6}} |
||
|{{Abundance|0|10}} |
|{{Abundance|0|10}} |
||
| − | |{{Abundance|0| |
+ | |{{Abundance|0|22}} |
| − | |{{Abundance|7| |
+ | |{{Abundance|7|24}} |
|- BGCOLOR=#e6e6ef |
|- BGCOLOR=#e6e6ef |
||
|align=left width=5%|[[Argyro Rivet]] ([[Warrior|WAR]]) |
|align=left width=5%|[[Argyro Rivet]] ([[Warrior|WAR]]) |
||
|{{Abundance|0|6}} |
|{{Abundance|0|6}} |
||
|{{Abundance|0|10}} |
|{{Abundance|0|10}} |
||
| − | |{{Abundance|0| |
+ | |{{Abundance|0|22}} |
| − | |{{Abundance|0| |
+ | |{{Abundance|0|24}} |
|- BGCOLOR=#e6e6ef |
|- BGCOLOR=#e6e6ef |
||
|align=left width=5%|[[Astral Leather]] ([[Summoner|SMN]]) |
|align=left width=5%|[[Astral Leather]] ([[Summoner|SMN]]) |
||
|{{Abundance|0|6}} |
|{{Abundance|0|6}} |
||
|{{Abundance|4|10}} |
|{{Abundance|4|10}} |
||
| − | |{{Abundance|0| |
+ | |{{Abundance|0|22}} |
| − | |{{Abundance|0| |
+ | |{{Abundance|0|24}} |
|- BGCOLOR=#e6e6ef |
|- BGCOLOR=#e6e6ef |
||
|align=left width=5%|[[Benedict Yarn]] ([[White Mage|WHM]]) |
|align=left width=5%|[[Benedict Yarn]] ([[White Mage|WHM]]) |
||
|{{Abundance|1|6}} |
|{{Abundance|1|6}} |
||
|{{Abundance|0|10}} |
|{{Abundance|0|10}} |
||
| − | |{{Abundance|0| |
+ | |{{Abundance|0|22}} |
| − | |{{Abundance|0| |
+ | |{{Abundance|0|24}} |
|- BGCOLOR=#e6e6ef |
|- BGCOLOR=#e6e6ef |
||
|align=left width=5%|[[Black Rivet]] ([[Dark Knight|DRK]]) |
|align=left width=5%|[[Black Rivet]] ([[Dark Knight|DRK]]) |
||
|{{Abundance|2|8}} |
|{{Abundance|2|8}} |
||
|{{Abundance|0|10}} |
|{{Abundance|0|10}} |
||
| − | |{{Abundance|0| |
+ | |{{Abundance|0|22}} |
| − | |{{Abundance|0| |
+ | |{{Abundance|0|24}} |
|- BGCOLOR=#e6e6ef |
|- BGCOLOR=#e6e6ef |
||
|align=left width=5%|[[Blue Rivet]] ([[Dragoon|DRG]]) |
|align=left width=5%|[[Blue Rivet]] ([[Dragoon|DRG]]) |
||
|{{Abundance|0|6}} |
|{{Abundance|0|6}} |
||
|{{Abundance|0|10}} |
|{{Abundance|0|10}} |
||
| − | |{{Abundance|0| |
+ | |{{Abundance|0|22}} |
| − | |{{Abundance|0| |
+ | |{{Abundance|0|24}} |
|- BGCOLOR=#e6e6ef |
|- BGCOLOR=#e6e6ef |
||
|align=left width=5%|[[Brown Doeskin]] ([[Bard|BRD]]) |
|align=left width=5%|[[Brown Doeskin]] ([[Bard|BRD]]) |
||
|{{Abundance|8|10}} |
|{{Abundance|8|10}} |
||
|{{Abundance|0|10}} |
|{{Abundance|0|10}} |
||
| − | |{{Abundance|0| |
+ | |{{Abundance|0|22}} |
| − | |{{Abundance|0| |
+ | |{{Abundance|0|24}} |
|- BGCOLOR=#e6e6ef |
|- BGCOLOR=#e6e6ef |
||
|align=left width=5%|[[Canvas Toile]] ([[Corsair|COR]]) |
|align=left width=5%|[[Canvas Toile]] ([[Corsair|COR]]) |
||
|{{Abundance|0|6}} |
|{{Abundance|0|6}} |
||
|{{Abundance|6|10}} |
|{{Abundance|6|10}} |
||
| − | |{{Abundance|0| |
+ | |{{Abundance|0|22}} |
| − | |{{Abundance|0| |
+ | |{{Abundance|0|24}} |
|- BGCOLOR=#e6e6ef |
|- BGCOLOR=#e6e6ef |
||
|align=left width=5%|[[Cardinal Cloth]] ([[Red Mage|RDM]]) |
|align=left width=5%|[[Cardinal Cloth]] ([[Red Mage|RDM]]) |
||
|{{Abundance|0|6}} |
|{{Abundance|0|6}} |
||
|{{Abundance|0|9}} |
|{{Abundance|0|9}} |
||
| − | |{{Abundance|0| |
+ | |{{Abundance|0|22}} |
| − | |{{Abundance|6| |
+ | |{{Abundance|6|24}} |
|- BGCOLOR=#e6e6ef |
|- BGCOLOR=#e6e6ef |
||
|align=left width=5%|[[Charcoal Cotton]] ([[Ranger|RNG]]) |
|align=left width=5%|[[Charcoal Cotton]] ([[Ranger|RNG]]) |
||
|{{Abundance|0|6}} |
|{{Abundance|0|6}} |
||
|{{Abundance|1|10}} |
|{{Abundance|1|10}} |
||
| − | |{{Abundance|0| |
+ | |{{Abundance|0|22}} |
| − | |{{Abundance|0| |
+ | |{{Abundance|0|24}} |
|- BGCOLOR=#e6e6ef |
|- BGCOLOR=#e6e6ef |
||
|align=left width=5%|[[Corduroy Cloth]] ([[Puppetmaster|PUP]]) |
|align=left width=5%|[[Corduroy Cloth]] ([[Puppetmaster|PUP]]) |
||
|{{Abundance|0|6}} |
|{{Abundance|0|6}} |
||
|{{Abundance|0|10}} |
|{{Abundance|0|10}} |
||
| − | |{{Abundance|0| |
+ | |{{Abundance|0|22}} |
| − | |{{Abundance|3| |
+ | |{{Abundance|3|24}} |
|- BGCOLOR=#e6e6ef |
|- BGCOLOR=#e6e6ef |
||
|align=left width=5%|[[Diabolic Yarn]] ([[Black Mage|BLM]]) |
|align=left width=5%|[[Diabolic Yarn]] ([[Black Mage|BLM]]) |
||
|{{Abundance|0|6}} |
|{{Abundance|0|6}} |
||
|{{Abundance|0|10}} |
|{{Abundance|0|10}} |
||
| − | |{{Abundance|1| |
+ | |{{Abundance|1|22}} |
| − | |{{Abundance|0| |
+ | |{{Abundance|0|24}} |
|- BGCOLOR=#e6e6ef |
|- BGCOLOR=#e6e6ef |
||
|align=left width=5%|[[Ebony Lacquer]] ([[Ninja|NIN]]) |
|align=left width=5%|[[Ebony Lacquer]] ([[Ninja|NIN]]) |
||
|{{Abundance| 0|6}} |
|{{Abundance| 0|6}} |
||
|{{Abundance| 1|11}} |
|{{Abundance| 1|11}} |
||
| − | |{{Abundance|14| |
+ | |{{Abundance|14|22}} |
| − | |{{Abundance| 0| |
+ | |{{Abundance| 0|24}} |
|- BGCOLOR=#e6e6ef |
|- BGCOLOR=#e6e6ef |
||
|align=left width=5%|[[Electrum Stud]] ([[Scholar|SCH]]) |
|align=left width=5%|[[Electrum Stud]] ([[Scholar|SCH]]) |
||
|{{Abundance|0|6}} |
|{{Abundance|0|6}} |
||
|{{Abundance|0|10}} |
|{{Abundance|0|10}} |
||
| − | |{{Abundance| |
+ | |{{Abundance|1|22}} |
| − | |{{Abundance|0| |
+ | |{{Abundance|0|24}} |
|- BGCOLOR=#e6e6ef |
|- BGCOLOR=#e6e6ef |
||
|align=left width=5%|[[Fetid Lanolin]] ([[Beastmaster|BST]]) |
|align=left width=5%|[[Fetid Lanolin]] ([[Beastmaster|BST]]) |
||
|{{Abundance| 0|6}} |
|{{Abundance| 0|6}} |
||
|{{Abundance| 0|10}} |
|{{Abundance| 0|10}} |
||
| − | |{{Abundance| 1| |
+ | |{{Abundance| 1|22}} |
| − | |{{Abundance|10| |
+ | |{{Abundance|10|24}} |
|- BGCOLOR=#e6e6ef |
|- BGCOLOR=#e6e6ef |
||
|align=left width=5%|[[Flameshun Cloth]] ([[Blue Mage|BLU]]) |
|align=left width=5%|[[Flameshun Cloth]] ([[Blue Mage|BLU]]) |
||
|{{Abundance|0|6}} |
|{{Abundance|0|6}} |
||
|{{Abundance|1|11}} |
|{{Abundance|1|11}} |
||
| − | |{{Abundance|1| |
+ | |{{Abundance|1|22}} |
| − | |{{Abundance|0| |
+ | |{{Abundance|0|24}} |
|- BGCOLOR=#e6e6ef |
|- BGCOLOR=#e6e6ef |
||
|align=left width=5%|[[Gold Stud]] ([[Dancer|DNC]]) |
|align=left width=5%|[[Gold Stud]] ([[Dancer|DNC]]) |
||
|{{Abundance|0|6}} |
|{{Abundance|0|6}} |
||
|{{Abundance|0|10}} |
|{{Abundance|0|10}} |
||
| − | |{{Abundance|0| |
+ | |{{Abundance|0|22}} |
| − | |{{Abundance| |
+ | |{{Abundance|6|24}} |
|- BGCOLOR=#e6e6ef |
|- BGCOLOR=#e6e6ef |
||
|align=left width=5%|[[Kurogane]] ([[Samurai|SAM]]) |
|align=left width=5%|[[Kurogane]] ([[Samurai|SAM]]) |
||
|{{Abundance|0|6}} |
|{{Abundance|0|6}} |
||
|{{Abundance|0|10}} |
|{{Abundance|0|10}} |
||
| − | |{{Abundance|1| |
+ | |{{Abundance|1|22}} |
| − | |{{Abundance|0| |
+ | |{{Abundance|0|24}} |
|- BGCOLOR=#e6e6ef |
|- BGCOLOR=#e6e6ef |
||
|align=left width=5%|[[Light Filament]] ([[Thief|THF]]) |
|align=left width=5%|[[Light Filament]] ([[Thief|THF]]) |
||
|{{Abundance|0|6}} |
|{{Abundance|0|6}} |
||
|{{Abundance|0|10}} |
|{{Abundance|0|10}} |
||
| − | |{{Abundance|0| |
+ | |{{Abundance|0|22}} |
| − | |{{Abundance| |
+ | |{{Abundance|12|24}} |
|- BGCOLOR=#e6e6ef |
|- BGCOLOR=#e6e6ef |
||
|align=left width=5%|[[White Rivet]] ([[Paladin|PLD]]) |
|align=left width=5%|[[White Rivet]] ([[Paladin|PLD]]) |
||
|{{Abundance|0|6}} |
|{{Abundance|0|6}} |
||
|{{Abundance|0|10}} |
|{{Abundance|0|10}} |
||
| − | |{{Abundance|0| |
+ | |{{Abundance|0|22}} |
| − | |{{Abundance|3| |
+ | |{{Abundance|3|24}} |
|- BGCOLOR=#e6e6ef |
|- BGCOLOR=#e6e6ef |
||
|align=left width=5%|[[Adaman Ore]] |
|align=left width=5%|[[Adaman Ore]] |
||
| - |
| - |
||
| - |
| - |
||
| − | |{{Abundance|1| |
+ | |{{Abundance|1|8}} |
| - |
| - |
||
|- BGCOLOR=#e6e6ef |
|- BGCOLOR=#e6e6ef |
||
| Line 151: | Line 151: | ||
| - |
| - |
||
| - |
| - |
||
| − | |{{Abundance|0| |
+ | |{{Abundance|0|8}} |
| - |
| - |
||
|- BGCOLOR=#e6e6ef |
|- BGCOLOR=#e6e6ef |
||
| Line 157: | Line 157: | ||
| - |
| - |
||
| - |
| - |
||
| − | |{{Abundance|1| |
+ | |{{Abundance|1|8}} |
| - |
| - |
||
|- BGCOLOR=#e6e6ef |
|- BGCOLOR=#e6e6ef |
||
| Line 163: | Line 163: | ||
| - |
| - |
||
| - |
| - |
||
| − | |{{Abundance|1| |
+ | |{{Abundance|1|8}} |
| - |
| - |
||
|- BGCOLOR=#e6e6ef |
|- BGCOLOR=#e6e6ef |
||
| Line 169: | Line 169: | ||
| - |
| - |
||
| - |
| - |
||
| − | |{{Abundance|0| |
+ | |{{Abundance|0|8}} |
| - |
| - |
||
|- BGCOLOR=#e6e6ef |
|- BGCOLOR=#e6e6ef |
||
| Line 175: | Line 175: | ||
| - |
| - |
||
| - |
| - |
||
| − | |{{Abundance|1| |
+ | |{{Abundance|1|8}} |
| - |
| - |
||
|- BGCOLOR=#e6e6ef |
|- BGCOLOR=#e6e6ef |
||
| Line 181: | Line 181: | ||
| - |
| - |
||
| - |
| - |
||
| − | |{{Abundance|1| |
+ | |{{Abundance|1|8}} |
| - |
| - |
||
|- BGCOLOR=#e6e6ef |
|- BGCOLOR=#e6e6ef |
||
| Line 187: | Line 187: | ||
| - |
| - |
||
| - |
| - |
||
| − | |{{Abundance|0| |
+ | |{{Abundance|0|8}} |
| - |
| - |
||
|- BGCOLOR=#e6e6ef |
|- BGCOLOR=#e6e6ef |
||
| Line 194: | Line 194: | ||
| - |
| - |
||
| - |
| - |
||
| − | |{{Abundance|0| |
+ | |{{Abundance|0|24}} |
|- BGCOLOR=#e6e6ef |
|- BGCOLOR=#e6e6ef |
||
|align=left width=5%|[[Charcoal Chip]] |
|align=left width=5%|[[Charcoal Chip]] |
||
Revision as of 02:31, 29 October 2009
- SW Apollyon is a subsection of the Apollyon zone in the Limbus region.
- It is reached via the Teleport-Dem crag entrance to Al'Taieu.
- Can be cleared with a full alliance only taking the Time chest on the 3rd floor.
- A group of 12 typically only needs to take one Time chest on the 1st or 2nd floor.
- A group of 7 typically needs to take an extra Time chest on the 1st and 2nd floors, but a melee heavy group can get by with only taking one time chest on the first floor.
- A group of 4 can clear this by taking 0 time chests and skipping floors 1 and 2 by opening vortex ASAP and going up. The third floor will depend on luck with mimics vs. item/time chests and how much time you have remaining. Keep at least 5 minutes for the final floor if you have 2+ BLM DD or 10 minutes if you have 0 magic DD (to be safe).
- Duoed by RDM and BLM, both skilled and quite lucky - the first mimic chest killed opened the portal, and was killed using Chainspell.
- The Time chests give an additional 10 minutes.
- Drops AF+1 materials for All Jobs
- Typical Ancient Beastcoin yield: 40
- Reward for completion: Charcoal Chip
Drop Chart
| Item (Job) | Floor 1 | Floor 2 | Floor 3 | Floor 4 |
| Ancient Brass (MNK) | ||||
| Argyro Rivet (WAR) | ||||
| Astral Leather (SMN) | ||||
| Benedict Yarn (WHM) | ||||
| Black Rivet (DRK) | ||||
| Blue Rivet (DRG) | ||||
| Brown Doeskin (BRD) | ||||
| Canvas Toile (COR) | ||||
| Cardinal Cloth (RDM) | ||||
| Charcoal Cotton (RNG) | ||||
| Corduroy Cloth (PUP) | ||||
| Diabolic Yarn (BLM) | ||||
| Ebony Lacquer (NIN) | ||||
| Electrum Stud (SCH) | ||||
| Fetid Lanolin (BST) | ||||
| Flameshun Cloth (BLU) | ||||
| Gold Stud (DNC) | ||||
| Kurogane (SAM) | ||||
| Light Filament (THF) | ||||
| White Rivet (PLD) | ||||
| Adaman Ore | - | - | - | |
| Clot Plasma | - | - | - | |
| Darksteel Ore | - | - | - | |
| Darksteel Sheet | - | - | - | |
| Light Steel | - | - | - | |
| Oxblood | - | - | - | |
| Rainbow Thread | - | - | - | |
| Shell Powder | - | - | - | |
| Metal Chip | - | - | - | |
| Charcoal Chip | - | - | - | (100%) |
First Floor
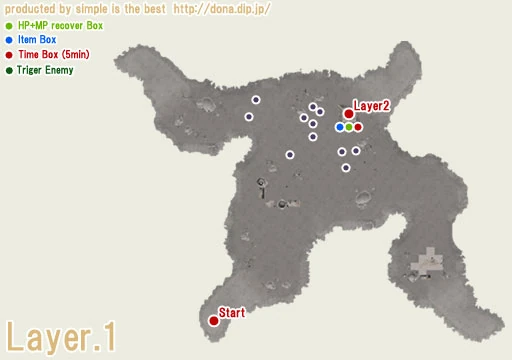
- Enemies: Fir Bholg x10 (Fomor)
- About 4250 HP
- Galka = PLD, Elvaan = THF, Hume = SAM, Tarutaru = BLM, Mithra = RDM
- The Mage Fir Bholg are highly resistant to magic damage.
- Each has a chance of dropping an Ancient Beastcoin.
- Linking by sound.
- Uses their respective two-hour abilities once each.
- Susceptible to Lullaby, Sleep, and Repose
- Summoner pullers need to be very careful, they will link and stay linked at times on pet pulls
- Like all Limbus mobs, these have party hate: once aggroed, everyone in the alliance will have hate on the ones that aggro, so a sac puller must drop from the party before pulling.
- You can open only one of the three chests.
- The Vortex and Chests come from the same race of Fomor, the same race as the person who first entered the zone.
- The Items chest has 4 Ancient Beastcoins and 1-2 AF+1 material (BRD, DRK, SAM, BLM, WAR, BLU, SCH, WHM, ?).
Second Floor
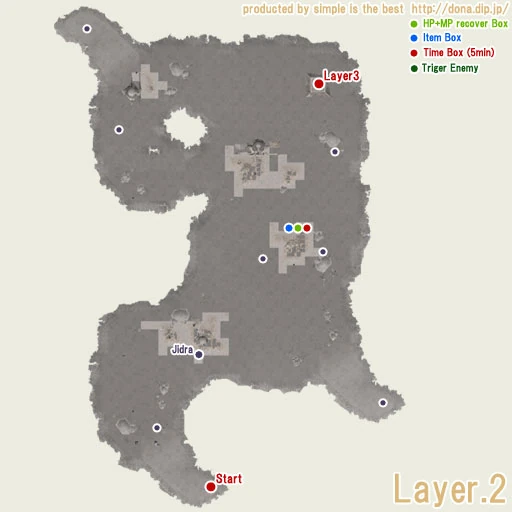
- Killing a Jidra causes one of the other monsters to spawn.
- Defeating the large, leafless Jidra opens the vortex (and doesn't spawn a kid).
- The large Jidra has the same special attack changes as Cemetery Cherry
- Leafstorm dispels all effects including food and gives Slow instead of damage.
- The Jidra never drop Ancient Beastcoins, but the others have a high chance to.
- When all enemies are dead, the Time, Items and Restore chests spawn. You can only open one.
- They actually appear farther south than shown on the map.
- The Items chest has 4 Ancient Beastcoins and an AF+1 material (RNG, WHM, SMN, BLM, WAR, COR, DRG).
Third Floor
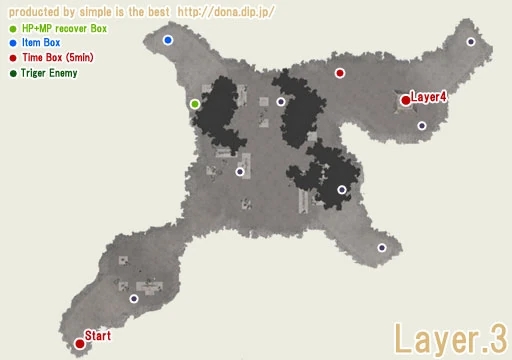
- Enemies: Armoury Crate x8 (Mimics)
- Often drop an Ancient Beastcoin.
- They only aggro when someone clicks on them to determine whether they are mimics or real chests. They are passive otherwise.
- Defeating one of the Mimics opens the vortex.
- The Time, Items and Restore chests are hidden among the Mimics. You can open all three.
- They are randomly distributed--they are not in the places marked on the map.
- You can't tell which chest it is which without opening it; they all look like Items chests.
- Note: Mimics have the Draw In ability, so trying to use a SMN and a pet to find the real chests won't work.

- Death Trap (AoE Stun and Poison) has a huge range (>31'). This ability has a somewhat lengthy activation time, so it is easy to stun it.
- The Items chest has 4 Ancient Beastcoins, 0-2 AF+1 materials (WAR, NIN, DRG, BLM, SAM, WHM, BLU, SCH) and a synthesis material (Oxblood, Shell Powder, Light Steel, Clot Plasma, Darksteel Ore, Darksteel Sheet, Adaman Ore, Rainbow Thread).
Fourth Floor
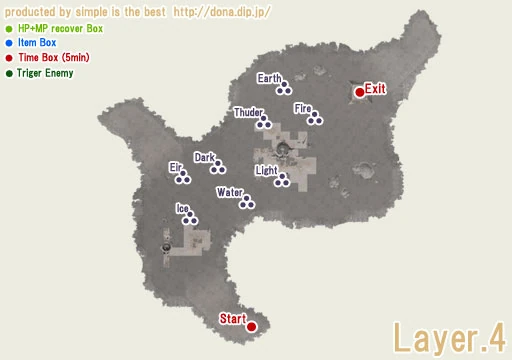
- Enemies: Air Elemental x3
- Dark Elemental x3
- Earth Elemental x3
- Fire Elemental x3
- Ice Elemental x3
- Light Elemental x3
- Thunder Elemental x3
- Water Elemental x3
- Often drop an Ancient Beastcoin
- They are susceptible to melee damage, unlike normal elementals. That being said, they still have a higher resistance than normal non-elemental monsters to melee attacks.
- Elementals of the same type link, and will link from a very large distance. They also aggro to magic and have shared party hate.
- A safe place to camp is the northeast corner near the exit portal where the final chest spawns.
- The Dark Elementals are resistant to Lullaby and Repose, and immune to Sleep.
- The Light Elementals are immune to Lullaby and Repose, but susceptible to Sleep.
- Defeating the Elementals corresponding to the in-game day that you entered this floor on (tested on 07/19/09 by killing Dark Elementals after day changed to Fire) causes the final chest to spawn at the exit.
- The final chest has 4-5 Ancient Beastcoins, ~2 AF+1 materials (THF, BST, MNK, RDM, PLD, PUP, DNC), a Charcoal Chip and a possibility of a Metal Chip.
| Limbus | |
|---|---|
| Apollyon | |
| Temenos | |
| Rewards | |
| NPCs | |