No edit summary |
|||
| (9 intermediate revisions by 6 users not shown) | |||
| Line 2: | Line 2: | ||
{{Zone Infobox |
{{Zone Infobox |
||
| ToC = |
| ToC = |
||
| − | [[#Involved in Quests/Missions|Quests/Missions]] • [[# |
+ | [[#Involved in Quests/Missions|Quests/Missions]] • [[#treasure chest|Treasure Chest]] • [[#fishing|Fishing]] • [[#weather|Weather]] • [[#NPCs Found Here|NPCs]] • [[#Notorious Monsters Found Here|Notorious Monsters]] • [[#Regular Monsters Found Here|Regular Monsters]] • [[#Event Monsters Found Here|Event Monsters]] |
| Description = This is a beautiful set of limestone caves discovered by Lord Ordelle, the famed [[Elvaan]] explorer. When the map of the area was completed, the shape of the tunnels closely resembled a person's body; this resulted in the alias "the Body Caves," which is still used by the local Elvaan. From the quest [[A Timely Visit]] we also learn that Ordelle's Caves was once known as the "Shrine of Endless Travels." |
| Description = This is a beautiful set of limestone caves discovered by Lord Ordelle, the famed [[Elvaan]] explorer. When the map of the area was completed, the shape of the tunnels closely resembled a person's body; this resulted in the alias "the Body Caves," which is still used by the local Elvaan. From the quest [[A Timely Visit]] we also learn that Ordelle's Caves was once known as the "Shrine of Endless Travels." |
||
| Line 8: | Line 8: | ||
| Connections = |
| Connections = |
||
| + | *[[La Theine Plateau]]: ({{Location Tooltip|area=Ordelle's Caves|map=Map 3|pos=G-10}}, {{Location Tooltip|area=Ordelle's Caves|map=Map 2|pos=H-2}}, {{Location Tooltip|area=Ordelle's Caves|map=Map 1|pos=K-3}}) |
||
| − | [[La Theine Plateau]]: (G-10, H-2, K-3) |
||
| − | + | *[[escape|Escapes]] to: [[La Theine Plateau]] ({{Location Tooltip|area=La Theine Plateau|pos=F-7}}) |
|
| + | *[[Survival Guide]]: ({{Location Tooltip|area=Ordelle's Caves|map=Map 2|pos=G-3}}) |
||
| − | |||
| + | | Monstrosity = {{Medium}} |
||
| Stats = {{Tractor}} {{Escape}} |
| Stats = {{Tractor}} {{Escape}} |
||
| Region = Zulkheim |
| Region = Zulkheim |
||
| Type = Dungeon |
| Type = Dungeon |
||
| + | | Maps = |
||
| + | {{Zone Tooltip Map|Map 1}} |
||
| + | {{Zone Tooltip Map|Map 2}} |
||
| + | {{Zone Tooltip Map|Map 3}} |
||
| Map Acquisition = [[Map of Ordelle's Caves|Purchase]] |
| Map Acquisition = [[Map of Ordelle's Caves|Purchase]] |
||
| Restrictions = None |
| Restrictions = None |
||
| Requirements = None |
| Requirements = None |
||
| + | | BGM = None |
||
| Expansion = Original |
| Expansion = Original |
||
}} |
}} |
||
| Line 26: | Line 32: | ||
{{TableQuestLine |Name= Blighted Gloom| Type=[[Adventuring Fellow Guide|NPC]]| Starter=[[Luto Mewrilah]]| Zone=[[Upper Jeuno]]| Coordinates=G-8}} |
{{TableQuestLine |Name= Blighted Gloom| Type=[[Adventuring Fellow Guide|NPC]]| Starter=[[Luto Mewrilah]]| Zone=[[Upper Jeuno]]| Coordinates=G-8}} |
||
| − | {{TableQuestLine |Name= Dark Puppet| Type=[[:category:Artifact Armor|AF]] |
+ | {{TableQuestLine |Name= Dark Puppet| Type=[[DRK]] [[:category:Artifact Armor|AF]]| Starter=[[Cid]]| Zone=[[Metalworks]]| Coordinates=G-8}} |
{{TableQuestLine |Name= Eco-Warrior (San d'Oria)| Type=General| Starter=[[Norejaie]]| Zone=[[Southern San d'Oria]]| Coordinates=K-6}} |
{{TableQuestLine |Name= Eco-Warrior (San d'Oria)| Type=General| Starter=[[Norejaie]]| Zone=[[Southern San d'Oria]]| Coordinates=K-6}} |
||
| Line 32: | Line 38: | ||
{{TableQuestLine |Name= Fistful of Fury| Type=General| Starter=[[Vola]]| Zone=[[Lower Jeuno]]| Coordinates=J-8}} |
{{TableQuestLine |Name= Fistful of Fury| Type=General| Starter=[[Vola]]| Zone=[[Lower Jeuno]]| Coordinates=J-8}} |
||
| − | {{TableQuestLine |Name= Hitting the Marquisate| Type=[[:category:Artifact Armor|AF]] |
+ | {{TableQuestLine |Name= Hitting the Marquisate| Type=[[THF]] [[:category:Artifact Armor|AF]]| Starter=[[Nanaa Mihgo]]| Zone=[[Windurst Woods]]| Coordinates=J-3}} |
| + | |||
| + | {{TableQuestLine |Name= Legacies Lost and Found| Type=[[RUN]] [[:category:Artifact Armor|AF]]| Starter=[[Octavien]]| Zone=[[Eastern Adoulin]]| Coordinates={{Location Tooltip|area=Eastern Adoulin|pos=I-8}}}} |
||
| − | {{TableQuestLine |Name= |
+ | {{TableQuestLine |Name=Now Recording...| Type=General| Starter= [[Darcia]]| Zone= [[Lower Jeuno]]| Coordinates= {{Location Tooltip|area=Lower Jeuno|pos=H-7}}}} |
| + | |||
| + | {{TableQuestLine |Name= Sharpening the Sword| Type=[[PLD]] [[:category:Artifact Armor|AF]]| Starter=[[Ailbeche]]| Zone=[[Northern San d'Oria]]| Coordinates=J-8}} |
||
{{TableQuestLine |Name= Signed in Blood| Type=General| Starter=[[Sobane]]| Zone=[[Southern San d'Oria]]| Coordinates=D-6}} |
{{TableQuestLine |Name= Signed in Blood| Type=General| Starter=[[Sobane]]| Zone=[[Southern San d'Oria]]| Coordinates=D-6}} |
||
| Line 40: | Line 50: | ||
{{TableQuestLine |Name= Strange Apparatus| Type=---| Starter=---| Zone=---| Coordinates= }} |
{{TableQuestLine |Name= Strange Apparatus| Type=---| Starter=---| Zone=---| Coordinates= }} |
||
| − | {{TableQuestLine |Name= The Goblin Tailor| Type=[[RSE]]| Starter=[[Guttrix]]| Zone=[[Lower Jeuno]] |
+ | {{TableQuestLine |Name= The Goblin Tailor| Type=[[RSE]]| Starter=[[Guttrix]]| Zone=[[Lower Jeuno]]| Coordinates=H-10}} |
{{TableMissionHeader}} |
{{TableMissionHeader}} |
||
{{TableMissionLine |Name = The Rescue Drill|San d'Oria Mission 2-1:The Rescue Drill| Nation=[[San d'Oria Missions|San d'Oria]]| Starter=[[San d'Orian Gate Guard]]| Zone=[[San d'Oria]]| Coordinates= }} |
{{TableMissionLine |Name = The Rescue Drill|San d'Oria Mission 2-1:The Rescue Drill| Nation=[[San d'Oria Missions|San d'Oria]]| Starter=[[San d'Orian Gate Guard]]| Zone=[[San d'Oria]]| Coordinates= }} |
||
| + | |||
| + | {{TableMissionLine |Name = Headstone Pilgrimage| Nation=[[Rise of the Zilart Missions|Zilart 5]]| Starter=---| Zone=---| Coordinates= }} |
||
| + | |||
| + | {{TableMissionLine |Name= The Geomagnetron| Nation= [[Seekers of Adoulin Missions|Adoulin 1-2]]| Starter= [[Darcia]]| Zone= [[Lower Jeuno]]| Coordinates= {{Location Tooltip|area=Lower Jeuno|pos=H-7}}}} |
||
{{TableQuestFooter}} |
{{TableQuestFooter}} |
||
==Other Information== |
==Other Information== |
||
| − | {| border="0" width="100%" cellpadding="5" cellspacing="2" |
||
| − | |BGCOLOR="#DFDFDF" rowspan="1" width="50%" valign="top"| |
||
{{Zone Section Header|chest}} |
{{Zone Section Header|chest}} |
||
{{:{{PAGENAME}}/Treasure_Chest}} |
{{:{{PAGENAME}}/Treasure_Chest}} |
||
| − | |} |
||
{{Zone Section Header|fishing}} |
{{Zone Section Header|fishing}} |
||
{{:{{PAGENAME}}/Fishing}} |
{{:{{PAGENAME}}/Fishing}} |
||
{{Zone Section Header|weather}} |
{{Zone Section Header|weather}} |
||
{{:{{PAGENAME}}/Weather}} |
{{:{{PAGENAME}}/Weather}} |
||
| − | |||
==Individual Training== |
==Individual Training== |
||
| Line 141: | Line 151: | ||
*3 [[Bilis Leech]] |
*3 [[Bilis Leech]] |
||
*3 [[Swagger Spruce]] |
*3 [[Swagger Spruce]] |
||
| + | |1890-3740 |
||
| − | |1560-3120 |
||
| − | | |
+ | |189-374 |
|} |
|} |
||
{| border="0" width="100%" cellpadding="0" cellspacing="1" |
{| border="0" width="100%" cellpadding="0" cellspacing="1" |
||
| − | |- |
+ | |- |
! style="background:#A58D63;" colspan="2" |Brown Casket |
! style="background:#A58D63;" colspan="2" |Brown Casket |
||
! style="background:#63C4DC;" colspan="2" |Blue Casket |
! style="background:#63C4DC;" colspan="2" |Blue Casket |
||
| Line 156: | Line 166: | ||
|- |
|- |
||
| style="background:#ECD2A5; padding-left:1em;" | [[Elixir]] |
| style="background:#ECD2A5; padding-left:1em;" | [[Elixir]] |
||
| − | | style="background:#ECD2A5; padding-left:1em;" | {{Abundance|4| |
+ | | style="background:#ECD2A5; padding-left:1em;" | {{Abundance| 4|30}} |
| − | | style="background:#BBE6E6; padding-left:1em;" | [[Lucid Ether I]] {{ |
+ | | style="background:#BBE6E6; padding-left:1em;" | [[Lucid Ether I]] {{temp|nc}} |
| − | | style="background:#BBE6E6; padding-left:1em;" | {{Abundance|1|26}} |
+ | | style="background:#BBE6E6; padding-left:1em;" | {{Abundance| 1|26}} |
|- |
|- |
||
| style="background:#ECD2A5; padding-left:1em;" | [[Jade Cell]] |
| style="background:#ECD2A5; padding-left:1em;" | [[Jade Cell]] |
||
| − | | style="background:#ECD2A5; padding-left:1em;" | {{Abundance|2| |
+ | | style="background:#ECD2A5; padding-left:1em;" | {{Abundance| 2|30}} |
| − | | style="background:#BBE6E6; padding-left:1em;" | [[Lucid Ether II]] {{ |
+ | | style="background:#BBE6E6; padding-left:1em;" | [[Lucid Ether II]] {{temp|nc}} |
| − | | style="background:#BBE6E6; padding-left:1em;" | {{Abundance|2|26}} |
+ | | style="background:#BBE6E6; padding-left:1em;" | {{Abundance| 2|26}} |
|- |
|- |
||
| style="background:#ECD2A5; padding-left:1em;" | [[Steel Bullet Pouch]] |
| style="background:#ECD2A5; padding-left:1em;" | [[Steel Bullet Pouch]] |
||
| − | | style="background:#ECD2A5; padding-left:1em;" | {{Abundance|1| |
+ | | style="background:#ECD2A5; padding-left:1em;" | {{Abundance| 1|30}} |
| − | | style="background:#BBE6E6; padding-left:1em;" | [[Catholicon]] {{ |
+ | | style="background:#BBE6E6; padding-left:1em;" | [[Catholicon]] {{temp|nc}} |
| − | | style="background:#BBE6E6; padding-left:1em;" | {{Abundance|3|26}} |
+ | | style="background:#BBE6E6; padding-left:1em;" | {{Abundance| 3|26}} |
|- |
|- |
||
| style="background:#ECD2A5; padding-left:1em;" | [[Xanthous Cell]] |
| style="background:#ECD2A5; padding-left:1em;" | [[Xanthous Cell]] |
||
| − | | style="background:#ECD2A5; padding-left:1em;" | {{Abundance|2| |
+ | | style="background:#ECD2A5; padding-left:1em;" | {{Abundance| 2|30}} |
| − | | style="background:#BBE6E6; padding-left:1em;" | [[Lucid Ether III]] {{ |
+ | | style="background:#BBE6E6; padding-left:1em;" | [[Lucid Ether III]] {{temp|nc}} |
| − | | style="background:#BBE6E6; padding-left:1em;" | {{Abundance|3|26}} |
+ | | style="background:#BBE6E6; padding-left:1em;" | {{Abundance| 3|26}} |
|- |
|- |
||
| style="background:#ECD2A5; padding-left:1em;" | [[Adaman Nugget]] |
| style="background:#ECD2A5; padding-left:1em;" | [[Adaman Nugget]] |
||
| − | | style="background:#ECD2A5; padding-left:1em;" | {{Abundance|3| |
+ | | style="background:#ECD2A5; padding-left:1em;" | {{Abundance| 3|30}} |
| − | | style="background:#BBE6E6; padding-left:1em;" | [[Clear Salve I]] {{ |
+ | | style="background:#BBE6E6; padding-left:1em;" | [[Clear Salve I]] {{temp|nc}} |
| − | | style="background:#BBE6E6; padding-left:1em;" | {{Abundance|2|26}} |
+ | | style="background:#BBE6E6; padding-left:1em;" | {{Abundance| 2|26}} |
|- |
|- |
||
| style="background:#ECD2A5; padding-left:1em;" | [[Remedy]] |
| style="background:#ECD2A5; padding-left:1em;" | [[Remedy]] |
||
| − | | style="background:#ECD2A5; padding-left:1em;" | {{Abundance|8| |
+ | | style="background:#ECD2A5; padding-left:1em;" | {{Abundance| 8|30}} |
| − | | style="background:#BBE6E6; padding-left:1em;" | [[Healing Mist]] {{ |
+ | | style="background:#BBE6E6; padding-left:1em;" | [[Healing Mist]] {{temp|nc}} |
| − | | style="background:#BBE6E6; padding-left:1em;" | {{Abundance|2|26}} |
+ | | style="background:#BBE6E6; padding-left:1em;" | {{Abundance| 2|26}} |
|- |
|- |
||
| style="background:#ECD2A5; padding-left:1em;" | [[Ebony Log]] |
| style="background:#ECD2A5; padding-left:1em;" | [[Ebony Log]] |
||
| − | | style="background:#ECD2A5; padding-left:1em;" | {{Abundance|1| |
+ | | style="background:#ECD2A5; padding-left:1em;" | {{Abundance| 1|30}} |
| − | | style="background:#BBE6E6; padding-left:1em;" | [[Healing Salve II]] {{ |
+ | | style="background:#BBE6E6; padding-left:1em;" | [[Healing Salve II]] {{temp|nc}} |
| − | | style="background:#BBE6E6; padding-left:1em;" | {{Abundance|2|26}} |
+ | | style="background:#BBE6E6; padding-left:1em;" | {{Abundance| 2|26}} |
|- |
|- |
||
| style="background:#ECD2A5; padding-left:1em;" | [[Rainbow Cape]] |
| style="background:#ECD2A5; padding-left:1em;" | [[Rainbow Cape]] |
||
| − | | style="background:#ECD2A5; padding-left:1em;" | {{Abundance|1| |
+ | | style="background:#ECD2A5; padding-left:1em;" | {{Abundance| 1|30}} |
| − | | style="background:#BBE6E6; padding-left:1em;" | [[Braver's Drink]] {{ |
+ | | style="background:#BBE6E6; padding-left:1em;" | [[Braver's Drink]] {{temp|nc}} |
| − | | style="background:#BBE6E6; padding-left:1em;" | {{Abundance|1|26}} |
+ | | style="background:#BBE6E6; padding-left:1em;" | {{Abundance| 1|26}} |
|- |
|- |
||
| style="background:#ECD2A5; padding-left:1em;" | [[Rubicund Cell]] |
| style="background:#ECD2A5; padding-left:1em;" | [[Rubicund Cell]] |
||
| − | | style="background:#ECD2A5; padding-left:1em;" | {{Abundance|2| |
+ | | style="background:#ECD2A5; padding-left:1em;" | {{Abundance| 2|30}} |
| − | | style="background:#BBE6E6; padding-left:1em;" | [[Ascetic's Tonic]] {{ |
+ | | style="background:#BBE6E6; padding-left:1em;" | [[Ascetic's Tonic]] {{temp|nc}} |
| − | | style="background:#BBE6E6; padding-left:1em;" | {{Abundance|1|26}} |
+ | | style="background:#BBE6E6; padding-left:1em;" | {{Abundance| 1|26}} |
|- |
|- |
||
| style="background:#ECD2A5; padding-left:1em;" | [[Galvanizer]] |
| style="background:#ECD2A5; padding-left:1em;" | [[Galvanizer]] |
||
| − | | style="background:#ECD2A5; padding-left:1em;" | {{Abundance|1| |
+ | | style="background:#ECD2A5; padding-left:1em;" | {{Abundance| 1|30}} |
| − | | style="background:#BBE6E6; padding-left:1em;" | [[Healing Powder]] {{ |
+ | | style="background:#BBE6E6; padding-left:1em;" | [[Healing Powder]] {{temp|nc}} |
| − | | style="background:#BBE6E6; padding-left:1em;" | {{Abundance|3|26}} |
+ | | style="background:#BBE6E6; padding-left:1em;" | {{Abundance| 3|26}} |
|- |
|- |
||
| style="background:#ECD2A5; padding-left:1em;" | [[Ogre Mask]] |
| style="background:#ECD2A5; padding-left:1em;" | [[Ogre Mask]] |
||
| − | | style="background:#ECD2A5; padding-left:1em;" | {{Abundance|2| |
+ | | style="background:#ECD2A5; padding-left:1em;" | {{Abundance| 2|30}} |
| − | | style="background:#BBE6E6; padding-left:1em;" | [[Stalwart's Tonic]] {{ |
+ | | style="background:#BBE6E6; padding-left:1em;" | [[Stalwart's Tonic]] {{temp|nc}} |
| − | | style="background:#BBE6E6; padding-left:1em;" | {{Abundance|1|26}} |
+ | | style="background:#BBE6E6; padding-left:1em;" | {{Abundance| 1|26}} |
|- |
|- |
||
| style="background:#ECD2A5; padding-left:1em;" | [[Ogre Trousers]] |
| style="background:#ECD2A5; padding-left:1em;" | [[Ogre Trousers]] |
||
| − | | style="background:#ECD2A5; padding-left:1em;" | {{Abundance|1| |
+ | | style="background:#ECD2A5; padding-left:1em;" | {{Abundance| 1|30}} |
| − | | style="background:#BBE6E6; padding-left:1em;" | [[Monarch's Drink]] {{ |
+ | | style="background:#BBE6E6; padding-left:1em;" | [[Monarch's Drink]] {{temp|nc}} |
| − | | style="background:#BBE6E6; padding-left:1em;" | {{Abundance|2|26}} |
+ | | style="background:#BBE6E6; padding-left:1em;" | {{Abundance| 2|26}} |
|- |
|- |
||
| − | | style="background:#ECD2A5; padding-left:1em;" | [[Chocobo Rope]] {{ |
+ | | style="background:#ECD2A5; padding-left:1em;" | [[Chocobo Rope]] {{Rare|nc}} {{Exclusive|nc}} |
| − | | style="background:#ECD2A5; padding-left:1em;" | {{Abundance|2| |
+ | | style="background:#ECD2A5; padding-left:1em;" | {{Abundance| 2|30}} |
| − | | style="background:#BBE6E6; padding-left:1em;" | [[Gnostic's Drink]] {{ |
+ | | style="background:#BBE6E6; padding-left:1em;" | [[Gnostic's Drink]] {{temp|nc}} |
| − | | style="background:#BBE6E6; padding-left:1em;" | {{Abundance|2|26}} |
+ | | style="background:#BBE6E6; padding-left:1em;" | {{Abundance| 2|26}} |
|- |
|- |
||
| style="background:#ECD2A5; padding-left:1em;" | [[Ogre Ledelsens]] |
| style="background:#ECD2A5; padding-left:1em;" | [[Ogre Ledelsens]] |
||
| − | | style="background:#ECD2A5; padding-left:1em;" | {{Abundance|2| |
+ | | style="background:#ECD2A5; padding-left:1em;" | {{Abundance| 2|30}} |
| − | | style="background:#BBE6E6; padding-left:1em;" | [[Vicar's Drink]] {{ |
+ | | style="background:#BBE6E6; padding-left:1em;" | [[Vicar's Drink]] {{temp|nc}} |
| − | | style="background:#BBE6E6; padding-left:1em;" | {{Abundance|1|26}} |
+ | | style="background:#BBE6E6; padding-left:1em;" | {{Abundance| 1|26}} |
|- |
|- |
||
| style="background:#ECD2A5; padding-left:1em;" | [[Pro-Ether +3]] |
| style="background:#ECD2A5; padding-left:1em;" | [[Pro-Ether +3]] |
||
| − | | style="background:#ECD2A5; padding-left:1em;" | {{Abundance|3| |
+ | | style="background:#ECD2A5; padding-left:1em;" | {{Abundance| 3|30}} |
| − | | style="background:#BBE6E6; padding-left:1em;" | [[Daedalus Wing]] {{ |
+ | | style="background:#BBE6E6; padding-left:1em;" | [[Daedalus Wing]] {{temp|nc}} |
| − | | style="background:#BBE6E6; padding-left:1em;" | {{Abundance|2|26}} |
+ | | style="background:#BBE6E6; padding-left:1em;" | {{Abundance| 2|26}} |
|- |
|- |
||
| style="background:#ECD2A5; padding-left:1em;" | [[Platinum Ingot]] |
| style="background:#ECD2A5; padding-left:1em;" | [[Platinum Ingot]] |
||
| − | | style="background:#ECD2A5; padding-left:1em;" | {{Abundance|1| |
+ | | style="background:#ECD2A5; padding-left:1em;" | {{Abundance| 1|30}} |
| − | | style="background:#BBE6E6; padding-left:1em;" | [[Dusty Elixir]] {{ |
+ | | style="background:#BBE6E6; padding-left:1em;" | [[Dusty Elixir]] {{temp|nc}} |
| − | | style="background:#BBE6E6; padding-left:1em;" | {{Abundance|1|26}} |
+ | | style="background:#BBE6E6; padding-left:1em;" | {{Abundance| 1|26}} |
|- |
|- |
||
| style="background:#ECD2A5; padding-left:1em;" | [[Dhalmel Hide]] |
| style="background:#ECD2A5; padding-left:1em;" | [[Dhalmel Hide]] |
||
| − | | style="background:#ECD2A5; padding-left:1em;" | {{Abundance|2| |
+ | | style="background:#ECD2A5; padding-left:1em;" | {{Abundance| 2|30}} |
| − | | style="background:#BBE6E6; padding-left:1em;" | [[Lucid Potion I]] {{ |
+ | | style="background:#BBE6E6; padding-left:1em;" | [[Lucid Potion I]] {{temp|nc}} |
| − | | style="background:#BBE6E6; padding-left:1em;" | {{Abundance|1|26}} |
+ | | style="background:#BBE6E6; padding-left:1em;" | {{Abundance| 1|26}} |
|- |
|- |
||
| style="background:#ECD2A5; padding-left:1em;" | [[Chicken Bone]] |
| style="background:#ECD2A5; padding-left:1em;" | [[Chicken Bone]] |
||
| − | | style="background:#ECD2A5; padding-left:1em;" | {{Abundance|1| |
+ | | style="background:#ECD2A5; padding-left:1em;" | {{Abundance| 1|30}} |
| − | | style="background:#BBE6E6; padding-left:1em;" | [[Healing Salve I]] {{ |
+ | | style="background:#BBE6E6; padding-left:1em;" | [[Healing Salve I]] {{temp|nc}} |
| style="background:#BBE6E6; padding-left:1em;" | {{Abundance|1|26}} |
| style="background:#BBE6E6; padding-left:1em;" | {{Abundance|1|26}} |
||
|- |
|- |
||
| style="background:#ECD2A5; padding-left:1em;" | [[Voiddust]] |
| style="background:#ECD2A5; padding-left:1em;" | [[Voiddust]] |
||
| − | | style="background:#ECD2A5; padding-left:1em;" | {{Abundance|1| |
+ | | style="background:#ECD2A5; padding-left:1em;" | {{Abundance| 1|30}} |
| − | | style="background:#BBE6E6; padding-left:1em;" | [[Healing Salve II]] {{ |
+ | | style="background:#BBE6E6; padding-left:1em;" | [[Healing Salve II]] {{temp|nc}} |
| − | | style="background:#BBE6E6; padding-left:1em;" | {{Abundance|1|26}} |
+ | | style="background:#BBE6E6; padding-left:1em;" | {{Abundance| 1|26}} |
|- |
|- |
||
| − | | style="background:#ECD2A5; padding-left:1em;" | |
+ | | style="background:#ECD2A5; padding-left:1em;" | [[Vivi-Valve]] |
| − | | style="background:#ECD2A5; padding-left:1em;" | |
+ | | style="background:#ECD2A5; padding-left:1em;" | {{Abundance| 1|30}} |
| − | | style="background:#BBE6E6; padding-left:1em;" | [[Lucid Wings I]] {{ |
+ | | style="background:#BBE6E6; padding-left:1em;" | [[Lucid Wings I]] {{temp|nc}} |
| − | | style="background:#BBE6E6; padding-left:1em;" | {{Abundance|1|26}} |
+ | | style="background:#BBE6E6; padding-left:1em;" | {{Abundance| 1|26}} |
|- |
|- |
||
| − | | style="background:#ECD2A5; padding-left:1em;" | |
+ | | style="background:#ECD2A5; padding-left:1em;" | [[Beeswax]] |
| − | | style="background:#ECD2A5; padding-left:1em;" | |
+ | | style="background:#ECD2A5; padding-left:1em;" | {{Abundance| 1|30}} |
| − | | style="background:#BBE6E6; padding-left:1em;" | [[Lucid Potion III]] {{ |
+ | | style="background:#BBE6E6; padding-left:1em;" | [[Lucid Potion III]] {{temp|nc}} |
| − | | style="background:#BBE6E6; padding-left:1em;" | {{Abundance|2|26}} |
+ | | style="background:#BBE6E6; padding-left:1em;" | {{Abundance| 2|26}} |
|- |
|- |
||
| − | | style="background:#ECD2A5; padding-left:1em;" | |
+ | | style="background:#ECD2A5; padding-left:1em;" | [[Ogre Gloves]] |
| − | | style="background:#ECD2A5; padding-left:1em;" | |
+ | | style="background:#ECD2A5; padding-left:1em;" | {{Abundance| 1|30}} |
| − | | style="background:#BBE6E6; padding-left:1em;" | [[Mana Mist]] {{ |
+ | | style="background:#BBE6E6; padding-left:1em;" | [[Mana Mist]] {{temp|nc}} |
| − | | style="background:#BBE6E6; padding-left:1em;" | {{Abundance|1|26}} |
+ | | style="background:#BBE6E6; padding-left:1em;" | {{Abundance| 1|26}} |
|- |
|- |
||
| style="background:#ECD2A5; padding-left:1em;" | |
| style="background:#ECD2A5; padding-left:1em;" | |
||
| style="background:#ECD2A5; padding-left:1em;" | |
| style="background:#ECD2A5; padding-left:1em;" | |
||
| − | | style="background:#BBE6E6; padding-left:1em;" | [[Champion's Gambir]] {{ |
+ | | style="background:#BBE6E6; padding-left:1em;" | [[Champion's Gambir]] {{temp|nc}} |
| − | | style="background:#BBE6E6; padding-left:1em;" | {{Abundance|1|26}} |
+ | | style="background:#BBE6E6; padding-left:1em;" | {{Abundance| 1|26}} |
|- |
|- |
||
| style="background:#ECD2A5; padding-left:1em;" | |
| style="background:#ECD2A5; padding-left:1em;" | |
||
| style="background:#ECD2A5; padding-left:1em;" | |
| style="background:#ECD2A5; padding-left:1em;" | |
||
| − | | style="background:#BBE6E6; padding-left:1em;" | [[Catholicon]] {{ |
+ | | style="background:#BBE6E6; padding-left:1em;" | [[Catholicon]] {{temp|nc}} |
| − | | style="background:#BBE6E6; padding-left:1em;" | {{Abundance|3|26}} |
+ | | style="background:#BBE6E6; padding-left:1em;" | {{Abundance| 3|26}} |
|- |
|- |
||
| style="background:#ECD2A5; padding-left:1em;" | |
| style="background:#ECD2A5; padding-left:1em;" | |
||
| Line 305: | Line 315: | ||
{{TableNPCHeader}} |
{{TableNPCHeader}} |
||
| − | {{TableNPCLine | Name= [[Rojaireaut]]| Coordinates=G-3| Type= }} |
+ | {{TableNPCLine | Name= [[Rojaireaut]]| Coordinates={{Location Tooltip|area=Ordelle's Caves|map=Map 2|pos=G-3}}| Type= }} |
| − | {{TableNPCLine | Name= [[Ruillont]]| Coordinates=H-3| Type= }} |
+ | {{TableNPCLine | Name= [[Ruillont]]| Coordinates={{Location Tooltip|area=Ordelle's Caves|map=Map 2|pos=H-3}}| Type= }} |
{{TableNPCFooter}} |
{{TableNPCFooter}} |
||
| Line 314: | Line 324: | ||
{{TableMobHeader-NM}} |
{{TableMobHeader-NM}} |
||
| − | {{TableMobLine-NM | Name=Aroma Leech| Spawn= ''Spawned: [[RSE]]''| Lvl=38| Drop=[[Balm Sachet]]<br>[[Millefleurs Sachet]]<br>[[Olibanum Sachet]]<br>[[Attar Sachet]]<br>[[Sweet Sachet]]<br>[[Civet Sachet]]<br>[[Musk Sachet]]|Steal= | Family=Leeches| NumSpawns= | Note= }} |
+ | {{TableMobLine-NM | Name=Aroma Leech| Spawn= ''Spawned: [[RSE]]''| Lvl=38-40| Drop=[[Balm Sachet]]<br>[[Millefleurs Sachet]]<br>[[Olibanum Sachet]]<br>[[Attar Sachet]]<br>[[Sweet Sachet]]<br>[[Civet Sachet]]<br>[[Musk Sachet]]|Steal= | Family=Leeches| NumSpawns= | Note= }} |
{{TableMobLine-NM | Name=Bombast| Spawn=| Lvl=42-44| Drop=[[Ardent Earring]]| Steal=| Family=Bombs| NumSpawns= {{Tooltip-NMMap|map= Ordelles-caves NM.png|NM= Bombast}}| Note= }} |
{{TableMobLine-NM | Name=Bombast| Spawn=| Lvl=42-44| Drop=[[Ardent Earring]]| Steal=| Family=Bombs| NumSpawns= {{Tooltip-NMMap|map= Ordelles-caves NM.png|NM= Bombast}}| Note= }} |
||
| Line 349: | Line 359: | ||
{{TableMobLine-Regular | Name=Thread Leech| Spawn=''One fished up''| Lvl=18-21 | Drop=[[Carbuncle's Ruby]]<br>[[Fiend Blood]]| Steal= | Family=Leeches| NumSpawns=15| Note=L, H}} |
{{TableMobLine-Regular | Name=Thread Leech| Spawn=''One fished up''| Lvl=18-21 | Drop=[[Carbuncle's Ruby]]<br>[[Fiend Blood]]| Steal= | Family=Leeches| NumSpawns=15| Note=L, H}} |
||
| + | |||
| − | ---------------------------------------------------------------------------------------------------------------------------- |
||
{{TableMobLine-Regular | Name=Dung Beetle| Spawn=| Lvl=23-26 | Drop=[[Beetle Jaw]]<br>[[Beetle Shell]]<br>[[Insect Wing]]| Steal= | Family=Beetles| NumSpawns=14| Note=L, S, Sc}} |
{{TableMobLine-Regular | Name=Dung Beetle| Spawn=| Lvl=23-26 | Drop=[[Beetle Jaw]]<br>[[Beetle Shell]]<br>[[Insect Wing]]| Steal= | Family=Beetles| NumSpawns=14| Note=L, S, Sc}} |
||
| Line 402: | Line 412: | ||
{{TableMobLine-Regular | Name=Rancid Ooze| Spawn=''Fished up''| Lvl=34-36 | Drop=[[Slime Oil]]| Steal= | Family=Slimes| NumSpawns=1| Note=A, H}} |
{{TableMobLine-Regular | Name=Rancid Ooze| Spawn=''Fished up''| Lvl=34-36 | Drop=[[Slime Oil]]| Steal= | Family=Slimes| NumSpawns=1| Note=A, H}} |
||
| − | {{TableMobLine-Regular | Name=Buds Bunny| Spawn=| Lvl=83-89| Drop={{Question}}| Steal={{Question}}| Family=Rabbits| NumSpawns=~25| Note= S}} |
+ | {{TableMobLine-Regular | Name=Buds Bunny| Spawn=| Lvl=83-89| Drop={{Question}}| Steal={{Question}}| Family=Rabbits| NumSpawns=~25| Note=NA, S }} |
{{TableMobLine-Regular | Name=Targe Beetle| Spawn=| Lvl=83-89| Drop={{Question}}| Steal={{Question}}| Family=Beetles| NumSpawns=~30| Note=L, S}} |
{{TableMobLine-Regular | Name=Targe Beetle| Spawn=| Lvl=83-89| Drop={{Question}}| Steal={{Question}}| Family=Beetles| NumSpawns=~30| Note=L, S}} |
||
Revision as of 09:13, 9 December 2019
|
Table of Contents
|
Zone Information
| |||||||||||||||||||||||||||||||||
|
Description
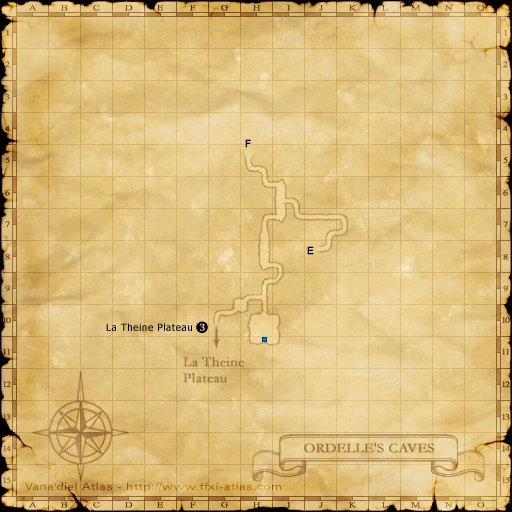
This is a beautiful set of limestone caves discovered by Lord Ordelle, the famed Elvaan explorer. When the map of the area was completed, the shape of the tunnels closely resembled a person's body; this resulted in the alias "the Body Caves," which is still used by the local Elvaan. From the quest A Timely Visit we also learn that Ordelle's Caves was once known as the "Shrine of Endless Travels."  | ||||||||||||||||||||||||||||||||||
|
Connections
|


Involved in Quests/Missions
| Quest | Type | Starter | Location |
|---|---|---|---|
| A Squire's Test II | General | Balasiel | Southern San d'Oria F-7 |
| Blighted Gloom | NPC | Luto Mewrilah | Upper Jeuno G-8 |
| Dark Puppet | DRK AF | Cid | Metalworks G-8 |
| Eco-Warrior (San d'Oria) | General | Norejaie | Southern San d'Oria K-6 |
| Fistful of Fury | General | Vola | Lower Jeuno J-8 |
| Hitting the Marquisate | THF AF | Nanaa Mihgo | Windurst Woods J-3 |
| Legacies Lost and Found | RUN AF | Octavien | Eastern Adoulin I-8 |
| Now Recording... | General | Darcia | Lower Jeuno H-7 |
| Sharpening the Sword | PLD AF | Ailbeche | Northern San d'Oria J-8 |
| Signed in Blood | General | Sobane | Southern San d'Oria D-6 |
| Strange Apparatus | --- | --- | --- |
| The Goblin Tailor | RSE | Guttrix | Lower Jeuno H-10 |
| Mission | Nation | Starter | Location |
| The Rescue Drill | San d'Oria | San d'Orian Gate Guard | San d'Oria |
| Headstone Pilgrimage | Zilart 5 | --- | --- |
| The Geomagnetron | Adoulin 1-2 | Darcia | Lower Jeuno H-7 |

Other Information
[ edit ]
| Item | Abundance |
|---|---|
| Gil: 1,800-4,140 (??? Gil)More data needed |
|
| Magical Pattern | Received with quest active |
| Torn-Out Pages | Received with quest active |
| Force Belt | |
| Amethyst | |
| Clear Topaz | |
| Tourmaline | |
| Sardonyx | |
| Light Opal | |
| Lapis Lazuli | |
| Amber | |
| Onyx | |
|
Treasure Maps | |

[ edit ]
| Fish | Cap | Body of Water |
|---|---|---|
| Crayfish | 7 | All |
| Silver Ring | 0 | |
| Rusty Bucket | 0 | |
| Rusty Cap | 0 | |
| Rusty Leggings | 0 | |
| Rusty Subligar | 0 | |
|
Fishing Maps | ||
[ edit ]
| Possible Weather | Weather Reporter |
|---|---|
|
Elemental Map | |

Individual Training
| Area of Book | Page | Tgt. Level | Max Level | Mobs to Fight | XP/Gil | Tabs |
|---|---|---|---|---|---|---|
| Ordelle's Caves (H-11) Map 1 (upper ledge), (G-2) Map 2 |
1 | 18~21 | 30 | 730-1460 | 73-146 | |
| 2 | 21~27 | 34 |
|
840-1680 | 84-168 | |
| 3 | 17~26 | 33 |
|
800-1600 | 80-160 | |
| 4 | 23~26 | 37 | 850-1700 | 85-170 | ||
| 5 | 26~28 | 35 |
|
???-??? | ???-??? | |
| 6 | 29~34 | 41 | ???-??? | ???-??? | ||
| 7 | 84~86 | 90 | 1810-3620 | 181-362 | ||
| 8 | 86~88 | 90 | 1890-3740 | 189-374 |
| Brown Casket | Blue Casket | ||
|---|---|---|---|
| Item | Abundance | Item | Abundance |
| Elixir | Lucid Ether I |
||
| Jade Cell | Lucid Ether II |
||
| Steel Bullet Pouch | Catholicon |
||
| Xanthous Cell | Lucid Ether III |
||
| Adaman Nugget | Clear Salve I |
||
| Remedy | Healing Mist |
||
| Ebony Log | Healing Salve II |
||
| Rainbow Cape | Braver's Drink |
||
| Rubicund Cell | Ascetic's Tonic |
||
| Galvanizer | Healing Powder |
||
| Ogre Mask | Stalwart's Tonic |
||
| Ogre Trousers | Monarch's Drink |
||
| Chocobo Rope |
Gnostic's Drink |
||
| Ogre Ledelsens | Vicar's Drink |
||
| Pro-Ether +3 | Daedalus Wing |
||
| Platinum Ingot | Dusty Elixir |
||
| Dhalmel Hide | Lucid Potion I |
||
| Chicken Bone | Healing Salve I |
||
| Voiddust | Healing Salve II |
||
| Vivi-Valve | Lucid Wings I |
||
| Beeswax | Lucid Potion III |
||
| Ogre Gloves | Mana Mist |
||
| Champion's Gambir |
|||
| Catholicon |
|||
NPCs Found Here
| Name | Location | Type |
|---|---|---|
| Rojaireaut | G-3 | |
| Ruillont | H-3 |
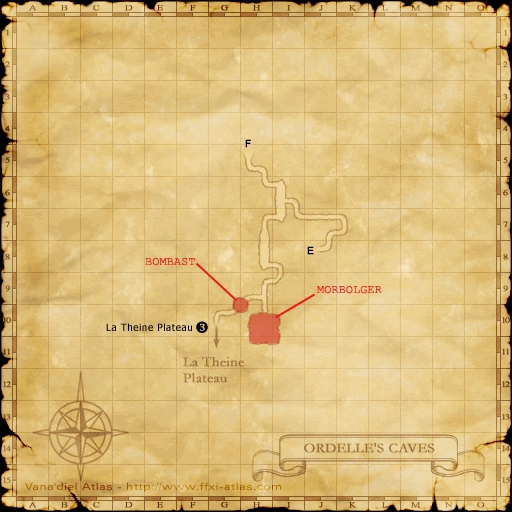
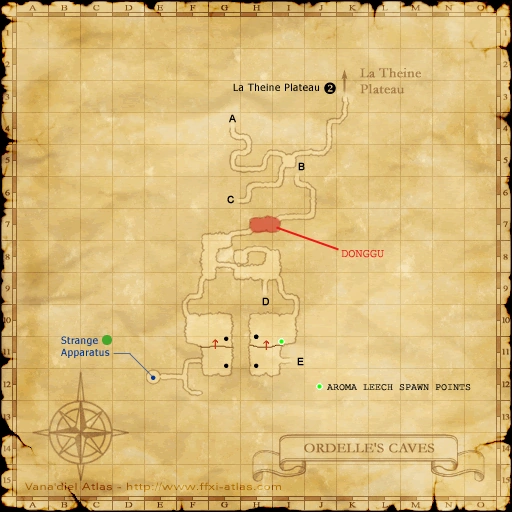
Notorious Monsters Found Here
| Name | Level | Drops | Steal | Family | Spawns | Notes
|
|---|---|---|---|---|---|---|
Aroma Leech
|
38-40 | Balm Sachet Millefleurs Sachet Olibanum Sachet Attar Sachet Sweet Sachet Civet Sachet Musk Sachet |
Leeches |
| ||
| Bombast
|
42-44 | Ardent Earring | Bombs |
| ||
| Donggu
|
42-44 | Fidelity Earring | Funguars |
| ||
| Morbolger | 42-44 | Morbolger Vine Malboro Vine |
Malboro Vine | Morbols |
| |
| Agar Agar
|
Soarer Earring | Slimes |
|
|
HP = Detects Low HP; M = Detects Magic; Sc = Follows by Scent; T(S) = True-sight; T(H) = True-hearing JA = Detects job abilities; WS = Detects weaponskills; Z(D) = Asleep in Daytime; Z(N) = Asleep at Nighttime; A(R) = Aggressive to Reive participants |
Regular Monsters Found Here
|
HP = Detects Low HP; M = Detects Magic; Sc = Follows by Scent; T(S) = True-sight; T(H) = True-hearing JA = Detects job abilities; WS = Detects weaponskills; Z(D) = Asleep in Daytime; Z(N) = Asleep at Nighttime; A(R) = Aggressive to Reive participants |
Event Monsters Found Here
| Name | Family | Spawns | Notes |
|---|---|---|---|
Gerwitz's Axe
|
Evil Weapons | ||
Gerwitz's Soul
|
Ghosts | ||
Gerwitz's Sword
|
Evil Weapons | ||
Metallic Slime
|
Slimes | ||
Necroplasm
|
Doomed | ||
Polevik
|
Elementals |
|
HP = Detects Low HP; M = Detects Magic; Sc = Follows by Scent; T(S) = True-sight; T(H) = True-hearing JA = Detects job abilities; WS = Detects weaponskills; Z(D) = Asleep in Daytime; Z(N) = Asleep at Nighttime; A(R) = Aggressive to Reive participants |