Byrd (Message Wall | contribs) (→Drops) |
Byrd (Message Wall | contribs) (→Drops) |
||
| Line 155: | Line 155: | ||
|[[Hi-Potion +3]] {{Drop Rate|100%}} |
|[[Hi-Potion +3]] {{Drop Rate|100%}} |
||
|- BGCOLOR=#e3e6ff align=center |
|- BGCOLOR=#e3e6ff align=center |
||
| − | |[[Hi-Potion Tank]] {{Drop Rate|16| |
+ | |[[Hi-Potion Tank]] {{Drop Rate|16|43}} |
|- BGCOLOR=#e3e6ff align=center |
|- BGCOLOR=#e3e6ff align=center |
||
| − | |[[Hi-Ether Tank]] {{Drop Rate| |
+ | |[[Hi-Ether Tank]] {{Drop Rate|17|43}} |
|- BGCOLOR=#e3e6ff align=center |
|- BGCOLOR=#e3e6ff align=center |
||
| − | |[[Hi-Reraiser]] {{Drop Rate|9| |
+ | |[[Hi-Reraiser]] {{Drop Rate|9|43}} |
|} |
|} |
||
| Line 165: | Line 165: | ||
{| width=100% |
{| width=100% |
||
|- BGCOLOR=#ffdead |
|- BGCOLOR=#ffdead |
||
| − | ! [[??? Box]] {{Drop Rate| |
+ | ! [[??? Box]] {{Drop Rate|24|43}} |
|- BGCOLOR=#e3e6ff align=center |
|- BGCOLOR=#e3e6ff align=center |
||
| − | |[[Igneous Rock]] {{Drop Rate|0| |
+ | |[[Igneous Rock]] {{Drop Rate|0|24}} |
|- BGCOLOR=#e3e6ff align=center |
|- BGCOLOR=#e3e6ff align=center |
||
| − | |[[Qiqirn Sandbag]] {{Drop Rate| |
+ | |[[Qiqirn Sandbag]] {{Drop Rate|4|24}} |
|- BGCOLOR=#e3e6ff align=center |
|- BGCOLOR=#e3e6ff align=center |
||
| − | |[[Imp Wing]] {{Drop Rate|9| |
+ | |[[Imp Wing]] {{Drop Rate|9|24}} |
|- BGCOLOR=#e3e6ff align=center |
|- BGCOLOR=#e3e6ff align=center |
||
| − | |[[Mythril Bolt Quiver]] {{Drop Rate|2| |
+ | |[[Mythril Bolt Quiver]] {{Drop Rate|2|24}} |
|- BGCOLOR=#e3e6ff align=center |
|- BGCOLOR=#e3e6ff align=center |
||
| − | |[[Bloody Bolt Quiver]] {{Drop Rate|1| |
+ | |[[Bloody Bolt Quiver]] {{Drop Rate|1|24}} |
|- BGCOLOR=#e3e6ff align=center |
|- BGCOLOR=#e3e6ff align=center |
||
| − | |[[Acid Bolt Quiver]] {{Drop Rate|1| |
+ | |[[Acid Bolt Quiver]] {{Drop Rate|1|24}} |
|- BGCOLOR=#e3e6ff align=center |
|- BGCOLOR=#e3e6ff align=center |
||
| − | |[[Apple Mint]] {{Drop Rate|2| |
+ | |[[Apple Mint]] {{Drop Rate|2|24}} |
|- BGCOLOR=#e3e6ff align=center |
|- BGCOLOR=#e3e6ff align=center |
||
| − | |[[Blind Bolt Quiver]] {{Drop Rate|1| |
+ | |[[Blind Bolt Quiver]] {{Drop Rate|1|24}} |
|- BGCOLOR=#e3e6ff align=center |
|- BGCOLOR=#e3e6ff align=center |
||
| − | |[[Karakul Cloth]] {{Drop Rate|3| |
+ | |[[Karakul Cloth]] {{Drop Rate|3|24}} |
|} |
|} |
||
| Line 189: | Line 189: | ||
{| width=100% |
{| width=100% |
||
|- BGCOLOR=#ffdead |
|- BGCOLOR=#ffdead |
||
| − | ! [[??? Necklace]] {{Drop Rate|12| |
+ | ! [[??? Necklace]] {{Drop Rate|12|43}} |
|- BGCOLOR=#e3e6ff align=center |
|- BGCOLOR=#e3e6ff align=center |
||
|[[Gorget +1]] {{Drop Rate|4|12}} |
|[[Gorget +1]] {{Drop Rate|4|12}} |
||
| Line 201: | Line 201: | ||
{| width=100% |
{| width=100% |
||
|- BGCOLOR=#ffdead |
|- BGCOLOR=#ffdead |
||
| − | ! [[??? Ring]] {{Drop Rate|7| |
+ | ! [[??? Ring]] {{Drop Rate|7|43}} |
|- BGCOLOR=#e3e6ff align=center |
|- BGCOLOR=#e3e6ff align=center |
||
|[[Copper Ring]] {{Drop Rate|3|7}} |
|[[Copper Ring]] {{Drop Rate|3|7}} |
||
Revision as of 03:52, 3 November 2009
|
Enemies
| Monster | Level | Strengths | Weaknesses | Spawns |
Notes |
|---|---|---|---|---|---|
|
|
|
|
1 |
A, L, T(S) | |
|
|
|
|
1 |
A, L, T(S) | |
|
|
|
|
1 |
A, L, T(S) | |
|
|
|
1 |
A, T(H) | ||
|
|
|
|
5 |
A, L, S | |
|
|
|
|
5 |
A, S, H, HP | |
|
HP = Detects Low HP; M = Detects Magic; Sc = Follows by Scent; T(S) = True-sight; T(H) = True-hearing JA = Detects job abilities; WS = Detects weaponskills; Z(D) = Asleep in Daytime; Z(N) = Asleep at Nighttime; A(R) = Aggressive to Reive participants | |||||
Drops
|
|
|
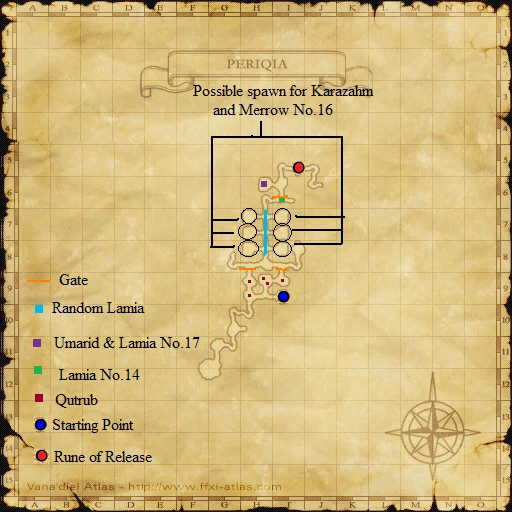
Walkthrough
Defeat the 3 NM Lamiae to rescue the 2 Generals.
- You start out in (I-9) and must kill 5 Qutrub before moving on to the next area.
- Kill one in the SW corner of (H-9), then head to the NW corner of (H-9) where you kill one more.
- Head back towards where you started and there will be two Qutrub in the NE corner of (H-9).
- The final Qutrub is in the north part of (I-9), right next to the locked gate.
- When those 5 are killed, the gate at (I-9) will open up and you can move on to the north.
- Head north through the tunnel with the 6 prison-like holding areas. (There are random lamia here, but they are sight aggro, so Invisible right past them.)
- You will get the message, "You hear the sounds of swords clashing in the distance."
- It is random which room Karazahm will be in, but find her and kill the NM Lamia (Merrow No.16) she is fighting before she dies.
- If Karazahm dies, you instantly fail.
- Once the NM Lamia is killed, the general will turn into an NPC. You can talk to her, then Invisible up again and move on.
- Travel north to (I-6) where another NM lamia (Lamia No.14) awaits at a gate.
- Belly Dance is both an AoE and gaze attack. Highly recommended that you have everyone in range and facing Lamia No.14 so she will take you through the gate. If one of your members does not get charmed, they will most likely end up dead if they have performed any actions on Lamia No.14 or PT members while fighting her.
- If at some point during the battle all party members are Charmed or dead, the NM may choose to unlock and walk through the gate, dragging all the Charmed folk along for the ride. This is supposed to happen, as it opens the gate for you. All of her Charm attacks are avoidable, however, and if someone is always alive and uncharmed, Lamia No.14 will not open the door. Don't worry if you kill her without her ever opening the door - the door will open automatically a few seconds after her death.
- Beware- Lamia No.14 may bring you near the charmed general while you are under her control. When you become uncharmed, you may unavoidably aggro the general, which makes for a dangerous situation.
- If you plan to have all party members charmed by staying within the charm radius, keep DoT on her because she will regen HP if you don't. (This seems to be the best strategy as she usually pulls your party through the gate after the first charm.)
- Lamia No.14 can Belly Dance after being pulled through door. Use same strategy, stay close and let the whole party get charmed. This NM has a lot of hit points compared to other two NMs so multiple charms are possible. Having said that, on second charm, NM did not move, so aggro from NPC is unlikely.
- Finish her off upon being uncharmed and continue forth.
- Although Lamia No.14 can still use Belly Dance on the other side of the door, she favors it far less than she does on the initial side.
- Umarid is at the north part of (H-6) and will fight you; he's been charmed by the Lamia.
- Damage must be done to him (somewhere between 30-50% of his life) in order for the final NM Lamia (Lamia No.17) to appear. If you kill Umarid, you instantly fail.
- Be very careful about weapon skills or high tier spells. Umarid does not have particularly high defense or a lot of hit points.
- Once the final Lamia pops put all efforts into killing it.
- Have someone kite the general because he does hit hard.
- After Lamia No.17 spawns, it is difficult for anyone other than the person tanking the general to gain hate to kite him.
- When that Lamia is killed the general becomes uncharmed and the Assault is won.
- Damage must be done to him (somewhere between 30-50% of his life) in order for the final NM Lamia (Lamia No.17) to appear. If you kill Umarid, you instantly fail.
- The Rune of Release pops at (I-5).
Notes
- Karazahm can be cured. It is possible that other spells may be used.
Umarid cannot be slept. We found it easiest to kite as a single MNK/NIN was able to take out the Lamia No.17 with minimal support. Repose seems to work though.False. Sleep 2 landed just fine. [1]
Map
| Assault | |
|---|---|
| Leujaoam Missions | |
| Mamool Ja Missions | |
| Lebros Missions | |
| Periqia Missions | |
| Ilrusi Missions | |
| Nyzul Isle Missions | |
| Assault Point Rewards | |
| Nyzul Isle Rewards | |