- It's highly recommended that any melee damage dealers sub Ninja to absorb AoE damage by the two weapons. However, a Samurai with capped archery may find it beneficial to sub Ranger for this fight instead, tanking mammets with Seigan and shooting the two weapons from out of range.
- It's highly recommended that all melee bring a large amount of Hi-Potions to help mitigate damage taken and lessen the load on the healers; Hi-Potion Tanks are a very space and cost-effective way of doing this.
- Hi-Potions generate a large amount of hate - the same as the spells Bind and Blind, which is slightly over 1/3 of Provoke's hate - regardless of whether they recover any HP. Tanks should use this to their advantage by repeatedly using Hi-Potions if they lose hate. On the other hand, other party members should exercise caution - using several Hi-Potions in a row could rip hate from the tank, or make it harder for the tank to regain hate.
- Blue Mages are a great asset for this mission; using Head Butt to frequently stun Omega and Ultima can save the healers a lot of MP.
- Similarly, White Mages and Black Mages should Flash and Stun as frequently as possible. While this may seem risky and counterintuitive, both Omega and Ultima hit extremely hard and attack faster than normal enemies. Both spells will greatly reduce the amount of damage the tank takes, ultimately resulting in less hate lost for the tank, as well as much less MP spent and hate accumulated from casting Cure.
- All opponents, including Omega and Ultima, can be aspired for MP.
- All Summoner party can win this fight. 2 Summoners Astral Flow on Omega at around 40%, using only regular Blood Pact until that time (reference to the element of the day for avatar preference). On Ultima, the remaining 4 summoners Astral Flow at around 50% health. Bring Hi-Ether or comparable items for gaining MP back while waiting for 60 second timer on Blood Pact and Yagudo Drinks for refresh.
- Having at least three damage dealers should be enough to win the fight, assuming the party does not wipe out. Damage dealers can include NIN and PLD/NIN (WAR also works if defender is off).
- If a party runs out of time, it is usually because they have wiped once or twice during battle.
- In other words, fighting the battle "Slow, steady, and safe" will usually ensure victory.
- Mammets have extremely low Defense and Evasion; any DD should have capped or near-capped Attack and Accuracy, even without any buffs or food. However, they hit for a respectable amount of damage, and their Accuracy is low enough for them to occasionally miss even non-evasive melee jobs (e.g. WAR, DRK, PLD, DRG.)
- Like the Mammets, Omega and Ultima also have very low Evasion, even without buffs or food. DDs should have capped Accuracy against them.
- Defense food is highly recommended for both the tank and any melee damage dealers. Tanks may want to invest in Pescatora, which not only boosts their Defense by 22%, but also boosts their HP by 15% up to a maximum of 150. Although NIN tanks might consider Jack-o'-Lantern to use Arcana Killer, it only has a 5% proc rate, making it very unreliable compared to defense foods.
- If the party is confident in its ability to stay alive, melee damage dealers can opt to eat Attack boosting foods. However, Sushi should not be used, since all enemies in this fight have too little Evasion for it to help.
- Many parties consider Omega more difficult to deal with and defeat than Ultima, due to its Additional Effect: Stun, frequent use of high-damage AoEs (which can frequently leave your tank and melees without shadows), its increasing attack speed, and the fact that Discharger prevents the party from using spells to finish it off.
- Having a 2nd member with Provoke and Utsusemi will help a lot in the first 2 fights; If using the Paladin super tanking method the additional Provoker will act as a tank for the Mammet that is being targeted. For the Omega fight, an additional Provoker can assist the paladin if in danger or lose of hate.
- Try go conserve mp and time as much as possible, everyone should use Reraise Earring or Reraise Gorget and not Reraise magic, before doing a real run make sure that everyone has cleared their 1st CS by zoning into the battle field and out. If the party is wiped make sure everyone accept Reraise at the same time, put on magic buffs and Samurai should Meditate right away while Weakness is still in effect, once Weakness goes away healers should use mp pots to quickly get mp back up after healing all the members, Red Mage should of course use Convert.
- It is best to do several dry run or as much as possible to ensure that you find the best tactic that suits the party, all the members got their role in the party, and familiarized with the enemies nature. The cost of consumables that would greatly assist in the fight for each member may exceed 50k per real fight, failing multiple times my break your budget.
Mammet-22 Zeta x5
- You will enter the battlefield facing five Mammet-22 Zeta.
- Mammets in all four jobs
- These Mammets will change jobs, just like the Mammets-19 Epsilon you fought in Ancient Vows. Mages have staves and cast -ga II spells; Warrior have swords and spam TP; Dragoon have lances and concentrate on physical attack. They all have AoE TP abilities and magic. Transmogrification is still a very dangerous ability. However, these Mammets are significantly weaker (relative to the party) than the 19 Epsilon variety. They have 4,000 HP each.
- They are resistant to Sleep; however, they are susceptible to Bind and Shadowbind (the latter of which can buy up to 30 seconds).
- Due to the size of the battlefield, kiting individual Mammets is no longer much of an option. Tanking is a safer bet. Ninja (and jobs that sub Ninja) can blink tank individual Mammets; Paladins can hold one, maybe two, for damage-dealers to finish off; Summoner Avatars and Beastmaster pets can tank single Mammets for a while.
- Yellow Liquid no longer drops from defeated Mammets.
- Strategy tips
- Remember to use Yellow Liquid to speed up the fight.
- If taking on all five Mammets at once, make sure they are all Silence from the start; Ensure that Silence sticks, even on the Mammets that have melee weapons out. When they switch to their Staves, it will keep them from using -ga AoE magic. (Staff Form may still have increased Silence resistance and shortened duration in general; Elemental Seal may help if Silence is immediately resisted. Debuffers should pay close attention.)
- Since most of the Mammet moves are AoE, the kiters and the rest of the party should spread out as much as possible to avoid damage, keep the mages on one side and the melees on the other to avoid the mages from getting stunned.
- Continue to watch the log for Transmogrification. If you see yourself healing a Mammet with physical damage, drop target lock and turn around for about fifteen to eighteen seconds, "testing" occasionally with single swings.
- All players need to be self-sufficient at the beginning. If a player is having trouble handling a Mammet until he or she can receive backup, consider altering your strategy.
- Melees that will be tanking a Mammet should gear defensively. There's virtually no benefit to be gained from offensive equipment due to the Mammets' Defense and Evasion being so low. However, they can hit for up to 90 damage, and their Accuracy is low, so both Defense and Evasion are very beneficial. Equipment such as Haubergeon, Woodsman Ring and Sniper's Ring should not be used.
- An alternative strategy is to have one party member (probably your main tank or a Thief) receive sight aggro from all five Mammets, but do nothing that would "claim" them, or turn their name red (Provoke, use of Yellow Liquid, etc.), When this is done, the member could either run them all into a corner or kite them around. Since the player hasn't done anything aggressive to the Mammets, they have no hate, only aggro, so mages healing them will not receive hate, either. The rest of the party can then pull the Mammets off of the train one at a time, killing them at their leisure.
- A Paladin using Bat Earrings and Blinding Potions (or Melody Earrings and Dragonfoe Mambo and Sheepfoe Mambo from a Bard) would be effective for this strategy, as Mammets have poor accuracy. For this, it's best if the Paladin stand in one spot and cure himself rather than trying to kite.
- The other members that are eliminating the Mammets should better target a Mammet carrying a staff to relief the Paladin as much as possible from GA magics.
- Note that anyone resting on the battlefield will draw aggro from the unclaimed Mammets, as will a Summoner, Dragoon, or Beastmaster releasing a pet.
- Try to conserve resources; however, don't try to save TP for the next battle, because it will be lost. Your objective should be to finish this fight without any deaths, with as much items as possible, and with no two-hour abilities used. Don't worry about the fight taking a couple of minutes longer as a result.
- Also remember that, should it be necessary, you can exit and re-enter the battle an unlimited number of times in order to practice Mammet strategies.
- A fair goal would be to have about 36 minutes left on the clock by the time you get through the next cutscene.
- For a normal set up party with Paladin and high damage dealers like melees using Utsusemi, it is possible to finish the 1st fight with 40 minutes remaining without using pots, greatly enhanced equipment or difficulty.
Omega
- When the mammets are defeated, everyone alive will be returned to full HP/MP (weakened members will still be weakened however). Raise your dead and rest to full as quickly as possible. When ready, re-enter the Battlefield to fight the Biotechnological Weapon Omega.
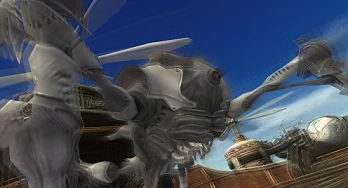
- Omega has around 14,000 HP. It uses damaging AoE attacks, and becomes especially dangerous when its HP reaches 25% or lower. Defeating Omega quickly as soon as it reaches low HP can be the most crucial part of the entire mission.
- Omega has Counter, and possibly Guard.
- Omega will not turn to face its target. Like Dragons, it can attack its target no matter which direction it's facing, and will only turn towards its target after a TP move, or if its target is out of range.
- Omega has an innate Additional Effect of Stun on all of its physical attacks.
- Omega is known to use the following abilities:
- From 25-100% HP:
- Ion Efflux: Cone Attack Paralyze (moderate).
- Rear Laser: May be used if Omega's target is behind it. Cone Petrification.
- Target Analysis: AoE Absorb-All, like Diabolos's Ultimate Terror. Absorbed by Utsusemi.
- Guided Missile: Physical damage AoE centered on the primary target. ~400 to Paladin, ~700 to others. Absorbed by Utsusemi.
- Hyper Pulse: AoE (magic?) damage and Bind. Strips Utsusemi like a Wyrm Wing attack.
- From 0-25% HP: May occasionally be used starting at 50% (found false, used it at 70%)
- Discharger: Gives Omega a Magic Shield effect that makes it 100% resist all spells for a limited period.
- Magic Shield does not protect from magic damage in general, just spells; elemental Weapon Skills and Astral Flow are not affected.
- Dispel or Magic Finale will not remove Discharger's effect; it must wear off on its own.
- Also gives Omega Shock Spikes (~25 damage per hit) for a short time; if the spikes have the same duration as the Magic Shield, that would be a convenient way to see when the Magic Shield has worn off.
- Pile Pitch: Reduces the target's HP to 5% of its current value and resets hate (similar to the Tonberry ability Throat Stab).
- Using a CCB Polymer Pump on Omega or Ultima will prevent them from using any special moves for exactly one minute.
- Contrary to popular belief, Ultima and Omega DO have a slight HP regen. It is very small and slow but they DO regen HP. After about 5 minutes they gain about 1% HP.
- Strategy tips
- When the battle begins, the tank should remain where he or she is, and engage Omega from there. Everyone else should move past Omega and stay in front of the airship door. Everyone should move away from the tank before engaging, as Omega always uses a special attack when it aggroes, and you don't want your mages getting hit by Guided Missile.
- Almost all of Omega’s moves before 25% HP are AoEs. Mages and ranged attackers should keep as much distance from Omega as possible. Any melee attackers other than the tank need to sub Ninja for Utsusemi to absorb Guided Missile. The tank should stand on one side of Omega to avoid having their attacks countered or guarded; all other melee should stand on the other side to avoid Ion Efflux and Rear Lasers (if it uses Rear Lasers, someone is standing too close to its back side.)
- If the party has a Ranger make sure he/she does not stand near by the mages, due to possibility of bringing harmful AoE to the mages like Paralyze, Petrification and especially Guided Missile. The bow(front) of the Airship would be best for the Ranger. If the Ranger dies at a bad spot, he or she should accept Reraise as soon as Omega's AOE is out of range, use reuse Reraise equipment once close by to the mages and wait for Weakness to wear off.
- Barthundra will not prevent the En-Stun effect from landing but it will greatly reduce the time of stun effect will last.
- Melee damage dealers should prioritize their own survival over damaging Omega, retreating to a safe distance if they become injured. If the party is having a hard time keeping up with Omega's AoEs, then the melees should run away until they can recast Utsusemi before continuing to attack. Do NOT risk dying.
- Any WAR/NIN or NIN/WARs being attacked by Omega while their shadows are down should immediately cancel Berserk AND put up Defender. Omega can do a lot of damage very quickly, and attempting to conserve Berserk may result in death. Because of Omega's frequent use of high damage AoEs, and because the tank will probably need somebody to Provoke Omega off of him/her at some point or another, it may be best to simply not use Berserk at all until Omega is dead.
- Anyone with a damage-dealing job that can't sub Ninja seems to be best off bringing out their Ranged Weapon for Omega. Ranged Attacks can be used to build TP from a distance; each time the damage-dealers' TP reaches 100, they can run up to Omega, use their Weapon Skill, then quickly run back out of AoE range. They do not have to deal heavy ranged damage or be Rangers to do this, though some damage-dealers sub Ranger in this mission for that purpose.
- Once Omega starts using Discharger and Pile Pitch, it won't do any more AoE attacks, so they can move in and melee at this point, and reraise immediately if they get KO'd. Just don't let them suicide on the Shock Spikes.
- Omega won't go down quickly. Keep chipping away at it, but try not to cause any hate issues; do everything in your power to keep Omega facing the tank and only the tank. Skillchains and Magic Bursts may cause hate problems. If in doubt, do a dry run to test your tank's ability to hold hate.
- Use Yagudo Drinks and Hi-Potions, but try to conserve some for the next battle. However, don't try to save TP for the next battle, because it will be lost. Rest only when someone else can cover your job.
- CCB Polymer Pumps make this mission MUCH easier. Everyone in your party should have one. Plan to use 2 or 3 on Omega. Use one to give you some breathing room after 50% HP if necessary. Just before Omega reaches 25%, use a CCB Polymer Pump. A minute later, use another CCB Polymer Pump.
- Try to use a CCB before Omega switches modes and then kill it fast before it can use Discharger.
- Below 25%, hit Omega hard to kill it as fast as possible. You probably want to use Astral Flow, Icarus Wings or a melee DD 2-hour to finish off Omega. Discharger will prevent Black Mages from doing any damage. Hundred Fists also doesn't work too well with Discharger, as the Monk will spend a lot of time Stunned and/or kill themselves on the spikes.
- Don't use up all your damage on Omega, though, you'll need plenty for Ultima.
- Paladin tanks should not use Invincible on Omega unless CCB Polymer have been used and still in effect, as the hate reset caused by Pile Pitch will most likely cause them to be ignored altogether.
- A Ninja tank will require more attention, and will need to be Hasted and Erased to keep damage output and shadows up.
- If using staff (e.g. Wind staff), spam enfeebles, Ni-level Ninjutsu and Hi-Potions to build and maintain enmity.
- Bat Earring x2 + Blind Potion and Wind staff do very well on NIN for this BC.
- Ninja with capped ninjutsu for the level can do decent damage with Ni-level ninjutsu. Ninjutsu skill items: Ninja Hatsuburi will help with the ninjutsu's damage and magic accuracy.
- Summoners in a party without a Red Mage should use Shiva's Frost Armor to help negate Omega's attacks (Helpful throughout the entire fight).
- In the event a party member, who isn't the tank, gains hate after use of Pile Pitch, it may be necessary for that member to kite Omega around until the tank can regain hate. If you're a heavy damage dealer, be prepared to kite it for several seconds if possible.
- If it becomes clear the Party will wipe out soon, take all the advantage of TP and Abilities with 10 min cool down or less you are most likely not to you use those abilities within the next 6 min.
- Defeating Omega with 15-20 minutes left on the timer would be a modest goal.
Ultima
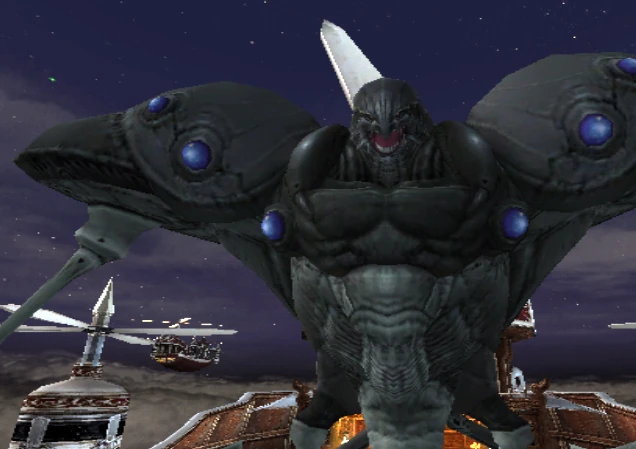
- Ultima has slightly more HP than Omega (around 15,000). It only uses AoE attacks between 20-40% HP, but it has a wider variety of status-causing abilities, and has a tendency to go around one-shotting everyone once it drops below 20% HP.
- Ultima has an innate Additional Effect of Paralyze on all of its physical attacks.
- Ultima attacks about every 3.3 seconds, and has Double Attack.
- With Elegy, it attacks about every 5 seconds. With Slow+Elegy, about every 6 seconds.
- Ultima's attacks do not speed up at low HP.
- Ultima is known to use the following abilities:
- From 70%-100% HP:
- Wirecutter: Single-target physical damage (~400 to PLD), absorbed by Utsusemi (2 shadows)
- Particle Shield: Strong Defense Boost. Remove with Dispel/Magic Finale
- Chemical Bomb: Cone Attack Elegy and Slow (stronger than Haste). Remove with two Erases
- From 40-70% HP:
- Nuclear Waste: Causes a status effect that reduces all elemental resistances by 50. AoE
- Followed 5 seconds later by one of the following elemental Cone Attacks, all of which do 490 damage if unresisted:
- From 20-40% HP:
- From 0-20% HP:
- Strategy tips
- Use the same placing strategies as Omega: tank where you spawn, all other members on the other side. And again have everyone move away from the tank before pulling to avoid Chemical Bomb.
- Wipe where you spawn, so you can Reraise if need be.
- Mages should constantly use Yagudo Drinks, if they don't already have Refresh from a Red Mage.
- Ultima doesn't use any AoE attacks until 40% HP, so melees can move in right away even if they're weakened; just stand to the back or sides.
- If you have 3 CCB Polymer Pumps and start using them shortly after Ultima starts to use Equalizer, they ought to last until it is dead.
- At this point start to use damage two-hours (Mighty Strikes, Astral Flow, Hundred Fists, etc.) and Icarus Wings to wear it down as quickly as possible.
- If you run out of CCBs during the Antimatter stage, Invincible can protect everyone for another 30 seconds.
- Again, note that Ultima WILL Regenerate HP if left alone and unaggroed, but it is a very slow gain. Over 5 minutes he only gains 1%.
- The tank will need lots of White Mage attention, curing and status removal. Make sure the WHM has the meds or support (Mage's Ballad, Refresh) to stay casting without any rest, if necessary.
- A Paladin tank has decent survivability in this battle (provided they pack many Hi-Potions), and status effects will not have much of an impact (there have even been reports of parties with a Paladin tank completing this mission without a White Mage!). Defeated in 25 Mins with a set up of: PLD/WAR, BLU, BLU, RDM, BLM, DRG. 5 CCB Polymer Pumps used, 1 wipe at 1% Ultima.
- A Ninja tank will require more attention, and will need to be Hasted and Erased to keep damage output and shadows up. The Ninja must not cast Utsusemi with both Elegy and Slow on. But trying to keep up Haste early on will drain MP fast, so you may want to skip it until Ultima stops using Chemical Bomb. If using wind staff + Bat earring + Blind Potion, spamming enfeebles and Ni-level with capped Ninjutsu to build and hold sufficient enmity for damage dealers to weapon skill safely.
- The White Mage should Haste themselves to lower Erase recast time.
- Keep mages as far away as possible to limit damage from the very deadly Equalizer.
- It is safe for a Paladin to move around for Cover once Ultima starts using Equalizer, as it won't use any more breath attacks after that point.
- A Blue Mage should use Filamented Hold and Head Butt in this battle. They should also use Bludgeon, and Chain Affinity with Red Lotus Blade>Death Scissors, Sickle Slash, or Jet Stream.
Note:
- It is very true that a Paladin tank can win this fight with out a White Mage. We won this fight last night with the set up of: Paladin, Bard/White Mage, Red Mage, Ranger, Black Mage, Blue Mage with a time of 27 minutes. (Our Black Mage was even using Warrior sub! Due to a slight mistake while they were chaning jobs.)
- If you can't get a Paladin which is the ideal tank for this fight, a NIN/DRK can easily tank as well. Our setup was: Ninja, Samurai, Corsair, Bard, White Mage, Black Mage. With Ninja Roll and dual-Mambo from the Bard, along with Evasion merits, evasion gear and bat earrings, the tank was rarely threatened. Mammets was no problem; sight aggro from tank as we pulled off one by one. On Omega and Ultima, we allowed the tank to build hate for a minute before DDs and mages started attacking; this provided a very smooth fight.
- BRD is very helpful to this battle; elegy and march stack with their respective spells of slow and haste. BRD can assist damage dealers' ranged attacks with Hunter's Prelude and Victory March. The small battlefield is only large enough to affect either tank or other party members. Alternate between Hunter's Prelude(Ranged attacks to build TP), Army's Paeon IV(Reduce curing load on mages), Mage's Ballad II and other songs depending on need. Maintain Victory March at all times to keep recast timers as possibly low.
- Have a handy macro to use Hi-Potion, /item "Hi-Potion" <me> this reduces significant time in healing. Tanks should use Hi-Potions at the beginning of the fight or after Pile Pitch to reduce enmity build-up from cures.
Winning setup 1/1
Absolutly easy fight with this setup: Nin/war, rdm/whm, rdm/whm, blu/nin, drg/nin, rng/nin. 5 of us never did the fight before, drg helped on it since he already cleared it before. We got 5 CCB pumps for the fight, each dd used DD food and Nin(me) used Tavnazia Taco. Nin was midly eva geared, but 4/4 eva merits and about 20 eva+, using af pants on night could boost this up to 30s. We set a 3 ppl per rdm to max efficient heal. First Nin uses Yonin, then defender and ran up right corner agroing all mamets, never engaging, just waiting there, casting shadows as needed. Mages ran to lower left corner and dds to lower right corner. Rng pulled one mamet at a time, and Blu, Drg and rng killed it real fast, repeat and rinse till all mamets are dead. Mamet fight took around 5-6 minutes. For Ultima Nin voked it and tanked it on spawn point, using Yonin to keep max hate and Acc gear to improve hit rate, mages went to lower left corner, Blu kept stuning ultima all times, when ultima reached 50% we used a CCB pump, then another on 25% lasted till dead, none hit yellow hp this way. With Omega we tried same strategy, but we set to use it at 60% but Blu was the one to use pump d/c on mid fight, we keep as is, and manage to get it down to 45-50 without pump but we wipe giving time to Blu to come back. We reraise heal and Blu came back, we buff and engage killing it for good. Total clear time 30 minutes, 22 seconds. almost 10 minutes to spare, without Blu d/c we probably clear without wipe with about 17-15 minutes to spare. Real easy and fun fight. -Additional tips: Get some Yellow liquids to set mamet job as Polearm, this will help at avoiding hits with their slow attack rate. Have someone checking the time for each pump to be used, and giving the orders for it, Tank not recommended on this job, since gotta concentrate on keeping hate lvls -Having some Vit gear like Bibiki Seashell and Unyilding ring really help mitigate the hits tank would receive. -Have some Hipots to heal yourself if needed We had fun and felt like and easy win, i hope this strategy help others as well!
PLD/WAR, WHM/BLM, RDM/WHM, MNK/NIN, BLU/NIN, SAM/NIN
Strategy:
Items: 10 yellow liquids, 5-6 polymers, hi-pots, hi-ethers, yagudo drinks, 2 icarus wings (only one was used). We went through approximately 30 hi-pots and 30 hi-ethers. Yagudo drinks helped but weren't used as much as planned. I think we had ~10-15 yag drinks.
Entry: Mages should bring scroll of instant reraise to save MP upon entry. Buff / rest. Want to pass through door at ~1:30-2:00. (WHM don't forget afflatus solace)
Mammets: Everyone except WHM picks a mammet and a corner. This prevents -aga spells from damaging everyone. RDM and WHM should silence mammets as soon as possible regardless of form (prioritize those already in staff form). Use yellow liquids to try to lock them into polearm form. RDM used bind to kite the 5th mammet.
Once SAM or MNK finishes mammet, they move on to the other mametts. Killing order should be BLU, RDM, and PLD.
- Remember that hand form is when the mammet will use transmogrification. When your mammet is in hand form pay more attention so you don't end up healing it. If there is another mammet still alive feel free to switch target and take it down while the other is in transmogrification.
- Want to finish the mammets within 7 minutes.
Omega: Omega is more difficult than Ultima except for when Ultima is at 20% or less. Because of this Omega should be killed as quick as possible. Polymers should be used at 75% and 20%.
Upon entry PLD should move to the left corner. All others move to right corner. As soon as the PLD draw hates, Omega will use an AOE. After that AOE, DDs can assist the PLD. Mages should stay in the corner. The airship width is enough that AOEs should not hit the mages.
- BLU should spam headbutt as much as possible.
At 75% the first polymer should be used. At this point the MNK uses WS (depending on amount of TP), uses I.Wing, WSs again, then uses Hundred Fists. This will take a huge chunk off Omega. Depending on PLD hate, MNK should survive through the 2 hour, but will probably die after polymer wears off. At this point just continue to beat on Omega until dead. Don't forget polymer usage at 20% for AOE spam.
- This fight should not take very long. Once weakness has worn off and everyone is good, rebuff and move on to next battle).
- Note: If a DD is orange/red and utsusemi timer is down, move out of AOE range, hi-pot spam, and get shadows back up. WHM should focus primarily on PLD at all times. RDM can cover DDs for cures amongst the buffing / enfeebling.
Ultima: Ultima is fairly easy prior to 20%. At 20% it starts spamming AOE attacks which can and will quickly cause a wipe. Polymers should be used at 70%, 50%, and 25%. This leaves one extra to be used where needed. At 20% SAM should go all out (including 2 hour). Afterwards beat on Ultima until dead. If the first polymer wears off prior to Ultima being defeated, feel free to use a second at this point.
- Note: Our BLU got caught up in the fight and didn't use a polymer at 75%. The first polymer was used at 50%. We used one at ~30% then as soon as it wore off used another (~20%).
Our completion time was 31 minutes and 19 seconds.
Krizz 15:09, January 19, 2010 (UTC)
NIN/WAR (Elvaan), RNG/NIN (Galka), BLU/NIN (Hume), SCH/RDM (Hume), RDM/WHM (Hume), BRD/WHM (Mithra)
Mammets:
The NIN ate a Jack-o'-Lantern and went in with Wind Staff, Bat Earrings, Scorpion Harness, Empress Hairpin and any other 60 cap evasion gear he could wear. He got initial sight agro on the mammets and effectively blink-super-tanked them while the BLU and RNG picked off the mammets one by one. BRD gave NIN Double Mambo, RDM gave him Haste, SCH focused on Cures and -nas.
Omega:
NIN switched to katana and a mix of eva, DD and enmity gear for this round. He pulled Omega to one of the corners of the ship, and we allowed him a few minutes to build hate solo with Ninjutsu and katana DoT/WS. BLU and RNG came into melee range and BLU focused on Head Butt as much as possible. With Haste and Pianissimo'd double March, Head Butt recast was approximately 4 seconds. With Refresh, MP recovered by the time recasts were up again.
I highly recommend the BLU to focus as much as possible on accuracy gear/food. Head Butt accuracy and recast is the single most important thing to focus on. Single-hit Blue Magic spells are preferred unless Ultima or Omega are under the effects of a pump, since spells like Bludgeon will give them a lot of TP. DD spells should be used sparingly or during the zerg portions.
Speaking of, BLU and RNG's close-range DPS is enough DD for a majority of the fight, only using WS very sparingly (to avoid pulling hate). This is not a race. This is a marathon.
The BRD and RDM kept Elegy and Slow on Omega, while the RDM kept both the NIN and BLU Hasted. BRD Pianissimo'd ranged buffs for the RNG, Mambo for the NIN and used Ballad for herself and the mages. The SCH was entirely in healing mode, removing all negative status effects and curing (SCH has access to all the same -nas as WHM at this level, including Stona and Erase). SCH did not use sublimation. Instead he used Refresh and double Ballad.
Ultima:
Pretty much the same as Omega, only a bit faster. SCH was more occupied with status-removal this time, but with the same strategy as above, Ultima barely ever got a single TP move in. It was slightly more resistant to Head Butt than Omega, but any TP moves that did connect were quickly absorbed by shadows. For the last ~20%, everyone zerged to finish it off quickly.
On our dry run (we only did one), we got Ultima to 2% with DoTs and nukes from the RDM and SCH before wiping.
On our real run (food, pumps, reraise, etc), we cleared in 22 minutes without any deaths. Everyone came with Ethers and Potions, but none were used. Only 2 Pumps were used on Ultima below 40%.
If you're struggling with this fight, consider exploiting some of the new jobs, abilities, and equipment. Blue Mage's Head Butt, Bard's Pianissimo and Scholar's Addendum: White make this fight much easier than it used to be.
--Eremes
My party did this fight NIN NIN NIN BRD RDM SCH, could use any mages in place of RDM and SCH, though. No wipes and no difficulty. You will need 4-6 pumps and mages may need ethers. Ninjas should sub warrior and eat attack food, as they will be the DDs for this fight. It's very straightforward. Have two ninjas each take their own mammet, and the third super-tanks the rest. Then you peel each mammet from the super tank. On Omega and Ultima, you will be using a "slow and steady" approach. With a bard's Carnage Elegy, RDM's Slow, Paralyze, and Blind, it is very difficult for these NMs to kill your ninjas. If one ninjas gets hit, have another one tank. Once Omega got into low HP hate became an issue so you will need to watch that.
Post June 21st 2010 Update
The update uncapped all CoP Area and BCNM battles. This battle has gotten much easier to do with 4 lvl 75s. MNK,RNG,DRK,WHM. The mammets were extremely easy, allowing each DD fight 1 or 2 mammets. As a RNG it was very easy to kill each mammet without the use of Yellow Liquid. The Omega battle was a bit more challenging due to his TP move that did 1182 dmg to me and a DRK. We barely survived, but killed Omega pretty swiftly. Ultima was expected to be difficult, although due to his low attack speed, it was easy to take him down. The TP moves can be a pain though. I used a CCB Polymer on Ultima just to stay on the safe side. This battle would be cake with a tank involved.