m (formatting) |
|||
| (36 intermediate revisions by 12 users not shown) | |||
| Line 1: | Line 1: | ||
| + | {{Item Sections}}<section begin="Item Image"/>{{Item Image|NobleLady.png}}<section end="Item Image"/> |
||
| ⚫ | |||
| − | __NOTOC__ |
||
| − | [[Image:NobleLady.png]] |
||
| − | {|cellpadding="5" width="100%" |
||
| − | |width="50%" valign="top"| |
||
==Statistics== |
==Statistics== |
||
| + | {{Item Statistics |
||
| − | '''Noble Lady'''<br> |
||
| + | | type = fish |
||
| ⚫ | |||
| + | | icon id = 4485 |
||
| ⚫ | |||
| ⚫ | |||
| − | '''Stackable:''' 12 |
||
| + | | stackable = 12 |
||
| − | <br><br> |
||
| + | | duration = 5 minutes |
||
| − | '''Food Effects:''' (5 minutes, Mithra[[Latent and Hidden Effects#Food-related Effects|*]]) |
||
| + | | effects = |
||
| − | *[[Dexterity|{{Wind|Dexterity +3}}]] |
||
| + | *{{Effect|Positive|Dexterity|+3}} |
||
| − | *[[Mind|{{Fire|Mind -5}}]] |
||
| + | *{{Effect|Negative|Mind|-5}} |
||
| − | *[[Charisma|{{Wind|Charisma +3}}]] |
||
| + | *{{Effect|Positive|Charisma|+3}} |
||
| − | |width="50%" valign="top"| |
||
| ⚫ | |||
==Other Uses== |
==Other Uses== |
||
| + | {{Used In |
||
| ⚫ | |||
| + | | quest = Fisherman's Heart |
||
| − | <br><br> |
||
| ⚫ | |||
| − | '''[[Resale Price]]:''' 400~600 gil |
||
| + | | resale price = {{Resale Price|400}} |
||
| ⚫ | |||
| + | | guild resale price = {{Guild Resale Price|582|600|guild=Fishing}} |
||
| − | |width="50%" valign="top"| |
||
| + | | monster rearing feed = {{Monster Rearing Feed|Seafood}} |
||
| + | }} |
||
==Synthesis Recipes== |
==Synthesis Recipes== |
||
| + | {{Synthesis Recipe|None}} |
||
| − | ''None'' |
||
| − | |width="50%" valign="top"| |
||
==Used in Recipes== |
==Used in Recipes== |
||
| − | + | {{rl|Tavnazian Salad|Cooking|92}} |
|
| − | + | {{rl|Dorado Sushi|Cooking|93}} |
|
| ⚫ | |||
| ⚫ | |||
| + | {{Synthesis Recipe|None}} |
||
| − | |width="50%" valign="top"| |
||
| ⚫ | |||
| ⚫ | |||
| − | + | {{rl|None}} |
|
| − | |width="50%" valign="top"| |
||
| ⚫ | |||
| − | *''None'' |
||
| ⚫ | |||
==How to Obtain== |
==How to Obtain== |
||
{{AH|Food|Fish}} |
{{AH|Food|Fish}} |
||
| − | ===Fishing Guild's Comment=== |
||
| ⚫ | |||
| ⚫ | |||
===Merchants=== |
===Merchants=== |
||
| + | {|class="ffxi-table wide-table" |
||
| − | :{| width="60%" cellpadding="2" cellspacing="2" |
||
| + | |- class="ffxi-header" |
||
| − | | |
+ | |colspan="3"|'''Price:''' 2,100~2,800 gil |
| − | |- BGCOLOR="#ffdead" |
||
| ⚫ | |||
| ⚫ | |||
| − | !width=" |
+ | !width="30%"| Name |
| − | !width="35%"| |
+ | !width="35%"| Location |
| ⚫ | |||
| − | |- BGCOLOR="#e3e6ff" |
||
| ⚫ | |||
|[[Mep Nhapopoluko]] |
|[[Mep Nhapopoluko]] |
||
| − | | |
+ | |{{Location|Bibiki Bay|H-7}} |
| − | | |
+ | | {{Merchant|Guild||hours = 1:00-18:00|restocked = true}} |
| ⚫ | |||
| − | Closed Lightningday |
||
| ⚫ | |||
| − | |- BGCOLOR="#e3e6ff" |
||
| + | {|class="ffxi-table wide-table" |
||
| + | |- class="ffxi-header" |
||
| + | |colspan="3"|'''Price:''' 2,100~13,664 gil |
||
| + | |- |
||
| ⚫ | |||
| ⚫ | |||
| ⚫ | |||
| + | |- |
||
|[[Jidwahn]] |
|[[Jidwahn]] |
||
|[[Silver Sea route to Nashmau]] |
|[[Silver Sea route to Nashmau]] |
||
| + | | {{Merchant|Guild||hours = 1:00-23:00|restocked = false}} |
||
| − | |[[Guild Merchant]] |
||
| + | |- |
||
| − | |- BGCOLOR="#e3e6ff" |
||
| + | |[[Wahnid]] |
||
| + | |{{Location|Aht Urhgan Whitegate|H-11}} |
||
| + | | {{Merchant|Guild||hours = 1:00-18:00|restocked = false}} |
||
| + | |- |
||
| + | |[[Pashi Maccaleh]] |
||
| + | |[[Open sea route to Mhaura]] |
||
| + | | {{Merchant|Guild||hours = 1:00-23:00|restocked = false}} |
||
| + | |- |
||
| + | |[[Cehn Teyohngo]] |
||
| + | |[[Open sea route to Al Zahbi]] |
||
| + | | {{Merchant|Guild||hours = 1:00-23:00|restocked = false}} |
||
| + | |- |
||
| + | |[[Lokhong]] |
||
| + | |[[Ship bound for Selbina]] |
||
| + | | {{Merchant|Guild||hours = 1:00-23:00|restocked = false}} |
||
| + | |- |
||
|[[Rajmonda]] |
|[[Rajmonda]] |
||
|[[Ship bound for Mhaura]] |
|[[Ship bound for Mhaura]] |
||
| + | | {{Merchant|Guild||hours = 1:00-23:00|restocked = false}} |
||
| − | |[[Guild Merchant]] |
||
| − | |- |
+ | |- valign="top" |
| − | |[[Graegham]] |
+ | | [[Graegham]] |
| + | |rowspan="2"| {{Location|Selbina|H-9}} |
||
| − | |[[Selbina]] (H-9) |
||
| + | |rowspan="2"| {{Merchant|Guild|Fishing|restocked = false}} |
||
| − | |[[Guild Merchant]] |
||
| + | |- |
||
| − | |- BGCOLOR="#e3e6ff" |
||
| − | |[[Mendoline]] |
+ | | [[Mendoline]] |
| + | |- |
||
| − | |[[Selbina]] (H-9) |
||
| − | |[[Guild Merchant]] |
||
| − | |- BGCOLOR="#e3e6ff" |
||
|[[Babubu]] |
|[[Babubu]] |
||
| − | | |
+ | |{{Location|Port Windurst|C-8}} |
| + | | {{Merchant|Guild|Fishing|restocked = false}} |
||
| − | |[[Guild Merchant]] |
||
|} |
|} |
||
| + | ===Monster Rearing=== |
||
| − | |||
| + | *[[Monster Rearing/Sea Monk|Sea monk]] |
||
| + | *[[Monster Rearing/Blue Sea Monk|Blue Sea Monk]] |
||
===Fishing=== |
===Fishing=== |
||
| + | {{Fishing |
||
| − | :{| width="80%" cellspacing="3" cellpadding="4" |
||
| + | | guild NPC = Degong |
||
| − | | style="background:#ffdead;" colspan="3"| '''Skill Cap:''' 66 |
||
| + | | guild comment = |
||
| − | |- style="background:#ffdead;" |
||
| ⚫ | |||
| ⚫ | |||
| ⚫ | |||
| ⚫ | |||
| + | | skill cap = 66 |
||
| ⚫ | |||
| + | | size = Small |
||
| − | |- valign="top" style="background:#e3e6ff;" |
||
| + | | location = |
||
| ⚫ | |||
| − | [[Ship bound for Mhaura]] |
+ | *[[Ship bound for Mhaura]] {{Fishing|Recommended}} |
| − | [[Ship bound for Selbina]] |
+ | *[[Ship bound for Selbina]] {{Fishing|Recommended}} |
| − | [[Open sea route to Al Zahbi]] |
+ | *[[Open sea route to Al Zahbi]] |
| − | [[Open sea route to Mhaura]] |
+ | *[[Open sea route to Mhaura]] |
| − | [[Manaclipper]] |
+ | *[[Manaclipper]] (Maliyakaleya Reef Route -> Purgonorgo Isle Route) |
| + | | bait = |
||
| − | Maliyakaleya Reef Route<br> |
||
| + | *[[Minnow]] {{Fishing|Recommended}} |
||
| − | Purgonorgo Isle Route |
||
| + | *[[Peeled Lobster]] |
||
| − | |valign="top" align="left" width="33%" BGCOLOR="#e3e6ff"| |
||
| − | [[ |
+ | *[[Robber Rig]] |
| − | [[ |
+ | *[[Rogue Rig]] |
| − | [[ |
+ | *[[Shrimp Lure]] |
| ⚫ | |||
| − | [[Rogue Rig]]<br> |
||
| − | [[ |
+ | *[[Sliced Sardine]] |
| + | | rods = |
||
| ⚫ | |||
| ⚫ | |||
| − | [[Sliced Sardine]]<br> |
||
| ⚫ | |||
| − | |valign="top" align="left" width="33%" BGCOLOR="#E3E6FF"| |
||
| − | [[ |
+ | *[[Halcyon Fishing Rod]] {{Fishing|May snap line}} |
| − | [[ |
+ | *[[Hume Fishing Rod]] {{Fishing|may snap line}} |
| − | [[ |
+ | *[[Lu Shang's Fishing Rod]] |
| − | [[ |
+ | *[[Lu Shang's Fishing Rod +1]] |
| − | [[Clothespole]] |
+ | *[[Clothespole]] {{Fishing|too small}} |
| − | [[ |
+ | *[[Composite Fishing Rod]] {{Fishing|too small}} |
| + | *[[Mithran Fishing Rod]] {{Fishing|too small}} |
||
| − | <Br> |
||
| + | *[[Carbon Fishing Rod]] {{Fishing|May break}} |
||
| − | ''Will Possibly Break:''<Br> |
||
| + | }} |
||
| ⚫ | |||
Revision as of 20:29, 13 December 2020

Statistics
Noble lady
A large saltwater fish that
lives in the southern seas.
lives in the southern seas.
Stackable: 12
Other Uses
Guild Points Value: 1,200 / 15,120 (12.6 items)
Resale Price: ~400 gil
Guild Resale Price: 582~600 gil (Fishermans' Guild)
Monster Rearing Feed: Seafood
Synthesis Recipes
None
Used in Recipes
 93 Dorado Sushi
Desynthesis Recipes
None
Obtained from Desynthesis
- None
How to Obtain
Auction House Category: Food > Fish ![]()
Can be obtained as a random reward from the Gobbie Mystery Box Special Dial and similar sources.
Merchants
| Price: 2,100~2,800 gil | ||
| Name | Location | Type |
|---|---|---|
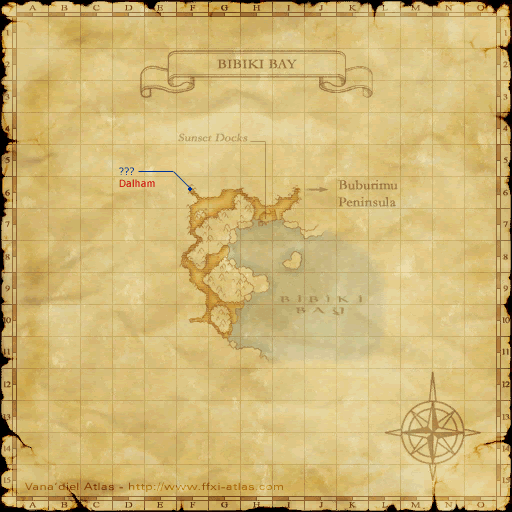
| Mep Nhapopoluko | Bibiki Bay (H-7) | Guild Merchant
|
| Price: 2,100~13,664 gil | ||
| Name | Location | Type |
|---|---|---|
| Jidwahn | Silver Sea route to Nashmau | Guild Merchant
|
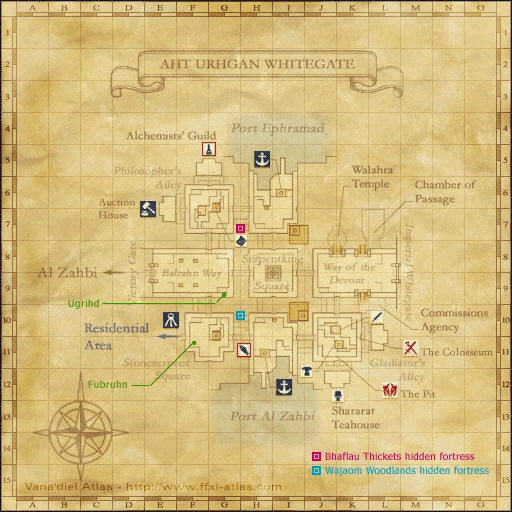
| Wahnid | Aht Urhgan Whitegate (H-11) | Guild Merchant
|
| Pashi Maccaleh | Open sea route to Mhaura | Guild Merchant
|
| Cehn Teyohngo | Open sea route to Al Zahbi | Guild Merchant
|
| Lokhong | Ship bound for Selbina | Guild Merchant
|
| Rajmonda | Ship bound for Mhaura | Guild Merchant
|
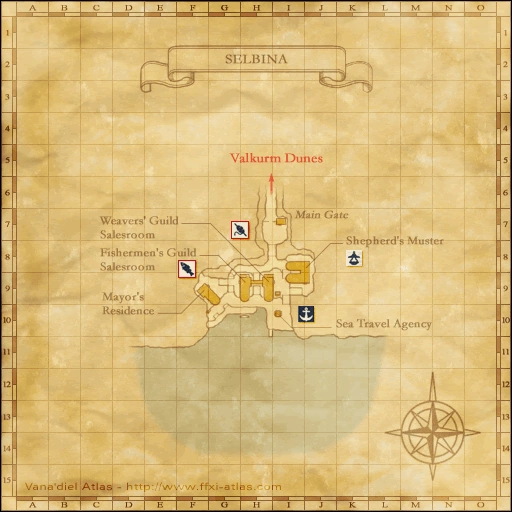
| Graegham | Selbina (H-9) | Fishermans' Guild
|
| Mendoline | ||
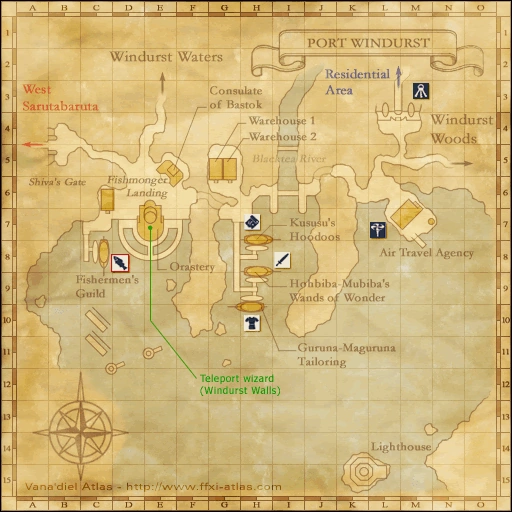
| Babubu | Port Windurst (C-8) | Fishermans' Guild
|
Monster Rearing
Fishing
- Degong
- "You'll have to head to the shallows of the Bastore Sea to find any Noble Ladies.
- Slices of sardine should be good enough to get 'em to bite, but I'm not guaranteein' anything."
| Skill Cap: 66 Size: Small (Something caught the hook!) | ||
| Location | Bait | Rods |
|---|---|---|
|
||
| * Recommended fishing setup. ● Fish may be too big. ● Fish may be too small. !! Line may snap. !!! Rod may break. | ||