(→BCNM) |
m (Links) |
||
| (31 intermediate revisions by 19 users not shown) | |||
| Line 1: | Line 1: | ||
| + | {{Item Sections}}[[ja:ミスリル鉱]] |
||
| − | [[Category:Materials]] |
||
| + | <section begin="Item Image"/>{{Item Image|Mythrilore.jpg|Mythril Ore}}<section end="Item Image"/> |
||
| − | __NOTOC__ |
||
| − | [[Image:Mythrilore.jpg|Mythril Ore]] |
||
| − | {|cellpadding="5" width="100%" |
||
| − | |width="50%" valign="top" align="left"| |
||
==Statistics== |
==Statistics== |
||
| + | {{Item Statistics |
||
| − | '''Chunk of mythril ore''' <br> |
||
| − | + | | name = Chunk of mythril ore |
|
| + | | icon id = 644 |
||
| − | <br><br> |
||
| + | | description = This ore contains the metal mythril. |
||
| − | '''Stackable:''' Not Stackable |
||
| + | | stackable = 12 |
||
| + | | type = Material |
||
| ⚫ | |||
| − | |width="50%" valign="top" align="left"| |
||
==Other Uses== |
==Other Uses== |
||
| + | {{Used In |
||
| − | '''[[NPC Sell Price]]:''' ~250 - 256 gil |
||
| + | | resale price = {{Resale Price|207|256}} |
||
| − | |||
| + | | guild resale price = {{Guild Resale Price|375}} |
||
| ⚫ | |||
| ⚫ | |||
| − | |width="50%" valign="top" align="left"| |
||
==Synthesis Recipes== |
==Synthesis Recipes== |
||
| + | {{Synthesis Recipe|None}} |
||
| − | ''None'' |
||
| − | |width="50%" valign="top" align="left"| |
||
==Used in Recipes== |
==Used in Recipes== |
||
| − | + | {{rl|Mythril Ingot|Goldsmithing|40}} |
|
| − | + | {{rl|Mythril Ingot|Goldsmithing|41}} |
|
| − | + | {{rl|Vivified Mythril|Goldsmithing|40}} |
|
| ⚫ | |||
| + | {{Synthesis Recipe|None}} |
||
| ⚫ | |||
| ⚫ | |||
| + | {{rl|None}} |
||
| − | |width="50%" valign="top" align="left"| |
||
| ⚫ | |||
| − | ''None'' |
||
| − | |||
| − | |width="50%" valign="top" align="left"| |
||
| ⚫ | |||
| − | *''None'' |
||
| − | |||
| ⚫ | |||
==How to Obtain== |
==How to Obtain== |
||
{{AH|Materials|Goldsmithing}} |
{{AH|Materials|Goldsmithing}} |
||
===Merchants=== |
===Merchants=== |
||
| + | {|class="ffxi-table wide-table" |
||
| − | :{| border="0" width="60%" cellpadding="2" cellspacing="2" |
||
| ⚫ | |||
| − | |- style="background:#ffdead" |
||
| ⚫ | |||
| ⚫ | |||
| ⚫ | |||
| − | |- style="background:#ffdead" |
||
| − | ! |
+ | !width="35%"| Location |
| − | ! |
+ | !width="35%"| Type |
| ⚫ | |||
| − | ! width="35%" |Type |
||
| − | |- style="background:#d5d9ff" |
||
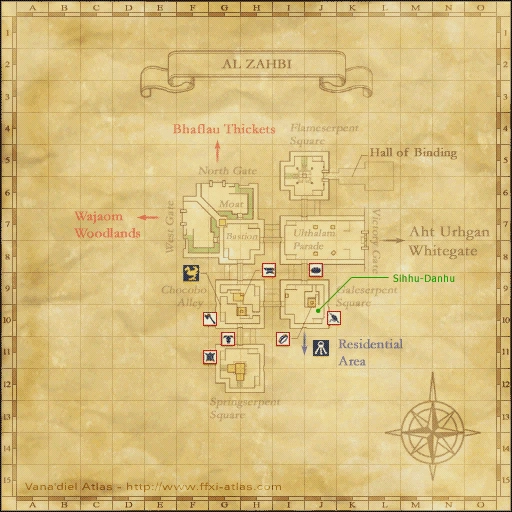
| [[Bornahn]] |
| [[Bornahn]] |
||
| − | | |
+ | | {{Location|Al Zahbi|J-10}} |
| − | | |
+ | | {{Merchant|Guild|}} |
| + | |- |
||
| − | |- style="background:#d5d9ff" |
||
| [[Teerth]] |
| [[Teerth]] |
||
| − | | |
+ | | {{Location|Bastok Markets|H-8}} |
| − | | |
+ | | {{Merchant|Guild|}} |
| + | |- |
||
| − | |- style="background:#d5d9ff" |
||
| [[Visala]] |
| [[Visala]] |
||
| − | | |
+ | | {{Location|Bastok Markets|H-8}} |
| − | | |
+ | | {{Merchant|Guild|}} |
| + | |- |
||
| − | |- style="background:#d5d9ff" |
||
| [[Albinie]] |
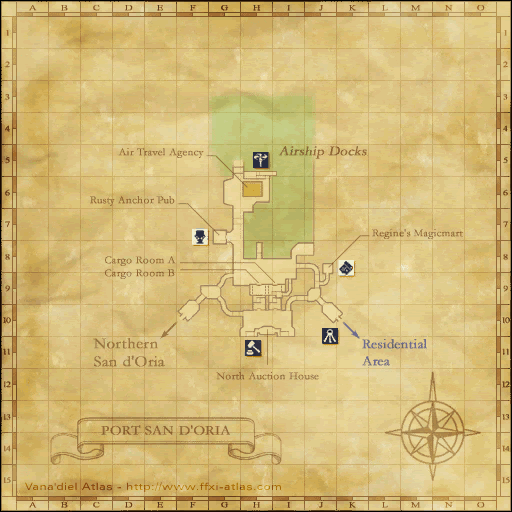
| [[Albinie]] |
||
| − | | |
+ | | {{Location|Port San d'Oria|H-6}} |
| − | | |
+ | | {{Merchant|Standard}} |
| + | :''San d'Oria Citizen, 1st'' |
||
| − | |- style="background:#d5d9ff" |
||
| + | |- |
||
| [[Denvihr]] |
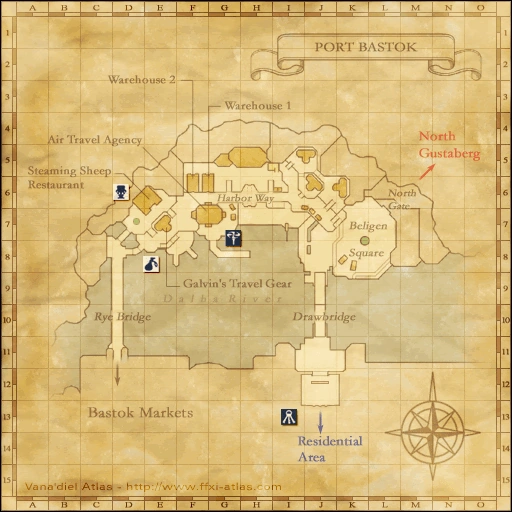
| [[Denvihr]] |
||
| − | | |
+ | | {{Location|Port Bastok|G-7}} |
| − | | |
+ | | {{Merchant|Standard}} |
| + | :''Bastok Citizen, 1st'' |
||
| − | |- style="background:#d5d9ff" |
||
| + | |- |
||
| [[Uli Pehkowa]] |
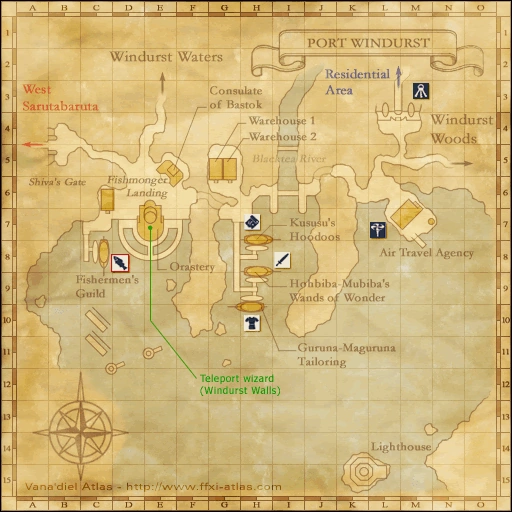
| [[Uli Pehkowa]] |
||
| − | | |
+ | | {{Location|Port Windurst|M-7}} |
| − | | |
+ | | {{Merchant|Standard}} |
| + | :''Windurst Citizen, 1st'' |
||
|} |
|} |
||
| + | |||
===Chocobo Digging=== |
===Chocobo Digging=== |
||
| + | {|class="ffxi-table wide-table" |
||
| − | :{| border="0" width="40%" cellpadding="2" cellspacing="2" |
||
| + | |- |
||
| − | |- style="background:#ffdead;" |
||
| − | ! |
+ | !width="50%"| Zone |
| − | ! |
+ | !width="50%"| Abundance |
| + | |- |
||
| − | |- style="background:#d5d9ff;" |
||
| [[Eastern Altepa Desert]] |
| [[Eastern Altepa Desert]] |
||
| Rare |
| Rare |
||
| + | |- |
||
| − | |- style="background:#d5d9ff;" |
||
| [[North Gustaberg]] |
| [[North Gustaberg]] |
||
| Rare |
| Rare |
||
| + | |- |
||
| − | |- style="background:#d5d9ff;" |
||
| [[Meriphataud Mountains]] {{Chocobo Digging|Burrow}} |
| [[Meriphataud Mountains]] {{Chocobo Digging|Burrow}} |
||
| Rare |
| Rare |
||
| + | |- |
||
| − | |- style="background:#d5d9ff;" |
||
| [[South Gustaberg]] |
| [[South Gustaberg]] |
||
| Very Rare |
| Very Rare |
||
| + | |- class="ffxi-footer" |
||
| − | |- style="background:#ffdead;" |
||
| − | | |
+ | |align="center" colspan="2"| {{Chocobo Digging Notes}} |
|} |
|} |
||
| + | |||
===Mining=== |
===Mining=== |
||
| + | {|class="ffxi-table wide-table" |
||
| − | :{| border="0" width="40%" cellpadding="2" cellspacing="2" |
||
| + | |- |
||
| − | |- style="background:#ffdead;" |
||
| − | ! |
+ | !width="50%"| Zone |
| − | ! |
+ | !width="50%"| Abundance |
| + | |- |
||
| − | |- style="background:#d5d9ff;" |
||
| − | | [[Halvung]] |
||
| − | | Uncommon |
||
| − | |- style="background:#d5d9ff;" |
||
| [[Palborough Mines]] |
| [[Palborough Mines]] |
||
| Rare |
| Rare |
||
| + | |- |
||
| − | |- style="background:#d5d9ff;" |
||
| + | | [[North Gustaberg (S)]] |
||
| + | | Rare |
||
| + | |- |
||
| [[Newton Movalpolos]] |
| [[Newton Movalpolos]] |
||
| Very Rare |
| Very Rare |
||
| + | |- |
||
| − | |- style="background:#d5d9ff;" |
||
| [[Oldton Movalpolos]] |
| [[Oldton Movalpolos]] |
||
| Very Rare |
| Very Rare |
||
|} |
|} |
||
| + | |||
===Gardening=== |
===Gardening=== |
||
| + | {{FruitSeeds |
||
| − | :{| border="0" width="60%" cellpadding="2" cellspacing="2" |
||
| + | | PorLightLight = 3 |
||
| − | |- style="background:#ffdead;" |
||
| + | }} |
||
| ⚫ | |||
| ⚫ | |||
| − | ! width="15%" |Crystal 1 |
||
| − | ! width="15%" |Crystal 2 |
||
| ⚫ | |||
| − | |- style="background:#d5d9ff;" align="center" |
||
| − | | align="left" |[[Gardening: Porcelain Flowerpot Recipes|Porcelain Flowerpot]] |
||
| ⚫ | |||
| − | | [[Light Crystal|{{Light|Light}}]] |
||
| − | | [[Light Crystal|{{Light|Light}}]] |
||
| ⚫ | |||
| ⚫ | |||
===Dropped From=== |
===Dropped From=== |
||
| + | {|class="ffxi-table wide-table" |
||
| − | :{| border="0" width="60%" cellpadding="2" cellspacing="2" |
||
| + | |- |
||
| − | |- style="background:#ffdead;" |
||
| − | ! |
+ | !width="35%"| Name |
| − | ! |
+ | !width="15%"| Level |
| − | ! |
+ | !width="60%"| Zone |
| + | |- class="bg-nm" |
||
| ⚫ | |||
| − | | |
+ | | '''[[Bigmouth Billy]] ([[NM]])''' |
| − | | |
+ | |align="center"| 9-10 |
| [[East Ronfaure]] |
| [[East Ronfaure]] |
||
| + | |- |
||
| ⚫ | |||
| − | | |
+ | | [[Stone Golem]] |
| − | | |
+ | |align="center"| 40-42 |
| [[Beaucedine Glacier]] |
| [[Beaucedine Glacier]] |
||
| + | |- |
||
| − | |- style="background:#d5d9ff;" valign="top" |
||
| − | | |
+ | | [[Ore Golem]] |
| − | | |
+ | |align="center"| 43-45 |
| [[Fei'Yin]] |
| [[Fei'Yin]] |
||
| + | |- class="bg-nm" |
||
| − | |- style="background:#ffd9d9;" valign="top" |
||
| − | | |
+ | | '''[[Gargantua]] ([[NM]])''' |
| − | | |
+ | |align="center"| 47-48 |
| [[Beaucedine Glacier]] |
| [[Beaucedine Glacier]] |
||
| + | |- |
||
| − | |- style="background:#d5d9ff;" valign="top" |
||
| − | | |
+ | | [[Rock Golem]] |
| − | | |
+ | |align="center"| 49-50 |
| [[Sanctuary of Zi'Tah]] |
| [[Sanctuary of Zi'Tah]] |
||
| + | |- |
||
| − | |- style="background:#d5d9ff;" valign="top" |
||
| − | | |
+ | | [[Antican Centurio]] |
| − | | |
+ | |align="center"| 50-52 |
| + | | [[Eastern Altepa Desert]] |
||
| + | |- |
||
| + | | [[Antican Hastatus]] |
||
| + | |align="center"| 52-59 |
||
| [[Quicksand Caves]] |
| [[Quicksand Caves]] |
||
| + | |- |
||
| − | |- style="background:#d5d9ff;" valign="top" |
||
| − | | |
+ | | [[Antican Princeps]] |
| − | | |
+ | |align="center"| 52-59 |
| [[Quicksand Caves]] |
| [[Quicksand Caves]] |
||
| + | |- |
||
| − | |- style="background:#d5d9ff;" valign="top" |
||
| − | | |
+ | | [[Antican Signifer]] |
| − | | |
+ | |align="center"| 52-59 |
| [[Quicksand Caves]] |
| [[Quicksand Caves]] |
||
| + | |- |
||
| − | |- style="background:#d5d9ff;" valign="top" |
||
| − | | |
+ | | [[Antican Lanista]] |
| − | | |
+ | |align="center"| 54-58 |
| [[Western Altepa Desert]] |
| [[Western Altepa Desert]] |
||
| + | |- |
||
| − | |- style="background:#ffd9d9;" valign="top" |
||
| + | | [[Antican Secutor]] |
||
| ⚫ | |||
| − | | |
+ | |align="center"| 54-58 |
| + | | [[Western Altepa Desert]] |
||
| + | |- class="bg-nm" |
||
| ⚫ | |||
| + | |align="center"| 56-58 |
||
| [[Quicksand Caves]] |
| [[Quicksand Caves]] |
||
| + | |- |
||
| − | |- style="background:#d5d9ff;" valign="top" |
||
| − | | |
+ | | [[Colossus]] |
| − | | |
+ | |align="center"| 56-58 |
| [[Fei'Yin]] |
| [[Fei'Yin]] |
||
| + | |- class="bg-nm" |
||
| − | |- style="background:#ffd9d9;" valign="top" |
||
| − | | |
+ | | '''[[Sagittarius X-XIII]] ([[NM]])''' |
| − | | |
+ | |align="center"| 57-58 |
| [[Quicksand Caves]] |
| [[Quicksand Caves]] |
||
| + | |- |
||
| − | |- style="background:#d5d9ff;" valign="top" |
||
| − | | |
+ | | [[Tomb Worm]] |
| − | | |
+ | |align="center"| 58-60 |
| [[King Ranperre's Tomb]] |
| [[King Ranperre's Tomb]] |
||
| + | |- class="bg-nm" |
||
| − | |- style="background:#ffd9d9;" valign="top" |
||
| − | | |
+ | | '''[[Tribunus VII-I]] ([[NM]])''' |
| − | | |
+ | |align="center"| 60-62 |
| [[Quicksand Caves]] |
| [[Quicksand Caves]] |
||
| − | |- |
+ | |- valign="top" |
| − | | |
+ | |rowspan="2"| [[Cave Worm]] |
| align="center"|60-63 |
| align="center"|60-63 |
||
| [[Kuftal Tunnel]] |
| [[Kuftal Tunnel]] |
||
| + | |- |
||
| − | |- style="background:#d5d9ff;" |
||
| − | | |
+ | |align="center"| 61-64 |
| [[Den of Rancor]] |
| [[Den of Rancor]] |
||
| + | |- class="bg-nm" |
||
| − | |- style="background:#ffd9d9;" valign="top" |
||
| − | | |
+ | | '''[[Goliath]] ([[NM]])''' |
| − | | |
+ | |align="center"| 62 |
| [[Fei'Yin]] |
| [[Fei'Yin]] |
||
| + | |- class="bg-nm" |
||
| − | |- style="background:#ffd9d9;" valign="top" |
||
| − | | |
+ | | '''[[Antican Praefectus]] ([[NM]])''' |
| − | | |
+ | |align="center"| 65 |
| [[Quicksand Caves]] |
| [[Quicksand Caves]] |
||
| + | |- class="bg-nm" |
||
| − | |- style="background:#ffd9d9;" valign="top" |
||
| − | | |
+ | | '''[[Antican Proconsul]] ([[NM]])''' |
| − | | |
+ | |align="center"| 65 |
| [[Quicksand Caves]] |
| [[Quicksand Caves]] |
||
| + | |- class="bg-nm" |
||
| − | |- style="background:#ffd9d9;" valign="top" |
||
| − | | |
+ | | '''[[Antican Magister]] ([[NM]])''' |
| − | | |
+ | |align="center"| 66 |
| [[Quicksand Caves]] |
| [[Quicksand Caves]] |
||
| + | |- |
||
| − | |- style="background:#d5d9ff;" valign="top" |
||
| − | | |
+ | | [[Kuftal Digger]] |
| − | | |
+ | |align="center"| 66-69 |
| [[Kuftal Tunnel]] |
| [[Kuftal Tunnel]] |
||
| + | |- |
||
| − | |- style="background:#d5d9ff;" valign="top" |
||
| − | | |
+ | | [[Mythril Golem]] |
| − | | |
+ | |align="center"| 69-70 |
| [[Ro'Maeve]] |
| [[Ro'Maeve]] |
||
| + | |- class="bg-nm" |
||
| − | |- style="background:#ffd9d9;" valign="top" |
||
| − | | |
+ | | '''[[Proconsul XII]] ([[NM]])''' |
| − | | |
+ | |align="center"| 72 |
| [[Quicksand Caves]] |
| [[Quicksand Caves]] |
||
| + | |- class="bg-nm" |
||
| − | |- style="background:#ffd9d9;" valign="top" |
||
| − | | |
+ | | '''[[Antican Tribunus]] ([[NM]])''' |
| − | | |
+ | |align="center"| 72-74 |
| [[Quicksand Caves]] |
| [[Quicksand Caves]] |
||
| + | |- class="bg-nm" |
||
| − | |- style="background:#ffd9d9;" valign="top" |
||
| − | | |
+ | | '''[[Triarius X-XV]] ([[NM]])''' |
| − | | |
+ | |align="center"| 72-74 |
| [[Quicksand Caves]] |
| [[Quicksand Caves]] |
||
| + | |- |
||
| − | |- style="background:#d5d9ff;" valign="top" |
||
| − | | |
+ | | [[Enkidu]] |
| − | | |
+ | |align="center"| 77-80 |
| [[Ve'Lugannon Palace]] |
| [[Ve'Lugannon Palace]] |
||
| + | |- |
||
| − | |- style="background:#d5d9ff;" valign="top" |
||
| − | | |
+ | | [[Aura Statue]] |
| − | | |
+ | |align="center"| 79-84 |
| [[Shrine of Ru'Avitau]] |
| [[Shrine of Ru'Avitau]] |
||
| + | |- |
||
| − | |- style="background:#d5d9ff;" valign="top" |
||
| − | | |
+ | | [[Darksteel Golem]] |
| − | | |
+ | |align="center"| 80-82 |
| [[Ro'Maeve]] |
| [[Ro'Maeve]] |
||
| + | |- class="bg-nm" |
||
| − | |- style="background:#ffd9d9;" valign="top" |
||
| − | | |
+ | | '''[[Tzee Xicu the Manifest]] ([[NM]])''' |
| − | | |
+ | |align="center"| 85 |
| [[Castle Oztroja]] |
| [[Castle Oztroja]] |
||
|} |
|} |
||
| + | |||
===Stolen From=== |
===Stolen From=== |
||
| + | {|class="ffxi-table wide-table" |
||
| − | :{| border="0" width="60%" cellpadding="2" cellspacing="2" |
||
| + | |- |
||
| − | |- style="background:#ffdead;" |
||
| − | ! |
+ | !width="35%"| Name |
| − | ! |
+ | !width="15%"| Level |
| − | ! |
+ | !width="60%"| Zone |
| + | |- |
||
| − | |- style="background:#d5d9ff;" valign="top" |
||
| − | | |
+ | | [[Bugbear Trashman]] |
| − | | |
+ | |align="center"| 65-67 |
| [[Newton Movalpolos]] |
| [[Newton Movalpolos]] |
||
| + | |- |
||
| − | |- style="background:#d5d9ff;" valign="top" |
||
| − | | |
+ | | [[Bugbear Watchman]] |
| − | | |
+ | |align="center"| 71-76 |
| [[Newton Movalpolos]] |
| [[Newton Movalpolos]] |
||
| + | |- |
||
| − | |- style="background:#d5d9ff;" valign="top" |
||
| − | | |
+ | | [[Bugbear Deathsman]] |
| − | | |
+ | |align="center"| 74-76 |
| [[Newton Movalpolos]] |
| [[Newton Movalpolos]] |
||
|} |
|} |
||
| + | |||
===BCNM=== |
===BCNM=== |
||
| + | {|class="ffxi-table wide-table" |
||
| − | :{| border="0" width="60%" cellpadding="2" cellspacing="2" |
||
| + | |- |
||
| − | |- style="background:#ffdead;" |
||
| − | ! |
+ | !width="30%"| Name |
| − | ! |
+ | !width="30%"| Zone |
| − | ! |
+ | !width="15%"| Level |
| − | ! |
+ | !width="15%"| Time |
| − | ! |
+ | !width="10%"| Members |
| − | |- |
+ | |- align="center" |
| align="left" |[[Birds of a Feather]] |
| align="left" |[[Birds of a Feather]] |
||
| align="left" |[[Waughroon Shrine]] |
| align="left" |[[Waughroon Shrine]] |
||
| Line 285: | Line 281: | ||
| 15 minutes |
| 15 minutes |
||
| 3 |
| 3 |
||
| − | |- |
+ | |- align="center" |
| align="left" |[[Cactuar Suave]] |
| align="left" |[[Cactuar Suave]] |
||
| align="left" |[[Chamber of Oracles]] |
| align="left" |[[Chamber of Oracles]] |
||
| Line 291: | Line 287: | ||
| 30 minutes |
| 30 minutes |
||
| 6 |
| 6 |
||
| − | |- |
+ | |- align="center" |
| align="left" |[[Come Into My Parlor]] |
| align="left" |[[Come Into My Parlor]] |
||
| align="left" |[[Qu'Bia Arena]] |
| align="left" |[[Qu'Bia Arena]] |
||
| Line 297: | Line 293: | ||
| 30 minutes |
| 30 minutes |
||
| 6 |
| 6 |
||
| − | |- |
+ | |- align="center" |
| align="left" |[[Contaminated Colosseum]] |
| align="left" |[[Contaminated Colosseum]] |
||
| align="left" |[[Horlais Peak]] |
| align="left" |[[Horlais Peak]] |
||
| Line 303: | Line 299: | ||
| 30 minutes |
| 30 minutes |
||
| 6 |
| 6 |
||
| − | |- |
+ | |- align="center" |
| ⚫ | |||
| + | | align="left" |[[Waughroon Shrine]] |
||
| + | | 75 |
||
| + | | 30 minutes |
||
| ⚫ | |||
| + | |- align="center" |
||
| + | | align="left" |[[Double Dragonian]] |
||
| + | | align="left" |[[Horlais Peak]] |
||
| + | | 75 |
||
| + | | 30 minutes |
||
| + | | 6 |
||
| + | |- align="center" |
||
| align="left" |[[Eye of the Storm]] |
| align="left" |[[Eye of the Storm]] |
||
| align="left" |[[Chamber of Oracles]] |
| align="left" |[[Chamber of Oracles]] |
||
| Line 309: | Line 317: | ||
| 30 minutes |
| 30 minutes |
||
| 6 |
| 6 |
||
| − | |- |
+ | |- align="center" |
| align="left" |[[Horns of War]] |
| align="left" |[[Horns of War]] |
||
| align="left" |[[Horlais Peak]] |
| align="left" |[[Horlais Peak]] |
||
| Line 315: | Line 323: | ||
| 30 minutes |
| 30 minutes |
||
| 18 |
| 18 |
||
| − | |- |
+ | |- align="center" |
| + | | align="left" |[[The Hills Are Alive]] |
||
| + | | align="left" |[[Waughroon Shrine]] |
||
| + | | 75 |
||
| + | | 30 minutes |
||
| + | | 18 |
||
| + | |- align="center" |
||
| align="left" |[[Idol Thoughts]] |
| align="left" |[[Idol Thoughts]] |
||
| align="left" |[[Qu'Bia Arena]] |
| align="left" |[[Qu'Bia Arena]] |
||
| Line 321: | Line 335: | ||
| 30 minutes |
| 30 minutes |
||
| 6 |
| 6 |
||
| − | |- |
+ | |- align="center" |
| align="left" |[[Legion XI Comitatensis]] |
| align="left" |[[Legion XI Comitatensis]] |
||
| align="left" |[[Chamber of Oracles]] |
| align="left" |[[Chamber of Oracles]] |
||
| Line 327: | Line 341: | ||
| 30 minutes |
| 30 minutes |
||
| 6 |
| 6 |
||
| − | |- |
+ | |- align="center" |
| align="left" |[[Petrifying Pair]] |
| align="left" |[[Petrifying Pair]] |
||
| align="left" |[[Ghelsba Outpost]] |
| align="left" |[[Ghelsba Outpost]] |
||
| Line 333: | Line 347: | ||
| 15 minutes |
| 15 minutes |
||
| 3 |
| 3 |
||
| − | |- |
+ | |- align="center" |
| align="left" |[[Treasure and Tribulations]] |
| align="left" |[[Treasure and Tribulations]] |
||
| align="left" |[[Balga's Dais]] |
| align="left" |[[Balga's Dais]] |
||
| Line 339: | Line 353: | ||
| 30 minutes |
| 30 minutes |
||
| 6 |
| 6 |
||
| + | |} |
||
| + | |||
| + | |||
| + | ===Einherjar=== |
||
| + | :*Found in the final [[Armoury Crate]] if [[Hrungnir]] was the chamber boss. |
||
| + | ===Treasure Casket=== |
||
| + | :*[[Batallia Downs]] |
||
| + | :*[[Rolanberry Fields]] |
||
| + | :*[[Eastern Altepa Desert]] |
||
| + | :*[[Qufim Island]] |
||
| + | ===Tenshodo Coffer=== |
||
| + | {|class="ffxi-table wide-table" |
||
| + | |- |
||
| ⚫ | |||
| ⚫ | |||
| ⚫ | |||
| + | |'''[[Crimson Key]]''' |
||
| + | |Trade [[Seedspall Lux]], [[Seedspall Luna]], and [[Seedspall Astrum]] to [[Squintrox Dryeyes]] |
||
| ⚫ | |||
| + | |'''[[Peach coral key]]''' |
||
| + | |Beat [[Custom Cardian]] group for the mission [[An Errand! The Professor's Price]] |
||
|} |
|} |
||
Latest revision as of 17:55, 2 May 2021

Statistics
Chunk of mythril ore
This ore contains the metal mythril.
Stackable: 12
Other Uses
Resale Price: 207~256 gil
Guild Resale Price: ~375 gil
Synthesis Recipes
None
Used in Recipes
Desynthesis Recipes
None
Obtained from Desynthesis
- None
How to Obtain
Auction House Category: Materials > Goldsmithing ![]()
Can be obtained as a random reward from the Gobbie Mystery Box Special Dial and similar sources.
Merchants
| Price: 1,500 - 9,800 gil | ||
| Name | Location | Type |
|---|---|---|
| Bornahn | Al Zahbi (J-10) | Guild Merchant |
| Teerth | Bastok Markets (H-8) | Guild Merchant |
| Visala | Bastok Markets (H-8) | Guild Merchant |
| Albinie | Port San d'Oria (H-6) | Standard Merchant
|
| Denvihr | Port Bastok (G-7) | Standard Merchant
|
| Uli Pehkowa | Port Windurst (M-7) | Standard Merchant
|

Chocobo Digging
| Zone | Abundance |
|---|---|
| Eastern Altepa Desert | Rare |
| North Gustaberg | Rare |
| Meriphataud Mountains ● | Rare |
| South Gustaberg | Very Rare |
| ● = Requires Burrow ● = Requires Egg Helm ● = Requires Bore ● = Obtainable only at Night | |
Mining
| Zone | Abundance |
|---|---|
| Palborough Mines | Rare |
| North Gustaberg (S) | Rare |
| Newton Movalpolos | Very Rare |
| Oldton Movalpolos | Very Rare |
Gardening
| Fruit Seeds: | |||
|---|---|---|---|
| Flowerpot | Crystal 1 | Crystal 2 | Yield |
| 3 | |||


Dropped From
Stolen From
| Name | Level | Zone |
|---|---|---|
| Bugbear Trashman | 65-67 | Newton Movalpolos |
| Bugbear Watchman | 71-76 | Newton Movalpolos |
| Bugbear Deathsman | 74-76 | Newton Movalpolos |
BCNM
| Name | Zone | Level | Time | Members |
|---|---|---|---|---|
| Birds of a Feather | Waughroon Shrine | 30 | 15 minutes | 3 |
| Cactuar Suave | Chamber of Oracles | 75 | 30 minutes | 6 |
| Come Into My Parlor | Qu'Bia Arena | 75 | 30 minutes | 6 |
| Contaminated Colosseum | Horlais Peak | 75 | 30 minutes | 6 |
| Copycat | Waughroon Shrine | 75 | 30 minutes | 6 |
| Double Dragonian | Horlais Peak | 75 | 30 minutes | 6 |
| Eye of the Storm | Chamber of Oracles | 60 | 30 minutes | 6 |
| Horns of War | Horlais Peak | 75 | 30 minutes | 18 |
| The Hills Are Alive | Waughroon Shrine | 75 | 30 minutes | 18 |
| Idol Thoughts | Qu'Bia Arena | 50 | 30 minutes | 6 |
| Legion XI Comitatensis | Chamber of Oracles | 60 | 30 minutes | 6 |
| Petrifying Pair | Ghelsba Outpost | 30 | 15 minutes | 3 |
| Treasure and Tribulations | Balga's Dais | 50 | 30 minutes | 6 |
Einherjar
- Found in the final Armoury Crate if Hrungnir was the chamber boss.
Treasure Casket
Tenshodo Coffer
| Key | Mission |
|---|---|
| Crimson Key | Trade Seedspall Lux, Seedspall Luna, and Seedspall Astrum to Squintrox Dryeyes |
| Peach coral key | Beat Custom Cardian group for the mission An Errand! The Professor's Price |