No edit summary Tag: Visual edit |
(tables) |
||
| Line 7: | Line 7: | ||
:[[West Ronfaure]] / [[East Ronfaure]] / [[La Theine Plateau]] / [[Valkurm Dunes]] / [[Jugner Forest]] / [[Batallia Downs]] / [[North Gustaberg]] / [[South Gustaberg]] / [[Konschtat Highlands]] / [[Pashhow Marshlands]] / [[Rolanberry Fields]] / [[Beaucedine Glacier]] / [[Xarcabard]] / [[Cape Teriggan]] / [[Eastern Altepa Desert]] / [[West Sarutabaruta]] / [[East Sarutabaruta]] / [[Tahrongi Canyon]] / [[Buburimu Peninsula]] / [[Meriphataud Mountains]] / [[Sauromugue Champaign]] / [[The Sanctuary of Zi'Tah]] / [[Ro'Maeve]] / [[Yuhtunga Jungle]] / [[Yhoator Jungle]] / [[Western Altepa Desert]] / [[Qufim Island]] / [[Behemoth's Dominion]] / [[Valley of Sorrows]] |
:[[West Ronfaure]] / [[East Ronfaure]] / [[La Theine Plateau]] / [[Valkurm Dunes]] / [[Jugner Forest]] / [[Batallia Downs]] / [[North Gustaberg]] / [[South Gustaberg]] / [[Konschtat Highlands]] / [[Pashhow Marshlands]] / [[Rolanberry Fields]] / [[Beaucedine Glacier]] / [[Xarcabard]] / [[Cape Teriggan]] / [[Eastern Altepa Desert]] / [[West Sarutabaruta]] / [[East Sarutabaruta]] / [[Tahrongi Canyon]] / [[Buburimu Peninsula]] / [[Meriphataud Mountains]] / [[Sauromugue Champaign]] / [[The Sanctuary of Zi'Tah]] / [[Ro'Maeve]] / [[Yuhtunga Jungle]] / [[Yhoator Jungle]] / [[Western Altepa Desert]] / [[Qufim Island]] / [[Behemoth's Dominion]] / [[Valley of Sorrows]] |
||
*The tablets can only be targeted when a player gets within close proximity of one, though they do show up on [[widescan]] near the bottom of the list above any [[NPC|NPCs]] and [[Field Manual|Field Manuals]]. |
*The tablets can only be targeted when a player gets within close proximity of one, though they do show up on [[widescan]] near the bottom of the list above any [[NPC|NPCs]] and [[Field Manual|Field Manuals]]. |
||
| − | **The tablets do not automatically spawn when it is time; they only spawn when a players comes within 87'~ of them. Same for widescan. They will not appear on widescan until a player has spawned one by coming within proximity of it. [ |
+ | **The tablets do not automatically spawn when it is time; they only spawn when a players comes within 87'~ of them. Same for widescan. They will not appear on widescan until a player has spawned one by coming within proximity of it. [https://forum.square-enix.com/ffxi/threads/14328-%E3%83%8F%E3%83%83%E3%83%94%E3%83%BC%E3%83%91%E3%83%AF%E3%83%BC%E3%81%AB%E5%AF%BE%E3%81%99%E3%82%8B%E6%84%8F%E8%A6%8B%E3%80%81%E8%A6%81%E6%9C%9B?p=579171&viewfull=1#post579171] |
**There is a 2-3 second delay from when a player comes within proximity of a tablet and it will become targetable and scannable, making it easy to miss with enhanced movement speed. |
**There is a 2-3 second delay from when a player comes within proximity of a tablet and it will become targetable and scannable, making it easy to miss with enhanced movement speed. |
||
| − | *It is possible to search for mog tablets while remaining on a mount or chocobo. [ |
+ | *It is possible to search for mog tablets while remaining on a mount or chocobo. [https://forum.square-enix.com/ffxi/threads/14328-%E3%83%8F%E3%83%83%E3%83%94%E3%83%BC%E3%83%91%E3%83%AF%E3%83%BC%E3%81%AB%E5%AF%BE%E3%81%99%E3%82%8B%E6%84%8F%E8%A6%8B%E3%80%81%E8%A6%81%E6%9C%9B?p=579171&viewfull=1#post579171][http://www.playonline.com/pcd/verup/ff11us/detail/4742/detail.html] |
*A message will be displayed to every player in areas subject to [[Super Kupowers]] whenever a tablet has been found. |
*A message will be displayed to every player in areas subject to [[Super Kupowers]] whenever a tablet has been found. |
||
| Line 17: | Line 17: | ||
You do not have to return to the [[Explorer Moogle]] after finding a Mog-Tablet in order for the [[Super Kupowers]] to be granted. You have until the [[Super Kupowers]] wear off (1 week) to claim your reward. |
You do not have to return to the [[Explorer Moogle]] after finding a Mog-Tablet in order for the [[Super Kupowers]] to be granted. You have until the [[Super Kupowers]] wear off (1 week) to claim your reward. |
||
| − | *If you already have a reward item marked {{Rare}}{{Exclusive}} from a previous Mog-Tablet recovery and the reward given from a new recovery is the same, you will be unable to obtain both the item '''and''' the [[Kupofried's Ring]] even if you do not have a ring in your possession already. You must first discard the conflicting item, then talk to the [[Explorer Moogle]] again to recieve both the item and the ring together. |
+ | *If you already have a reward item marked {{Rare|nc}}{{Exclusive|nc}} from a previous Mog-Tablet recovery and the reward given from a new recovery is the same, you will be unable to obtain both the item '''and''' the [[Kupofried's Ring]] even if you do not have a ring in your possession already. You must first discard the conflicting item, then talk to the [[Explorer Moogle]] again to recieve both the item and the ring together. |
When all 11 tablets are discovered, [[Super Kupowers]] will be granted to all players for one week within certain areas. After this period of time, the tablets will be scattered again, and following a period of 8-24 hours, they will become discoverable once again. |
When all 11 tablets are discovered, [[Super Kupowers]] will be granted to all players for one week within certain areas. After this period of time, the tablets will be scattered again, and following a period of 8-24 hours, they will become discoverable once again. |
||
| Line 47: | Line 47: | ||
| width="60" align="center" valign="top" style="background:#FFE4E1;" | [[image:Eastern_Altepa_Desert_Map.jpg|40px]] |
| width="60" align="center" valign="top" style="background:#FFE4E1;" | [[image:Eastern_Altepa_Desert_Map.jpg|40px]] |
||
| valign="top" | |
| valign="top" | |
||
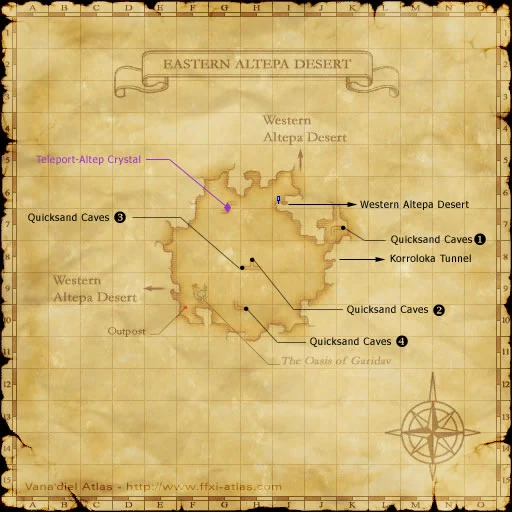
| − | *F-8 Dead center |
+ | *{{Location Tooltip|area=Eastern Altepa Desert|pos=F-8}} Dead center |
| − | *G-6 Top Center |
+ | *{{Location Tooltip|area=Eastern Altepa Desert|pos=G-6}} Top Center |
| + | *{{Location Tooltip|area=Eastern Altepa Desert|pos=G-8}} Top left |
||
| − | *G-8 Top left |
||
| − | *G-8/9 Mid-left on the line |
+ | *{{Location Tooltip|area=Eastern Altepa Desert|pos=G-8}}/{{Location Tooltip|area=Eastern Altepa Desert|pos=G-9}} Mid-left on the line |
|} |
|} |
||
| width="50%" valign="top" | |
| width="50%" valign="top" | |
||
| Line 60: | Line 60: | ||
[[image:Western_Altepa_Desert_Map.jpg|40px]] |
[[image:Western_Altepa_Desert_Map.jpg|40px]] |
||
| valign="top" | |
| valign="top" | |
||
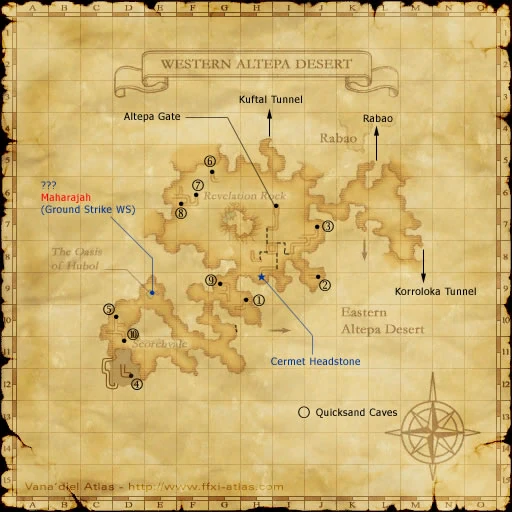
| − | *D-12 Top near trench |
+ | *{{Location Tooltip|area=Western Altepa Desert|pos=D-12}} Top near trench |
| − | *F-11 Dead center |
+ | *{{Location Tooltip|area=Western Altepa Desert|pos=F-11}} Dead center |
| − | *G-5 Very bottom right |
+ | *{{Location Tooltip|area=Western Altepa Desert|pos=G-5}} Very bottom right |
| − | *G-11 top center |
+ | *{{Location Tooltip|area=Western Altepa Desert|pos=G-11}} top center |
| − | *K-6 Bottom left |
+ | *{{Location Tooltip|area=Western Altepa Desert|pos=K-6}} Bottom left |
| − | *L-6 Bottom middle (in between the plants) |
+ | *{{Location Tooltip|area=Western Altepa Desert|pos=L-6}} Bottom middle (in between the plants) |
|} |
|} |
||
|} |
|} |
||
| Line 78: | Line 78: | ||
| width="60" align="center" valign="top" style="background:#FFE4E1;" | [[image:YuhtungaJungle.png|40px]] |
| width="60" align="center" valign="top" style="background:#FFE4E1;" | [[image:YuhtungaJungle.png|40px]] |
||
| valign="top" | |
| valign="top" | |
||
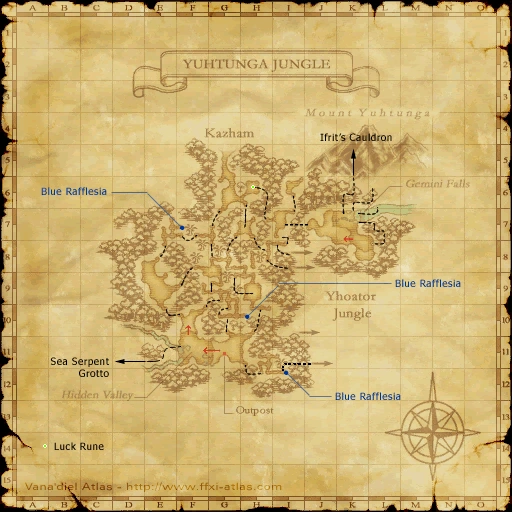
| − | *E-9 Bottom left |
+ | *{{Location Tooltip|area=Yuhtunga Jungle|pos=E-9}} Bottom left |
| − | *H-7 Behind a rock near the tunnel |
+ | *{{Location Tooltip|area=Yuhtunga Jungle|pos=H-7}} Behind a rock near the tunnel |
| − | *I-6 Next to the rock. |
+ | *{{Location Tooltip|area=Yuhtunga Jungle|pos=I-6}} Next to the rock. |
| − | *K-8 Near center (must walk through Ifrit's Cauldron) |
+ | *{{Location Tooltip|area=Yuhtunga Jungle|pos=K-8}} Near center (must walk through Ifrit's Cauldron) |
|} |
|} |
||
| width="50%" valign="top" | |
| width="50%" valign="top" | |
||
| Line 90: | Line 90: | ||
| width="60" align="center" valign="top" style="background:#FFE4E1;" | [[image:YhoatorJungle.png|40px]] |
| width="60" align="center" valign="top" style="background:#FFE4E1;" | [[image:YhoatorJungle.png|40px]] |
||
| valign="top" | |
| valign="top" | |
||
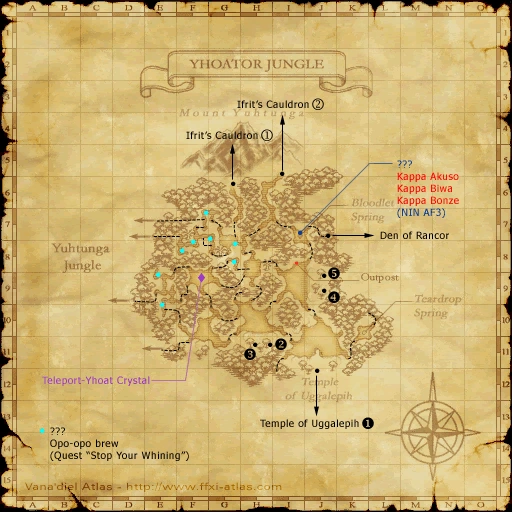
| − | *E-9 Lower middle at the bend |
+ | *{{Location Tooltip|area=Yhoator Jungle|pos=E-9}} Lower middle at the bend |
| − | *H-8 Above ground dead center |
+ | *{{Location Tooltip|area=Yhoator Jungle|pos=H-8}} Above ground dead center |
| − | *I-9 Just South of Outpost in the ruins. |
+ | *{{Location Tooltip|area=Yhoator Jungle|pos=I-9}} Just South of Outpost in the ruins. |
| − | *G-7 lower left corner in the bend of the path. |
+ | *{{Location Tooltip|area=Yhoator Jungle|pos=G-7}} lower left corner in the bend of the path. |
|} |
|} |
||
|} |
|} |
||
| Line 104: | Line 104: | ||
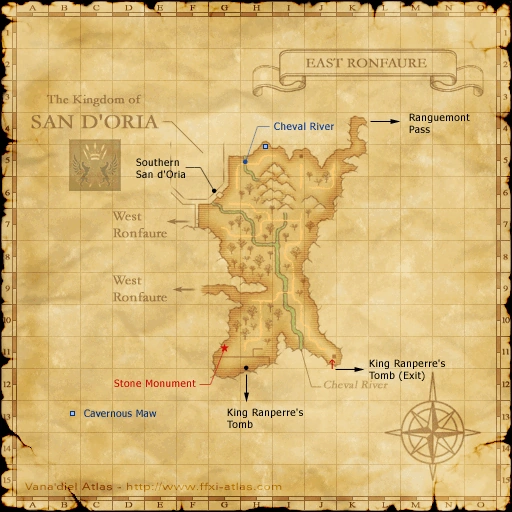
! colspan="2" style="background:#B0C4DE;" align="left" | '''[[East Ronfaure]]''' |
! colspan="2" style="background:#B0C4DE;" align="left" | '''[[East Ronfaure]]''' |
||
|- |
|- |
||
| − | | width="60" align="center" valign="top" style="background:#FFE4E1;" | [[image: |
+ | | width="60" align="center" valign="top" style="background:#FFE4E1;" | [[image:East_Ronfaure.png|40px]] |
| valign="top" | |
| valign="top" | |
||
| − | *I-7 Bridge on river |
+ | *{{Location Tooltip|area=East Ronfaure|pos=I-7}} Bridge on river |
| − | *I-9 Near bridge on river |
+ | *{{Location Tooltip|area=East Ronfaure|pos=I-9}} Near bridge on river |
| − | *I-9 Top middle near river |
+ | *{{Location Tooltip|area=East Ronfaure|pos=I-9}} Top middle near river |
| − | *H-8 Bottom left corner |
+ | *{{Location Tooltip|area=East Ronfaure|pos=H-8}} Bottom left corner |
|} |
|} |
||
| width="50%" valign="top" | |
| width="50%" valign="top" | |
||
| Line 118: | Line 118: | ||
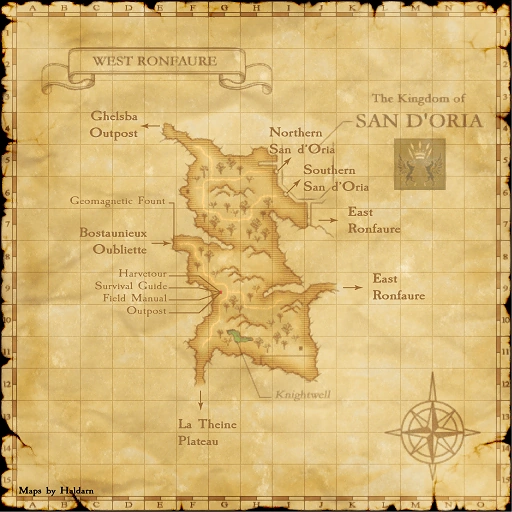
| width="60" align="center" valign="top" style="background:#FFE4E1;" | [[image:West Ronfaure.png|40px]] |
| width="60" align="center" valign="top" style="background:#FFE4E1;" | [[image:West Ronfaure.png|40px]] |
||
| valign="top" | |
| valign="top" | |
||
| − | *F-7 Bottom Left |
+ | *{{Location Tooltip|area=West Ronfaure|pos=F-7}} Bottom Left |
| − | *G-7 Top middle |
+ | *{{Location Tooltip|area=West Ronfaure|pos=G-7}} Top middle |
| − | *H-7 Bottom Left |
+ | *{{Location Tooltip|area=West Ronfaure|pos=H-7}} Bottom Left |
| + | *{{Location Tooltip|area=West Ronfaure|pos=H-8}} Center |
||
| − | *H-8 Center |
||
| + | *{{Location Tooltip|area=West Ronfaure|pos=H-9}} Center |
||
| − | *H-9 Center |
||
| − | *H-10 Bottom Right |
+ | *{{Location Tooltip|area=West Ronfaure|pos=H-10}} Bottom Right |
| − | *I-10 North East of Stone Monument |
+ | *{{Location Tooltip|area=West Ronfaure|pos=I-10}} North East of Stone Monument |
|} |
|} |
||
|} |
|} |
||
| Line 137: | Line 137: | ||
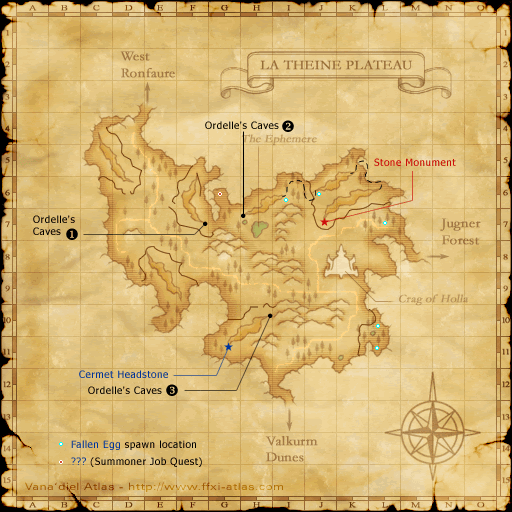
| width="60" align="center" valign="top" style="background:#FFE4E1;" | [[File:La Theine Plateau.png|40px]] |
| width="60" align="center" valign="top" style="background:#FFE4E1;" | [[File:La Theine Plateau.png|40px]] |
||
| valign="top" | |
| valign="top" | |
||
| − | *D-7 Top left |
+ | *{{Location Tooltip|area=La Theine Plateau|pos=D-7}} Top left |
| − | *D-7 Below Middle Of Mountain |
+ | *{{Location Tooltip|area=La Theine Plateau|pos=D-7}} Below Middle Of Mountain |
| − | *E-7 Near the road on the hillside. |
+ | *{{Location Tooltip|area=La Theine Plateau|pos=E-7}} Near the road on the hillside. |
| − | *I-6 Near the middle. |
+ | *{{Location Tooltip|area=La Theine Plateau|pos=I-6}} Near the middle. |
| − | *I-9 Next to the road. |
+ | *{{Location Tooltip|area=La Theine Plateau|pos=I-9}} Next to the road. |
| − | *I-7 West of mountains |
+ | *{{Location Tooltip|area=La Theine Plateau|pos=I-7}} West of mountains |
| − | *K-11 In the middle near the pond. |
+ | *{{Location Tooltip|area=La Theine Plateau|pos=K-11}} In the middle near the pond. |
|} |
|} |
||
| width="50%" valign="top" | |
| width="50%" valign="top" | |
||
| Line 152: | Line 152: | ||
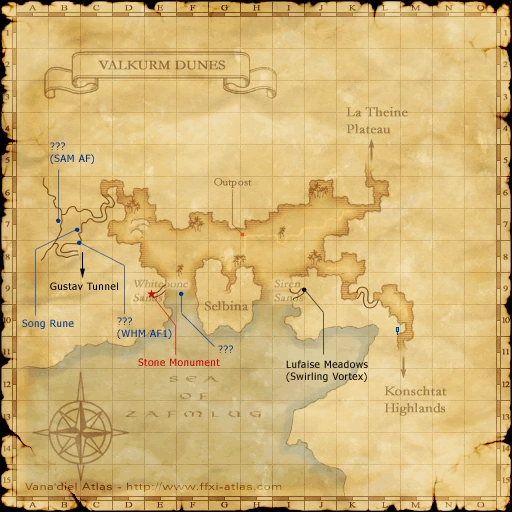
| width="60" align="center" valign="top" style="background:#FFE4E1;" | [[File:Valkurm Dunes.png|40px]] |
| width="60" align="center" valign="top" style="background:#FFE4E1;" | [[File:Valkurm Dunes.png|40px]] |
||
| valign="top" | |
| valign="top" | |
||
| − | *D-7 On way to secret beach |
+ | *{{Location Tooltip|area=Valkurm Dunes|pos=D-7}} On way to secret beach |
| − | *E-8 Just west of the palm trees |
+ | *{{Location Tooltip|area=Valkurm Dunes|pos=E-8}} Just west of the palm trees |
| − | *F-7 Right in-between all the palm trees |
+ | *{{Location Tooltip|area=Valkurm Dunes|pos=F-7}} Right in-between all the palm trees |
| − | *G-7 Middle of square, between root and wall |
+ | *{{Location Tooltip|area=Valkurm Dunes|pos=G-7}} Middle of square, between root and wall |
| − | *H-9 A little north of the boat |
+ | *{{Location Tooltip|area=Valkurm Dunes|pos=H-9}} A little north of the boat |
|} |
|} |
||
|} |
|} |
||
| Line 169: | Line 169: | ||
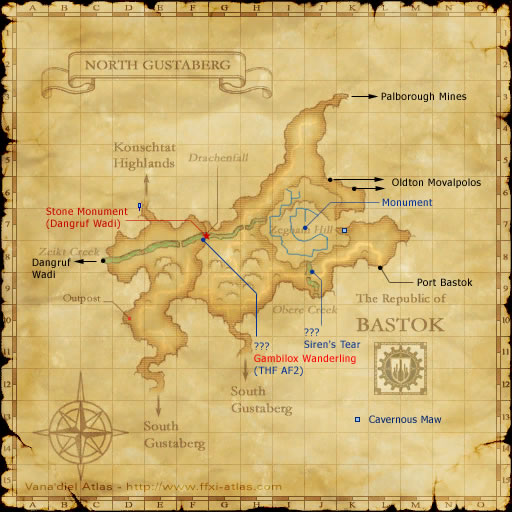
| width="60" align="center" valign="top" style="background:#FFE4E1;" | [[image:North_Gustaberg_Map.jpg|40px]] |
| width="60" align="center" valign="top" style="background:#FFE4E1;" | [[image:North_Gustaberg_Map.jpg|40px]] |
||
| valign="top" | |
| valign="top" | |
||
| − | *D-10/E-10 by road next to a rock |
+ | *{{Location Tooltip|area=North Gustaberg|pos=D-10}}/{{Location Tooltip|area=North Gustaberg|pos=E-10}} by road next to a rock |
| − | *F-8/G-8 Center of border line |
+ | *{{Location Tooltip|area=North Gustaberg|pos=F-8}}/{{Location Tooltip|area=North Gustaberg|pos=G-8}} Center of border line |
| − | *F-9 Bottom right |
+ | *{{Location Tooltip|area=North Gustaberg|pos=F-9}} Bottom right |
| − | *H-7 Center (just south of the river) |
+ | *{{Location Tooltip|area=North Gustaberg|pos=H-7}} Center (just south of the river) |
| − | *J-8 Northwest corner on Zegham Hill |
+ | *{{Location Tooltip|area=North Gustaberg|pos=J-8}} Northwest corner on Zegham Hill |
| − | *K-7 Top-Left Quad near bend |
+ | *{{Location Tooltip|area=North Gustaberg|pos=K-7}} Top-Left Quad near bend |
|} |
|} |
||
| width="50%" valign="top" | |
| width="50%" valign="top" | |
||
| Line 183: | Line 183: | ||
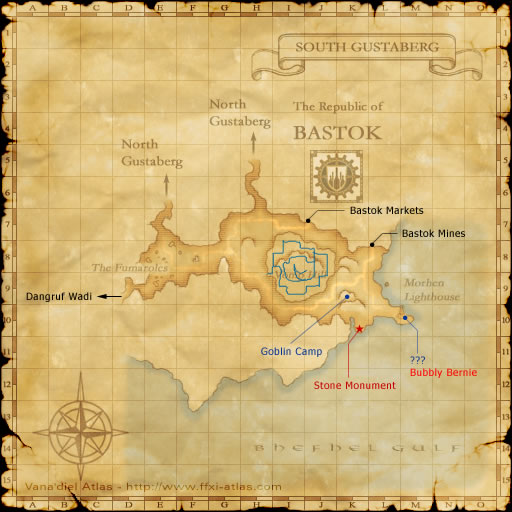
| width="60" align="center" valign="top" style="background:#FFE4E1;" | [[File:South Gustaberg.jpg|40px]] |
| width="60" align="center" valign="top" style="background:#FFE4E1;" | [[File:South Gustaberg.jpg|40px]] |
||
| valign="top" | |
| valign="top" | |
||
| − | *E-9 Between 3 small ponds |
+ | *{{Location Tooltip|area=South Gustaberg|pos=E-9}} Between 3 small ponds |
| − | *F-8 Left side |
+ | *{{Location Tooltip|area=South Gustaberg|pos=F-8}} Left side |
| − | *I-8 Center top - top level Vomp Hill |
+ | *{{Location Tooltip|area=South Gustaberg|pos=I-8}} Center top - top level Vomp Hill |
| − | *J-9 Lower left under platform |
+ | *{{Location Tooltip|area=South Gustaberg|pos=J-9}} Lower left under platform |
| − | *J-9 Top right corner |
+ | *{{Location Tooltip|area=South Gustaberg|pos=J-9}} Top right corner |
|} |
|} |
||
|} |
|} |
||
| Line 200: | Line 200: | ||
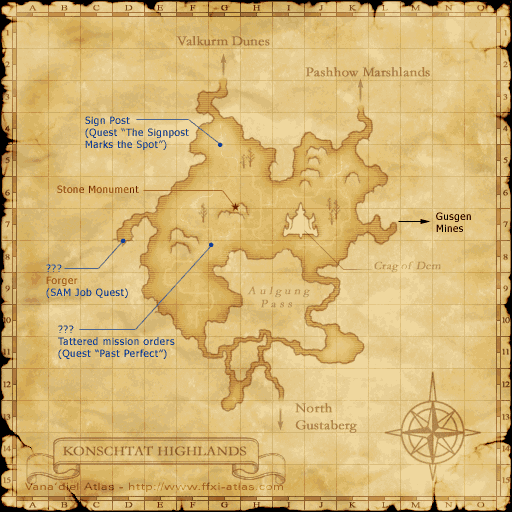
| width="60" align="center" valign="top" style="background:#FFE4E1;" | [[image:Konschtat Highlands.png|40px]] |
| width="60" align="center" valign="top" style="background:#FFE4E1;" | [[image:Konschtat Highlands.png|40px]] |
||
| valign="top" | |
| valign="top" | |
||
| − | * F-6/E-6 At the middle of line dividing the coordinates. |
+ | *{{Location Tooltip|area=Konschtat Highlands|pos=F-6}}/{{Location Tooltip|area=Konschtat Highlands|pos=E-6}} At the middle of line dividing the coordinates. |
| − | * H-4/5 At the middle of line dividing the coordinates. |
+ | *{{Location Tooltip|area=Konschtat Highlands|pos=H-4}}/{{Location Tooltip|area=Konschtat Highlands|pos=H-5}} At the middle of line dividing the coordinates. |
| − | * K-4 Heading toward Pashhow. |
+ | *{{Location Tooltip|area=Konschtat Highlands|pos=K-4}} Heading toward Pashhow. |
|} |
|} |
||
| width="50%" valign="top" | |
| width="50%" valign="top" | |
||
| Line 211: | Line 211: | ||
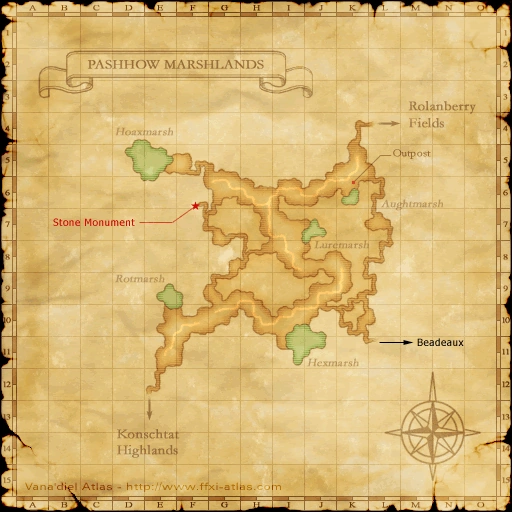
| width="60" align="center" valign="top" style="background:#FFE4E1;" | [[image:PashowMarshlands.png|40px]] |
| width="60" align="center" valign="top" style="background:#FFE4E1;" | [[image:PashowMarshlands.png|40px]] |
||
| valign="top" | |
| valign="top" | |
||
| − | *H-6 Bottom left |
+ | *{{Location Tooltip|area=Pashhow Marshlands|pos=H-6}} Bottom left |
| − | *H-10 Top right |
+ | *{{Location Tooltip|area=Pashhow Marshlands|pos=H-10}} Top right |
| − | *H-9 Bottom center |
+ | *{{Location Tooltip|area=Pashhow Marshlands|pos=H-9}} Bottom center |
| − | *I-8 Center of the map beside pathway |
+ | *{{Location Tooltip|area=Pashhow Marshlands|pos=I-8}} Center of the map beside pathway |
| − | *J-6 Against the wall |
+ | *{{Location Tooltip|area=Pashhow Marshlands|pos=J-6}} Against the wall |
|} |
|} |
||
|} |
|} |
||
| Line 228: | Line 228: | ||
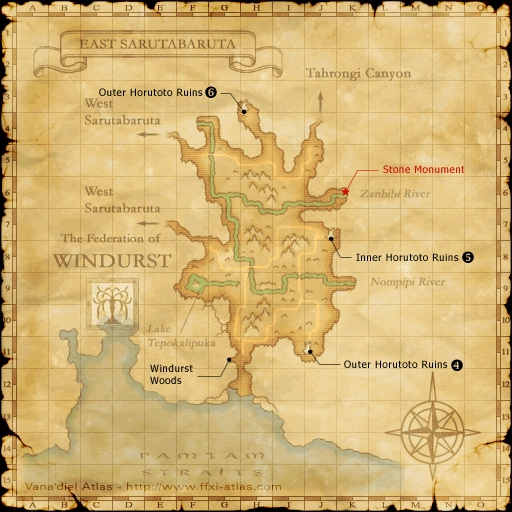
| width="60" align="center" valign="top" style="background:#FFE4E1;" | [[image:East Sarutabaruta.png|40px]] |
| width="60" align="center" valign="top" style="background:#FFE4E1;" | [[image:East Sarutabaruta.png|40px]] |
||
| valign="top" | |
| valign="top" | |
||
| − | *G-5 Bottom right |
+ | *{{Location Tooltip|area=East Sarutabaruta|pos=G-5}} Bottom right |
| − | *G-6 Top left corner |
+ | *{{Location Tooltip|area=East Sarutabaruta|pos=G-6}} Top left corner |
| − | *H-8 Bottom, south of path |
+ | *{{Location Tooltip|area=East Sarutabaruta|pos=H-8}} Bottom, south of path |
| − | *J-7 Bottom right, right next to the tower |
+ | *{{Location Tooltip|area=East Sarutabaruta|pos=J-7}} Bottom right, right next to the tower |
| − | *J-8 Bottom left |
+ | *{{Location Tooltip|area=East Sarutabaruta|pos=J-8}} Bottom left |
|} |
|} |
||
| width="50%" valign="top" | |
| width="50%" valign="top" | |
||
| Line 241: | Line 241: | ||
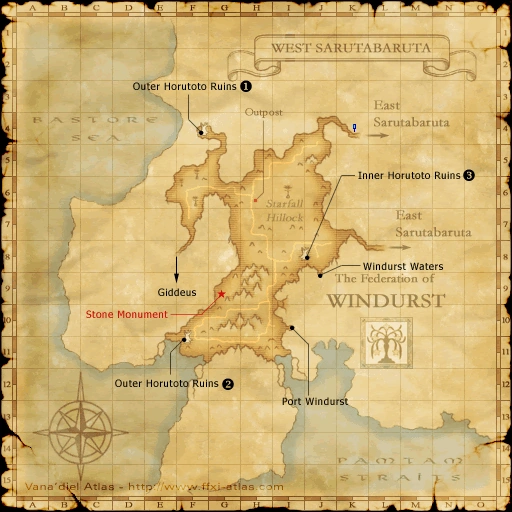
| width="60" align="center" valign="top" style="background:#FFE4E1;" | [[image:WestSarutabaruta.png|40px]] |
| width="60" align="center" valign="top" style="background:#FFE4E1;" | [[image:WestSarutabaruta.png|40px]] |
||
| valign="top" | |
| valign="top" | |
||
| − | *G-9 Bottom middle |
+ | *{{Location Tooltip|area=West Sarutabaruta|pos=G-9}} Bottom middle |
| − | *H-6 North of Outpost close to a tree |
+ | *{{Location Tooltip|area=West Sarutabaruta|pos=H-6}} North of Outpost close to a tree |
| − | *H-7 On the north line (south of outpost, right as the road turns East) |
+ | *{{Location Tooltip|area=West Sarutabaruta|pos=H-7}} On the north line (south of outpost, right as the road turns East) |
| − | *I-8 Top left corner |
+ | *{{Location Tooltip|area=West Sarutabaruta|pos=I-8}} Top left corner |
| − | *J-8 Middle-East |
+ | *{{Location Tooltip|area=West Sarutabaruta|pos=J-8}} Middle-East |
|} |
|} |
||
|} |
|} |
||
| Line 258: | Line 258: | ||
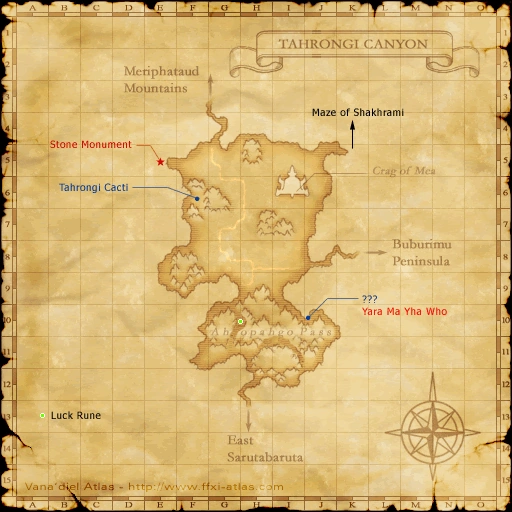
| width="60" align="center" valign="top" style="background:#FFE4E1;" | [[image:Tahrongi Canyon.png|40px]] |
| width="60" align="center" valign="top" style="background:#FFE4E1;" | [[image:Tahrongi Canyon.png|40px]] |
||
| valign="top" | |
| valign="top" | |
||
| − | *G-5 Bottom right. |
+ | *{{Location Tooltip|area=Tahrongi Canyon|pos=G-5}} Bottom right. |
| − | *G-7/H-7 Right on the line in the middle. |
+ | *{{Location Tooltip|area=Tahrongi Canyon|pos=G-7}}/{{Location Tooltip|area=Tahrongi Canyon|pos=H-7}} Right on the line in the middle. |
| − | *H-6 Southeast Corner. |
+ | *{{Location Tooltip|area=Tahrongi Canyon|pos=H-6}} Southeast Corner. |
| − | *H-8 Smack in the middle, on top of the hill. |
+ | *{{Location Tooltip|area=Tahrongi Canyon|pos=H-8}} Smack in the middle, on top of the hill. |
| − | *I-8/J-8 Right on the line in the middle. |
+ | *{{Location Tooltip|area=Tahrongi Canyon|pos=I-8}}/{{Location Tooltip|area=Tahrongi Canyon|pos=J-8}} Right on the line in the middle. |
|} |
|} |
||
| width="50%" valign="top" | |
| width="50%" valign="top" | |
||
| Line 271: | Line 271: | ||
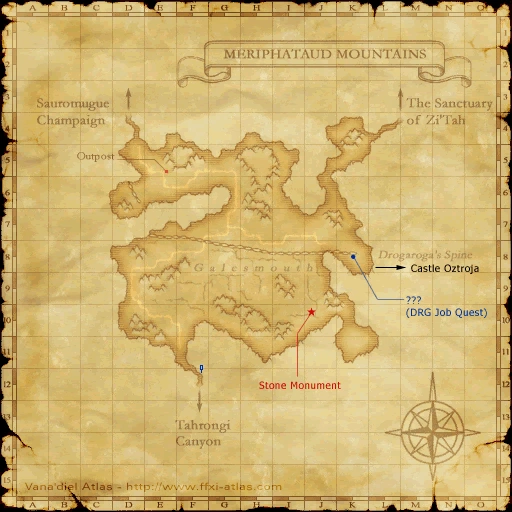
| width="60" align="center" valign="top" style="background:#FFE4E1;" | [[image:MeriphataudMountains.png|40px]] |
| width="60" align="center" valign="top" style="background:#FFE4E1;" | [[image:MeriphataudMountains.png|40px]] |
||
| valign="top" | |
| valign="top" | |
||
| − | *E-5 Top left corner |
+ | *{{Location Tooltip|area=Meriphataud Mountains|pos=E-5}} Top left corner |
| − | *F-9 Under the top line, just under the big "G" letter. |
+ | *{{Location Tooltip|area=Meriphataud Mountains|pos=F-9}} Under the top line, just under the big "G" letter. |
| − | *H-6 Bottom left corner |
+ | *{{Location Tooltip|area=Meriphataud Mountains|pos=H-6}} Bottom left corner |
| − | *H-8 Left side under spine |
+ | *{{Location Tooltip|area=Meriphataud Mountains|pos=H-8}} Left side under spine |
| + | *{{Location Tooltip|area=Meriphataud Mountains|pos=I-7}} Middle |
||
| − | *I-7 Middle |
||
| − | *I-8 South Middle Right |
+ | *{{Location Tooltip|area=Meriphataud Mountains|pos=I-8}} South Middle Right |
|} |
|} |
||
|} |
|} |
||
| Line 289: | Line 289: | ||
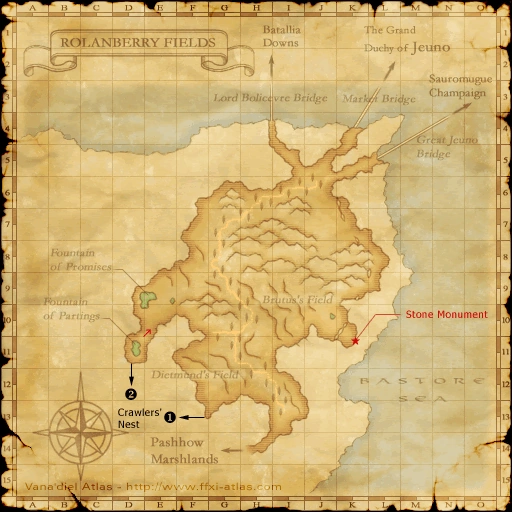
| width="60" align="center" valign="top" style="background:#FFE4E1;" | [[image:RolanberryFields.png|40px]] |
| width="60" align="center" valign="top" style="background:#FFE4E1;" | [[image:RolanberryFields.png|40px]] |
||
| valign="top" | |
| valign="top" | |
||
| − | *F-9 Lower Left |
+ | *{{Location Tooltip|area=Rolanberry Fields|pos=F-9}} Lower Left |
| − | *F-10 Lower Right |
+ | *{{Location Tooltip|area=Rolanberry Fields|pos=F-10}} Lower Right |
| + | *{{Location Tooltip|area=Rolanberry Fields|pos=G-7}} |
||
| − | *G-7 |
||
| − | *H-11 near the vines |
+ | *{{Location Tooltip|area=Rolanberry Fields|pos=H-11}} near the vines |
| + | *{{Location Tooltip|area=Rolanberry Fields|pos=I-9}} Center |
||
| − | *I-9 Center |
||
|} |
|} |
||
| width="50%" valign="top" | |
| width="50%" valign="top" | |
||
| Line 302: | Line 302: | ||
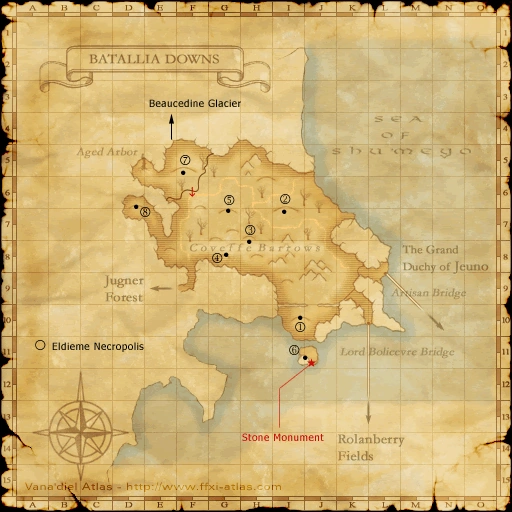
| width="60" align="center" valign="top" style="background:#FFE4E1;" | [[image:Batallia-downs.png|40px]] |
| width="60" align="center" valign="top" style="background:#FFE4E1;" | [[image:Batallia-downs.png|40px]] |
||
| valign="top" | |
| valign="top" | |
||
| − | *E-5 Near Necropolis entrance |
+ | *{{Location Tooltip|area=Batallia Downs|pos=E-5}} Near Necropolis entrance |
| − | *E-7 SouthWest Quadrant |
+ | *{{Location Tooltip|area=Batallia Downs|pos=E-7}} SouthWest Quadrant |
| − | *G-7 Southeast, on top of a hill. |
+ | *{{Location Tooltip|area=Batallia Downs|pos=G-7}} Southeast, on top of a hill. |
| − | *H-6 On top of the hill near the ruins |
+ | *{{Location Tooltip|area=Batallia Downs|pos=H-6}} On top of the hill near the ruins |
| + | *{{Location Tooltip|area=Batallia Downs|pos=H-8}} Center |
||
| − | *H-8 Center |
||
|} |
|} |
||
|} |
|} |
||
| Line 319: | Line 319: | ||
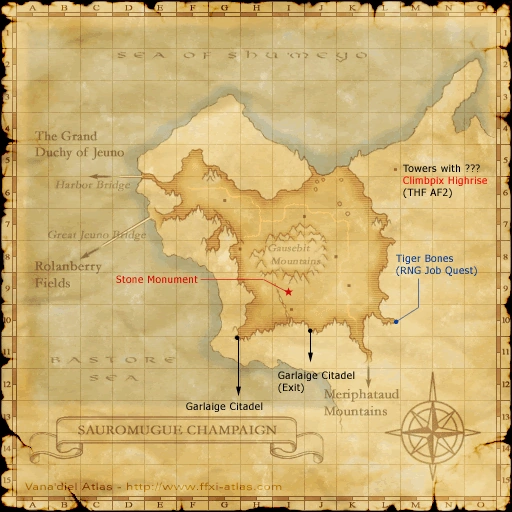
| width="60" align="center" valign="top" style="background:#FFE4E1;" | [[image:SauromugueChampaign.png|40px]] |
| width="60" align="center" valign="top" style="background:#FFE4E1;" | [[image:SauromugueChampaign.png|40px]] |
||
| valign="top" | |
| valign="top" | |
||
| − | *H-9 Next to Gausebit Mountains |
+ | *{{Location Tooltip|area=Sauromugue Champaign|pos=H-9}} Next to Gausebit Mountains |
| − | *I-7 center in ruins on hillside. |
+ | *{{Location Tooltip|area=Sauromugue Champaign|pos=I-7}} center in ruins on hillside. |
| − | *K-7 Near tower |
+ | *{{Location Tooltip|area=Sauromugue Champaign|pos=K-7}} Near tower |
| − | *K-8 Near path |
+ | *{{Location Tooltip|area=Sauromugue Champaign|pos=K-8}} Near path |
| − | *K-10 On path. |
+ | *{{Location Tooltip|area=Sauromugue Champaign|pos=K-10}} On path. |
| − | *L-7 Eastern side at start of Mountain Path |
+ | *{{Location Tooltip|area=Sauromugue Champaign|pos=L-7}} Eastern side at start of Mountain Path |
|} |
|} |
||
| Line 334: | Line 334: | ||
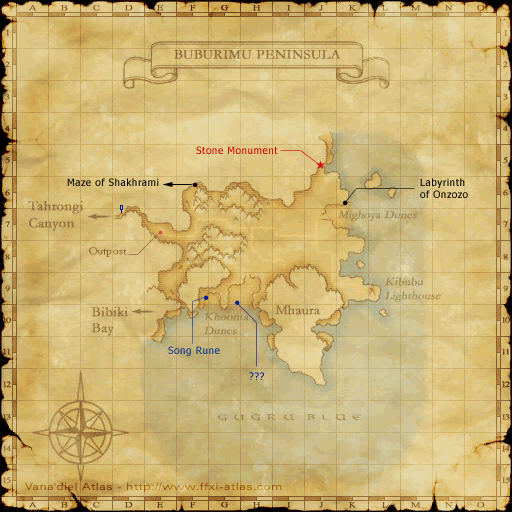
| width="60" align="center" valign="top" style="background:#FFE4E1;" | [[image:Buburimu Peninsula.png|40px]] |
| width="60" align="center" valign="top" style="background:#FFE4E1;" | [[image:Buburimu Peninsula.png|40px]] |
||
| valign="top" | |
| valign="top" | |
||
| − | *J-7 Bottom middle |
+ | *{{Location Tooltip|area=Buburimu Peninsula|pos=J-7}} Bottom middle |
| − | * J-8 Middle right |
+ | *{{Location Tooltip|area=Buburimu Peninsula|pos=J-8}} Middle right |
|} |
|} |
||
|} |
|} |
||
| Line 348: | Line 348: | ||
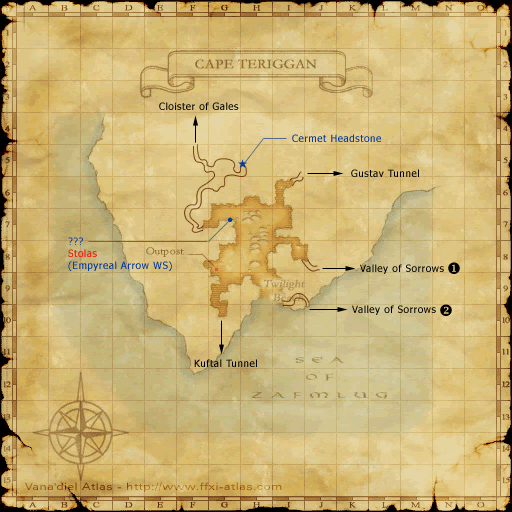
| width="60" align="center" valign="top" style="background:#FFE4E1;" | [[image:CapeTeriggan.png|40px]] |
| width="60" align="center" valign="top" style="background:#FFE4E1;" | [[image:CapeTeriggan.png|40px]] |
||
| valign="top" | |
| valign="top" | |
||
| − | *G-7/H-7 right on the line |
+ | *{{Location Tooltip|area=Cape Teriggan|pos=G-7}}/{{Location Tooltip|area=Cape Teriggan|pos=H-7}} right on the line |
| + | *{{Location Tooltip|area=Cape Teriggan|pos=H-9}} Center |
||
| − | *H-9 Center |
||
| − | *Southwest quadrant of H-7 |
+ | *Southwest quadrant of {{Location Tooltip|area=Cape Teriggan|pos=H-7}} |
|} |
|} |
||
| width="50%" valign="top" | |
| width="50%" valign="top" | |
||
| Line 359: | Line 359: | ||
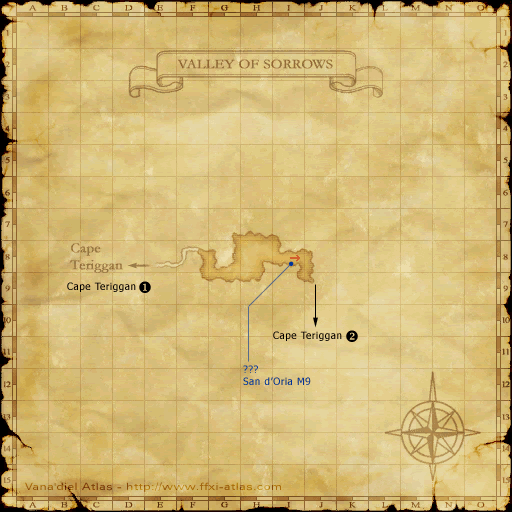
| width="60" align="center" valign="top" style="background:#FFE4E1;" | [[image:Sorrow-valley.png|40px]] |
| width="60" align="center" valign="top" style="background:#FFE4E1;" | [[image:Sorrow-valley.png|40px]] |
||
| valign="top" | |
| valign="top" | |
||
| − | *G-8 By the entrance |
+ | *{{Location Tooltip|area=Valley of Sorrows|pos=G-8}} By the entrance |
| − | *H-8 Dead center |
+ | *{{Location Tooltip|area=Valley of Sorrows|pos=H-8}} Dead center |
|} |
|} |
||
|} |
|} |
||
| Line 373: | Line 373: | ||
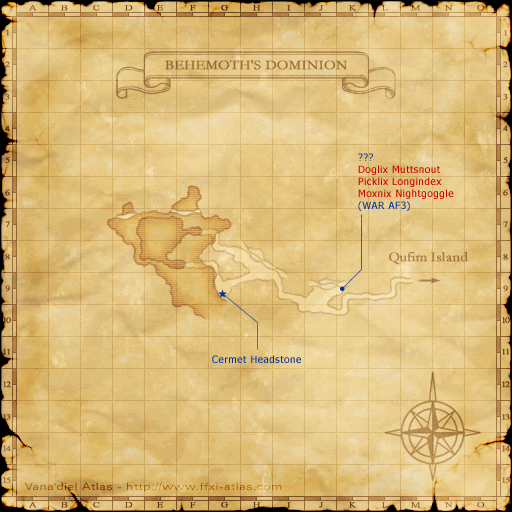
| width="60" align="center" valign="top" style="background:#FFE4E1;" | [[image:BehemothsDominion.png|40px]] |
| width="60" align="center" valign="top" style="background:#FFE4E1;" | [[image:BehemothsDominion.png|40px]] |
||
| valign="top" | |
| valign="top" | |
||
| − | *E-8 Top right corner |
+ | *{{Location Tooltip|area=Behemoth's Dominion|pos=E-8}} Top right corner |
| + | *{{Location Tooltip|area=Behemoth's Dominion|pos=F-7}} Left Middle between {{Location Tooltip|area=Behemoth's Dominion|pos=E-7}}/{{Location Tooltip|area=Behemoth's Dominion|pos=F-7}} Line |
||
| − | *F-7 Left Middle between E-7/F-7 Line |
||
| − | *H-8 against the spine |
+ | *{{Location Tooltip|area=Behemoth's Dominion|pos=H-8}} against the spine |
|} |
|} |
||
| width="50%" valign="top" | |
| width="50%" valign="top" | |
||
| Line 384: | Line 384: | ||
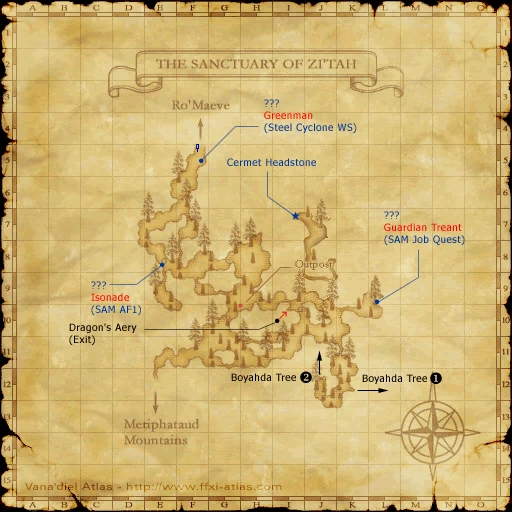
| width="60" align="center" valign="top" style="background:#FFE4E1;" | [[image:Zitah-sanctuary.png|40px]] |
| width="60" align="center" valign="top" style="background:#FFE4E1;" | [[image:Zitah-sanctuary.png|40px]] |
||
| valign="top" | |
| valign="top" | |
||
| − | *F-8 Bottom middle |
+ | *{{Location Tooltip|area=The Sanctuary of Zi'Tah|pos=F-8}} Bottom middle |
| − | *D-7 Behind rock on near the wall |
+ | *{{Location Tooltip|area=The Sanctuary of Zi'Tah|pos=D-7}} Behind rock on near the wall |
| − | *H-8 Bottom Left Corner |
+ | *{{Location Tooltip|area=The Sanctuary of Zi'Tah|pos=H-8}} Bottom Left Corner |
| − | *K-10 South near rocks |
+ | *{{Location Tooltip|area=The Sanctuary of Zi'Tah|pos=K-10}} South near rocks |
| − | *G-10 Bottom center small hill |
+ | *{{Location Tooltip|area=The Sanctuary of Zi'Tah|pos=G-10}} Bottom center small hill |
|} |
|} |
||
|} |
|} |
||
| Line 401: | Line 401: | ||
| width="60" align="center" valign="top" style="background:#FFE4E1;" | [[image:Romaeve.png|40px]] |
| width="60" align="center" valign="top" style="background:#FFE4E1;" | [[image:Romaeve.png|40px]] |
||
| valign="top" | |
| valign="top" | |
||
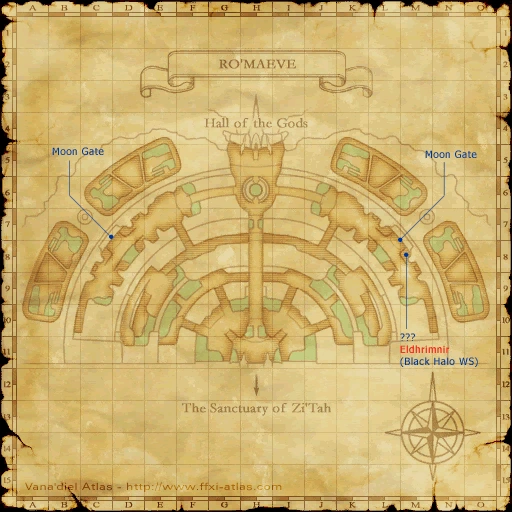
| − | *C-9 Southeast Quadrant |
+ | *{{Location Tooltip|area=Ro'Maeve|pos=C-9}} Southeast Quadrant |
| − | *G-9 Upper right |
+ | *{{Location Tooltip|area=Ro'Maeve|pos=G-9}} Upper right |
| − | *M-9 Southwest Quadrant |
+ | *{{Location Tooltip|area=Ro'Maeve|pos=M-9}} Southwest Quadrant |
| + | *{{Location Tooltip|area=Ro'Maeve|pos=L-9}} |
||
| − | *L-9 |
||
|} |
|} |
||
| width="50%" valign="top" | |
| width="50%" valign="top" | |
||
| Line 413: | Line 413: | ||
| width="60" align="center" valign="top" style="background:#FFE4E1;" | [[image:Beaucedine_glacier.jpg|40px]] |
| width="60" align="center" valign="top" style="background:#FFE4E1;" | [[image:Beaucedine_glacier.jpg|40px]] |
||
| valign="top" | |
| valign="top" | |
||
| − | *G-7 Right in middle |
+ | *{{Location Tooltip|area=Beaucedine Glacier|pos=G-7}} Right in middle |
| − | *H-8 Up on very top cliff (have to go around to get there) |
+ | *{{Location Tooltip|area=Beaucedine Glacier|pos=H-8}} Up on very top cliff (have to go around to get there) |
| − | *I-7 Atop the cliff, near center. |
+ | *{{Location Tooltip|area=Beaucedine Glacier|pos=I-7}} Atop the cliff, near center. |
| − | *K-5 close to fei'yin behind rock on the right side of ramp |
+ | *{{Location Tooltip|area=Beaucedine Glacier|pos=K-5}} close to fei'yin behind rock on the right side of ramp |
| − | *J-9 left side, top level |
+ | *{{Location Tooltip|area=Beaucedine Glacier|pos=J-9}} left side, top level |
| − | *H-9 Top right corner, between pond and cliff |
+ | *{{Location Tooltip|area=Beaucedine Glacier|pos=H-9}} Top right corner, between pond and cliff |
|} |
|} |
||
|} |
|} |
||
| Line 431: | Line 431: | ||
| width="60" align="center" valign="top" style="background:#FFE4E1;" | [[image:Xarcabard.png|40px]] |
| width="60" align="center" valign="top" style="background:#FFE4E1;" | [[image:Xarcabard.png|40px]] |
||
| valign="top" | |
| valign="top" | |
||
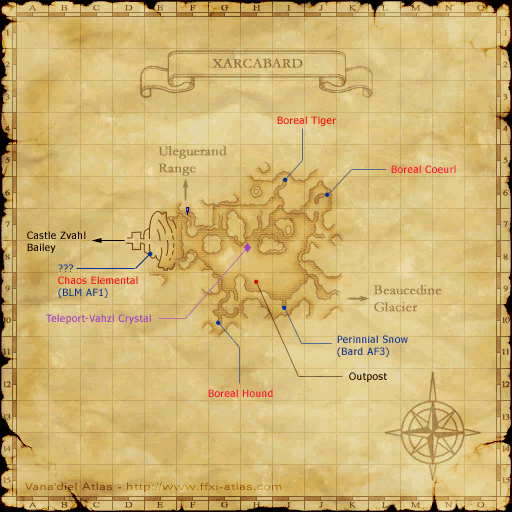
| − | *F-7 Southeast corner, near trench |
+ | *{{Location Tooltip|area=Xarcabard|pos=F-7}} Southeast corner, near trench |
| − | *F-8 Near wall (Might be the same as the F-7 one) |
+ | *{{Location Tooltip|area=Xarcabard|pos=F-8}} Near wall (Might be the same as the {{Location Tooltip|area=Xarcabard|pos=F-7}} one) |
| − | *G-8 Upper right corner of coordinate square, along the wall |
+ | *{{Location Tooltip|area=Xarcabard|pos=G-8}} Upper right corner of coordinate square, along the wall |
| − | *H-7 Top level towards bottom |
+ | *{{Location Tooltip|area=Xarcabard|pos=H-7}} Top level towards bottom |
| − | *H-9 Right behind the rock North of the Outpost Warp |
+ | *{{Location Tooltip|area=Xarcabard|pos=H-9}} Right behind the rock North of the Outpost Warp |
| − | *I-7 middle bottom of coordinate square on map next to rock at the base of the mountain |
+ | *{{Location Tooltip|area=Xarcabard|pos=I-7}} middle bottom of coordinate square on map next to rock at the base of the mountain |
|} |
|} |
||
| width="50%" valign="top" | |
| width="50%" valign="top" | |
||
| Line 445: | Line 445: | ||
| width="60" align="center" valign="top" style="background:#FFE4E1;" | [[image:JugnerForest.png|40px]] |
| width="60" align="center" valign="top" style="background:#FFE4E1;" | [[image:JugnerForest.png|40px]] |
||
| valign="top" | |
| valign="top" | |
||
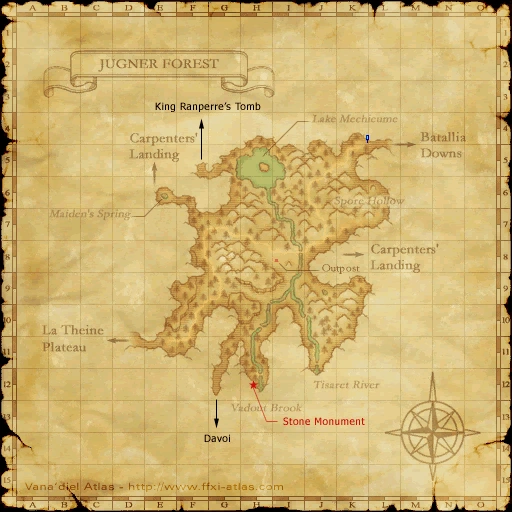
| + | *{{Location Tooltip|area=Jugner Forest|pos=I-6}}/{{Location Tooltip|area=Jugner Forest|pos=J-6}} top corner |
||
| − | *I-6/J-6 top corner |
||
| − | *K-7 bottom left corner |
+ | *{{Location Tooltip|area=Jugner Forest|pos=K-7}} bottom left corner |
| − | *J-10 middle, eastern bank of river |
+ | *{{Location Tooltip|area=Jugner Forest|pos=J-10}} middle, eastern bank of river |
| + | *{{Location Tooltip|area=Jugner Forest|pos=K-10}} |
||
| − | *K-10 |
||
| − | *I-5 bottom middle, west of mountain near lake |
+ | *{{Location Tooltip|area=Jugner Forest|pos=I-5}} bottom middle, west of mountain near lake |
|} |
|} |
||
|} |
|} |
||
| + | |||
| − | {| class="article-table" |
||
| + | {| width="100%" cellspacing="0" cellpadding="5" |
||
| ⚫ | |||
| − | Quifim |
||
|- |
|- |
||
| + | | width="50%" valign="top" | |
||
| − | |[https://vignette.wikia.nocookie.net/ffxi/images/0/02/Qufim_Island.png/revision/latest?cb=20090507114749] |
||
| + | {| style="border-collapse:collapse;" width="100%" cellspacing="0" cellpadding="5" border="1" |
||
| − | |G-8 North-West Corner. |
||
| + | |- |
||
| − | (Near: Atkorkamuy spawn) |
||
| + | ! colspan="2" style="background:#B0C4DE;" align="left" | '''[[Qufim Island]]''' |
||
| + | |- |
||
| + | | width="60" align="center" valign="top" style="background:#FFE4E1;" | [[image:Qufim_Island.png|40px]] |
||
| + | | valign="top" | |
||
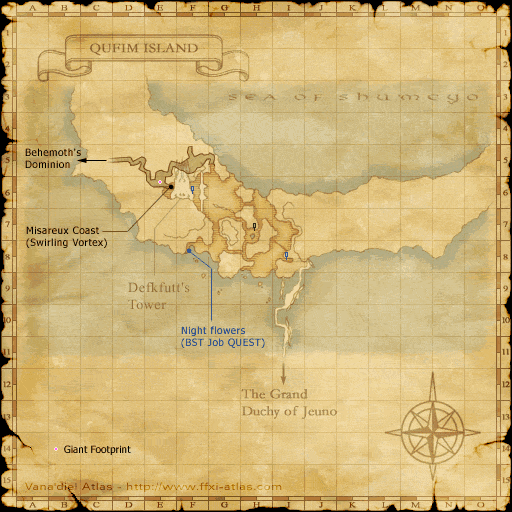
| + | *{{Location Tooltip|area=Qufim Island|pos=G-8}} North-West Corner. (Near: Atkorkamuy spawn) |
||
|} |
|} |
||
| + | | width="50%" valign="top" | <!-- Make this section look like the others if you add a new area, it's invisible for now --> |
||
| + | {| style="border-collapse:collapse;" width="100%" cellspacing="0" cellpadding="5" border="0" |
||
| + | |- |
||
| ⚫ | |||
| + | |- |
||
| + | | width="60" align="center" valign="top" | |
||
| + | | valign="top" | |
||
| + | |} |
||
| + | |} |
||
| + | |||
| − | == |
+ | ==Retired Secondary Rewards== |
The Mog-Tablet secondary rewards have changed throughout the years. |
The Mog-Tablet secondary rewards have changed throughout the years. |
||
| + | :{| width="100%" cellpadding="2" cellspacing="2" |
||
| ⚫ | |||
| + | |- BGCOLOR="#ffdead" alignment="center" |
||
| ⚫ | |||
| + | !Tablet |
||
| ⚫ | |||
| ⚫ | |||
| ⚫ | |||
| ⚫ | |||
| ⚫ | |||
| ⚫ | |||
| ⚫ | |||
| + | |- BGCOLOR="#e3e6ff" align="center" |
||
| − | *Tablet of Fortitude: [[Talaria]] |
||
| ⚫ | |||
| ⚫ | |||
| ⚫ | |||
| ⚫ | |||
| + | |[[Vanadium Ore]] |
||
| ⚫ | |||
| ⚫ | |||
| ⚫ | |||
| + | |- BGCOLOR="#e3e6ff" align="center" |
||
| ⚫ | |||
| ⚫ | |||
| ⚫ | |||
| ⚫ | |||
| ⚫ | |||
| − | + | |[[Palladian Brass Ingot]] |
|
| + | |[[Oxblood]] |
||
| ⚫ | |||
| + | |- BGCOLOR="#e3e6ff" align="center" |
||
| ⚫ | |||
| − | + | |Tablet of Compassion : |
|
| ⚫ | |||
| − | *Tablet of Fortitude: [[Talaria]] |
||
| ⚫ | |||
| ⚫ | |||
| + | |[[Damascene Cloth]] |
||
| ⚫ | |||
| + | |- BGCOLOR="#e3e6ff" align="center" |
||
| ⚫ | |||
| − | + | |Tablet of Justice : |
|
| ⚫ | |||
| ⚫ | |||
| ⚫ | |||
| ⚫ | |||
| ⚫ | |||
| ⚫ | |||
| + | |- BGCOLOR="#e3e6ff" align="center" |
||
| ⚫ | |||
| − | + | |Tablet of Hope : |
|
| ⚫ | |||
| ⚫ | |||
| + | |[[Redeyes]] |
||
| − | + | |[[Nomad Moogle Rod]] |
|
| − | *Tablet of Fortitude: [[Talaria]] |
||
| + | |- BGCOLOR="#e3e6ff" align="center" |
||
| ⚫ | |||
| − | + | |Tablet of Fortitude : |
|
| + | |[[Talaria]] |
||
| ⚫ | |||
| + | |[[Talaria]] |
||
| ⚫ | |||
| + | |[[Talaria]] |
||
| ⚫ | |||
| + | |- BGCOLOR="#e3e6ff" align="center" |
||
| + | |Tablet of Courage : |
||
| ⚫ | |||
| ⚫ | |||
| ⚫ | |||
| + | |- BGCOLOR="#e3e6ff" align="center" |
||
| + | |Tablet of Temperance : |
||
| ⚫ | |||
| ⚫ | |||
| + | |[[Nomad Moogle Statue]] |
||
| + | |- BGCOLOR="#e3e6ff" align="center" |
||
| ⚫ | |||
| ⚫ | |||
| + | |[[Urunday Log]] |
||
| ⚫ | |||
| + | |- BGCOLOR="#e3e6ff" align="center" |
||
| ⚫ | |||
| + | |[[Opaline Dress]] |
||
| ⚫ | |||
| + | |[[Dragon Meat]] |
||
| + | |- BGCOLOR="#e3e6ff" align="center" |
||
| ⚫ | |||
| + | |[[Coffee Table]] |
||
| ⚫ | |||
| ⚫ | |||
| + | |} |
||
==References== |
==References== |
||
Revision as of 02:48, 23 May 2020

A Mog Tablet in the Pashhow Marshlands
As part of the Mog Tablet Quest, eleven Mog Tablets have been scattered around Vana'diel and must be discovered and restored by adventurers in return for special rewards.
While the tablets are scattered, they can be found in any of the following areas:
- West Ronfaure / East Ronfaure / La Theine Plateau / Valkurm Dunes / Jugner Forest / Batallia Downs / North Gustaberg / South Gustaberg / Konschtat Highlands / Pashhow Marshlands / Rolanberry Fields / Beaucedine Glacier / Xarcabard / Cape Teriggan / Eastern Altepa Desert / West Sarutabaruta / East Sarutabaruta / Tahrongi Canyon / Buburimu Peninsula / Meriphataud Mountains / Sauromugue Champaign / The Sanctuary of Zi'Tah / Ro'Maeve / Yuhtunga Jungle / Yhoator Jungle / Western Altepa Desert / Qufim Island / Behemoth's Dominion / Valley of Sorrows
- The tablets can only be targeted when a player gets within close proximity of one, though they do show up on widescan near the bottom of the list above any NPCs and Field Manuals.
- The tablets do not automatically spawn when it is time; they only spawn when a players comes within 87'~ of them. Same for widescan. They will not appear on widescan until a player has spawned one by coming within proximity of it. [1]
- There is a 2-3 second delay from when a player comes within proximity of a tablet and it will become targetable and scannable, making it easy to miss with enhanced movement speed.
- It is possible to search for mog tablets while remaining on a mount or chocobo. [2][3]
- A message will be displayed to every player in areas subject to Super Kupowers whenever a tablet has been found.
For successful discovery of a tablet, talking to the Explorer Moogle in Ru'Lude Gardens will yield a Kupofried's Ring as well as a second reward, specific to the tablet discovered.
- There is a short delay between discovering a tablet and being able to receive your reward. If you warp back to Ru'Lude Gardens too quickly, the Explorer Moogle may talk to you as if you have not discovered the tablet. If this happens, wait until the message telling you the tablet has been discovered appears on the chatlog again. The message you get upon discovery is to notify you, the second message logs your success with the Explorer Moogle and you are then able to receive your reward.
You do not have to return to the Explorer Moogle after finding a Mog-Tablet in order for the Super Kupowers to be granted. You have until the Super Kupowers wear off (1 week) to claim your reward.
- If you already have a reward item marked

 from a previous Mog-Tablet recovery and the reward given from a new recovery is the same, you will be unable to obtain both the item and the Kupofried's Ring even if you do not have a ring in your possession already. You must first discard the conflicting item, then talk to the Explorer Moogle again to recieve both the item and the ring together.
When all 11 tablets are discovered, Super Kupowers will be granted to all players for one week within certain areas. After this period of time, the tablets will be scattered again, and following a period of 8-24 hours, they will become discoverable once again.
- A message will be displayed to every player in areas subject to Super Kupowers when the Kupowers fade away and the tablets spread. This message does not mean that the tablets are once again immediately findable; a random period between 8-24 hours is required.
Tablets and Secondary Rewards
- Tablet of Dignity: Sneak Ring
- Tablet of Loyalty: Deodorize Ring
- Tablet of Compassion: Invisible Ring
- Tablet of Justice: Macrocosmic Orb
- Tablet of Hope: Nomad Moogle Rod
- Tablet of Fortitude: Talaria
- Tablet of Courage: Pelican Ring
- Tablet of Temperance: Nomad Moogle Statue
- Tablet of Piety: Kupon I-Orche
- Tablet of Charity: Reraise Ring
- Tablet of Wisdom: Moogle's Largesse
Tablet Locations
These are the map locations where tablets have been successfully located. There have been confirmations from multiple servers of matching coordinates. There are, however, many that are yet to be discovered.
- When the coordinate is given, a quadrant is also provided to help the search.
|
| ||||||||
|
| ||||||||
|
| ||||||||
|
| ||||||||
|
| ||||||||
|
| ||||||||
|
| ||||||||
|
| ||||||||
|
| ||||||||
|
| ||||||||
|
| ||||||||
|
| ||||||||
|
| ||||||||
|
| ||||||||
|
| ||||||||
-3.jpg)
Retired Secondary Rewards
The Mog-Tablet secondary rewards have changed throughout the years.
Tablet May 2009-March 2013 March 2013-May 2014[1] May 2014-August 2015[2] Tablet of Dignity : Orichalcum Ore Vanadium Ore Malboro Fiber Tablet of Loyalty : Scintillant Ingot Palladian Brass Ingot Oxblood Tablet of Compassion : Adaman Ingot Damascus Ingot Damascene Cloth Tablet of Justice : Noble's Bed Themis Orb Macrocosmic Orb Tablet of Hope : Bookshelf Redeyes Nomad Moogle Rod Tablet of Fortitude : Talaria Talaria Talaria Tablet of Courage : Argent Coat
For Females: Vile Elixir +1Vile Elixir +1 Vile Elixir +1 Tablet of Temperance : Nomad Moogle Statue Nomad Moogle Statue Nomad Moogle Statue Tablet of Piety : Bloodwood Log Urunday Log Beetle Blood Tablet of Charity : Opaline Dress Dragon Meat Dragon Meat Tablet of Wisdom : Coffee Table Moogle's Largesse Moogle's Largesse