(Added Chimh Dlesbah, event replayer for Crystalline Prophecy) |
mNo edit summary |
||
| (28 intermediate revisions by 14 users not shown) | |||
| Line 1: | Line 1: | ||
| − | [[de:Unter-Jeuno]]{{Zone Infobox |
+ | [[de:Unter-Jeuno]][[fr:Bas Jeuno]]{{Zone Infobox |
| ToC = [[#Involved in Quests/Missions|Quests/Missions]] • [[#fishing|Fishing]] • [[#NPCs Found Here|NPCs]] |
| ToC = [[#Involved in Quests/Missions|Quests/Missions]] • [[#fishing|Fishing]] • [[#NPCs Found Here|NPCs]] |
||
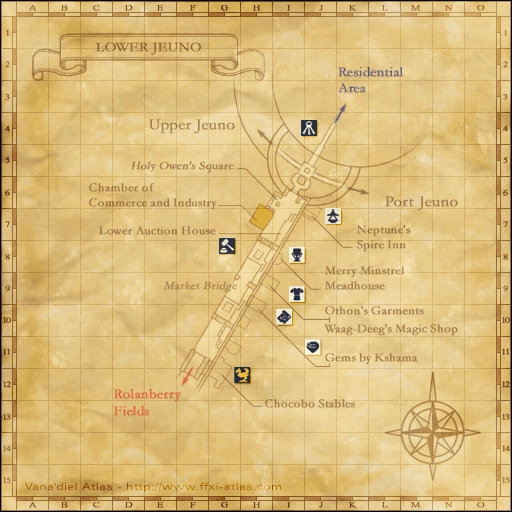
| Description = The lower level of [[Jeuno]], otherwise known as Market Bridge, is filled with a wide variety of [[:category:architecture|shops]] selling everything an aspiring adventurer could need. While somewhat hidden in the depths of the district, even the Goblins and [[Neptune's Spire|Tenshodo]] have set up shops here. If the shops don't sell what you are looking for, the [[Auction House|Lower Auction House]] will often have your desired item listed. Reflecting the fact that the lower level of Jeuno is considered by many to be the center of [[Vana'diel]] commerce, the Chamber of Commerce and Industry is located here. [[Chocobo]]s can also be rented here for access to [[Rolanberry Fields]]. |
| Description = The lower level of [[Jeuno]], otherwise known as Market Bridge, is filled with a wide variety of [[:category:architecture|shops]] selling everything an aspiring adventurer could need. While somewhat hidden in the depths of the district, even the Goblins and [[Neptune's Spire|Tenshodo]] have set up shops here. If the shops don't sell what you are looking for, the [[Auction House|Lower Auction House]] will often have your desired item listed. Reflecting the fact that the lower level of Jeuno is considered by many to be the center of [[Vana'diel]] commerce, the Chamber of Commerce and Industry is located here. [[Chocobo]]s can also be rented here for access to [[Rolanberry Fields]]. |
||
| − | [[ |
+ | [[File:Jeuno-lower-pic.jpg|300px|center]] |
| Connections = |
| Connections = |
||
| + | Exit to [[Western Adoulin]] / [[Eastern Adoulin]] : Waypoint at (H-7) |
||
| − | [[Upper Jeuno]]: {{Tooltip-Connection-Map|map=Jeuno-lower.png|blip=GreenBlip|text=I-5|x=53.71|y=28.90}}{{spc}} |
||
| + | <br>Exit to [[Upper Jeuno]]: (I-5) |
||
| − | [[Port Jeuno]]: {{Tooltip-Connection-Map|map=Jeuno-lower.png|blip=GreenBlip|text=K-6|x=66.60|y=35.74}}{{spc}} |
||
| + | <br>Exit to [[Port Jeuno]]: (K-6) |
||
| − | [[Rolanberry Fields]]: {{Tooltip-Connection-Map|map=Jeuno-lower.png|blip=GreenBlip|text=F-12|x=36.91|y=73.04}} |
||
| + | <br>Exit to [[Rolanberry Fields]]: (F-12) |
||
| + | <br>Exit to [[Everbloom Hollow]] / [[Ghoyu's Reverie]] / [[Ruhotz Silvermines]]: Via [[Maze Mongers Shopfront]] with appropriate Maze Tabula |
||
| + | <br>[[Home Point]] #1: (G-11) |
||
| + | <br>[[Home Point]] #2: (I-5) |
||
| Stats = None |
| Stats = None |
||
| Region = Jeuno |
| Region = Jeuno |
||
| Line 12: | Line 16: | ||
| HELM = {{Zone Icon|fishing}} |
| HELM = {{Zone Icon|fishing}} |
||
| Weather = None |
| Weather = None |
||
| + | | Maps = |
||
| + | {{Zone Tooltip Map|Map 1}} |
||
| Map Acquisition = [[Map of the Jeuno Area|Purchase]] |
| Map Acquisition = [[Map of the Jeuno Area|Purchase]] |
||
| Restrictions = None |
| Restrictions = None |
||
| Requirements = None |
| Requirements = None |
||
| Expansion = Final Fantasy XI |
| Expansion = Final Fantasy XI |
||
| + | | BGM = "The Grand Duchy of Jeuno" |
||
}} |
}} |
||
== Involved in [[:Category:Quests|Quests]]/[[:Category:Missions|Missions]] == |
== Involved in [[:Category:Quests|Quests]]/[[:Category:Missions|Missions]] == |
||
| + | {{TableQuestHeader}} |
||
| − | {| border="0" class="sortable" width="100%" cellpadding="3" cellspacing="2" |
||
| + | |||
| − | |align="center" width="30%" BGCOLOR="#F2E6CE"|'''Quest''' |
||
| + | {{TableQuestLine |Name= A Clock Most Delicate| Type=General| Starter= [[Galmut]]| Zone= [[Upper Jeuno]]| Coordinates= J-7}} |
||
| − | |align="center" width="17%" BGCOLOR="#F2E6CE"|'''Type''' |
||
| + | |||
| − | |align="center" width="21%" BGCOLOR="#F2E6CE"|'''Starter''' |
||
| + | {{TableQuestLine |Name= A Minstrel in Despair| Type=General| Starter= [[Mertaire]]| Zone= [[Lower Jeuno]]| Coordinates= I-8}} |
||
| − | |align="center" width="16%" BGCOLOR="#F2E6CE"|'''Location''' |
||
| + | |||
| − | |align="center" width="16%" BGCOLOR="#F2E6CE"|'''Fame''' |
||
| + | {{TableQuestLine |Name= A New Dawn| Type=[[BST]] [[:category:Artifact Armor|AF3]]| Starter= [[Dietmund]]| Zone= [[Lower Jeuno]]| Coordinates= G-11}} |
||
| − | |- |
||
| + | |||
| − | |align="left" BGCOLOR="#FFFCF5"| [[A Minstrel in Despair]] |
||
| + | {{TableQuestLine |Name= Apocalypse Nigh| Type=Epilogue| Starter= [[Esha'ntarl]]| Zone= [[Ru'Lude Gardens]]| Coordinates= }} |
||
| − | |align="center" BGCOLOR="#FFFCF5"|General |
||
| + | |||
| − | |align="center" BGCOLOR="#FFFCF5"|[[Mertaire]] |
||
| + | {{TableQuestLine |Name= Beat Around the Bushin| Type=General| Starter= [[Vola]]| Zone= [[Lower Jeuno]]| Coordinates= J-8}} |
||
| − | |align="center" BGCOLOR="#FFFCF5"|(I - 8) |
||
| + | |||
| − | |align="center" BGCOLOR="#FFFCF5"|Level 30+ |
||
| + | {{TableQuestLine |Name= Blessed Radiance| Type=[[Fellow]]| Starter= [[Luto Mewrilah]]| Zone= [[Upper Jeuno]]| Coordinates= G-8}} |
||
| − | |- |
||
| + | |||
| − | |align="left" BGCOLOR="#FFFCF5"| [[A New Dawn]] |
||
| + | {{TableQuestLine |Name= Chips| Type= General | Starter= [[Ghebi Damomohe]]| Zone= [[Lower Jeuno]]| Coordinates= I-7}} |
||
| − | |align="center" BGCOLOR="#FFFCF5"|[[:category:Artifact Armor|Artifact Armor]] ([[BST]] AF3) |
||
| + | |||
| − | |align="center" BGCOLOR="#FFFCF5"|[[Dietmund]] |
||
| + | {{TableQuestLine |Name= Collect Tarut Cards| Type=General| Starter= [[Chululu]]| Zone= [[Lower Jeuno]]| Coordinates= I-8}} |
||
| − | |align="center" BGCOLOR="#FFFCF5"|(G - 11) |
||
| + | |||
| − | |align="center" BGCOLOR="#FFFCF5"|-- |
||
| + | {{TableQuestLine |Name= Community Service| Type=General| Starter= [[Zauko]]| Zone= [[Lower Jeuno]]| Coordinates= I-6}} |
||
| − | |- |
||
| + | |||
| − | |align="left" BGCOLOR="#FFFCF5"| [[Beat Around the Bushin]] |
||
| + | {{TableQuestLine |Name= Cook's Pride| Type=General| Starter= [[Naruru]]| Zone= [[Lower Jeuno]]| Coordinates= H-10}} |
||
| − | |align="center" BGCOLOR="#FFFCF5"|General |
||
| + | |||
| − | |align="center" BGCOLOR="#FFFCF5"|[[Vola]] |
||
| + | {{TableQuestLine |Name= Deal with Tenshodo| Type=General| Starter= [[Garnev]]| Zone= [[Lower Jeuno]]| Coordinates= J-7}} |
||
| − | |align="center" BGCOLOR="#FFFCF5"|(J - 8) |
||
| + | |||
| − | |align="center" BGCOLOR="#FFFCF5"|[[Tenshodo]]: 6 |
||
| + | {{TableQuestLine |Name= Fistful of Fury| Type=General| Starter= [[Vola]]| Zone= [[Lower Jeuno]]| Coordinates= J-8}} |
||
| − | |- |
||
| + | |||
| − | |align="left" BGCOLOR="#FFFCF5"| [[Collect Tarut Cards]] |
||
| + | {{TableQuestLine |Name= Hook, Line, and Sinker| Type=General| Starter= [[Omer]]| Zone= [[Lower Jeuno]]| Coordinates= G-10}} |
||
| − | |align="center" BGCOLOR="#FFFCF5"|General |
||
| + | |||
| − | |align="center" BGCOLOR="#FFFCF5"|[[Chululu]] |
||
| + | {{TableQuestLine |Name= In the Mood for Love| Type=General| Starter= [[Odasel]]| Zone= [[Lower Jeuno]]| Coordinates= H-9}} |
||
| − | |align="center" BGCOLOR="#FFFCF5"|(I - 8) |
||
| + | |||
| − | |align="center" BGCOLOR="#FFFCF5"|2 |
||
| + | {{TableQuestLine |Name= Lure of the Wildcat (Jeuno)| Type=General| Starter= [[Ajithaam]]| Zone= [[Upper Jeuno]]| Coordinates= F-5}} |
||
| − | |- |
||
| + | |||
| − | |align="left" BGCOLOR="#FFFCF5"| [[Community Service]] |
||
| + | {{TableQuestLine |Name= Mirror Images| Type=[[Fellow]]| Starter= [[Luto Mewrilah]]| Zone= [[Upper Jeuno]]| Coordinates= G-8}} |
||
| − | |align="center" BGCOLOR="#FFFCF5"|General |
||
| + | |||
| − | |align="center" BGCOLOR="#FFFCF5"|[[Zauko]] |
||
| + | {{TableQuestLine |Name=Mysteries of Beadeaux I| Type=General| Starter= [[Sattal-Mansal]]| Zone= [[Lower Jeuno]]| Coordinates= J-8}} |
||
| − | |align="center" BGCOLOR="#FFFCF5"|(I - 6) |
||
| + | |||
| − | |align="center" BGCOLOR="#FFFCF5"|1 |
||
| + | {{TableQuestLine |Name=Mysteries of Beadeaux II| Type=General| Starter= [[Sattal-Mansal]]| Zone= [[Lower Jeuno]]| Coordinates= J-8}} |
||
| − | |- |
||
| + | |||
| − | |align="left" BGCOLOR="#FFFCF5"| [[Cook's Pride]] |
||
| + | {{TableQuestLine |Name=Never to Return| Type=General| Starter= [[Kurou-Morou]]| Zone= [[Lower Jeuno]]| Coordinates= I-7}} |
||
| − | |align="center" BGCOLOR="#FFFCF5"|General |
||
| + | |||
| − | |align="center" BGCOLOR="#FFFCF5"|[[Naruru]] |
||
| + | {{TableQuestLine |Name=The Old Monument| Type=General| Starter= [[Mertaire]]| Zone= [[Lower Jeuno]]| Coordinates= I-8}} |
||
| − | |align="center" BGCOLOR="#FFFCF5"|(H - 10) |
||
| + | |||
| − | |align="center" BGCOLOR="#FFFCF5"|3 |
||
| + | {{TableQuestLine |Name=Painful Memory| Type=[[BRD]] [[:category:Artifact Armor|AF1]]| Starter= [[Mertaire]]| Zone= [[Lower Jeuno]]| Coordinates= I-8}} |
||
| − | |- |
||
| + | |||
| − | |align="left" BGCOLOR="#FFFCF5"| [[Deal with Tenshodo]] |
||
| + | {{TableQuestLine |Name=Path of the Bard| Type=Job: [[Bard]]| Starter= [[Mertaire]]| Zone= [[Lower Jeuno]]| Coordinates= I-8}} |
||
| − | |align="center" BGCOLOR="#FFFCF5"|General |
||
| + | |||
| − | |align="center" BGCOLOR="#FFFCF5"|[[Garnev]] |
||
| + | {{TableQuestLine |Name=Return to the Depths| Type= General| Starter= [[Ayame]]| Zone= [[Metalworks]]| Coordinates= K-7}} |
||
| − | |align="center" BGCOLOR="#FFFCF5"|(J - 7) |
||
| + | |||
| − | |align="center" BGCOLOR="#FFFCF5"|? ([[Tenshodo]]) |
||
| + | {{TableQuestLine |Name=Rubbish Day| Type=General| Starter= [[Chululu]]| Zone= [[Lower Jeuno]]| Coordinates= I-8}} |
||
| − | |- |
||
| + | |||
| − | |align="left" BGCOLOR="#FFFCF5"| [[Fistful of Fury]] |
||
| + | {{TableQuestLine |Name=Save My Son| Type=Job: [[Beastmaster]]| Starter= [[Dietmund]]| Zone= [[Lower Jeuno]]| Coordinates= G-11}} |
||
| − | |align="center" BGCOLOR="#FFFCF5"|General |
||
| + | |||
| − | |align="center" BGCOLOR="#FFFCF5"|[[Vola]] |
||
| + | {{TableQuestLine |Name=Save the Clock Tower| Type=General| Starter= [[Derrick]]| Zone= [[Lower Jeuno]]| Coordinates= H-7}} |
||
| − | |align="center" BGCOLOR="#FFFCF5"|(J - 8) |
||
| + | |||
| − | |align="center" BGCOLOR="#FFFCF5"|[[Tenshodo]]: 3 |
||
| + | {{TableQuestLine |Name=Tenshodo Membership | Type=General| Starter= [[Ghebi Damomohe]]| Zone= [[Lower Jeuno]]| Coordinates= I-7}} |
||
| − | |- |
||
| + | |||
| − | |align="left" BGCOLOR="#FFFCF5"| [[The Gobbiebag Part I|Gobbiebag Part I, The]] |
||
| + | {{TableQuestLine |Name=The Geomagnetron| Type=General| Starter= [[Darcia]]| Zone= [[Lower Jeuno]]| Coordinates= H-7}} |
||
| − | |align="center" BGCOLOR="#FFFCF5"|[[Gobbiebag]] |
||
| + | |||
| − | |align="center" BGCOLOR="#FFFCF5"|[[Bluffnix]] |
||
| + | {{TableQuestLine |Name=The Gobbiebag Part I| Type=General| Starter= [[Bluffnix]]| Zone= [[Lower Jeuno]]| Coordinates= H-9}} |
||
| − | |align="center" BGCOLOR="#FFFCF5"|(H - 9) |
||
| + | |||
| − | |align="center" BGCOLOR="#FFFCF5"|2 |
||
| + | {{TableQuestLine |Name=The Gobbiebag Part II| Type=General| Starter= [[Bluffnix]]| Zone= [[Lower Jeuno]]| Coordinates= H-9}} |
||
| − | |- |
||
| + | |||
| − | |align="left" BGCOLOR="#FFFCF5"| [[The Gobbiebag Part II|Gobbiebag Part II, The]] |
||
| + | {{TableQuestLine |Name=The Gobbiebag Part III| Type=General| Starter= [[Bluffnix]]| Zone= [[Lower Jeuno]]| Coordinates= H-9}} |
||
| − | |align="center" BGCOLOR="#FFFCF5"|[[Gobbiebag]] |
||
| + | |||
| − | |align="center" BGCOLOR="#FFFCF5"|[[Bluffnix]] |
||
| + | {{TableQuestLine |Name=The Gobbiebag Part IV| Type=General| Starter= [[Bluffnix]]| Zone= [[Lower Jeuno]]| Coordinates= H-9}} |
||
| − | |align="center" BGCOLOR="#FFFCF5"|(H - 9) |
||
| + | |||
| − | |align="center" BGCOLOR="#FFFCF5"|4 |
||
| + | {{TableQuestLine |Name=The Gobbiebag Part V| Type=General| Starter= [[Bluffnix]]| Zone= [[Lower Jeuno]]| Coordinates= H-9}} |
||
| − | |- |
||
| + | |||
| − | |align="left" BGCOLOR="#FFFCF5"| [[The Gobbiebag Part III|Gobbiebag Part III, The]] |
||
| + | {{TableQuestLine |Name=The Gobbiebag Part VI| Type=General| Starter= [[Bluffnix]]| Zone= [[Lower Jeuno]]| Coordinates= H-9}} |
||
| − | |align="center" BGCOLOR="#FFFCF5"|[[Gobbiebag]] |
||
| + | |||
| − | |align="center" BGCOLOR="#FFFCF5"|[[Bluffnix]] |
||
| + | {{TableQuestLine |Name=The Gobbiebag Part VII| Type=General| Starter= [[Bluffnix]]| Zone= [[Lower Jeuno]]| Coordinates= H-9}} |
||
| − | |align="center" BGCOLOR="#FFFCF5"|(H - 9) |
||
| + | |||
| − | |align="center" BGCOLOR="#FFFCF5"|5 |
||
| + | {{TableQuestLine |Name=The Gobbiebag Part VIII| Type=General| Starter= [[Bluffnix]]| Zone= [[Lower Jeuno]]| Coordinates= H-9}} |
||
| − | |- |
||
| + | |||
| − | |align="left" BGCOLOR="#FFFCF5"| [[The Gobbiebag Part IV|Gobbiebag Part IV, The]] |
||
| + | {{TableQuestLine |Name=The Gobbiebag Part IX| Type=General| Starter= [[Bluffnix]]| Zone= [[Lower Jeuno]]| Coordinates= H-9}} |
||
| − | |align="center" BGCOLOR="#FFFCF5"|[[Gobbiebag]] |
||
| + | |||
| − | |align="center" BGCOLOR="#FFFCF5"|[[Bluffnix]] |
||
| + | {{TableQuestLine |Name=The Gobbiebag Part X| Type=General| Starter= [[Bluffnix]]| Zone= [[Lower Jeuno]]| Coordinates= H-9}} |
||
| − | |align="center" BGCOLOR="#FFFCF5"|(H - 9) |
||
| + | |||
| − | |align="center" BGCOLOR="#FFFCF5"|5 |
||
| + | {{TableQuestLine |Name=The Goblin Tailor| Type=RSE| Starter= [[Guttrix]]| Zone= [[Lower Jeuno]]| Coordinates= H-10}} |
||
| − | |- |
||
| + | |||
| − | |align="left" BGCOLOR="#FFFCF5"| [[The Gobbiebag Part V|Gobbiebag Part V, The]] |
||
| + | {{TableQuestLine |Name=The Kind Cardian| Type=General| Starter=[[Apururu]]| Zone= [[Windurst Woods]]| Coordinates= H-9}} |
||
| − | |align="center" BGCOLOR="#FFFCF5"|[[Gobbiebag]] |
||
| + | |||
| − | |align="center" BGCOLOR="#FFFCF5"|[[Bluffnix]] |
||
| + | {{TableQuestLine |Name=The Lost Cardian| Type=General| Starter=[[Panta-Putta]]| Zone= [[Lower Jeuno]]| Coordinates= G-10}} |
||
| − | |align="center" BGCOLOR="#FFFCF5"|(H - 9) |
||
| + | |||
| − | |align="center" BGCOLOR="#FFFCF5"|6 |
||
| + | {{TableQuestLine |Name=The Miraculous Dale| Type=General| Starter= [[Rakuru-Rakoru]]| Zone= [[Lower Jeuno]]| Coordinates= I-6}} |
||
| − | |- |
||
| + | |||
| − | |align="left" BGCOLOR="#FFFCF5"| [[The Gobbiebag Part VI|Gobbiebag Part VI, The]] |
||
| + | {{TableQuestLine |Name=The Requiem| Type=[[BRD]] [[:category:Artifact Armor|AF2]]| Starter= [[Bki Tbujhja]]| Zone= [[Lower Jeuno]]| Coordinates= I-8}} |
||
| − | |align="center" BGCOLOR="#FFFCF5"|[[Gobbiebag]] |
||
| + | |||
| − | |align="center" BGCOLOR="#FFFCF5"|[[Bluffnix]] |
||
| + | {{TableQuestLine |Name=The Road to Aht Urhgan| Type=Travel| Starter= [[Faursel]]| Zone= [[Lower Jeuno]]| Coordinates= J-8}} |
||
| − | |align="center" BGCOLOR="#FFFCF5"|(H - 9) |
||
| + | |||
| − | |align="center" BGCOLOR="#FFFCF5"|6 |
||
| + | {{TableQuestLine |Name=The Wonder Magic Set| Type=General| Starter= [[Panta-Putta]]| Zone= [[Lower Jeuno]]| Coordinates= G-10}} |
||
| − | |- |
||
| + | |||
| − | |align="left" BGCOLOR="#FFFCF5"| [[The Gobbiebag Part VII|Gobbiebag Part VII, The]] |
||
| + | {{TableQuestLine |Name=Unlisted Qualities| Type=[[Fellow]]| Starter= [[Luto Mewrilah]]| Zone= [[Upper Jeuno]]| Coordinates= I-10}} |
||
| − | |align="center" BGCOLOR="#FFFCF5"|[[Gobbiebag]] |
||
| + | |||
| − | |align="center" BGCOLOR="#FFFCF5"|[[Bluffnix]] |
||
| + | {{TableQuestLine |Name=Unlocking a Myth| Type=[[:Category:Weapon Skills|Weapon Skill]]| Starter= [[Zalsuhm]]| Zone= [[Lower Jeuno]]| Coordinates= H-9}} |
||
| − | |align="center" BGCOLOR="#FFFCF5"|(H - 9) |
||
| + | |||
| − | |align="center" BGCOLOR="#FFFCF5"|? |
||
| + | {{TableQuestLine |Name=Your Crystal Ball| Type=General| Starter= [[Kurou-Morou]]| Zone= [[Lower Jeuno]]| Coordinates= I-7}} |
||
| − | |- |
||
| + | |||
| − | |align="left" BGCOLOR="#FFFCF5"| [[The Gobbiebag Part VIII|Gobbiebag Part VIII, The]] |
||
| + | {{TableMissionHeader}} |
||
| − | |align="center" BGCOLOR="#FFFCF5"|[[Gobbiebag]] |
||
| + | |||
| − | |align="center" BGCOLOR="#FFFCF5"|[[Bluffnix]] |
||
| + | {{TableMissionLine |Name = A Crystalline Prophecy (Mission)| Nation= [[A Crystalline Prophecy Missions|A Crystalline Prophecy]]| Starter=--- | Zone=--- | Coordinates= }} |
||
| − | |align="center" BGCOLOR="#FFFCF5"|(H - 9) |
||
| + | |||
| − | |align="center" BGCOLOR="#FFFCF5"|? |
||
| + | {{TableMissionLine |Name = Ro'Maeve (Mission)| Nation= [[Rise of the Zilart Missions|Zilart]]| Starter=[[Aldo]] | Zone= '''Lower Jeuno'''| Coordinates= }} |
||
| − | |- |
||
| + | |||
| − | |align="left" BGCOLOR="#FFFCF5"| [[The Goblin Tailor|Goblin Tailor, The]] |
||
| + | {{TableMissionLine |Name=The Sealed Shrine| Nation= [[:Category:Rise of the Zilart Missions|Zilart]]| Starter= --| Zone= --| Coordinates= }} |
||
| − | |align="center" BGCOLOR="#FFFCF5"|[[RSE]] |
||
| + | |||
| − | |align="center" BGCOLOR="#FFFCF5"|[[Guttrix]] |
||
| + | {{TableMissionLine |Name = Awakening| Nation= [[Rise of the Zilart Missions|Zilart]]| Starter=---| Zone= ---| Coordinates= }} |
||
| − | |align="center" BGCOLOR="#FFFCF5"|(H - 10) |
||
| + | |||
| − | |align="center" BGCOLOR="#FFFCF5"|2 |
||
| + | {{TableMissionLine |Name= A Vessel Without a Captain| Nation= [[Chains of Promathia Missions|Promathia 3-2]]| Starter= ---| Zone= ---| Coordinates= }} |
||
| − | |- |
||
| + | |||
| − | |align="left" BGCOLOR="#FFFCF5"| [[Hook, Line, and Sinker]] |
||
| + | {{TableMissionLine |Name= Tending Aged Wounds| Nation= [[Chains of Promathia Missions|Promathia 3-4]]| Starter= ---| Zone= ---| Coordinates= }} |
||
| − | |align="center" BGCOLOR="#FFFCF5"|General |
||
| + | |||
| − | |align="center" BGCOLOR="#FFFCF5"|[[Omer]] |
||
| + | {{TableMissionLine |Name= Darkness Named| Nation= [[Chains of Promathia Missions|Promathia 3-5]]| Starter= ---| Zone= ---| Coordinates= }} |
||
| − | |align="center" BGCOLOR="#FFFCF5"|(G - 10) |
||
| + | |||
| − | |align="center" BGCOLOR="#FFFCF5"|? |
||
| + | {{TableMissionLine |Name= Romancing the Clone| Nation= [[A Shantotto Ascension]]| Starter= [[Aldo]]| Zone= [[Lower Jeuno]]| Coordinates= }} |
||
| − | |- |
||
| + | |||
| − | |align="left" BGCOLOR="#FFFCF5"| [[In the Mood for Love]] |
||
| + | {{TableMissionLine |Name= Sugar-coated Subterfuge| Nation= [[A Shantotto Ascension]]| Starter= [[Aldo]]| Zone= [[Lower Jeuno]]| Coordinates= }} |
||
| − | |align="center" BGCOLOR="#FFFCF5"|General |
||
| + | |||
| − | |align="center" BGCOLOR="#FFFCF5"|[[Odasel]] |
||
| + | {{TableQuestFooter}} |
||
| − | |align="center" BGCOLOR="#FFFCF5"|(H - 9) |
||
| − | |align="center" BGCOLOR="#FFFCF5"|? |
||
| − | |- |
||
| − | |align="left" BGCOLOR="#FFFCF5"| [[The Kind Cardian|Kind Cardian, The]] |
||
| − | |align="center" BGCOLOR="#FFFCF5"|General |
||
| − | |align="center" BGCOLOR="#FFFCF5"|[[Panta-Putta]] |
||
| − | |align="center" BGCOLOR="#FFFCF5"|(G - 10) |
||
| − | |align="center" BGCOLOR="#FFFCF5"|? |
||
| − | |- |
||
| − | |align="left" BGCOLOR="#FFFCF5"| [[The Lost Cardian|Lost Cardian, The]] |
||
| − | |align="center" BGCOLOR="#FFFCF5"|General |
||
| − | |align="center" BGCOLOR="#FFFCF5"|[[Panta-Putta]] |
||
| − | |align="center" BGCOLOR="#FFFCF5"|(G - 10) |
||
| − | |align="center" BGCOLOR="#FFFCF5"|? |
||
| − | |- |
||
| − | |align="left" BGCOLOR="#FFFCF5"| [[The Miraculous Dale|Miraculous Dale, The]] |
||
| − | |align="center" BGCOLOR="#FFFCF5"|General |
||
| − | |align="center" BGCOLOR="#FFFCF5"|[[Rakuru-Rakoru]] |
||
| − | |align="center" BGCOLOR="#FFFCF5"|(I - 6) |
||
| − | |align="center" BGCOLOR="#FFFCF5"|? |
||
| − | |- |
||
| − | |align="left" BGCOLOR="#FFFCF5"| [[Mysteries of Beadeaux I]] |
||
| − | |align="center" BGCOLOR="#FFFCF5"|General |
||
| − | |align="center" BGCOLOR="#FFFCF5"|[[Sattal-Mansal]] |
||
| − | |align="center" BGCOLOR="#FFFCF5"|(J - 8) |
||
| − | |align="center" BGCOLOR="#FFFCF5"|-- |
||
| − | |- |
||
| − | |align="left" BGCOLOR="#FFFCF5"| [[Mysteries of Beadeaux II]] |
||
| − | |align="center" BGCOLOR="#FFFCF5"|General |
||
| − | |align="center" BGCOLOR="#FFFCF5"|[[Sattal-Mansal]] |
||
| − | |align="center" BGCOLOR="#FFFCF5"|(J - 8) |
||
| − | |align="center" BGCOLOR="#FFFCF5"|-- |
||
| − | |- |
||
| − | |align="left" BGCOLOR="#FFFCF5"| [[Never to Return]] |
||
| − | |align="center" BGCOLOR="#FFFCF5"|General |
||
| − | |align="center" BGCOLOR="#FFFCF5"|[[Kurou-Morou]] |
||
| − | |align="center" BGCOLOR="#FFFCF5"|(I - 7) |
||
| − | |align="center" BGCOLOR="#FFFCF5"|5 |
||
| − | |- |
||
| − | |align="left" BGCOLOR="#FFFCF5"| [[The Old Monument|Old Monument, The]] |
||
| − | |align="center" BGCOLOR="#FFFCF5"|General |
||
| − | |align="center" BGCOLOR="#FFFCF5"|[[Mertaire]] |
||
| − | |align="center" BGCOLOR="#FFFCF5"|(I - 8) |
||
| − | |align="center" BGCOLOR="#FFFCF5"|Level 30+ |
||
| − | |- |
||
| − | |align="left" BGCOLOR="#FFFCF5"| [[Painful Memory]] |
||
| − | |align="center" BGCOLOR="#FFFCF5"|[[:category:Artifact Weapon|Artifact Weapon]] ([[BRD]] AF1) |
||
| − | |align="center" BGCOLOR="#FFFCF5"|[[Mertaire]] |
||
| − | |align="center" BGCOLOR="#FFFCF5"|(I - 8) |
||
| − | |align="center" BGCOLOR="#FFFCF5"|[[Bard]] level 40+ |
||
| − | |- |
||
| − | |align="left" BGCOLOR="#FFFCF5"| [[Path of the Bard]] |
||
| − | |align="center" BGCOLOR="#FFFCF5"|[[Bard]] Flag Quest |
||
| − | |align="center" BGCOLOR="#FFFCF5"|[[Mertaire]] |
||
| − | |align="center" BGCOLOR="#FFFCF5"|(I - 8) |
||
| − | |align="center" BGCOLOR="#FFFCF5"|Level 30+ |
||
| − | |- |
||
| − | |align="left" BGCOLOR="#FFFCF5"| [[The Requiem|Requiem, The]] |
||
| − | |align="center" BGCOLOR="#FFFCF5"|[[:category:artifact Armor|Artifact Armor]] ([[BRD]] AF2) |
||
| − | |align="center" BGCOLOR="#FFFCF5"|[[Bki Tbujhja]] |
||
| − | |align="center" BGCOLOR="#FFFCF5"|(H - 8) |
||
| − | |align="center" BGCOLOR="#FFFCF5"|-- |
||
| − | |- |
||
| − | |align="left" BGCOLOR="#FFFCF5"| [[The Road to Aht Urhgan|Road to Aht Urhgan, The]] |
||
| − | |align="center" BGCOLOR="#FFFCF5"|General |
||
| − | |align="center" BGCOLOR="#FFFCF5"|[[Faursel]] |
||
| − | |align="center" BGCOLOR="#FFFCF5"|(J - 8) |
||
| − | |align="center" BGCOLOR="#FFFCF5"|-- |
||
| − | |- |
||
| − | |align="left" BGCOLOR="#FFFCF5"| [[Rubbish Day]] |
||
| − | |align="center" BGCOLOR="#FFFCF5"|General |
||
| − | |align="center" BGCOLOR="#FFFCF5"|[[Chululu]] |
||
| − | |align="center" BGCOLOR="#FFFCF5"|(I - 8) |
||
| − | |align="center" BGCOLOR="#FFFCF5"|? |
||
| − | |- |
||
| − | |align="left" BGCOLOR="#FFFCF5"| [[Save My Son]] |
||
| − | |align="center" BGCOLOR="#FFFCF5"|[[Beastmaster]] Flag Quest |
||
| − | |align="center" BGCOLOR="#FFFCF5"|[[Dietmund]] |
||
| − | |align="center" BGCOLOR="#FFFCF5"|(G - 11) |
||
| − | |align="center" BGCOLOR="#FFFCF5"|Level 30+ |
||
| − | |- |
||
| − | |align="left" BGCOLOR="#FFFCF5"| [[Save the Clock Tower]] |
||
| − | |align="center" BGCOLOR="#FFFCF5"|General |
||
| − | |align="center" BGCOLOR="#FFFCF5"|[[Derrick]] |
||
| − | |align="center" BGCOLOR="#FFFCF5"|(H - 7) |
||
| − | |align="center" BGCOLOR="#FFFCF5"|5 |
||
| − | |- |
||
| − | |align="left" BGCOLOR="#FFFCF5"| [[Tenshodo Membership]] |
||
| − | |align="center" BGCOLOR="#FFFCF5"|General |
||
| − | |align="center" BGCOLOR="#FFFCF5"|[[Silver Owl]] |
||
| − | |align="center" BGCOLOR="#FFFCF5"|(F - 6) |
||
| − | |align="center" BGCOLOR="#FFFCF5"|2 |
||
| − | |- |
||
| − | |align="left" BGCOLOR="#FFFCF5"| [[The Wonder Magic Set|Wonder Magic Set, The]] |
||
| − | |align="center" BGCOLOR="#FFFCF5"|General |
||
| − | |align="center" BGCOLOR="#FFFCF5"|[[Panta-Putta]] |
||
| − | |align="center" BGCOLOR="#FFFCF5"|(G - 10) |
||
| − | |align="center" BGCOLOR="#FFFCF5"|3 |
||
| − | |- |
||
| − | |align="left" BGCOLOR="#FFFCF5"| [[Your Crystal Ball]] |
||
| − | |align="center" BGCOLOR="#FFFCF5"|General |
||
| − | |align="center" BGCOLOR="#FFFCF5"|[[Kurou-Morou]] |
||
| − | |align="center" BGCOLOR="#FFFCF5"|(I - 7) |
||
| − | |align="center" BGCOLOR="#FFFCF5"|2 |
||
| − | |- |
||
| − | |align="left" BGCOLOR="#FFFCF5"| [[Unlocking a Myth]] |
||
| − | |align="center" BGCOLOR="#FFFCF5"|Weapon skills |
||
| − | |align="center" BGCOLOR="#FFFCF5"|[[Zalsuhm]] |
||
| − | |align="center" BGCOLOR="#FFFCF5"|(H - 9) |
||
| − | |align="center" BGCOLOR="#FFFCF5"|? |
||
| − | |} |
||
==Other Information== |
==Other Information== |
||
| Line 272: | Line 169: | ||
{{TableNPCLine | Name=[[Bluffnix]]| Coordinates= (H - 9)| Type= }} |
{{TableNPCLine | Name=[[Bluffnix]]| Coordinates= (H - 9)| Type= }} |
||
{{TableNPCLine | Name=[[Bogharg]]| Coordinates= (H - 9)| Type= }} |
{{TableNPCLine | Name=[[Bogharg]]| Coordinates= (H - 9)| Type= }} |
||
| − | {{TableNPCLine | Name=[[Caruvinda]]| Coordinates= (J - 6)| Type= |
+ | {{TableNPCLine | Name=[[Caruvinda]]| Coordinates= (J - 6)| Type= [[Armor Depository]]}} |
{{TableNPCLine | Name=[[Chenokih]]| Coordinates= (H - 9)| Type= Standard Merchant}} |
{{TableNPCLine | Name=[[Chenokih]]| Coordinates= (H - 9)| Type= Standard Merchant}} |
||
{{TableNPCLine | Name=[[Chetak]]| Coordinates= (H - 9)| Type= Standard Merchant}} |
{{TableNPCLine | Name=[[Chetak]]| Coordinates= (H - 9)| Type= Standard Merchant}} |
||
| Line 282: | Line 179: | ||
{{TableNPCLine | Name=[[Derrick]]| Coordinates= (H - 7)| Type= }} |
{{TableNPCLine | Name=[[Derrick]]| Coordinates= (H - 7)| Type= }} |
||
{{TableNPCLine | Name=[[Dietmund]]| Coordinates= (G - 11)| Type= }} |
{{TableNPCLine | Name=[[Dietmund]]| Coordinates= (G - 11)| Type= }} |
||
| + | {{TableNPCLine | Name=[[Domenic]]| Coordinates= (J - 7)| Type= Battlefield Teleport }} |
||
{{TableNPCLine | Name=[[Faursel]]| Coordinates= (J - 8)| Type= }} |
{{TableNPCLine | Name=[[Faursel]]| Coordinates= (J - 8)| Type= }} |
||
{{TableNPCLine | Name=[[Fephita]]| Coordinates= (G - 11)| Type= [[Chocobo Renter]]}} |
{{TableNPCLine | Name=[[Fephita]]| Coordinates= (G - 11)| Type= [[Chocobo Renter]]}} |
||
| Line 299: | Line 197: | ||
{{TableNPCLine | Name=[[Mataligeat]]| Coordinates= (H - 8)| Type= }} |
{{TableNPCLine | Name=[[Mataligeat]]| Coordinates= (H - 8)| Type= }} |
||
{{TableNPCLine | Name=[[Matoaka]]| Coordinates= (H - 9)| Type= Standard Merchant}} |
{{TableNPCLine | Name=[[Matoaka]]| Coordinates= (H - 9)| Type= Standard Merchant}} |
||
| − | {{TableNPCLine | Name=[[Mendi]]| Coordinates= (H - 8)| Type= |
+ | {{TableNPCLine | Name=[[Mendi]]| Coordinates= (H - 8)| Type=[[Reputation NPC]]}} |
{{TableNPCLine | Name=[[Mertaire]]| Coordinates= (I - 8)| Type= }} |
{{TableNPCLine | Name=[[Mertaire]]| Coordinates= (I - 8)| Type= }} |
||
{{TableNPCLine | Name=[[Mesukiki]]| Coordinates= (I - 7)| Type= [[Item Deliverer]]}} |
{{TableNPCLine | Name=[[Mesukiki]]| Coordinates= (I - 7)| Type= [[Item Deliverer]]}} |
||
| + | {{TableNPCLine | Name=[[Miladi-Nildi]]| Coordinates= (J - 5)| Type= }} |
||
{{TableNPCFooter}} |
{{TableNPCFooter}} |
||
|rowspan="1" valign="top"| |
|rowspan="1" valign="top"| |
||
{{TableNPCHeader}} |
{{TableNPCHeader}} |
||
| − | {{TableNPCLine | Name=[[Miladi-Nildi]]| Coordinates= (J - 5)| Type= }} |
||
{{TableNPCLine | Name=[[Momiji]]| Coordinates= (I - 6)| Type= }} |
{{TableNPCLine | Name=[[Momiji]]| Coordinates= (I - 6)| Type= }} |
||
{{TableNPCLine | Name=[[Morefie]]| Coordinates= (H - 9)| Type= Standard Merchant}} |
{{TableNPCLine | Name=[[Morefie]]| Coordinates= (H - 9)| Type= Standard Merchant}} |
||
| Line 317: | Line 215: | ||
{{TableNPCLine | Name=[[Parike-Poranke]]| Coordinates= (H - 8)| Type= Adventurer's Assistant}} |
{{TableNPCLine | Name=[[Parike-Poranke]]| Coordinates= (H - 8)| Type= Adventurer's Assistant}} |
||
{{TableNPCLine | Name=[[Pawkrix]]| Coordinates= (H - 10)| Type= Standard Merchant}} |
{{TableNPCLine | Name=[[Pawkrix]]| Coordinates= (H - 10)| Type= Standard Merchant}} |
||
| + | {{TableNPCLine | Name=[[Porter Moogle]]| Coordinates= (I - 6)| Type= Equipment Storer}} |
||
{{TableNPCLine | Name=[[Promurouve]]| Coordinates= (H - 7)| Type= Map Dealer}} |
{{TableNPCLine | Name=[[Promurouve]]| Coordinates= (H - 7)| Type= Map Dealer}} |
||
{{TableNPCLine | Name=[[Raji]]| Coordinates= (I - 7)| Type= }} |
{{TableNPCLine | Name=[[Raji]]| Coordinates= (I - 7)| Type= }} |
||
Latest revision as of 16:20, 7 February 2018
|
Table of Contents
|
Zone Information
| ||||||||||||||||||||||||||||||
|
Description
The lower level of Jeuno, otherwise known as Market Bridge, is filled with a wide variety of shops selling everything an aspiring adventurer could need. While somewhat hidden in the depths of the district, even the Goblins and Tenshodo have set up shops here. If the shops don't sell what you are looking for, the Lower Auction House will often have your desired item listed. Reflecting the fact that the lower level of Jeuno is considered by many to be the center of Vana'diel commerce, the Chamber of Commerce and Industry is located here. Chocobos can also be rented here for access to Rolanberry Fields. 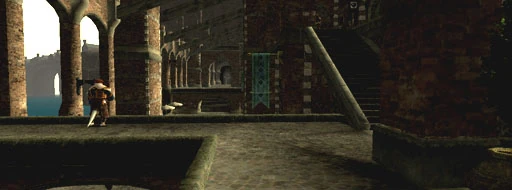 | |||||||||||||||||||||||||||||||
|
Connections
Exit to Western Adoulin / Eastern Adoulin : Waypoint at (H-7)
|
Involved in Quests/Missions
Other Information
|
[ edit ]
|
||||||||||||||||||||||||||
NPCs Found Here
|
|