m (iw) |
No edit summary |
||
| Line 85: | Line 85: | ||
|} |
|} |
||
*Head to the ''[[:Image:Innerhorutotoruins1.jpg|Lily Tower]]'' in [[East Sarutabaruta]] at J-7. |
*Head to the ''[[:Image:Innerhorutotoruins1.jpg|Lily Tower]]'' in [[East Sarutabaruta]] at J-7. |
||
| − | *Go to the northwest corner of the ring-shaped room at G-8 and into the room with the Ancient Magical Gizmo. There is a cracked wall |
+ | *Go to the northwest corner of the ring-shaped room at G-8 and into the room with the Ancient Magical Gizmo. (it means simply : go to the room at G-8) There is a cracked wall there; go through the cracked wall and then proceed to the ''Mahogany Door''. |
(The following "Note" kinda confused me so I thought I'd edit this here.. after you go through the cracked wall, you'll arrive at a new map. Go to G-7 to access a hidden passage, follow the path and you'll be at the Mahogany Door.) |
(The following "Note" kinda confused me so I thought I'd edit this here.. after you go through the cracked wall, you'll arrive at a new map. Go to G-7 to access a hidden passage, follow the path and you'll be at the Mahogany Door.) |
||
Revision as of 13:15, 23 July 2008
|
Walkthrough
Windurst
- The mission will not be available until after you amass a certain number of Rank Points obtained by trading stacks of crystals of any type to any of the War Warlock's (character with the initials W.W. after their name) located at the city gates.
- Trading 1 stack of crystals will unlock the mission.
- After accepting the Mission, talk to Tosuka-Porika at G-8 in the Optistery in the northern portion of Windurst Waters. Then go outside the Optistery and down the stairs. Take the warp from Tonana (G-8) to Windurst Woods and go see Nanaa Mihgo at J-3.
- Note: It is recommended that you talk to Hariga-Origa and start the Glyph Hanger quest for the Map of the Horutoto Ruins, if you have not done so already.
- Purchase some Prism Powders and Silent Oils or have Sneak and Invisible available for the next part. It is recommended to obtain an Instant Warp scroll as well, provided your Home Point is in Windurst.
The Maze
 Maze of Shakhrami Upper |
 Maze of Shakhrami Lower |
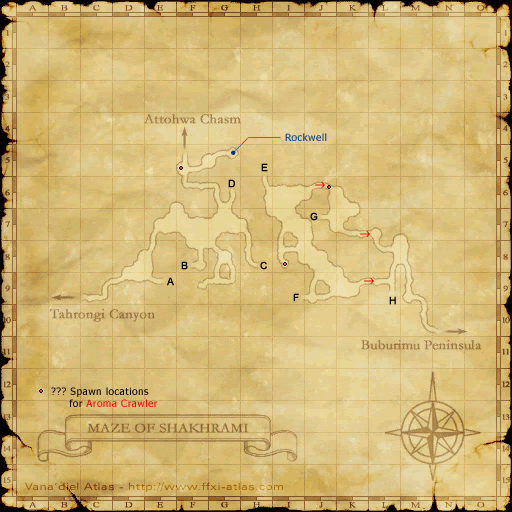
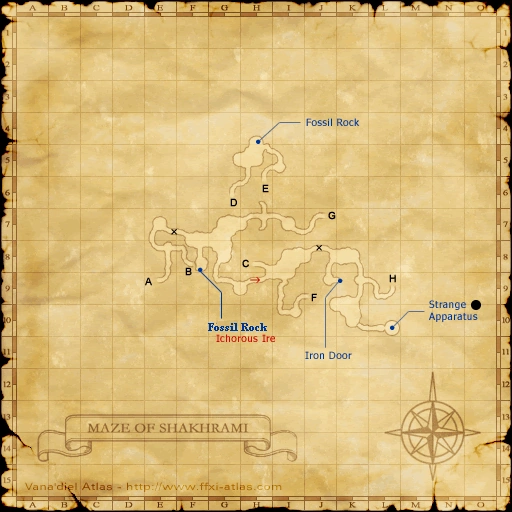
- Continue to the Maze of Shakhrami, which can be found at the very Northeast corner of Tahrongi Canyon (K-5).
- Once inside, go to H-5 on the lower maze map (map 2). There are four Fossil Rocks in this room. There are also two Fossil Rocks in the large room on the same map at I-8.
- Examine a Fossil Rock and get key item Lapis Coral.
- There are 5 Fossil Rocks to examine, one will give you the Lapis Coral. There are several aggressive mobs on the way to this room, Goblins which detect by sight and Maze Scorpions and Ghouls which detect by sound. Once in fossil room, the active mobs all detect on sound only. You'll need to cancel your Invisible to examine the Fossil Rock, but you can keep Sneak.
- Head back to Nanaa Mihgo in Windurst Woods (J-3) to receive key item Hideout key.
Horutoto Ruins
Lily Tower |
Beetle's Burrow |
- Head to the Lily Tower in East Sarutabaruta at J-7.
- Go to the northwest corner of the ring-shaped room at G-8 and into the room with the Ancient Magical Gizmo. (it means simply : go to the room at G-8) There is a cracked wall there; go through the cracked wall and then proceed to the Mahogany Door.
(The following "Note" kinda confused me so I thought I'd edit this here.. after you go through the cracked wall, you'll arrive at a new map. Go to G-7 to access a hidden passage, follow the path and you'll be at the Mahogany Door.)
- NOTE: Walking through the cracked wall will take you to a new map of Beetle's Burrow. The cracked wall at G-8 will lead to the new map at K-7. Go Southwest - there are two paths, but you can take either of them, as they both converge at I-9. At I-9, take the West tunnel at the 3-way intersection. Follow the tunnel Northwest - again, take either path, as both converge at your target, the Mahogany Door.
- After the cut scene, head to the House of the Hero in Windurst Walls (G-3). After the cut scene, go back to Tosuka-Porika to finish the mission.
Game Description
- Mission Orders
- There are reports that the Cat Burglar has her paws on a "Book of the Gods," a restricted book that was lost twenty years ago. Assist the Opistery in investigating the reports, and attempt to retrieve the priceless, but dangerous, tome.