No edit summary |
No edit summary |
||
| (45 intermediate revisions by 26 users not shown) | |||
| Line 6: | Line 6: | ||
| npc = Any [[Windurst Gate Guard]] |
| npc = Any [[Windurst Gate Guard]] |
||
| requirements = Sufficient Rank Points |
| requirements = Sufficient Rank Points |
||
| − | | level = 20+ |
||
| title = |
| title = |
||
| − | | reward = Rank points |
+ | | reward = Rank points<br> |
| − | | items = [[Lapis Monocle]]<br>[[Lapis Coral]]<br>[[Hideout Key]] |
+ | | items = {{KeyItem}}[[Lapis Monocle]]<br>{{KeyItem}}[[Lapis Coral]]<br>{{KeyItem}}[[Hideout Key]] |
| repeatable = No |
| repeatable = No |
||
| parent = |
| parent = |
||
| Line 16: | Line 15: | ||
| next = [[A Testing Time]] |
| next = [[A Testing Time]] |
||
| cutscenes = |
| cutscenes = |
||
| − | {{Mission/Cutscene|Lost for Words (pt.1)|[[Dienger]] |
+ | {{Mission/Cutscene|Lost for Words (pt.1)|[[Dienger]] {{Location|Windurst Waters|map=North|F-5}}}} |
| − | {{Mission/Cutscene|Lost for Words|[[Goblin Footprint]] |
+ | {{Mission/Cutscene|Lost for Words|[[Goblin Footprint]] {{Location|Inner Horutoto Ruins|map=Lily Tower|I-7}}}} |
| − | {{Mission/Cutscene|Lost for Words|[[Juvillie]] |
+ | {{Mission/Cutscene|Lost for Words|[[Juvillie]] {{Location|Windurst Walls|D-6}}}} |
| − | {{Mission/Cutscene|Lost for Words (pt.2)|[[Dienger]] |
+ | {{Mission/Cutscene|Lost for Words (pt.2)|[[Dienger]] {{Location|Windurst Waters|map=North|F-5}}}} |
}} |
}} |
||
== Walkthrough == |
== Walkthrough == |
||
=== Windurst === |
=== Windurst === |
||
| + | *This mission cannot be skipped. |
||
| − | *The mission will not be available until after you amass a certain number of [[Rank Points]] obtained by trading stacks of crystals of any type to any of the War Warlocks (character with the initials W.W. after their name) located at the city gates. |
+ | *The mission will not be available until after you amass a certain number of [[Rank Points]] obtained by trading stacks of crystals of any type to any of the War Warlocks (character with the initials W.W. after their name) located at the city gates. |
| + | **Trading 1 crystal (not a stack, just 1) will unlock this mission. |
||
| + | **Trading 7 crystals will cap your rank points for Rank 2. |
||
| − | *After accepting the Mission, talk to [[Tosuka-Porika]] |
+ | *After accepting the Mission from the [[Windurst Gate Guard]], talk to [[Tosuka-Porika]] in the [[Optistery]] at {{Location|Windurst Waters|map=North|G-8}} (near [[Home Point]] #1). Tosuka-Porika will be in the east wing of the Optistery. |
| ⚫ | |||
| + | *Head to [[Nanaa Mihgo]] at {{Location|Windurst Woods|J-3}}. |
||
| ⚫ | |||
| + | **You can run north to the [[Home Point]] on the way to the [[Windurst Waters]] exit to [[West Sarutabaruta]] and teleport to [[Home Point]] #1 in [[Windurst Woods]], then run north to [[Nanaa Mihgo]]. |
||
| + | **Alternatively, go outside the Optistery and down the stairs to the east. Take the warp from [[Tonana]] ({{Location Tooltip|area=Windurst Waters|map=North|pos=G-8}}) to [[Windurst Woods]] to the front of the [[Chocobo Stables (Windurst)|Chocobo Stables]] and go north to see [[Nanaa Mihgo]] at ({{Location Tooltip|area=Windurst Woods|pos=J-3}}). |
||
| + | * Talk to [[Nanaa Mihgo]] and obtain the '''Key Item''': {{KeyItem}}[[Lapis Monocle]]. |
||
| − | :*'''Note''' It is recommended that you talk to [[Hariga-Origa]] and start the [[Glyph Hanger]] quest for the [[Map of the Horutoto Ruins]], if you have not done so already. |
||
| + | * If you are under level 35, it is suggested that you have some form of [[Sneak]] and [[Invisible]] available for the next part, such as [[Circumspection]] or [[Prism Powder]] and [[Silent Oil]]. |
||
| − | *Then go outside the Optistery and down the stairs. Take the warp from [[Tonana]] (G-8) to [[Windurst Woods]] and go see [[Nanaa Mihgo]] at J-3. '''Obtain Key Item''': [[Lapis Monocle]]. |
||
| + | * An [[Instant Warp]] scroll or a [[Warp Ring]] with your [[Home Point]] set to [[Windurst]] will make for a quick return. |
||
| − | |||
| − | *Purchase some [[Prism Powder]]s and [[Silent Oil]]s or have [[Sneak]] and [[Invisible]] available for the next part. It is recommended to obtain an [[Instant Warp]] scroll as well, provided your [[Home Point]] is in [[Windurst]]. |
||
=== The Maze === |
=== The Maze === |
||
| Line 41: | Line 45: | ||
|valign="top"|[[Image:MazeofShakhrami2.png|thumb|100px|Maze of Shakhrami Lower]] |
|valign="top"|[[Image:MazeofShakhrami2.png|thumb|100px|Maze of Shakhrami Lower]] |
||
|} |
|} |
||
| − | *Continue to the [[Maze of Shakhrami]], which can be found at the |
+ | *Continue to the [[Maze of Shakhrami]], which can be found at the northeast corner of {{Location|Tahrongi Canyon|K-5}}. |
| + | **[[Survival Guide]] warping is the quickest way. Otherwise, [[Unity Concord NPC|Unity Warp]] to [[Tahrongi Canyon]] (Level 99 and below category) and hug the right wall north. |
||
| + | * Once inside, go to ({{Location Tooltip|area=Maze of Shakhrami|map=Map 1|pos=G-6}}) on the upper map and take the right tunnel to get to the lower map. |
||
| ⚫ | **There are several aggressive mobs on the way, [[Goblin]]s which detect by sight and [[Maze Scorpion]]s and [[Ghoul]]s which detect by sound. Once in the fossil room, the active mobs all detect on sound only. You'll need to cancel your [[Invisible]] to examine the '''Fossil Rock''', but you can keep [[Sneak]]. |
||
| − | * |
+ | * Head to ({{Location Tooltip|area=Maze of Shakhrami|map=Map 2|pos=H-5}}) on the lower map. |
| ⚫ | |||
| ⚫ | |||
| − | * Head to H-5 on the lower map |
||
| + | **Locations (all second/lower map): ({{Location Tooltip|area=Maze of Shakhrami|map=Map 2|pos=G-5}}), ({{Location Tooltip|area=Maze of Shakhrami|map=Map 2|pos=H-4}}), 2x ({{Location Tooltip|area=Maze of Shakhrami|map=Map 2|pos=H-5}}), ({{Location Tooltip|area=Maze of Shakhrami|map=Map 2|pos=F-8}}), 2x ({{Location Tooltip|area=Maze of Shakhrami|map=Map 2|pos=I-8}}) |
||
| ⚫ | |||
| ⚫ | |||
| ⚫ | |||
| − | :*Locations (All second/lower map): G-5, H-4, 2x H-5, F-8, 2x I-8 |
||
| ⚫ | |||
| ⚫ | |||
| ⚫ | |||
| ⚫ | |||
| ⚫ | |||
| − | |||
| ⚫ | |||
=== Horutoto Ruins === |
=== Horutoto Ruins === |
||
| Line 62: | Line 66: | ||
|valign="top"|[[Image:InnerHorutotoRuins2.png|thumb|100px|Beetle's Burrow]] |
|valign="top"|[[Image:InnerHorutotoRuins2.png|thumb|100px|Beetle's Burrow]] |
||
|} |
|} |
||
| − | :'''Note:''' It is recommended that you do [[Making Headlines]] in conjunction with this mission. |
+ | :'''Note:''' It is recommended that you do [[Making Headlines]] in conjunction with this mission. |
| ⚫ | |||
| − | |||
| + | :**There is a [[Survival Guide]] located here. |
||
| ⚫ | |||
| − | *Go to the |
+ | :*Go to the southwest corner of the big room shaped like a rectangular ring at ({{Location Tooltip|area=Inner Horutoto Ruins|map=Lily Tower|pos=G-9}}) and into the room with an '''Ancient Magical Gizmo'''. There is a '''Cracked Wall''' there. Click and go through the Cracked Wall. |
| − | *Walking through the |
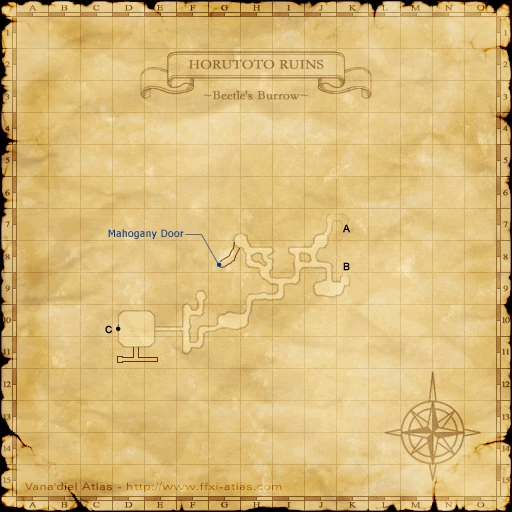
+ | :*Walking through the Cracked Wall will take you to a new map in [[:Image:InnerHorutotoRuins2.png|Beetle's Burrow]] at ({{Location Tooltip|area=Inner Horutoto Ruins|map=Beetle's Burrow|pos=K-9}}). |
| + | :*There is no need for Sneak nor Invisible, as the beetles and bats here in the upper 80s do not aggro. If you see any goblins or skeletons near the end (they aggro even at 99), you will be able to avoid them by hugging the western (left) wall. |
||
| − | *Go Southwest - there are two paths, take either one of them, as they both converge at I-9. |
||
| + | :*Head to ({{Location Tooltip|area=Inner Horutoto Ruins|map=Beetle's Burrow|pos=G-8}}) (the tunnel extension there is not marked on your in-game map; see the [http://ffxiclopedia.wikia.com/wiki/Inner_Horutoto_Ruins/Maps#Rose_Tower_2 Inner Horutoto Ruins map]). |
||
| − | *At I-9, take the West tunnel at the 3-way intersection. Follow the tunnel Northwest - again, take either path, as both converge. Note that this area will not show on the map if you go to check it meaning whenever you are going to this area, the last part will show your character walking out of the boundaries. |
||
| + | :**Go west from ({{Location Tooltip|area=Inner Horutoto Ruins|map=Beetle's Burrow|pos=K-9}}), take the path north and follow the western wall. |
||
| − | *Enter the Mahogany Door. |
||
| + | :**At ({{Location Tooltip|area=Inner Horutoto Ruins|map=Beetle's Burrow|pos=I-9}}), take the west tunnel at the 3-way intersection. Follow the tunnel northwest at the next intersection. |
||
| − | |||
| + | :**Follow the western wall and you'll make it to the '''Mahogany Door'''. There is a [[Grounds Tome]] here also. |
||
| ⚫ | |||
| + | :*Click on the Mahogany Door at ({{Location Tooltip|area=Inner Horutoto Ruins|map=Beetle's Burrow|pos=G-8}}). |
||
| ⚫ | :*After the cut scene, head to the [[House of the Hero]] in {{Location|Windurst Walls|G-3}} ([[Home Point]] #1 is closest) and click on the front door. After the cut scene, go back to [[Tosuka-Porika]] at the Optistery in {{Location|Windurst Waters|map=North|G-8}} (near [[Home Point]] #1) to finish the mission. |
||
| + | :*As usual, the NPCs around the [[Windurst Gate Guard]]s have additional dialogue. |
||
{{Mission/Description |
{{Mission/Description |
||
| Line 77: | Line 84: | ||
}} |
}} |
||
| + | {{spoiler2}} |
||
| − | {{spoiler3 |
||
| − | | spoiler = |
||
| − | {{/Plot Details}} |
||
| − | }} |
||
Revision as of 14:52, 3 December 2019
| Mission Name | Lost for Words |
|---|---|
| Number | 2-1 |
| Start NPC | Any Windurst Gate Guard |
| Requirements | Sufficient Rank Points |
| Items Needed | |
| Reward | Rank points |
| Repeatable | No |
| ← Previous Mission | Next Mission → |
|---|---|
| The Price of Peace | A Testing Time |
| Replay Cutscenes | |
|---|---|
| Lost for Words (pt.1) | Dienger Windurst Waters, North (F-5) |
| Lost for Words | Goblin Footprint Inner Horutoto Ruins, Lily Tower (I-7) |
| Lost for Words | Juvillie Windurst Walls (D-6) |
| Lost for Words (pt.2) | Dienger Windurst Waters, North (F-5) |
Walkthrough
Windurst
- This mission cannot be skipped.
- The mission will not be available until after you amass a certain number of Rank Points obtained by trading stacks of crystals of any type to any of the War Warlocks (character with the initials W.W. after their name) located at the city gates.
- Trading 1 crystal (not a stack, just 1) will unlock this mission.
- Trading 7 crystals will cap your rank points for Rank 2.
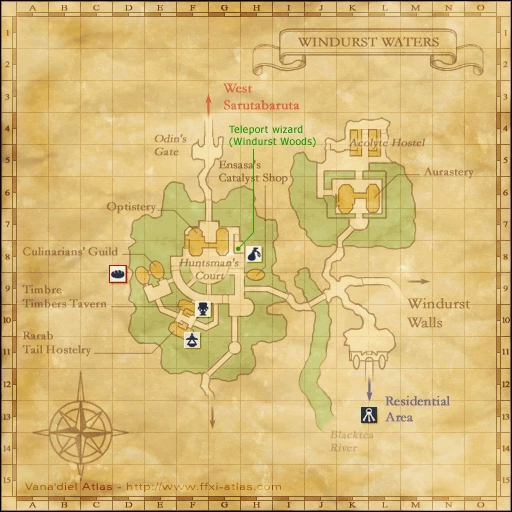
- After accepting the Mission from the Windurst Gate Guard, talk to Tosuka-Porika in the Optistery at Windurst Waters, North (G-8) (near Home Point #1). Tosuka-Porika will be in the east wing of the Optistery.
- Note: You may have to talk to Tosuka-Porika twice if you've started Past Reflections. No need to zone, just talk to him again.
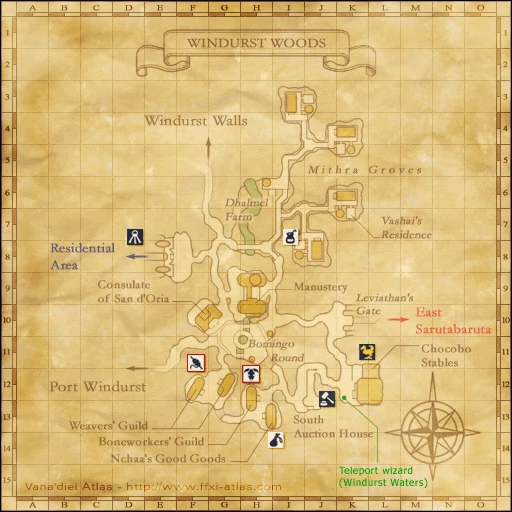
- Head to Nanaa Mihgo at Windurst Woods (J-3).
- You can run north to the Home Point on the way to the Windurst Waters exit to West Sarutabaruta and teleport to Home Point #1 in Windurst Woods, then run north to Nanaa Mihgo.
- Alternatively, go outside the Optistery and down the stairs to the east. Take the warp from Tonana (G-8) to Windurst Woods to the front of the Chocobo Stables and go north to see Nanaa Mihgo at (J-3).
- Talk to Nanaa Mihgo and obtain the Key Item:
 Lapis Monocle.
- If you are under level 35, it is suggested that you have some form of Sneak and Invisible available for the next part, such as Circumspection or Prism Powder and Silent Oil.
- An Instant Warp scroll or a Warp Ring with your Home Point set to Windurst will make for a quick return.
The Maze
  Maze of Shakhrami Upper |
  Maze of Shakhrami Lower |
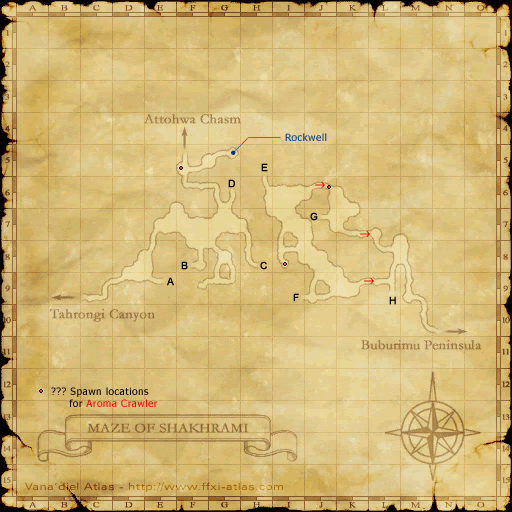
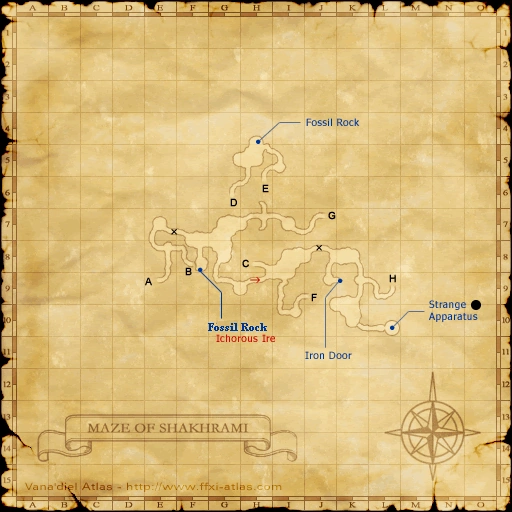
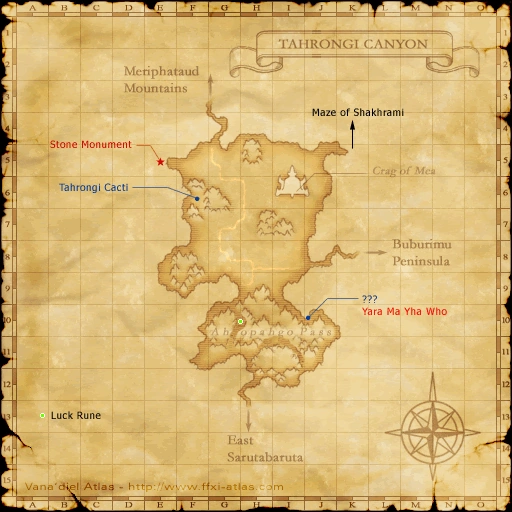
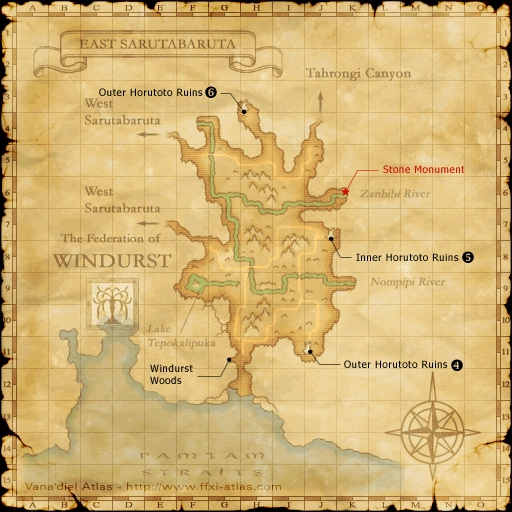
- Continue to the Maze of Shakhrami, which can be found at the northeast corner of Tahrongi Canyon (K-5).
- Survival Guide warping is the quickest way. Otherwise, Unity Warp to Tahrongi Canyon (Level 99 and below category) and hug the right wall north.
- Once inside, go to (G-6) on the upper map and take the right tunnel to get to the lower map.
- There are several aggressive mobs on the way, Goblins which detect by sight and Maze Scorpions and Ghouls which detect by sound. Once in the fossil room, the active mobs all detect on sound only. You'll need to cancel your Invisible to examine the Fossil Rock, but you can keep Sneak.
- Head to (H-5) on the lower map.
- There are four Fossil Rocks in this room. There are also two Fossil Rocks in the large room on the same map at (I-8).
- Examine a Fossil Rock and get Lapis Coral.
- There are 5 Fossil Rocks to examine; one will give you the Lapis Coral.
- FYI Only: Ichorous Ire is spawned by clicking on the Fossil Rock at (F-8) on the second map. There is no need to kill this NM for this mission.
- Once you receive the Lapis Coral, head back to Nanaa Mihgo at Windurst Woods (J-3) to receive the Hideout Key.
Horutoto Ruins
  Lily Tower |
  Beetle's Burrow |
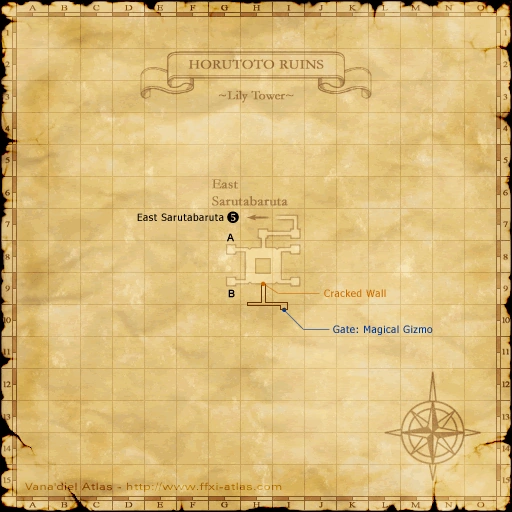
- Note: It is recommended that you do Making Headlines in conjunction with this mission.
- Head to the Lily Tower in East Sarutabaruta at (J-7).
- There is a Survival Guide located here.
- Go to the southwest corner of the big room shaped like a rectangular ring at (G-9) and into the room with an Ancient Magical Gizmo. There is a Cracked Wall there. Click and go through the Cracked Wall.
- Walking through the Cracked Wall will take you to a new map in Beetle's Burrow at (K-9).
- There is no need for Sneak nor Invisible, as the beetles and bats here in the upper 80s do not aggro. If you see any goblins or skeletons near the end (they aggro even at 99), you will be able to avoid them by hugging the western (left) wall.
- Head to (G-8) (the tunnel extension there is not marked on your in-game map; see the Inner Horutoto Ruins map).
- Go west from (K-9), take the path north and follow the western wall.
- At (I-9), take the west tunnel at the 3-way intersection. Follow the tunnel northwest at the next intersection.
- Follow the western wall and you'll make it to the Mahogany Door. There is a Grounds Tome here also.
- Click on the Mahogany Door at (G-8).
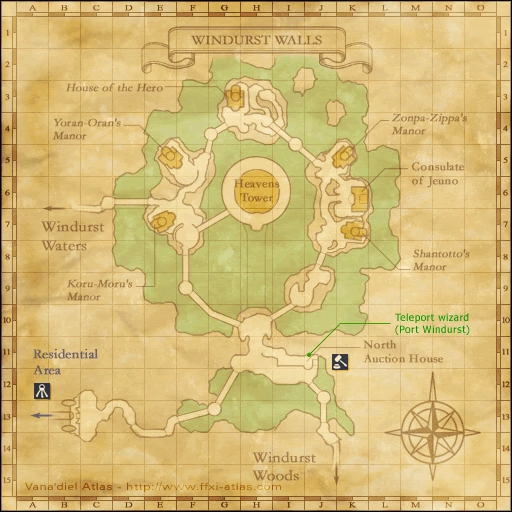
- After the cut scene, head to the House of the Hero in Windurst Walls (G-3) (Home Point #1 is closest) and click on the front door. After the cut scene, go back to Tosuka-Porika at the Optistery in Windurst Waters, North (G-8) (near Home Point #1) to finish the mission.
- As usual, the NPCs around the Windurst Gate Guards have additional dialogue.
- Head to the Lily Tower in East Sarutabaruta at (J-7).
Game Description
- Mission Orders
- There are reports that the Cat Burglar has her paws on a "Book of the Gods," a restricted book that was lost twenty years ago. Assist the Opistery in investigating the reports, and attempt to retrieve the priceless, but dangerous, tome.