Macc (Message Wall | contribs) mNo edit summary Tag: sourceedit |
mNo edit summary |
||
| (8 intermediate revisions by 6 users not shown) | |||
| Line 23: | Line 23: | ||
== Walkthrough == |
== Walkthrough == |
||
| + | '''Note:''' This mission requires a certain level of Rank Bar. Trade 6 crystals to the gate guard, or complete repeatable missions up to several times. |
||
| − | *Trading 6 (3 Light/Dark crystals on 11/29/2015) crystals, or completing [[Bat Hunt]] <s>9 times</s> probably twice, will give the necessary rank points for this mission. |
||
*After accepting the mission, enter the Great Hall of [[Chateau d'Oraguille]], and go to the king for a cutscene. |
*After accepting the mission, enter the Great Hall of [[Chateau d'Oraguille]], and go to the king for a cutscene. |
||
| − | *After the cutscene, talk to [[Rahal]] in the Royal Knights' Quarters to receive a |
+ | *After the cutscene, talk to [[Rahal]] in the Royal Knights' Quarters to receive a {{temp}} {{KeyItem}} [[Crystal dowser]]. |
| − | *Before heading out check if you |
+ | **Before heading out, check if you already have a [[Prelate Key]] in your inventory storage. It's an ex/rare item so you can only hold one. Bring it along to open a door. |
| + | **''Optional:'' Talk to [[Curilla]] for additional dialogue. |
||
| − | *Travel to the [[Temple of Uggalepih]]. A level 72+ character is safe from aggro from the weak mobs. |
||
| − | * |
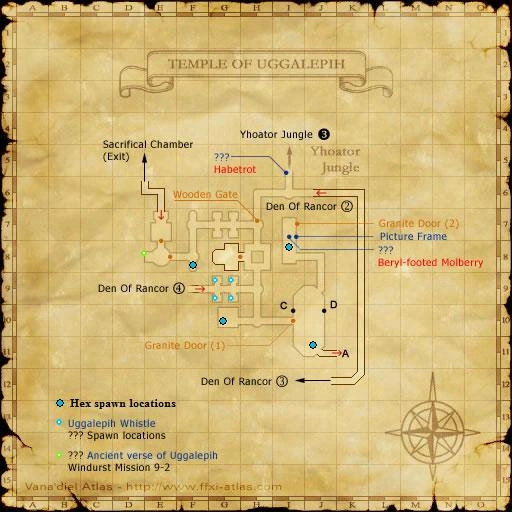
+ | *Travel by [[Teleport-Yhoat]], [[Survival Guide]] or [[Outpost Teleportation]] to [[Yhoator Jungle]]. A level 72+ character is safe from aggro from the weak mobs in the [[Temple of Uggalepih]]. Make your way to the main entrance of the temple (J-12). |
| − | + | *Once you zone into the Temple (Map 1), take the right path until you zone back into the jungle at (F-5). |
|
| − | **You may also use the [[Survival Guide]] to teleport directly to the [[Temple of Uggalepih]]. |
+ | **You may also use the [[Survival Guide]] to teleport directly to the [[Temple of Uggalepih]] (F-6) (Map 1). |
| − | * |
+ | *Follow the corridor, and you'll see a flight of stairs in front of you leading down. Don't go down them, but instead, turn left and then instantly left again and you will zone into another part of the Temple (Map 2). After zoning, follow the right wall until you find a wooden gate. Shortly after you pass through this, the path will split. Take the left path and clear the area. |
| − | *Here you will have to kill the [[Temple Guardian]] in order to continue |
+ | *Here you will have to kill the [[Temple Guardian]] in order to continue. |
| − | *After the guardian is defeated, |
+ | *After the guardian is defeated, the ''Granite Door'' it was guarding will now open. Continue through it and advance up either of the two stairways that are to the west and east sides of the room. Watch out for [[Manipulator]] who patrols the stairs. Use the [[Prelate Key]] dropped by a [[Tonberry Stabber]], [[Tonberry Chopper]], or a [[Tonberry Slasher]] to open the next ''Granite Door'' at the top of either stairway and continue onto Map 4. |
| − | **It is not necessary to farm the [[Prelate Key]]. Instead you can use any magic spell to aggro |
+ | **It is not necessary to farm the [[Prelate Key]]. Instead, you can use any magic spell to aggro the [[Hover Tank]] (detects magic) through the ''Granite Door'' if it's close enough. Once the engaged mob gets near the door, it will open. However, it may take a long time until the Hover Tank gets near enough to magic-aggro. |
| − | **It's also possible to scroll through targets and land on one of the mobs behind the door. It could be a tonberry or |
+ | **It's also possible to scroll through targets and land on one of the mobs behind the door. It could be a tonberry or Hover Tank. Once you've locked on to it, all you really need now is to wait for it to move straight behind the door and you will be able to pull it, thus opening the door. Beware of tonberry links. |
| − | ** |
+ | **Note: this will only work with the eastern door. If you pull a mob to the western door it will just walk through the door without opening it. |
| − | ** |
+ | ** Don't know when it was implemented, but it is no longer necessary to magic-aggro mobs to get the doors to open. you only need one prelate key to get to the 4 doors, and they all open when you examine them. this was probably done so that a level 99 character could solo the mission and the prelate key is rare-ex so one person would not be able to have enough keys to open all the doors. I just did this mission 9/21/2014. (I was able to aggro a tonberry to open the door. What I did was target a tonberry and wait for it to move in front of the door. Then I turned my camera angle so that it was parallel with the door which allowed me to use Bio on it. 9-10-16). |
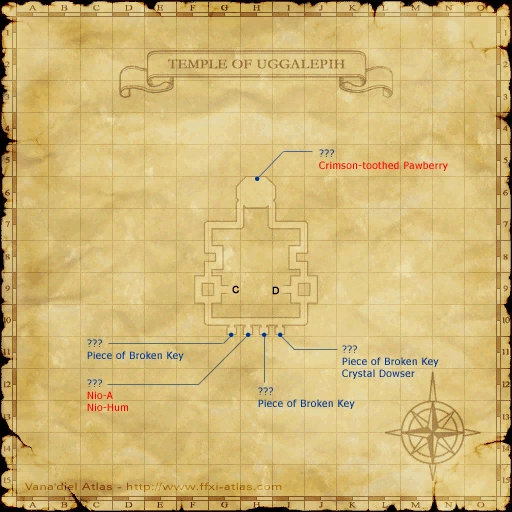
| + | *Head south until you see 4 doors on the right (if you came through the east ''Granite Door'', they will be on your left). Door 4 is the furthest down, Door 1 is the first door you will see (the reverse is true if you came from the east). |
||
| − | *Clear the hallway of tonberries and magic jugs. Now enter Doors 1, 3, and 4 and inspect the [[???]] for a key item. |
||
| − | * |
+ | *Clear the hallway of tonberries and magic jugs. Now enter Doors 1, 3, and 4 and inspect the [[???]] for a {{KeyItem}} "[[Piece of a Broken Key]]". Door 2 will do nothing until you have the 3 [[Key Items]]. |
| + | ** Room 4 has two [[???]] - you can check both; be sure to get the correct one which is located on the shelves to the right when entering the room. Everyone needs 3 key items before continuing. |
||
| − | *Once everyone is ready, have someone inspect Door 2. Once this door is inspected, 2 Doll |
+ | *Once everyone is ready, have someone inspect Door 2. Once this door is inspected, 2 Doll NMs will spawn, [[Nio-Hum]] and [[Nio-A]]. |
:*[[Nio-A]] and [[Nio-Hum]] are warriors and will use [[Mighty Strikes]]. |
:*[[Nio-A]] and [[Nio-Hum]] are warriors and will use [[Mighty Strikes]]. |
||
:*They will not sleep, so have a second tank keep Nio-A busy while everyone else concentrates on Nio-Hum. Mages should have Barfira up in case the dolls [[Meltdown]]. |
:*They will not sleep, so have a second tank keep Nio-A busy while everyone else concentrates on Nio-Hum. Mages should have Barfira up in case the dolls [[Meltdown]]. |
||
| Line 51: | Line 52: | ||
*Following the fight, everyone should inspect Door 2 for a cutscene. |
*Following the fight, everyone should inspect Door 2 for a cutscene. |
||
:*If anyone in the group did not have the 3 pieces of the broken key, they can get them after the fight and re-inspect the door. The dolls will not re-spawn. |
:*If anyone in the group did not have the 3 pieces of the broken key, they can get them after the fight and re-inspect the door. The dolls will not re-spawn. |
||
| − | *Once you see the text "You could not find Lightbringer here. Your investigation is over." the mission is complete. |
+ | *Once you see the text "You could not find Lightbringer here. Your investigation is over.", the mission is complete. |
| − | *Return to [[Chateau d'Oraguille]] and |
+ | *''Optional:'' Return to [[Chateau d'Oraguille]] and speak with [[Rahal]], [[Aramaviont]], [[Milchupain]], [[Halver]], and [[Curilla]] for additional dialogue. |
| + | *Click on the ''Door: Great Hall'' for a cutscene with King Destin and your reward. |
||
| − | *Speak with |
+ | *Speak with [[Trion]] and [[Pieuje]] for additional cutscenes. |
| + | **''Optional:'' Speak with [[Rahal]], [[Aramaviont]] and [[Milchupain]] for additional dialogue. |
||
{{Mission/Description |
{{Mission/Description |
||
Revision as of 23:48, 1 October 2019
| Mission Name | Lightbringer |
|---|---|
| Number | 8-2 |
| Start NPC | Any San d'Orian Gate Guard |
| Level | 65+ |
| Reward | Rank 9 80,000g |
| ← Previous Mission | Next Mission → |
|---|---|
| Coming of Age | Breaking Barriers |
Temple of Uggalepih 2
Temple of Uggalepih 4
Composite Map
Walkthrough
Note: This mission requires a certain level of Rank Bar. Trade 6 crystals to the gate guard, or complete repeatable missions up to several times.
- After accepting the mission, enter the Great Hall of Chateau d'Oraguille, and go to the king for a cutscene.
- After the cutscene, talk to Rahal in the Royal Knights' Quarters to receive a
 Crystal dowser.
- Before heading out, check if you already have a Prelate Key in your inventory storage. It's an ex/rare item so you can only hold one. Bring it along to open a door.
- Optional: Talk to Curilla for additional dialogue.
- Travel by Teleport-Yhoat, Survival Guide or Outpost Teleportation to Yhoator Jungle. A level 72+ character is safe from aggro from the weak mobs in the Temple of Uggalepih. Make your way to the main entrance of the temple (J-12).
- Once you zone into the Temple (Map 1), take the right path until you zone back into the jungle at (F-5).
- You may also use the Survival Guide to teleport directly to the Temple of Uggalepih (F-6) (Map 1).
- Follow the corridor, and you'll see a flight of stairs in front of you leading down. Don't go down them, but instead, turn left and then instantly left again and you will zone into another part of the Temple (Map 2). After zoning, follow the right wall until you find a wooden gate. Shortly after you pass through this, the path will split. Take the left path and clear the area.
- Here you will have to kill the Temple Guardian in order to continue.
- After the guardian is defeated, the Granite Door it was guarding will now open. Continue through it and advance up either of the two stairways that are to the west and east sides of the room. Watch out for Manipulator who patrols the stairs. Use the Prelate Key dropped by a Tonberry Stabber, Tonberry Chopper, or a Tonberry Slasher to open the next Granite Door at the top of either stairway and continue onto Map 4.
- It is not necessary to farm the Prelate Key. Instead, you can use any magic spell to aggro the Hover Tank (detects magic) through the Granite Door if it's close enough. Once the engaged mob gets near the door, it will open. However, it may take a long time until the Hover Tank gets near enough to magic-aggro.
- It's also possible to scroll through targets and land on one of the mobs behind the door. It could be a tonberry or Hover Tank. Once you've locked on to it, all you really need now is to wait for it to move straight behind the door and you will be able to pull it, thus opening the door. Beware of tonberry links.
- Note: this will only work with the eastern door. If you pull a mob to the western door it will just walk through the door without opening it.
- Don't know when it was implemented, but it is no longer necessary to magic-aggro mobs to get the doors to open. you only need one prelate key to get to the 4 doors, and they all open when you examine them. this was probably done so that a level 99 character could solo the mission and the prelate key is rare-ex so one person would not be able to have enough keys to open all the doors. I just did this mission 9/21/2014. (I was able to aggro a tonberry to open the door. What I did was target a tonberry and wait for it to move in front of the door. Then I turned my camera angle so that it was parallel with the door which allowed me to use Bio on it. 9-10-16).
- Head south until you see 4 doors on the right (if you came through the east Granite Door, they will be on your left). Door 4 is the furthest down, Door 1 is the first door you will see (the reverse is true if you came from the east).
- Clear the hallway of tonberries and magic jugs. Now enter Doors 1, 3, and 4 and inspect the ??? for a "Piece of a Broken Key". Door 2 will do nothing until you have the 3 Key Items.
- Room 4 has two ??? - you can check both; be sure to get the correct one which is located on the shelves to the right when entering the room. Everyone needs 3 key items before continuing.
- Once everyone is ready, have someone inspect Door 2. Once this door is inspected, 2 Doll NMs will spawn, Nio-Hum and Nio-A.
- Nio-A and Nio-Hum are warriors and will use Mighty Strikes.
- They will not sleep, so have a second tank keep Nio-A busy while everyone else concentrates on Nio-Hum. Mages should have Barfira up in case the dolls Meltdown.
- The NMs are not immune to Break.
- The NMs are immune to Stun.
- The NMs have extremely high magic damage reduction.
- You may spawn the NMs with Sneak active and pull only one with a ranged attack, a job ability such as Provoke or simply approach one of the dolls carefully without sneak to agro it (they will not link, similar to the two krakens in Coming of Age). Due to the narrow hallway and location of where they spawn, ranged attack is recommended, as you may have problems sighting the mob to use the job ability. You may pull either Nio-A or Nio-Hum and wait for to the other to despawn (don't kill too quickly). Only one NM needs to be defeated.
(see testimonials)
- Following the fight, everyone should inspect Door 2 for a cutscene.
- If anyone in the group did not have the 3 pieces of the broken key, they can get them after the fight and re-inspect the door. The dolls will not re-spawn.
- Once you see the text "You could not find Lightbringer here. Your investigation is over.", the mission is complete.
- Optional: Return to Chateau d'Oraguille and speak with Rahal, Aramaviont, Milchupain, Halver, and Curilla for additional dialogue.
- Click on the Door: Great Hall for a cutscene with King Destin and your reward.
- Speak with Trion and Pieuje for additional cutscenes.
- Optional: Speak with Rahal, Aramaviont and Milchupain for additional dialogue.
Game Description
- Mission Orders
- Royaulais Destin himself has summoned you for a vital mission. Seek audience with His Majesty in Chateau d'Oraguille immediately.