| Line 145: | Line 145: | ||
|- |
|- |
||
| style="background:#ECD2A5; padding-left:1em;" | [[Remedy]] |
| style="background:#ECD2A5; padding-left:1em;" | [[Remedy]] |
||
| − | | style="background:#ECD2A5; padding-left:1em;" | {{Abundance|0| |
+ | | style="background:#ECD2A5; padding-left:1em;" | {{Abundance|0|7}} |
| style="background:#BBE6E6; padding-left:1em;" | [[Champion's Tonic]] |
| style="background:#BBE6E6; padding-left:1em;" | [[Champion's Tonic]] |
||
| style="background:#BBE6E6; padding-left:1em;" | <!-- Abundance --> |
| style="background:#BBE6E6; padding-left:1em;" | <!-- Abundance --> |
||
|- |
|- |
||
| style="background:#ECD2A5; padding-left:1em;" | [[Hi-Reraiser]] |
| style="background:#ECD2A5; padding-left:1em;" | [[Hi-Reraiser]] |
||
| − | | style="background:#ECD2A5; padding-left:1em;" | {{Abundance|2| |
+ | | style="background:#ECD2A5; padding-left:1em;" | {{Abundance|2|7}} |
| style="background:#BBE6E6; padding-left:1em;" | [[Fanatic's Tonic]] |
| style="background:#BBE6E6; padding-left:1em;" | [[Fanatic's Tonic]] |
||
| style="background:#BBE6E6; padding-left:1em;" | <!-- Abundance --> |
| style="background:#BBE6E6; padding-left:1em;" | <!-- Abundance --> |
||
|- |
|- |
||
| style="background:#ECD2A5; padding-left:1em;" | [[Xanthous Cell]] |
| style="background:#ECD2A5; padding-left:1em;" | [[Xanthous Cell]] |
||
| − | | style="background:#ECD2A5; padding-left:1em;" | {{Abundance|2| |
+ | | style="background:#ECD2A5; padding-left:1em;" | {{Abundance|2|12}} |
| style="background:#BBE6E6; padding-left:1em;" | [[Healing Mist]] |
| style="background:#BBE6E6; padding-left:1em;" | [[Healing Mist]] |
||
| style="background:#BBE6E6; padding-left:1em;" | <!-- Abundance --> |
| style="background:#BBE6E6; padding-left:1em;" | <!-- Abundance --> |
||
|- |
|- |
||
| style="background:#ECD2A5; padding-left:1em;" | [[Vile Elixir]] |
| style="background:#ECD2A5; padding-left:1em;" | [[Vile Elixir]] |
||
| − | | style="background:#ECD2A5; padding-left:1em;" | {{Abundance|0| |
+ | | style="background:#ECD2A5; padding-left:1em;" | {{Abundance|0|7}} |
| style="background:#BBE6E6; padding-left:1em;" | [[Lucid Ether I]] |
| style="background:#BBE6E6; padding-left:1em;" | [[Lucid Ether I]] |
||
| style="background:#BBE6E6; padding-left:1em;" | <!-- Abundance --> |
| style="background:#BBE6E6; padding-left:1em;" | <!-- Abundance --> |
||
|- |
|- |
||
| style="background:#ECD2A5; padding-left:1em;" | [[Vile Elixir +1]] |
| style="background:#ECD2A5; padding-left:1em;" | [[Vile Elixir +1]] |
||
| − | | style="background:#ECD2A5; padding-left:1em;" | {{Abundance|0| |
+ | | style="background:#ECD2A5; padding-left:1em;" | {{Abundance|0|7}} |
| style="background:#BBE6E6; padding-left:1em;" | <!-- Item Name --> |
| style="background:#BBE6E6; padding-left:1em;" | <!-- Item Name --> |
||
| style="background:#BBE6E6; padding-left:1em;" | <!-- Abundance --> |
| style="background:#BBE6E6; padding-left:1em;" | <!-- Abundance --> |
||
|- |
|- |
||
| style="background:#ECD2A5; padding-left:1em;" | [[Daedalus Wing]]{{Temp}} |
| style="background:#ECD2A5; padding-left:1em;" | [[Daedalus Wing]]{{Temp}} |
||
| − | | style="background:#ECD2A5; padding-left:1em;" | {{Abundance|0| |
+ | | style="background:#ECD2A5; padding-left:1em;" | {{Abundance|0|7}} |
| style="background:#BBE6E6; padding-left:1em;" | <!-- Item Name --> |
| style="background:#BBE6E6; padding-left:1em;" | <!-- Item Name --> |
||
| style="background:#BBE6E6; padding-left:1em;" | <!-- Abundance --> |
| style="background:#BBE6E6; padding-left:1em;" | <!-- Abundance --> |
||
|- |
|- |
||
| style="background:#ECD2A5; padding-left:1em;" | [[Champion's Tonic]]{{Temp}} |
| style="background:#ECD2A5; padding-left:1em;" | [[Champion's Tonic]]{{Temp}} |
||
| − | | style="background:#ECD2A5; padding-left:1em;" | {{Abundance|0| |
+ | | style="background:#ECD2A5; padding-left:1em;" | {{Abundance|0|7}} |
| style="background:#BBE6E6; padding-left:1em;" | <!-- Item Name --> |
| style="background:#BBE6E6; padding-left:1em;" | <!-- Item Name --> |
||
| style="background:#BBE6E6; padding-left:1em;" | <!-- Abundance --> |
| style="background:#BBE6E6; padding-left:1em;" | <!-- Abundance --> |
||
|- |
|- |
||
| style="background:#ECD2A5; padding-left:1em;" | [[Ascetic's Tonic]]{{Temp}} |
| style="background:#ECD2A5; padding-left:1em;" | [[Ascetic's Tonic]]{{Temp}} |
||
| − | | style="background:#ECD2A5; padding-left:1em;" | {{Abundance|0| |
+ | | style="background:#ECD2A5; padding-left:1em;" | {{Abundance|0|7}} |
| style="background:#BBE6E6; padding-left:1em;" | <!-- Item Name --> |
| style="background:#BBE6E6; padding-left:1em;" | <!-- Item Name --> |
||
| style="background:#BBE6E6; padding-left:1em;" | <!-- Abundance --> |
| style="background:#BBE6E6; padding-left:1em;" | <!-- Abundance --> |
||
|- |
|- |
||
| style="background:#ECD2A5; padding-left:1em;" | [[Khroma Ore]] |
| style="background:#ECD2A5; padding-left:1em;" | [[Khroma Ore]] |
||
| − | | style="background:#ECD2A5; padding-left:1em;" | {{Abundance|0| |
+ | | style="background:#ECD2A5; padding-left:1em;" | {{Abundance|0|7}} |
| style="background:#BBE6E6; padding-left:1em;" | <!-- Item Name --> |
| style="background:#BBE6E6; padding-left:1em;" | <!-- Item Name --> |
||
| style="background:#BBE6E6; padding-left:1em;" | <!-- Abundance --> |
| style="background:#BBE6E6; padding-left:1em;" | <!-- Abundance --> |
||
|- |
|- |
||
| style="background:#ECD2A5; padding-left:1em;" | [[Manta Skin]] |
| style="background:#ECD2A5; padding-left:1em;" | [[Manta Skin]] |
||
| − | | style="background:#ECD2A5; padding-left:1em;" | {{Abundance|0| |
+ | | style="background:#ECD2A5; padding-left:1em;" | {{Abundance|0|7}} |
| style="background:#BBE6E6; padding-left:1em;" | <!-- Item Name --> |
| style="background:#BBE6E6; padding-left:1em;" | <!-- Item Name --> |
||
| style="background:#BBE6E6; padding-left:1em;" | <!-- Abundance --> |
| style="background:#BBE6E6; padding-left:1em;" | <!-- Abundance --> |
||
|- |
|- |
||
| style="background:#ECD2A5; padding-left:1em;" | [[Wizzan Grip]] |
| style="background:#ECD2A5; padding-left:1em;" | [[Wizzan Grip]] |
||
| − | | style="background:#ECD2A5; padding-left:1em;" | {{Abundance|0| |
+ | | style="background:#ECD2A5; padding-left:1em;" | {{Abundance|0|7}} |
| style="background:#BBE6E6; padding-left:1em;" | <!-- Item Name --> |
| style="background:#BBE6E6; padding-left:1em;" | <!-- Item Name --> |
||
| style="background:#BBE6E6; padding-left:1em;" | <!-- Abundance --> |
| style="background:#BBE6E6; padding-left:1em;" | <!-- Abundance --> |
||
|- |
|- |
||
| style="background:#ECD2A5; padding-left:1em;" | [[Rubicund Cell]] |
| style="background:#ECD2A5; padding-left:1em;" | [[Rubicund Cell]] |
||
| − | | style="background:#ECD2A5; padding-left:1em;" | {{Abundance|1| |
+ | | style="background:#ECD2A5; padding-left:1em;" | {{Abundance|1|6}} |
| style="background:#BBE6E6; padding-left:1em;" | <!-- Item Name --> |
| style="background:#BBE6E6; padding-left:1em;" | <!-- Item Name --> |
||
| style="background:#BBE6E6; padding-left:1em;" | <!-- Abundance --> |
| style="background:#BBE6E6; padding-left:1em;" | <!-- Abundance --> |
||
|- |
|- |
||
| style="background:#ECD2A5; padding-left:1em;" | [[Scream Fungus]] |
| style="background:#ECD2A5; padding-left:1em;" | [[Scream Fungus]] |
||
| − | | style="background:#ECD2A5; padding-left:1em;" | {{Abundance|1| |
+ | | style="background:#ECD2A5; padding-left:1em;" | {{Abundance|1|5}} |
| style="background:#BBE6E6; padding-left:1em;" | <!-- Item Name --> |
| style="background:#BBE6E6; padding-left:1em;" | <!-- Item Name --> |
||
| style="background:#BBE6E6; padding-left:1em;" | <!-- Abundance --> |
| style="background:#BBE6E6; padding-left:1em;" | <!-- Abundance --> |
||
|- |
|- |
||
| style="background:#ECD2A5; padding-left:1em;" | [[Pro-Ether +3]] |
| style="background:#ECD2A5; padding-left:1em;" | [[Pro-Ether +3]] |
||
| − | | style="background:#ECD2A5; padding-left:1em;" | {{Abundance|1| |
+ | | style="background:#ECD2A5; padding-left:1em;" | {{Abundance|1|5}} |
| style="background:#BBE6E6; padding-left:1em;" | <!-- Item Name --> |
| style="background:#BBE6E6; padding-left:1em;" | <!-- Item Name --> |
||
| style="background:#BBE6E6; padding-left:1em;" | <!-- Abundance --> |
| style="background:#BBE6E6; padding-left:1em;" | <!-- Abundance --> |
||
|- |
|- |
||
| − | | style="background:#ECD2A5; padding-left:1em;" | |
+ | | style="background:#ECD2A5; padding-left:1em;" | [[Lacquer Tree Log]] |
| − | | style="background:#ECD2A5; padding-left:1em;" | |
+ | | style="background:#ECD2A5; padding-left:1em;" | {{Abundance|1|5}} |
| style="background:#BBE6E6; padding-left:1em;" | <!-- Item Name --> |
| style="background:#BBE6E6; padding-left:1em;" | <!-- Item Name --> |
||
| style="background:#BBE6E6; padding-left:1em;" | <!-- Abundance --> |
| style="background:#BBE6E6; padding-left:1em;" | <!-- Abundance --> |
||
Revision as of 19:06, 1 February 2013
|
Table of Contents
|
Zone Information
| |||||||||||||||||||||||||||||||||
|
Description
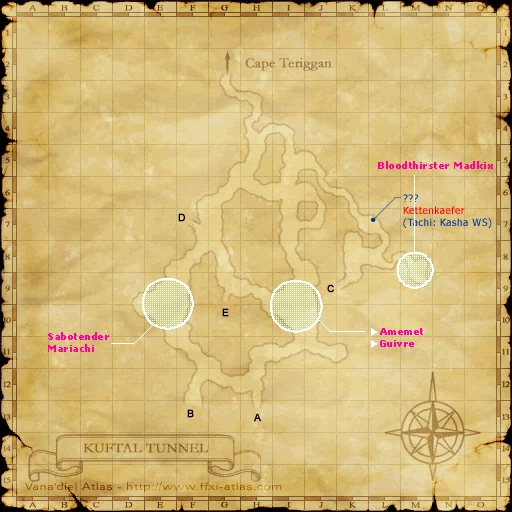
This tunnel connects the Western Altepa Desert section of Zepwell Island with Cape Teriggan. This maze of underground passageways can lead adventurers in circles, only to look up in horror as giant monsters such as Guivre look down on them with glee.  | ||||||||||||||||||||||||||||||||||
|
Connections
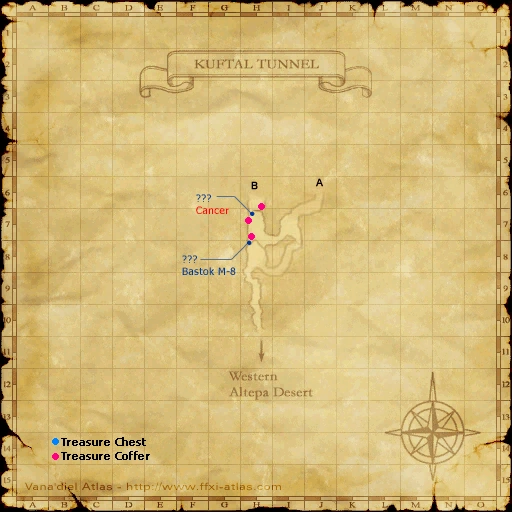
Western Altepa Desert: (H-4)
|
Involved in Quests/Missions
| Quest | Type | Starter | Location |
|---|---|---|---|
| Borghertz's Loyal Hands | AF (SAM) | Guslam | Upper Jeuno H-8 |
| Knight Stalker | AF (DRG) | Rahal | Chateau d'Oraguille H-9 |
| The Kuftal Tour | General | Datta | Rabao F-7 |
| The Potential Within | Weapon Skill (Great Katana) | Jaucribaix | Norg K-8 |
| The Promise | General | Kohlo-Lakolo | Port Windurst G-5 |
| True Will | AF (NIN) | Ryoma | Norg H-8 |
| Mission | Nation | Starter | Location |
| Enter the Talekeeper | Bastok | Bastok Gate Guard | Bastok |
Other Information
[ edit ]
| Item | Abundance |
|---|---|
| Gil: 5,200-33,840 (??? Gil)More data needed | |
| Map of the Kuftal Tunnel | Received if not previously obtained |
| Old Gauntlets | Received with quest active |
| Large Trick Box | Received with quest active |
| Challenge to the Royal Knights | Received with quest active |
| Moonstone | |
| Chrysoberyl | |
| Painite | |
| Jadeite | |
| Sunstone | |
| Aquamarine | |
| Zircon | |
| Fluorite | |
|
Treasure Maps | |
[ edit ]
| Fish | Cap | Body of Water |
|---|---|---|
| Giant Donko | 50 | All |
| Sandfish | 50 | |
| Cave Cherax | 110+ | |
| Rusty Subligar | 0 | |
| Rusty Cap | 0 | |
|
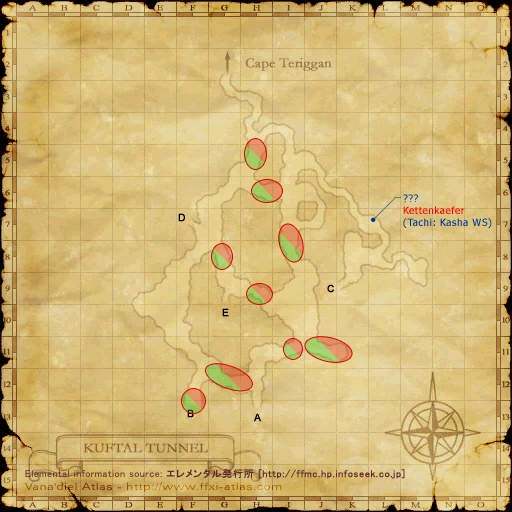
Fishing Map | ||
[ edit ]
| Possible Weather | Weather Reporter |
|---|---|
|
Elemental Map | |
Individual Training
| Area of Book | Pg | Tgt. Level | Max Level | Mobs to Fight | XP/Gil | Tabs |
|---|---|---|---|---|---|---|
| Kuftal Tunnel | 1 | 60~64 | 1440-2880 | 144-288 | ||
| 2 | 60~66 |
|
1480-2960 | 148-296 | ||
| 3 | 60~66 | 1380-2760 | 138-276 | |||
| 4 | 60~67 | 1550-3100 | 150-310 | |||
| 5 | 63~69 | 1410-2820 | 141-282 | |||
| 6 | 65~69 |
|
1540-3080 | 154-308 | ||
| 7 | 77~80 | 95 | 1660-3320 | 166-320 | ||
| 8 | 99~103 | ?? |
|
1900-3800 | 190-380 |
| Brown Casket | Blue Casket | ||
|---|---|---|---|
| Item | Abundance | Item | Abundance |
| Remedy | Champion's Tonic | ||
| Hi-Reraiser | Fanatic's Tonic | ||
| Xanthous Cell | Healing Mist | ||
| Vile Elixir | Lucid Ether I | ||
| Vile Elixir +1 | |||
| Daedalus Wing |
|||
| Champion's Tonic |
|||
| Ascetic's Tonic |
|||
| Khroma Ore | |||
| Manta Skin | |||
| Wizzan Grip | |||
| Rubicund Cell | |||
| Scream Fungus | |||
| Pro-Ether +3 | |||
| Lacquer Tree Log | |||
NPCs Found Here
| Name | Location | Type |
|---|---|---|
| Hawk Nose | Quest NPC |
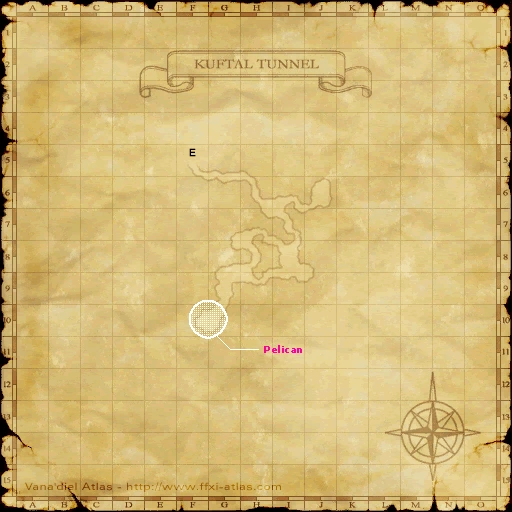
Notorious Monsters Found Here
| Name | Level | Drops | Steal | Family | Spawns | Notes
|
|---|---|---|---|---|---|---|
| Amemet | 66 | Lizard Egg Lizard Skin Lizard Tail Amemet Skin |
Lizards | A, L
| ||
| Arachne | 69 | Arachne Web | Spiders | A, L, H
| ||
| Bloodthirster Madkix | 69-72 | Acha d'Armas Goblin Helm Goblin Mail Gold Beastcoin |
Goblins | A, L, S
| ||
| Cancer | 65 | Rock Salt Crab Shell Land Crab Meat Arondight |
Crabs | H
| ||
| Guivre | 82-83 | Guivre's Skull Wyvern Scales Wyvern Skin Wyvern Wing |
Wyverns | A, S
| ||
| Pelican | 80-81 | Astral Aspis Cockatrice Meat Cockatrice Skin |
Cockatrice | A, S
| ||
| Phantom Worm | 70-72 | Adaman Ore Darksteel Ore Phantom Tathlum Silver Ore |
Worms | A, L, H
| ||
| Sabotender Mariachi | 68-70 | Bano Del Sol Cactuar Needle Cactuar Root Cactus Stems |
Sabotenders | A, L, H
| ||
| Yowie | 69-71 | Raptor Skin Yowie Skin |
Raptors | A, L, H
|


|
HP = Detects Low HP; M = Detects Magic; Sc = Follows by Scent; T(S) = True-sight; T(H) = True-hearing JA = Detects job abilities; WS = Detects weaponskills; Z(D) = Asleep in Daytime; Z(N) = Asleep at Nighttime; A(R) = Aggressive to Reive participants |
Regular Monsters Found Here
|
HP = Detects Low HP; M = Detects Magic; Sc = Follows by Scent; T(S) = True-sight; T(H) = True-hearing JA = Detects job abilities; WS = Detects weaponskills; Z(D) = Asleep in Daytime; Z(N) = Asleep at Nighttime; A(R) = Aggressive to Reive participants |
Event Monsters Found Here
| Name | Family | Spawns | Notes |
|---|---|---|---|
Dervo's Ghost
|
Ghosts | 1 | A, H, HP |
Gizerl's Ghost
|
Ghosts | 1 | A, H, HP |
Gordov's Ghost
|
Ghosts | 1 | A, H, HP |
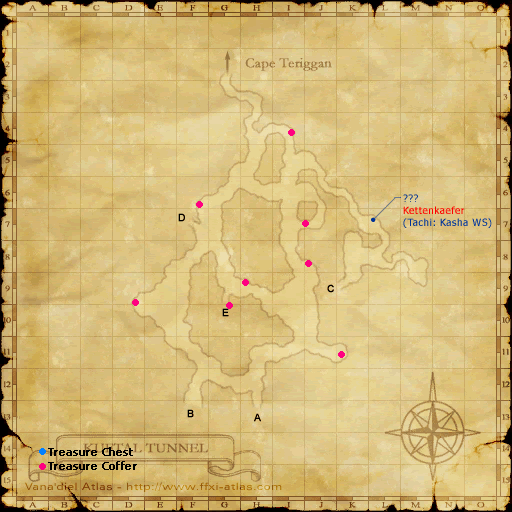
Kettenkaefer
|
Beetles | 1 | A, S, Sc |
Mimic
|
Mimics |
|
HP = Detects Low HP; M = Detects Magic; Sc = Follows by Scent; T(S) = True-sight; T(H) = True-hearing JA = Detects job abilities; WS = Detects weaponskills; Z(D) = Asleep in Daytime; Z(N) = Asleep at Nighttime; A(R) = Aggressive to Reive participants |