(increasing recommended level to 30 for soloers) |
No edit summary |
||
| (32 intermediate revisions by 16 users not shown) | |||
| Line 6: | Line 6: | ||
| npc = Any [[San d'Orian Gate Guard]] |
| npc = Any [[San d'Orian Gate Guard]] |
||
| requirements = [[The Rescue Drill|Mission 2-1]]<br>3/4 full Rank Point bar |
| requirements = [[The Rescue Drill|Mission 2-1]]<br>3/4 full Rank Point bar |
||
| − | | level = |
+ | | level = 31+ (for immunity to [[Level 5 Petrify]]) |
| title = Black Dragon Slayer<br>Dark Dragon Slayer<br>Certified Adventurer |
| title = Black Dragon Slayer<br>Dark Dragon Slayer<br>Certified Adventurer |
||
| reward = [[Rank]] 3<br>3000g<br>[[Adventurer's Certificate]] |
| reward = [[Rank]] 3<br>3000g<br>[[Adventurer's Certificate]] |
||
| − | | items = {{KeyItem}}[[Letter to the Consuls]]<br>{{KeyItem}}[[Dark Key]]<br>{{KeyItem}}[[Kindred |
+ | | items = {{KeyItem}}[[Letter to the Consuls]]<br>{{KeyItem}}[[Dark Key]]<br>{{KeyItem}}[[Kindred crest]]<br>{{KeyItem}}[[Kindred Report]] |
| repeatable = |
| repeatable = |
||
| parent = |
| parent = |
||
| Line 16: | Line 16: | ||
| next = [[Infiltrate Davoi]] |
| next = [[Infiltrate Davoi]] |
||
| cutscenes = |
| cutscenes = |
||
| − | {{Mission/Cutscene|Journey Abroad |
+ | {{Mission/Cutscene|Journey Abroad|[[Chaloutte]] {{Location|Chateau d'Oraguille|I-9}}}} |
| − | {{Mission/Cutscene|Journey Abroad|[[ |
+ | {{Mission/Cutscene|Journey Abroad/S. Consulate (pt.1)|[[Bozack]] {{Location|Windurst Woods|J-10}}}} |
| − | {{Mission/Cutscene|Journey Abroad |
+ | {{Mission/Cutscene|Journey Abroad (pt.1-2)|[[Mashua]] [[Heavens Tower]]}} |
| − | {{Mission/Cutscene|Journey Abroad(pt. |
+ | {{Mission/Cutscene|Journey Abroad/S. Consulate (pt.2)|[[Bozack]] {{Location|Windurst Woods|J-10}}}} |
| − | {{Mission/Cutscene| |
+ | {{Mission/Cutscene|Journey Abroad (pt.1)|[[Taulluque]] {{Location|Metalworks|I-8}}}} |
| − | {{Mission/Cutscene| |
+ | {{Mission/Cutscene|Journey Abroad (pt.2a)|[[Taulluque]] {{Location|Metalworks|I-8}}}} |
| − | {{Mission/Cutscene|Journey Abroad (pt. |
+ | {{Mission/Cutscene|Journey Abroad (pt.2b)|[[Taulluque]] {{Location|Metalworks|I-8}}}} |
| + | {{Mission/Cutscene|The Rank 2 Final Mission (pt.1-2)|[[Goblin Footprint]] [[Waughroon Shrine]]}} |
||
| + | {{Mission/Cutscene|The Rank 2 Final Mission (pt.1-2)|[[Goblin Footprint]] [[Balga's Dais]]}} |
||
}} |
}} |
||
== Notes == |
== Notes == |
||
| + | *You will travel to the other two nations in both walkthrough of this mission. Which walkthrough you choose depends on which nation you choose to visit first. |
||
*This fight is no longer capped at 25. |
*This fight is no longer capped at 25. |
||
| − | *If you did mission 2-2, you may need to trade |
+ | *If you did mission 2-2, you may need to trade 1 crystal or do [[Bat Hunt]] once. |
| − | *If you skipped mission 2-2, you may need to trade crystals to a Temple Knight for rank points |
+ | *If you skipped mission 2-2, you may need to trade 3 crystals to a Temple Knight for rank points. |
== Walkthrough == |
== Walkthrough == |
||
*Talk to the gate guard to obtain this mission. |
*Talk to the gate guard to obtain this mission. |
||
| − | *Talk to [[Halver]] in [[Chateau d'Oraguille]] to receive a {{KeyItem}}[[Letter to the Consuls]] and tell you to travel to [[Bastok]] and [[Windurst]] |
+ | *Talk to [[Halver]] in [[Chateau d'Oraguille]] to receive a {{KeyItem}}[[Letter to the Consuls]] and he'll tell you to travel to [[Bastok]] and [[Windurst]] to visit for your nation's embassies. |
| + | **There are two possible walkthroughs, depending on if you visit Bastok first or Windurst first. |
||
| − | *The order in which you complete each nation is up to you. However, the tasks you are assigned vary depending on the order you selection. |
||
| + | ***If you are in possession of {{KeyItem}}[[Rhapsody in White]], you will also receive [[Cipher: Halver]]. |
||
== Bastok [[Image:ArrowSmaller.gif|15px]] Windurst Walkthrough == |
== Bastok [[Image:ArrowSmaller.gif|15px]] Windurst Walkthrough == |
||
| Line 43: | Line 47: | ||
| items = [[Pickaxe]]s<br>[[Mine Gravel]]<br>[[Mythril Sand]] |
| items = [[Pickaxe]]s<br>[[Mine Gravel]]<br>[[Mythril Sand]] |
||
}} |
}} |
||
| + | ''Suggestion: Buy a stack of [[Pickaxe]]s from shops, to save you the trip of returning to Bastok to purchase more; pickaxes can break when [[mining]] and [[Mine Gravel]] (you need one) is a high drop but not guaranteed per mine attempt. You can also buy [[Mine Gravel]] (Others > Misc )but you have to travel to Palborough either way so it is not worth it usually.'' |
||
| − | *Head to the Consulate of San d'Oria in the [[Metalworks]] at (I-9) on the second floor and speak to [[Savae E Paleade]] for a cutscene. |
+ | *Head to the Consulate of San d'Oria in the [[Metalworks]] at ({{Location Tooltip|area=Metalworks|pos=I-9}}) on the second floor and speak to [[Savae E Paleade]] for a cutscene. |
| ⚫ | |||
| + | **If you've never been to [[Bastok]], you can [[Unity Concord NPC|Unity warp]] to [[South Gustaberg]] ("Content level 99 and below") and head to [[Bastok Markets]] at ({{Location Tooltip|area=South Gustaberg|pos=J-7}}). |
||
| ⚫ | |||
| ⚫ | |||
| − | **You are able to buy additional [[Pickaxe]]s from different shops to help with the mission. Pickaxes can break when mining, so having more can save you the trip of returning to Bastok to purchase more in case you are unlucky. |
||
| ⚫ | |||
| − | *Exit Bastok from [[Port Bastok]], then head to the [[Palborough Mines]] located in [[North Gustaberg]] at (K-3). |
||
| − | ** |
+ | **[[Grohm]] will describe the general process of how to get [[Mine Gravel]] & [[Mythril Sand]]. |
| + | *Head to {{Location|North Gustaberg|K-3}} to enter [[Palborough Mines]]. |
||
| − | *Upon entering [[Palborough Mines]], locate a '''Mythril Seam''' and mine for [[Mine Gravel]] by trading the [[Pickaxe]]s to the point. |
||
| + | **If you are low level, you may want to bring [[Silent Oil]]s to prevent aggro. |
||
| − | **A Mythril Seam is located at (F-7) on the first floor of the area or (I-9) of third floor. |
||
| + | *Locate a '''Mythril Seam''', ({{Location Tooltip|area=Palborough Mines|map=Map 1|pos=F-7}}) on the first floor or ({{Location Tooltip|area=Palborough Mines|map=Map 3|pos=I-9}}) of third floor, and mine for [[Mine Gravel]] by trading the [[Pickaxe]]s to the point. |
||
| − | **It may take several attempts to obtain [[Mine Gravel]]. |
+ | **It may take several attempts at the same Seam to obtain [[Mine Gravel]]. |
**If you receive the message "You find a chunk of mine gravel, but your pickaxe breaks in the process," you do successfully get the mine gravel. |
**If you receive the message "You find a chunk of mine gravel, but your pickaxe breaks in the process," you do successfully get the mine gravel. |
||
| + | *At ({{Location Tooltip|area=Palborough Mines|map=Map 1|pos=I-8}}) take the elevator to the third floor. At ({{Location Tooltip|area=Palborough Mines|map=Map 3|pos=I-6}}) to find a refiner. Trade [[Mine Gravel]] to '''Refiner Lid'''. '''Pull the lever on the refiner to activate it.''' Drop off ledge to floor below you. '''Pull second lever.''' [[Mythril Sand]] will be put into your inventory automatically. |
||
| − | *Once you obtain [[Mine Gravel]], go to (I-8) and take the elevator to the third floor. |
||
| ⚫ | |||
| − | *Head to (I-6) to find a refiner. |
||
| ⚫ | |||
| − | *Trade the [[Mine Gravel]] to the '''Refiner Lid'''. |
||
| − | *'''Pull the lever on the refiner to activate it.''' |
||
| − | *Drop off the ledge to the floor below you. |
||
| − | *Locate the second lever and pull it. |
||
| − | *Examine the nearby container to obtain [[Mythril Sand]]. |
||
| ⚫ | |||
| ⚫ | |||
===[[Windurst]]=== |
===[[Windurst]]=== |
||
| Line 70: | Line 69: | ||
}} |
}} |
||
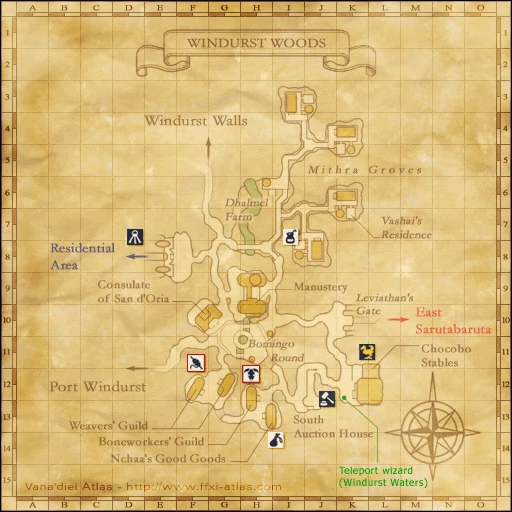
*Now head to [[Windurst]] and go to the San d'Orian embassy in [[Windurst Woods]]. |
*Now head to [[Windurst]] and go to the San d'Orian embassy in [[Windurst Woods]]. |
||
| − | *Talk to [[Mourices]] |
+ | *Talk to [[Mourices]] at ({{Location Tooltip|area=Windurst Woods|pos=G-10}}) inside the embassy. |
*Go to [[Heavens Tower]] in [[Windurst Walls]] and talk to [[Kupipi]] (in the clerical chamber straight ahead from entrance) to receive a {{KeyItem}}[[Dark Key]]. '''Make sure you do not skip this step!''' |
*Go to [[Heavens Tower]] in [[Windurst Walls]] and talk to [[Kupipi]] (in the clerical chamber straight ahead from entrance) to receive a {{KeyItem}}[[Dark Key]]. '''Make sure you do not skip this step!''' |
||
| + | **If you are in possession of {{KeyItem}}[[Rhapsody in White|"Rhapsody in White"]], you will also receive [[Cipher: Semih]]. |
||
| + | **If she gives you [[Trust: Kupipi]], you have to zone out and back in to trigger the 2-3 mission cutscene. If you talk to her without zoning, she just talks about [[Nanaa Mihgo]] instead. |
||
**''Everyone in your party must have this item to enter the BC, or have completed 2-3 previously '''in their current nation of allegiance'''. One person cannot get others into the fight who do not have the {{KeyItem}}[[Dark Key]], even if they are currently on this part of the mission, unless they have completed the mission in their current nation of allegiance.'' |
**''Everyone in your party must have this item to enter the BC, or have completed 2-3 previously '''in their current nation of allegiance'''. One person cannot get others into the fight who do not have the {{KeyItem}}[[Dark Key]], even if they are currently on this part of the mission, unless they have completed the mission in their current nation of allegiance.'' |
||
*Head to [[Giddeus]]. |
*Head to [[Giddeus]]. |
||
| + | **To get there, you can exit from [[Windurst Waters]] ([[Home Point]] #1) and head to {{Location|West Sarutabaruta|F-8}}. |
||
| − | **Only [[Invisible]] is needed in [[Giddeus]]. Bringing some form of [[Reraise]] is recommended. Buffs wear upon entry. |
||
| − | * |
+ | **Only [[Invisible]] is needed in [[Giddeus]]. Buffs are removed when you enter the BCNM. |
| + | *Once inside [[Giddeus]], head to ({{Location Tooltip|area=Giddeus|map=Ground Level|pos=G-12}}) to enter [[Balga's Dais]]. |
||
| − | * |
+ | *Enter the '''Burning Circle''' for a cutscene and to enter the BCNM with ([[Searcher]] and [[Black Dragon]]). |
| ⚫ | |||
| − | **If solo, |
+ | **'''If you are solo, make sure you are a minimum of level 30''' and on a very strong job, such as a [[Monk]] using [[Hundred Fists]]. Kill the dragon before killing the [[Searcher]], or the dragon will kill you rather easily after the [[Searcher]] has weakened you. The [[Searcher]] does not melee you unless you are close to it or it has less than 50% of its HP, so it is relatively inactive if you focus on the dragon first. |
| ⚫ | **If in a party with a [[Black Mage]], the recommended order is to kill [[Searcher]], then [[Black Dragon]]. The [[Black Mage|BLM]] should use [[Elemental Seal]] + [[Sleep]] on the dragon while everyone kills the [[Searcher]]. Once the [[Searcher]] is gone, the [[Black Dragon]] will die quickly. This dragon has a very potent AOE [[poison]] attack that does 10 damage per tick, which makes [[antidote]]s necessary. He also may [[curse]] the tanks. |
||
| − | **The [[Searcher]] does not melee you unless you are close to it or it has less than 50% of its HP, so it is relatively inactive if you focus on the dragon first. |
||
| ⚫ | *If in a party with a [[Black Mage]], the recommended order is to kill [[Searcher]], then [[Black Dragon]]. The [[Black Mage|BLM]] should use [[Elemental Seal]] + [[Sleep]] on the dragon while everyone kills the [[Searcher]]. Once the [[Searcher]] is gone, the [[Black Dragon]] will die quickly. This dragon has a very potent AOE [[poison]] attack that does 10 damage per tick, which makes [[antidote]]s necessary. He also may [[curse]] the tanks. |
||
{{testimonials}} |
{{testimonials}} |
||
*Once the [[Black Dragon]] is defeated, another cutscene will happen. |
*Once the [[Black Dragon]] is defeated, another cutscene will happen. |
||
| − | **A glitch may prevent this cutscene from |
+ | **A glitch may prevent this cutscene from occurring. If this happens, you can view the cutscene [http://www.youtube.com/watch?v=2yPF2Nky9bY here] (begin at 8:53). Alternatively, you can exit the dais and reenter from the main entrance to watch from the [[Goblin Footprint]]. |
*Report to [[Mourices]] at the embassy to receive a {{KeyItem}}[[Kindred Report]]. |
*Report to [[Mourices]] at the embassy to receive a {{KeyItem}}[[Kindred Report]]. |
||
*Report back to [[Halver]] in [[Chateau d'Oraguille]]. |
*Report back to [[Halver]] in [[Chateau d'Oraguille]]. |
||
| + | |||
| + | '''Additional Information:''' |
||
| + | |||
| + | After completing the mission, you should probably go talk to [https://ffxiclopedia.fandom.com/wiki/Trust:_Curilla Curilla] to obtain her [https://ffxiclopedia.fandom.com/wiki/Alter_Egos Alter-Ego] at this point. |
||
== Windurst [[Image:ArrowSmaller.gif|15px]] Bastok Walkthrough == |
== Windurst [[Image:ArrowSmaller.gif|15px]] Bastok Walkthrough == |
||
| Line 94: | Line 98: | ||
| items = {{KeyItem}}[[Shield Offering]]<Br>[[Parana Shield]] x2 |
| items = {{KeyItem}}[[Shield Offering]]<Br>[[Parana Shield]] x2 |
||
}} |
}} |
||
| − | *Head to the Consulate of San d'Oria in [[Windurst Woods]] at (G-10) and talk to [[Mourices]]. |
+ | *Head to the Consulate of San d'Oria in [[Windurst Woods]] at ({{Location Tooltip|area=Windurst Woods|pos=G-10}}) and talk to [[Mourices]]. |
| − | *Enter [[Heavens Tower]] in [[Windurst Walls]] at (H-7) for a cutscene. |
+ | *Enter [[Heavens Tower]] in [[Windurst Walls]] at ({{Location Tooltip|area=Windurst Walls|pos=H-7}}) for a cutscene. |
*Enter the Clerical Chamber and speak to [[Kupipi]]. She will give you a {{KeyItem}}[[Shield Offering]]. |
*Enter the Clerical Chamber and speak to [[Kupipi]]. She will give you a {{KeyItem}}[[Shield Offering]]. |
||
| + | **If you are in possession of {{KeyItem}}[[Rhapsody in White|"Rhapsody in White"]], you will also receive [[Cipher: Semih]]. |
||
| − | *Head to [[Giddeus]] in [[West Sarutabaruta]] at (F-8). |
+ | *Head to [[Giddeus]] in [[West Sarutabaruta]] at ({{Location Tooltip|area=West Sarutabaruta|pos=F-8}}). |
*After entering [[Giddeus]], you must defeat [[Zhuu Buxu the Silent]] twice to obtain 2 [[Parana Shield]]s. |
*After entering [[Giddeus]], you must defeat [[Zhuu Buxu the Silent]] twice to obtain 2 [[Parana Shield]]s. |
||
| − | **To get to [[Zhuu Buxu the Silent]], head to the path at (I-8) on the first map and go down the tunnels. Then, make your way to (H-7) on the second map. |
+ | **To get to [[Zhuu Buxu the Silent]], head to the path at ({{Location Tooltip|area=Giddeus|map=Ground Level|pos=I-8}}) on the first map and go down the tunnels. Then, make your way to ({{Location Tooltip|area=Giddeus|map=Underground Level|pos=H-7}}) on the second map. |
**[[Zhuu Buxu the Silent]] can aggro and link with the surrounding [[Yagudo]]. |
**[[Zhuu Buxu the Silent]] can aggro and link with the surrounding [[Yagudo]]. |
||
| ⚫ | |||
| − | **After defeating him, a [[Parana Shield]] drops. |
||
| + | *Make your way to ({{Location Tooltip|area=Giddeus|map=Underground Level|pos=F-7}}) on the second map and speak to [[Uu Zhoumo]] to give the {{KeyItem}}[[Shield Offering]]. You can do this while waiting for [[Zhuu Buxu the Silent]] to respawn. |
||
| ⚫ | |||
| − | * |
+ | *Return to the Consulate of San d'Oria and speak to [[Mourices]]. Trade him both [[Parana Shield]] as proof of your completed task. |
| − | *Return to the Consulate of San d'Oria and speak to [[Mourices]]. Trade him the [[Parana Shield]]s as proof of your completed task. |
||
===[[Bastok]]=== |
===[[Bastok]]=== |
||
| Line 110: | Line 114: | ||
| name = Journey to Bastok |
| name = Journey to Bastok |
||
| number = 2-3 |
| number = 2-3 |
||
| − | | items = {{KeyItem}}[[Dark Key]] |
||
}} |
}} |
||
| − | *Head to the Consulate of San d'Oria in the [[Metalworks]] at (H-9) on the second floor and speak to [[Savae E Paleade]] for a cutscene. |
+ | *Head to the Consulate of San d'Oria in the [[Metalworks]] at ({{Location Tooltip|area=Metalworks|pos=H-9}}) on the second floor and speak to [[Savae E Paleade]] for a cutscene. |
*Enter the Department of Industry adjacent to the President's Office and speak to [[Pius]]. |
*Enter the Department of Industry adjacent to the President's Office and speak to [[Pius]]. |
||
| − | *Walk to the Craftsmen's Eatery at (G-9) and speak to [[Grohm]]. |
+ | *Walk to the Craftsmen's Eatery at ({{Location Tooltip|area=Metalworks|pos=G-9}}) and speak to [[Grohm]]. |
| − | *Head to the [[Palborough Mines]] located in [[North Gustaberg]] at (K-3). |
+ | *Head to the [[Palborough Mines]] located in [[North Gustaberg]] at ({{Location Tooltip|area=North Gustaberg|pos=K-3}}). |
*In the [[Palborough Mines]], make your way to third floor of the mines and enter the [[Waughroon Shrine]]. |
*In the [[Palborough Mines]], make your way to third floor of the mines and enter the [[Waughroon Shrine]]. |
||
| − | **If you are |
+ | **If you are low level, you may want to bring [[Silent Oil]]s to prevent aggro from [[Quadav]]. |
| − | **The Waughroon Shrine is located at (H-10) on the third floor. |
+ | **The Waughroon Shrine is located at ({{Location Tooltip|area=Palborough Mines|map=Map 3|pos=H-10}}) on the third floor. |
| − | * |
+ | *Enter the '''Burning Circle''' for a cutscene and to enter the BCNM with ([[Searcher]] and [[Black Dragon]]). |
| ⚫ | |||
| − | *This will initiate a BCNM with two monsters: |
||
| ⚫ | |||
| − | **[[Seeker]] |
||
| − | **[[Dark Dragon]] |
||
| − | ***'''If you are solo, make sure you are an absolute minimum of level 30''' and on a very strong job, such as a [[Monk]] using [[Hundred Fists]]. |
||
| ⚫ | |||
**A glitch can prevent the victory cutscene from occuring. If that happens, you can watch the cutscene here: [http://www.youtube.com/watch?v=3KE1KykARw0] (begin watching from 1:53), or you can exit the shrine and reenter from the main entrance to watch from the [[Goblin Footprint]]. |
**A glitch can prevent the victory cutscene from occuring. If that happens, you can watch the cutscene here: [http://www.youtube.com/watch?v=3KE1KykARw0] (begin watching from 1:53), or you can exit the shrine and reenter from the main entrance to watch from the [[Goblin Footprint]]. |
||
| − | *After you've won the BCNM you can exit back into Palborough Mines travel a short distance on that map to H-8 where you can board one of the lever activated ferries and return to [[Zeruhn Mines]] which is connected to [[Bastok Mines]]. |
+ | *After you've won the BCNM you can exit back into Palborough Mines travel a short distance on that map to {{Location Tooltip|area=Palborough Mines|map=Map 3|pos=H-8}} where you can board one of the lever activated ferries and return to [[Zeruhn Mines]] which is connected to [[Bastok Mines]]. |
*Return to Bastok and speak to [[Savae E Paleade]] to obtain the {{KeyItem}}[[Kindred Report]] and to complete this portion of the mission. |
*Return to Bastok and speak to [[Savae E Paleade]] to obtain the {{KeyItem}}[[Kindred Report]] and to complete this portion of the mission. |
||
*Return to San d'Oria and speak to [[Halver]] to complete this mission. |
*Return to San d'Oria and speak to [[Halver]] to complete this mission. |
||
| Line 134: | Line 134: | ||
}} |
}} |
||
| − | :;Mission Orders (Windurst to Bastok) |
+ | :;Mission Orders (Windurst to Bastok) |
::;Journey to Windurst |
::;Journey to Windurst |
||
:::Bring an offering (a shield) from Heavens Tower in Windurst to the Yagudo treasure room in Giddeus. To uphold the honor of San d'Oria, claim two of the same shields from the Yagudo on your return. |
:::Bring an offering (a shield) from Heavens Tower in Windurst to the Yagudo treasure room in Giddeus. To uphold the honor of San d'Oria, claim two of the same shields from the Yagudo on your return. |
||
| Line 140: | Line 140: | ||
:::Reports indicate that the Quadav who inhabit the deepest levels of Palborough Mines are up to something. An official named Pius will instruct you further. |
:::Reports indicate that the Quadav who inhabit the deepest levels of Palborough Mines are up to something. An official named Pius will instruct you further. |
||
| − | :;Mission Orders (Bastok to Windurst) |
+ | :;Mission Orders (Bastok to Windurst) |
::;Journey to Bastok |
::;Journey to Bastok |
||
:::Survey Bastokan mining technology, and bring some mythril sand out of Palborough Mines. An official named Pius will instruct you further. |
:::Survey Bastokan mining technology, and bring some mythril sand out of Palborough Mines. An official named Pius will instruct you further. |
||
| Line 147: | Line 147: | ||
---- |
---- |
||
| + | {{spoiler2}} |
||
| − | {{spoiler3 |
||
| − | | spoiler = |
||
| − | {{/Plot Details}} |
||
| − | }} |
||
Revision as of 10:39, 24 May 2020
| Mission Name | Journey Abroad |
|---|---|
| Number | 2-3 |
| Start NPC | Any San d'Orian Gate Guard |
| Requirements | Mission 2-1 3/4 full Rank Point bar |
| Level | 31+ (for immunity to Level 5 Petrify) |
| Title Granted | Black Dragon Slayer Dark Dragon Slayer Certified Adventurer |
| Items Needed | |
| Reward | Rank 3 3000g Adventurer's Certificate |
| ← Previous Mission | Next Mission → |
|---|---|
| The Davoi Report | Infiltrate Davoi |
| Replay Cutscenes | |
|---|---|
| Journey Abroad | Chaloutte Chateau d'Oraguille (I-9) |
| Journey Abroad/S. Consulate (pt.1) | Bozack Windurst Woods (J-10) |
| Journey Abroad (pt.1-2) | Mashua Heavens Tower |
| Journey Abroad/S. Consulate (pt.2) | Bozack Windurst Woods (J-10) |
| Journey Abroad (pt.1) | Taulluque Metalworks (I-8) |
| Journey Abroad (pt.2a) | Taulluque Metalworks (I-8) |
| Journey Abroad (pt.2b) | Taulluque Metalworks (I-8) |
| The Rank 2 Final Mission (pt.1-2) | Goblin Footprint Waughroon Shrine |
| The Rank 2 Final Mission (pt.1-2) | Goblin Footprint Balga's Dais |

Notes
- You will travel to the other two nations in both walkthrough of this mission. Which walkthrough you choose depends on which nation you choose to visit first.
- This fight is no longer capped at 25.
- If you did mission 2-2, you may need to trade 1 crystal or do Bat Hunt once.
- If you skipped mission 2-2, you may need to trade 3 crystals to a Temple Knight for rank points.
Walkthrough
- Talk to the gate guard to obtain this mission.
- Talk to Halver in Chateau d'Oraguille to receive a
 Letter to the Consuls and he'll tell you to travel to Bastok and Windurst to visit for your nation's embassies.
- There are two possible walkthroughs, depending on if you visit Bastok first or Windurst first.
- If you are in possession of Rhapsody in White, you will also receive Cipher: Halver.
- If you are in possession of
- There are two possible walkthroughs, depending on if you visit Bastok first or Windurst first.
Bastok Windurst Walkthrough
Bastok
| Mission Name | Journey to Bastok |
|---|---|
| Number | 2-3 |
| Items Needed | Pickaxes Mine Gravel Mythril Sand |
Suggestion: Buy a stack of Pickaxes from shops, to save you the trip of returning to Bastok to purchase more; pickaxes can break when mining and Mine Gravel (you need one) is a high drop but not guaranteed per mine attempt. You can also buy Mine Gravel (Others > Misc )but you have to travel to Palborough either way so it is not worth it usually.
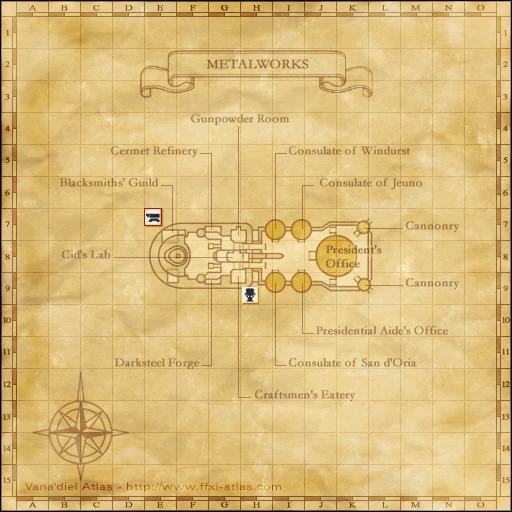
- Head to the Consulate of San d'Oria in the Metalworks at (I-9) on the second floor and speak to Savae E Paleade for a cutscene.
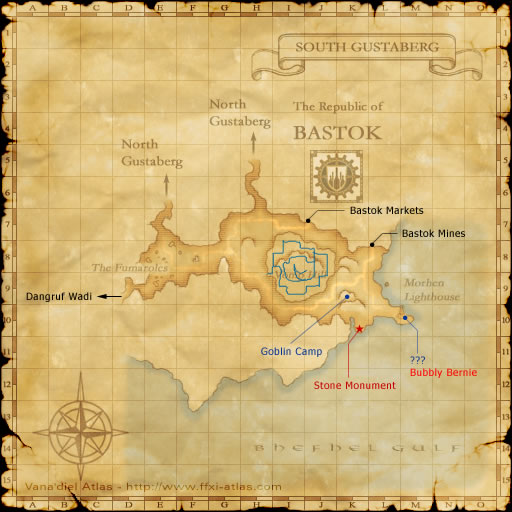
- If you've never been to Bastok, you can Unity warp to South Gustaberg ("Content level 99 and below") and head to Bastok Markets at (J-7).
- Enter the Department of Industry, door to the right of the President's Office at (J-8), and speak to Pius.
- Walk to the Craftsmen's Eatery at (G-9) and speak to Grohm for a cutscene and 3 Pickaxes.
- Grohm will describe the general process of how to get Mine Gravel & Mythril Sand.
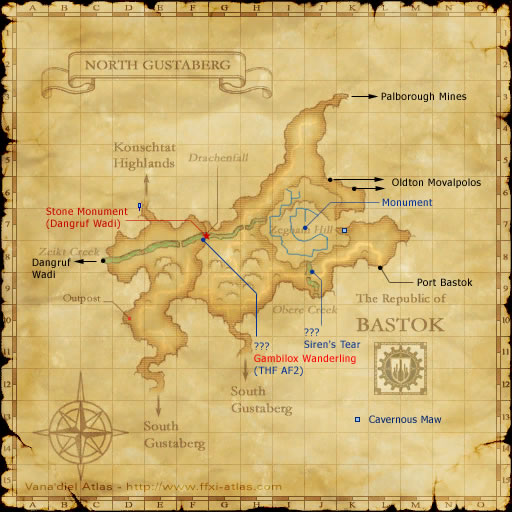
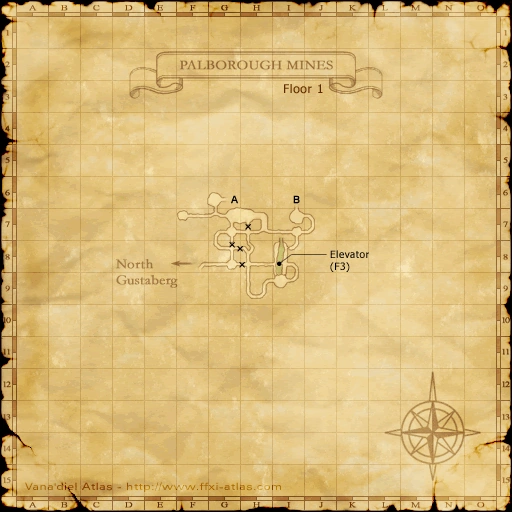
- Head to North Gustaberg (K-3) to enter Palborough Mines.
- If you are low level, you may want to bring Silent Oils to prevent aggro.
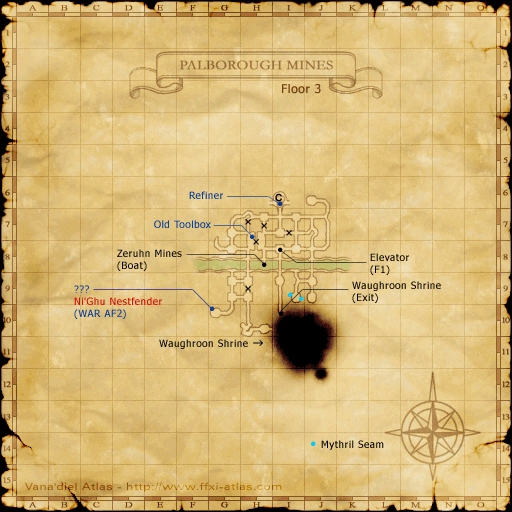
- Locate a Mythril Seam, (F-7) on the first floor or (I-9) of third floor, and mine for Mine Gravel by trading the Pickaxes to the point.
- It may take several attempts at the same Seam to obtain Mine Gravel.
- If you receive the message "You find a chunk of mine gravel, but your pickaxe breaks in the process," you do successfully get the mine gravel.
- At (I-8) take the elevator to the third floor. At (I-6) to find a refiner. Trade Mine Gravel to Refiner Lid. Pull the lever on the refiner to activate it. Drop off ledge to floor below you. Pull second lever. Mythril Sand will be put into your inventory automatically.
- You can go back to Bastok Mines quickly by taking the boat at H-8 on the 3rd floor.
- Return to Metalworks (Home Point #1) and trade the Mythril Sand to Savae E Paleade to complete this portion of the mission.
Windurst
| Mission Name | Journey to Windurst |
|---|---|
| Number | 2-3 |
| Items Needed |
- Now head to Windurst and go to the San d'Orian embassy in Windurst Woods.
- Talk to Mourices at (G-10) inside the embassy.
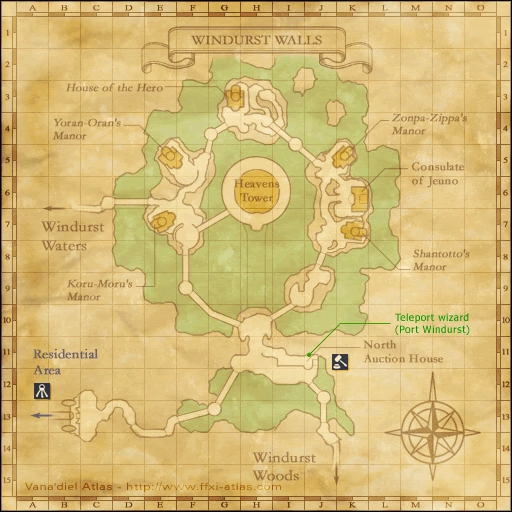
- Go to Heavens Tower in Windurst Walls and talk to Kupipi (in the clerical chamber straight ahead from entrance) to receive a Dark Key. Make sure you do not skip this step!
- If you are in possession of "Rhapsody in White", you will also receive Cipher: Semih.
- If she gives you Trust: Kupipi, you have to zone out and back in to trigger the 2-3 mission cutscene. If you talk to her without zoning, she just talks about Nanaa Mihgo instead.
- Everyone in your party must have this item to enter the BC, or have completed 2-3 previously in their current nation of allegiance. One person cannot get others into the fight who do not have the Dark Key, even if they are currently on this part of the mission, unless they have completed the mission in their current nation of allegiance.
- If you are in possession of
- Head to Giddeus.
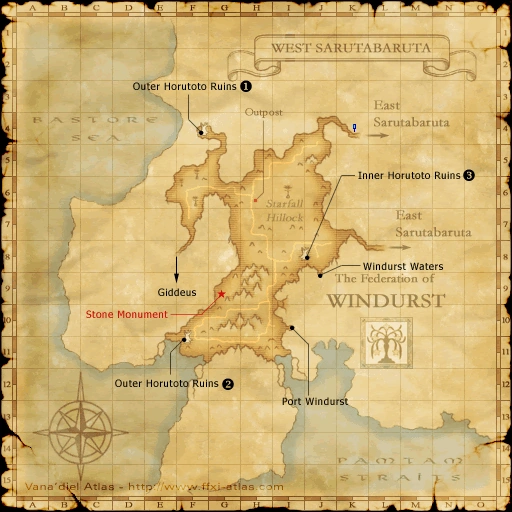
- To get there, you can exit from Windurst Waters (Home Point #1) and head to West Sarutabaruta (F-8).
- Only Invisible is needed in Giddeus. Buffs are removed when you enter the BCNM.
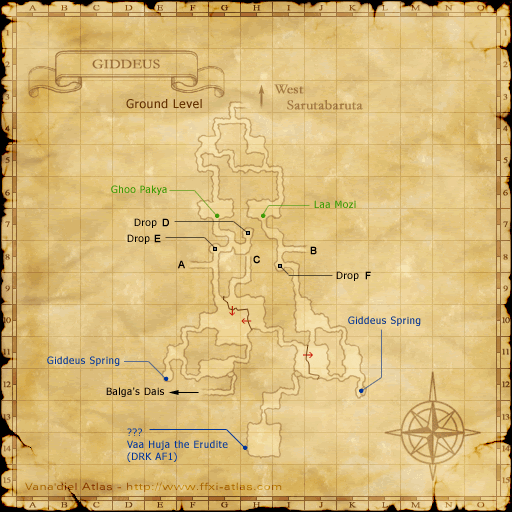
- Once inside Giddeus, head to (G-12) to enter Balga's Dais.
- Enter the Burning Circle for a cutscene and to enter the BCNM with (Searcher and Black Dragon).
- If you are solo, make sure you are a minimum of level 30 and on a very strong job, such as a Monk using Hundred Fists. Kill the dragon before killing the Searcher, or the dragon will kill you rather easily after the Searcher has weakened you. The Searcher does not melee you unless you are close to it or it has less than 50% of its HP, so it is relatively inactive if you focus on the dragon first.
- If in a party with a Black Mage, the recommended order is to kill Searcher, then Black Dragon. The BLM should use Elemental Seal + Sleep on the dragon while everyone kills the Searcher. Once the Searcher is gone, the Black Dragon will die quickly. This dragon has a very potent AOE poison attack that does 10 damage per tick, which makes antidotes necessary. He also may curse the tanks.
(see testimonials)
- Once the Black Dragon is defeated, another cutscene will happen.
- A glitch may prevent this cutscene from occurring. If this happens, you can view the cutscene here (begin at 8:53). Alternatively, you can exit the dais and reenter from the main entrance to watch from the Goblin Footprint.
- Report to Mourices at the embassy to receive a Kindred Report.
- Report back to Halver in Chateau d'Oraguille.
Additional Information:
After completing the mission, you should probably go talk to Curilla to obtain her Alter-Ego at this point.
Windurst Bastok Walkthrough
Windurst
| Mission Name | Journey to Windurst |
|---|---|
| Number | 2-3 |
| Items Needed | Parana Shield x2 |
- Head to the Consulate of San d'Oria in Windurst Woods at (G-10) and talk to Mourices.
- Enter Heavens Tower in Windurst Walls at (H-7) for a cutscene.
- Enter the Clerical Chamber and speak to Kupipi. She will give you a Shield Offering.
- If you are in possession of "Rhapsody in White", you will also receive Cipher: Semih.
- If you are in possession of
- Head to Giddeus in West Sarutabaruta at (F-8).
- After entering Giddeus, you must defeat Zhuu Buxu the Silent twice to obtain 2 Parana Shields.
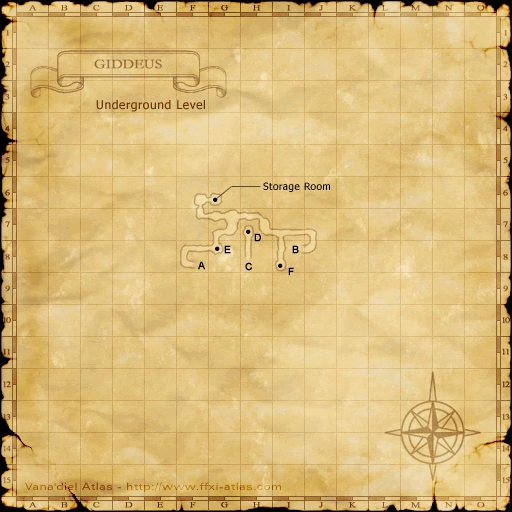
- To get to Zhuu Buxu the Silent, head to the path at (I-8) on the first map and go down the tunnels. Then, make your way to (H-7) on the second map.
- Zhuu Buxu the Silent can aggro and link with the surrounding Yagudo.
- The respawn time for Zhuu Buxu the Silent is 5 minutes.
- Make your way to (F-7) on the second map and speak to Uu Zhoumo to give the Shield Offering. You can do this while waiting for Zhuu Buxu the Silent to respawn.
- Return to the Consulate of San d'Oria and speak to Mourices. Trade him both Parana Shield as proof of your completed task.
Bastok
| Mission Name | Journey to Bastok |
|---|---|
| Number | 2-3 |
- Head to the Consulate of San d'Oria in the Metalworks at (H-9) on the second floor and speak to Savae E Paleade for a cutscene.
- Enter the Department of Industry adjacent to the President's Office and speak to Pius.
- Walk to the Craftsmen's Eatery at (G-9) and speak to Grohm.
- Head to the Palborough Mines located in North Gustaberg at (K-3).
- In the Palborough Mines, make your way to third floor of the mines and enter the Waughroon Shrine.
- If you are low level, you may want to bring Silent Oils to prevent aggro from Quadav.
- The Waughroon Shrine is located at (H-10) on the third floor.
- Enter the Burning Circle for a cutscene and to enter the BCNM with (Searcher and Black Dragon).
- If you are solo, make sure you are a minimum of level 30 and on a very strong job, such as a Monk using Hundred Fists. A solo hero with 4 trusts should have little difficulty clearing this BCNM below level 30.
- Defeat the two monsters to obtain a Kindred crest.
- A glitch can prevent the victory cutscene from occuring. If that happens, you can watch the cutscene here: [1] (begin watching from 1:53), or you can exit the shrine and reenter from the main entrance to watch from the Goblin Footprint.
- After you've won the BCNM you can exit back into Palborough Mines travel a short distance on that map to H-8 where you can board one of the lever activated ferries and return to Zeruhn Mines which is connected to Bastok Mines.
- Return to Bastok and speak to Savae E Paleade to obtain the Kindred Report and to complete this portion of the mission.
- Return to San d'Oria and speak to Halver to complete this mission.
Game Description
- Mission Orders
- Visit the faraway nations of Bastok and Windurst and receive official recognition as an adventurer.
- Mission Orders (Windurst to Bastok)
-
- Journey to Windurst
- Bring an offering (a shield) from Heavens Tower in Windurst to the Yagudo treasure room in Giddeus. To uphold the honor of San d'Oria, claim two of the same shields from the Yagudo on your return.
- Journey to Bastok
- Reports indicate that the Quadav who inhabit the deepest levels of Palborough Mines are up to something. An official named Pius will instruct you further.
- Mission Orders (Bastok to Windurst)
-
- Journey to Bastok
- Survey Bastokan mining technology, and bring some mythril sand out of Palborough Mines. An official named Pius will instruct you further.
- Journey to Windurst
- Oust the giant monster that dwells deep inside the Yagudo realm of Giddeus.