(→Armor - Body, Legs, Feet: added dinner formal set to the list of storable armors) |
mNo edit summary |
||
| (18 intermediate revisions by 13 users not shown) | |||
| Line 1: | Line 1: | ||
| + | [[File:Gallagher.jpg|thumb|[[Gallagher]], the Item Depository NPC of Bastok.]] |
||
| − | These NPCs store items that have been given as rewards in past [[:Category:Special Events|special events]]. |
||
| + | __TOC__ |
||
| + | The [[Item Depository]] is a service that allows certain items, mostly [[:Category:Special Events|special event]] reward items, to be stored with NPCs located in the major cities. |
||
| ⚫ | |||
| − | ==Event Item Storer== |
||
| + | |||
| − | {| border="0" width="70%" cellpadding="2" cellspacing="2" |
||
| ⚫ | |||
| − | |align="center" BGCOLOR="#ffdead" width="40%"|Name |
||
| + | |||
| − | |align="center" BGCOLOR="#ffdead" width="60%"|Location |
||
| ⚫ | |||
| + | |||
| + | {|width="70%" class="ffxi-table" |
||
| + | !width="40%"| Item Depository NPC |
||
| + | !width="60%"| Location |
||
|- |
|- |
||
| − | | |
+ | | [[Garridan]] |
| − | | |
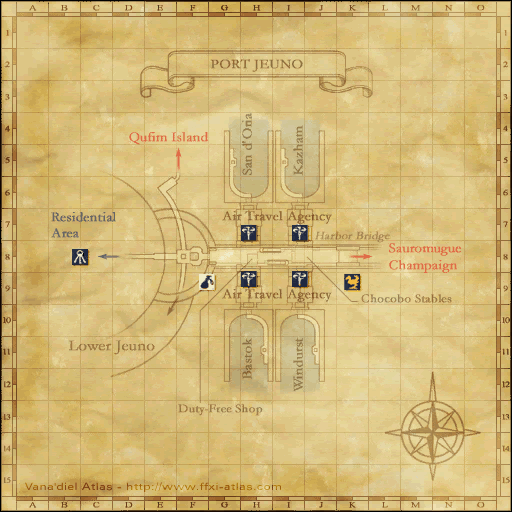
+ | | {{Location|Port Jeuno|J-8}} |
|- |
|- |
||
| − | | |
+ | | [[Olaky-Yayulaky]] |
| − | | |
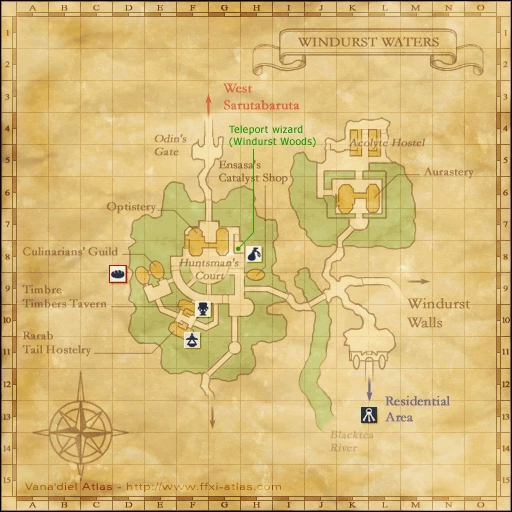
+ | | {{Location|Windurst Waters|map=North|F-8}} |
|- |
|- |
||
| − | | |
+ | | [[Poudoruchant]] |
| − | | |
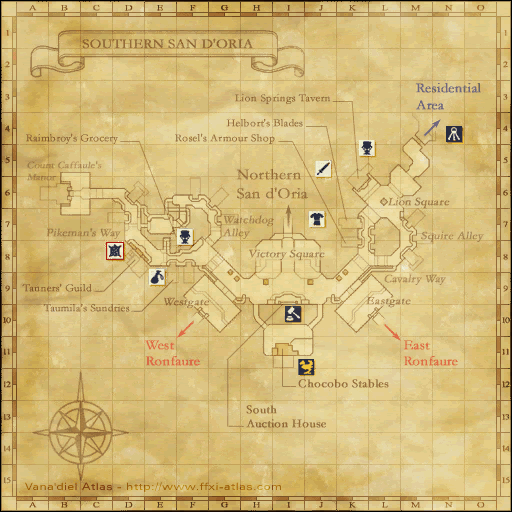
+ | | {{Location|Southern San d'Oria|F-8}} |
|- |
|- |
||
| − | | |
+ | | [[Gallagher]] |
| − | | |
+ | | {{Location|Port Bastok|I-11}} |
|- |
|- |
||
| − | | |
+ | | [[Jarafah]] |
| − | | |
+ | | {{Location|Aht Urhgan Whitegate|I-9}} |
|} |
|} |
||
| − | |||
| − | ==How to Use== |
||
| ⚫ | |||
| ⚫ | |||
| ⚫ | |||
| − | *You will be charged a fee of 250 [[Gil]] when you pick up your item later on. |
||
==Restrictions== |
==Restrictions== |
||
| − | *Items from recent events may not be |
+ | *Items from recent events may not be able to be stored immediately. |
| − | *Not all event items can be stored. |
+ | *Not all event items can be stored, such as items with limited charges. |
| ⚫ | |||
| − | **Items with limited charges cannot be stored. |
||
| ⚫ | |||
*Items that are signed will lose their signature. |
*Items that are signed will lose their signature. |
||
*The recast time for enchanted items will be reset to the maximum level upon withdrawal. |
*The recast time for enchanted items will be reset to the maximum level upon withdrawal. |
||
| + | *Items that are race or gender specific may only be stored by players of that race or gender. |
||
| − | |||
| + | *Items in the "Swimwear" column below are actually part of the "Armor - Body, Legs, Feet" section when talking with the Item Depository NPC. |
||
| ⚫ | |||
| + | ==See Also== |
||
| + | *[[Armor Depository]] |
||
| ⚫ | |||
| ⚫ | |||
{|cellpadding="5" width="70%" |
{|cellpadding="5" width="70%" |
||
|width="50%" valign="top"| |
|width="50%" valign="top"| |
||
===Furnishings=== |
===Furnishings=== |
||
| − | *[[Adamantoise Statue |
+ | *[[Adamantoise Statue]] |
| − | *[[Adventuring Certificate |
+ | *[[Adventuring Certificate]] |
| + | *[[Aeolsglocke]] |
||
| − | *[[Aldebaran Horn |
+ | *[[Aldebaran Horn]] |
| ⚫ | |||
| − | *[[ |
+ | *[[Alexander Statue]] |
| − | *[[ |
+ | *[[Blue Bamboo Grass]] |
| + | *[[Bastokan Flag]] |
||
| ⚫ | |||
| + | *[[Behemoth Statue]] |
||
| + | *[[Bomb Lantern]] |
||
*[[Bonbori]] |
*[[Bonbori]] |
||
| − | *[[Calabazilla Lantern |
+ | *[[Calabazilla Lantern]] |
| + | *[[Carillon Vermeil]] |
||
| − | *[[Clockwork Egg |
+ | *[[Clockwork Egg]] |
| − | *[[Copy |
+ | *[[Copy of "Hoary Spire"]] |
| − | *[[Cushaw Lantern |
+ | *[[Cushaw Lantern]] |
| − | *[[Dream Coffer|Dream coffers]] |
||
| + | *[[Djinn Pricket]] |
||
| − | *[[Dream Platter|Dream platters]] |
||
| − | *[[Dream |
+ | *[[Dream Coffer]] |
| − | *[[ |
+ | *[[Dream Platter]] |
| + | *[[Dream Stocking]] |
||
| − | *[[Fafnir Statue|Fafnir statues]] |
||
| − | *[[ |
+ | *[[Egg Buffet]] |
| − | *[[ |
+ | *[[Fafnir Statue]] |
| ⚫ | |||
| ⚫ | |||
| + | *[[Flower Egg]] |
||
| ⚫ | |||
| − | *[[ |
+ | *[[Green Bamboo Grass]] |
| + | *[[Harpsichord]] |
||
| ⚫ | |||
| + | *[[Jack-o'-Pricket]] |
||
| ⚫ | |||
| + | *[[Jeweled Egg]] |
||
| + | *[[Kabuto-kazari]] |
||
*[[Kadomatsu]] |
*[[Kadomatsu]] |
||
| − | *[[ |
+ | *[[Katana-kazari]] |
| + | *[[Korrigan Pricket]] |
||
| − | *[[Mandragora Lantern|Mandragora lanterns]] |
||
| − | *[[ |
+ | *[[Lamp Egg]] |
| + | *[[Leafbell]] |
||
| ⚫ | |||
| − | *[[ |
+ | *[[Mandragora Lantern]] |
| ⚫ | |||
| ⚫ | |||
| + | *[[Melodious Egg]] |
||
| ⚫ | |||
| ⚫ | |||
| ⚫ | |||
| − | *[[ |
+ | *[[Odin Statue]] |
| + | *[[Pepo Lantern]] |
||
| ⚫ | |||
| ⚫ | |||
| ⚫ | |||
| − | *[[ |
+ | *[[Red Bamboo Grass]] |
| + | *[[San d'Orian Flag]] |
||
| − | *[[Blue Bamboo Grass|Sprigs of blue bamboo grass]] |
||
| ⚫ | |||
| − | *[[Green Bamboo Grass|Sprigs of green bamboo grass]] |
||
| + | *[[Shadow Lord Statue]] |
||
| − | *[[Red Bamboo Grass|Sprigs of red bamboo grass]] |
||
| ⚫ | |||
| − | *[[Stuffed Chocobo|Stuffed chocobos]] |
||
| − | *[[ |
+ | *[[Snowman Mage]] |
| ⚫ | |||
| ⚫ | |||
| − | *[[ |
+ | *[[Stuffed Chocobo]] |
| + | *[[Timepiece]] |
||
| − | |||
| + | *[[Windurstian Flag]] |
||
| ⚫ | |||
| + | *[[Wing Egg]] |
||
|width="50%" valign="top"| |
|width="50%" valign="top"| |
||
| − | ===Weapons=== |
+ | ===Weapons and Shields=== |
| − | *[[Battledore |
+ | *[[Battledore]] |
| − | *[[Charm Wand |
+ | *[[Charm Wand +1]] |
| − | *[[Chocobo Wand |
+ | *[[Chocobo Wand]] |
| − | *[[Dream Bell |
+ | *[[Dream Bell]] |
| − | *[[Dream Bell |
+ | *[[Dream Bell +1]] |
| − | *[[Hardwood Katana |
+ | *[[Hardwood Katana]] |
*[[Ibushi Shinai]] |
*[[Ibushi Shinai]] |
||
*[[Ibushi Shinai +1]] |
*[[Ibushi Shinai +1]] |
||
| − | *[[Lotus Katana |
+ | *[[Lotus Katana]] |
| − | *[[Miracle Wand |
+ | *[[Miracle Wand +1]] |
| − | *[[Moogle Rod |
+ | *[[Moogle Rod]] |
| − | *[[Nomad Moogle Shield |
+ | *[[Nomad Moogle Shield]] |
| − | *[[Pitchfork]] |
+ | *[[Pitchfork]] |
| − | *[[Pitchfork |
+ | *[[Pitchfork +1]] |
*[[Shinai]] |
*[[Shinai]] |
||
| − | *[[Town Moogle Shield |
+ | *[[Town Moogle Shield]] |
| − | *[[Treat Staff |
+ | *[[Treat Staff]] |
| − | *[[Treat Staff |
+ | *[[Treat Staff II]] |
| − | *[[Trick Staff |
+ | *[[Trick Staff]] |
| − | *[[Wooden Katana |
+ | *[[Wooden Katana]] |
| − | |||
|- |
|- |
||
|width="50%" valign="top"| |
|width="50%" valign="top"| |
||
===Armor - Head=== |
===Armor - Head=== |
||
| − | *[[ |
+ | *[[Chocobo Beret]] |
| − | *[[ |
+ | *[[Coven Hat]] |
| − | *[[Dream Hat |
+ | *[[Dream Hat]] |
| − | *[[ |
+ | *[[Dream Hat +1]] |
| − | *[[ |
+ | *[[Egg Helm]] |
| − | *[[ |
+ | *[[Guide Beret]] |
| − | *[[Horror Head |
+ | *[[Horror Head]] |
| − | *[[ |
+ | *[[Horror Head II]] |
| + | *[[Lunar Cap]] |
||
| ⚫ | |||
| + | *[[Mandragora Beret]] |
||
| ⚫ | |||
| − | *[[ |
+ | *[[Moogle Cap]] |
| + | *[[Nomad Cap]] |
||
| − | *[[Pumpkin Head|Pumpkin heads]] |
||
| − | *[[Pumpkin Head |
+ | *[[Pumpkin Head]] |
| − | *[[ |
+ | *[[Pumpkin Head II]] |
| − | *[[ |
+ | *[[Redeyes]] |
| + | *[[Sol Cap]] |
||
| − | *[[Snow Bunny Hat +1|Snow bunny hats +1]] |
||
| − | *[[ |
+ | *[[Snow Bunny Hat +1]] |
| − | *[[ |
+ | *[[Sprout Beret]] |
| + | *[[Witch Hat]] |
||
| − | |||
|width="50%" valign="top"| |
|width="50%" valign="top"| |
||
| Line 136: | Line 152: | ||
*[[Dream Boots]] |
*[[Dream Boots]] |
||
*[[Dream Boots +1]] |
*[[Dream Boots +1]] |
||
| − | *[[Dream Robe |
+ | *[[Dream Robe]] |
| − | *[[Dream Robe |
+ | *[[Dream Robe +1]] |
| − | *[[Eerie Cloak |
+ | *[[Eerie Cloak]] |
| − | *[[Eerie Cloak |
+ | *[[Eerie Cloak +1]] |
*[[Lord's Yukata]] |
*[[Lord's Yukata]] |
||
*[[Lady's Yukata]] |
*[[Lady's Yukata]] |
||
| Line 152: | Line 168: | ||
*[[Otokogimi Yukata]] |
*[[Otokogimi Yukata]] |
||
*[[Otokogusa Yukata]] |
*[[Otokogusa Yukata]] |
||
| − | *[[Tidal Talisman]] |
+ | *[[Tidal Talisman]] |
| − | |||
|- |
|- |
||
|width="50%" valign="top"| |
|width="50%" valign="top"| |
||
| − | ===Swimwear=== |
+ | ====Swimwear==== |
| − | *[[Custom Gilet |
+ | *[[Custom Gilet]] |
| − | *[[Custom Gilet |
+ | *[[Custom Gilet +1]] |
| − | *[[Custom Trunks |
+ | *[[Custom Trunks]] |
| − | *[[Custom Trunks |
+ | *[[Custom Trunks +1]] |
| − | *[[Custom Top |
+ | *[[Custom Top]] |
| − | *[[Custom Top |
+ | *[[Custom Top +1]] |
| − | *[[Custom Shorts |
+ | *[[Custom Shorts]] |
| − | *[[Custom Shorts |
+ | *[[Custom Shorts +1]] |
| − | *[[Elder Gilet |
+ | *[[Elder Gilet]] |
| − | *[[Elder Gilet |
+ | *[[Elder Gilet +1]] |
| − | *[[Elder Trunks |
+ | *[[Elder Trunks]] |
| − | *[[Elder Trunks |
+ | *[[Elder Trunks +1]] |
| − | *[[Elvaan Gilet |
+ | *[[Elvaan Gilet]] |
| − | *[[Elvaan Gilet |
+ | *[[Elvaan Gilet +1]] |
| − | *[[Elvaan Trunks |
+ | *[[Elvaan Trunks]] |
| − | *[[Elvaan Trunks |
+ | *[[Elvaan Trunks +1]] |
| − | *[[Elvaan Top |
+ | *[[Elvaan Top]] |
| − | *[[Elvaan Top |
+ | *[[Elvaan Top +1]] |
| − | *[[Elvaan Shorts |
+ | *[[Elvaan Shorts]] |
| − | *[[Elvaan Shorts |
+ | *[[Elvaan Shorts +1]] |
| − | *[[Galka Gilet |
+ | *[[Galka Gilet]] |
| − | *[[Galka Gilet |
+ | *[[Galka Gilet +1]] |
| − | *[[Galka Trunks |
+ | *[[Galka Trunks]] |
| − | *[[Galka Trunks |
+ | *[[Galka Trunks +1]] |
| − | *[[Hume Gilet |
+ | *[[Hume Gilet]] |
| − | *[[Hume Gilet |
+ | *[[Hume Gilet +1]] |
| − | *[[Hume Trunks |
+ | *[[Hume Trunks]] |
| − | *[[Hume Trunks |
+ | *[[Hume Trunks +1]] |
| − | *[[Hume Top |
+ | *[[Hume Top]] |
| − | *[[Hume Top |
+ | *[[Hume Top +1]] |
| − | *[[Hume Shorts |
+ | *[[Hume Shorts]] |
| − | *[[Hume Shorts |
+ | *[[Hume Shorts +1]] |
| − | *[[Magna Gilet |
+ | *[[Magna Gilet]] |
| − | *[[Magna Gilet |
+ | *[[Magna Gilet +1]] |
| − | *[[Magna Trunks |
+ | *[[Magna Trunks]] |
| − | *[[Magna Trunks |
+ | *[[Magna Trunks +1]] |
| − | *[[Magna Top |
+ | *[[Magna Top]] |
| − | *[[Magna Top |
+ | *[[Magna Top +1]] |
| − | *[[Magna Shorts |
+ | *[[Magna Shorts]] |
| − | *[[Magna Shorts |
+ | *[[Magna Shorts +1]] |
| − | *[[Mithra Top |
+ | *[[Mithra Top]] |
| − | *[[Mithra Top |
+ | *[[Mithra Top +1]] |
| − | *[[Mithra Shorts |
+ | *[[Mithra Shorts]] |
| − | *[[Mithra Shorts |
+ | *[[Mithra Shorts +1]] |
| − | *[[Savage Top |
+ | *[[Savage Top]] |
| − | *[[Savage Top |
+ | *[[Savage Top +1]] |
| − | *[[Savage Shorts |
+ | *[[Savage Shorts]] |
| − | *[[Savage Shorts |
+ | *[[Savage Shorts +1]] |
| − | *[[Tarutaru Maillot |
+ | *[[Tarutaru Maillot]] |
| − | *[[Tarutaru Maillot |
+ | *[[Tarutaru Maillot +1]] |
| − | *[[Tarutaru Trunks |
+ | *[[Tarutaru Trunks]] |
| − | *[[Tarutaru Trunks |
+ | *[[Tarutaru Trunks +1]] |
| − | *[[Tarutaru Top |
+ | *[[Tarutaru Top]] |
| − | *[[Tarutaru Top |
+ | *[[Tarutaru Top +1]] |
| − | *[[Tarutaru Shorts |
+ | *[[Tarutaru Shorts]] |
| − | *[[Tarutaru Shorts |
+ | *[[Tarutaru Shorts +1]] |
| − | *[[Wonder Maillot |
+ | *[[Wonder Maillot]] |
| − | *[[Wonder Maillot |
+ | *[[Wonder Maillot +1]] |
| − | *[[Wonder Trunks |
+ | *[[Wonder Trunks]] |
| − | *[[Wonder Trunks |
+ | *[[Wonder Trunks +1]] |
*[[Wonder Top|Wonder tops]] |
*[[Wonder Top|Wonder tops]] |
||
| − | *[[Wonder Top |
+ | *[[Wonder Top +1]] |
| − | *[[Wonder Shorts |
+ | *[[Wonder Shorts]] |
| − | *[[Wonder Shorts |
+ | *[[Wonder Shorts +1]] |
| − | |||
[[Category:NPCs]][[de:Ereignisitem-Lagerer]] |
[[Category:NPCs]][[de:Ereignisitem-Lagerer]] |
||
| + | |} |
||
Revision as of 01:35, 6 September 2018
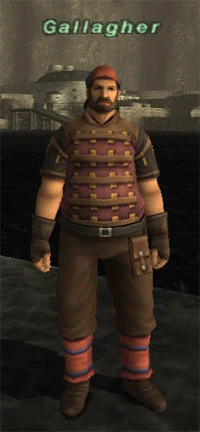
Gallagher, the Item Depository NPC of Bastok.
The Item Depository is a service that allows certain items, mostly special event reward items, to be stored with NPCs located in the major cities.
To store an item, simply trade the item to the NPC. The NPC will only accept one item at a time. It costs nothing to store and item, but retrieving an item requires a fee of 250 gil.
To retrieve your item, talk to the NPC and select the item from within the presented categories. Items can be stored at one NPC and retrieved from another.
Unlike with the Armor Depository, you will not receive a key item for the items traded.
| Item Depository NPC | Location |
|---|---|
| Garridan | Port Jeuno (J-8) |
| Olaky-Yayulaky | Windurst Waters, North (F-8) |
| Poudoruchant | Southern San d'Oria (F-8) |
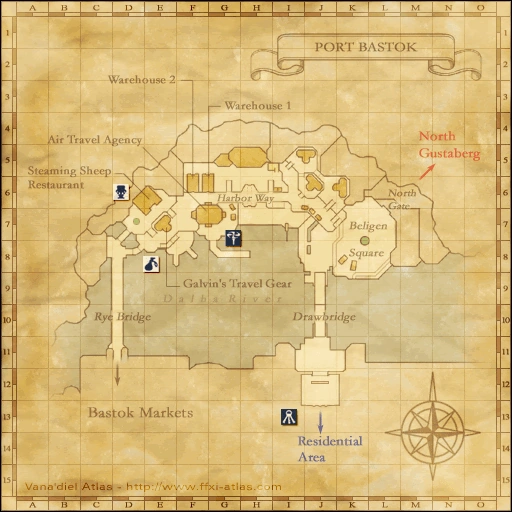
| Gallagher | Port Bastok (I-11) |
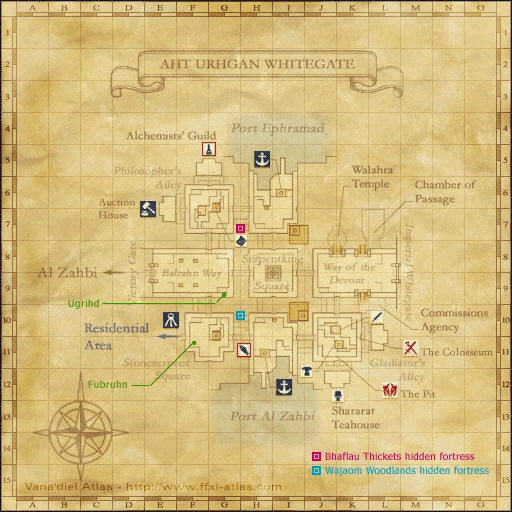
| Jarafah | Aht Urhgan Whitegate (I-9) |
Restrictions
- Items from recent events may not be able to be stored immediately.
- Not all event items can be stored, such as items with limited charges.
- The NPC will only accept one of each item per character.
- Items that are signed will lose their signature.
- The recast time for enchanted items will be reset to the maximum level upon withdrawal.
- Items that are race or gender specific may only be stored by players of that race or gender.
- Items in the "Swimwear" column below are actually part of the "Armor - Body, Legs, Feet" section when talking with the Item Depository NPC.