(→Drops) |
(→Drops) |
||
| Line 92: | Line 92: | ||
! Ancient Lockbox |
! Ancient Lockbox |
||
|- BGCOLOR=#e3e6ff align=center |
|- BGCOLOR=#e3e6ff align=center |
||
| − | | [[Hi-Potion +2]] {{Drop Rate| |
+ | | [[Hi-Potion +2]] {{Drop Rate|120|137}} |
|- BGCOLOR=#e3e6ff align=center |
|- BGCOLOR=#e3e6ff align=center |
||
| − | | [[Hi-Potion Tank]] {{Drop Rate| 69| |
+ | | [[Hi-Potion Tank]] {{Drop Rate| 69|137}} |
|- BGCOLOR=#e3e6ff align=center |
|- BGCOLOR=#e3e6ff align=center |
||
| − | | [[Reraiser]] {{Drop Rate| 38| |
+ | | [[Reraiser]] {{Drop Rate| 38|137}} |
|} |
|} |
||
| Line 102: | Line 102: | ||
{| width=100% |
{| width=100% |
||
|- BGCOLOR=#ffdead |
|- BGCOLOR=#ffdead |
||
| − | ! [[??? Earring]] {{Drop Rate| |
+ | ! [[??? Earring]] {{Drop Rate|90|146}} |
|- BGCOLOR=#e3e6ff align=center |
|- BGCOLOR=#e3e6ff align=center |
||
| − | | [[Storm Earring]] {{Drop Rate| 5| |
+ | | [[Storm Earring]] {{Drop Rate| 5|90}} |
|- BGCOLOR=#e3e6ff align=center |
|- BGCOLOR=#e3e6ff align=center |
||
| − | | [[Heims Earring]] {{Drop Rate| 5| |
+ | | [[Heims Earring]] {{Drop Rate| 5|90}} |
|- BGCOLOR=#e3e6ff align=center |
|- BGCOLOR=#e3e6ff align=center |
||
| − | | [[Silver Earring]] {{Drop Rate|21| |
+ | | [[Silver Earring]] {{Drop Rate|21|90}} |
|- BGCOLOR=#e3e6ff align=center |
|- BGCOLOR=#e3e6ff align=center |
||
| − | | [[Bone Earring]] {{Drop Rate|17| |
+ | | [[Bone Earring]] {{Drop Rate|17|90}} |
|- BGCOLOR=#e3e6ff align=center |
|- BGCOLOR=#e3e6ff align=center |
||
| − | | [[Beetle Earring]] {{Drop Rate| |
+ | | [[Beetle Earring]] {{Drop Rate|19|90}} |
|- BGCOLOR=#e3e6ff align=center |
|- BGCOLOR=#e3e6ff align=center |
||
| − | | [[Shell Earring]] {{Drop Rate|23| |
+ | | [[Shell Earring]] {{Drop Rate|23|90}} |
|} |
|} |
||
| Line 120: | Line 120: | ||
{| width=100% |
{| width=100% |
||
|- BGCOLOR=#ffdead |
|- BGCOLOR=#ffdead |
||
| − | ! [[??? Box]] {{Drop Rate|56| |
+ | ! [[??? Box]] {{Drop Rate|56|146}} |
|- BGCOLOR=#e3e6ff align=center |
|- BGCOLOR=#e3e6ff align=center |
||
| [[Aht Urhgan Brass Ingot]] {{Drop Rate| 3|56}} |
| [[Aht Urhgan Brass Ingot]] {{Drop Rate| 3|56}} |
||
Revision as of 04:56, 26 February 2009
|
Enemies
| Monster | Level | Strengths | Weaknesses | Spawns |
Notes |
|---|---|---|---|---|---|
|
11 |
A, T(H) | |||
|
8 |
A, T(H) | ||||
|
HP = Detects Low HP; M = Detects Magic; Sc = Follows by Scent; T(S) = True-sight; T(H) = True-hearing JA = Detects job abilities; WS = Detects weaponskills; Z(D) = Asleep in Daytime; Z(N) = Asleep at Nighttime; A(R) = Aggressive to Reive participants | |||||
Drops
|
|
Walkthrough
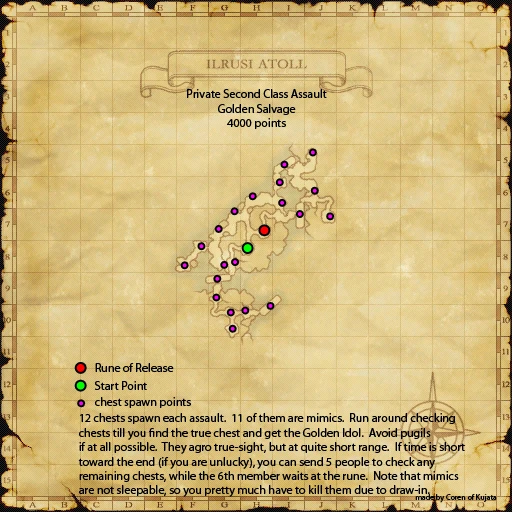
- You start in (H-8).
- Search the boats and surrounding areas for a chest which contains the golden figurehead. All but one chest is a mimic. There are 12 chests within the zone.
- From the start, there are three unconnected areas to search: to the NE and SW are areas with no Pugils, there's a total of 6 chests between the two, the most chests possibles on a single side is five, since one has to appear on the other side's boat; the rest of the enemies are in the NW area.
- Predator Claws dropped down 10% of Hit Points fish NM with 1027dmg, so they must have around ~10k HP. Better skip them or use Carbuncle until they lose your sight if you aggro them.
- Find the golden figurehead and you will be informed that the mission is over and to proceed to the evacuation area at the crossroads in (H-7).
- At the evacuation area there will be another chest. Open it for your rewards.
- Use the evacuation teleport to warp back to the staging area and receive your Assault Points.
- This Assault mission can easily be soloed by a SMN or someone with SMN as their support job (though you must still have the minimum 3 members to enter).
- The person wishing to solo this must summon an avatar, if SMN is your main job, it can be any avatar. If it is your support job, it is recommended that you use Garuda with Aerial Armor. With your avatar out, run up and check the chest, if it is a mimic, allow your avatar to pull hate and then run away to a safe distance.
- Puppetmaster is also able to solo this one with ease. All you need is valoredge frame, flashbulb and you are good. The puppetmaster and only the puppetmaster, casts Utsusemi: Ichi or Ni, uses one light maneuver, moves up to the chest, with automaton activated, clicks the chest, if it happens to be a mimic the puppetmaster lets one shadow be absorbed, automatically uses deploy on the mimic, as soon as deploy is used, quickly use deactivate and the mimic will return to its chest form. No fighting needed. Be advised that this strategy is very tricky and any PUP trying this strategy does so at their own risk. Read the guide for further details.
- Beastmaster can also solo this easily. Just set your pet if it is a mimic, run a distance away and call your pet back. You or your pet may get drawn in, you just need to work out the distance you need to be away from the mimic to escape drawn in.
- The mission can also be easily cleared with no fighting provided 2 members have Utsusemi and one of the two has a ranged attack (~25'). See the Strategy section for more info.
Strategies
Notes
- Death Trap from the mimics can be Stunned.
- The mimics will Draw In the player with the most hate if they are within 20'.
- Try to avoid the pugils (They are true sound). There is no need to fight them unless you get aggro.
- The chests on the 4 boats will ALWAYS spawn. The other 8 chests are randomly located.
Map
| Assault | |
|---|---|
| Leujaoam Missions | |
| Mamool Ja Missions | |
| Lebros Missions | |
| Periqia Missions | |
| Ilrusi Missions | |
| Nyzul Isle Missions | |
| Assault Point Rewards | |
| Nyzul Isle Rewards | |