mNo edit summary |
|||
| (10 intermediate revisions by 9 users not shown) | |||
| Line 4: | Line 4: | ||
{{Zone Infobox |
{{Zone Infobox |
||
| ToC = |
| ToC = |
||
| − | [[#Involved in Quests/Missions|Quests/Missions]] • [[#NPCs Found Here|NPCs]] • [[#weather|Weather]] • [[#treasure chest|Treasure Chest]] • [[#treasure coffer|Treasure Coffer]] • [[#Notorious Monsters Found Here|Notorious Monsters]] • [[#Regular Monsters Found Here|Regular Monsters]] • [[#Event Monsters Found Here|Event Monsters]] |
+ | [[#Involved in Quests/Missions|Quests/Missions]] • [[#NPCs Found Here|NPCs]] • [[#weather|Weather]] • [[#treasure chest|Treasure Chest]] • [[#treasure coffer|Treasure Coffer]] • [[#Individual_Training|Individual Training]] • [[#Notorious Monsters Found Here|Notorious Monsters]] • [[#Regular Monsters Found Here|Regular Monsters]] • [[#Event Monsters Found Here|Event Monsters]] |
| Description = During the [[Great War]], the armies of Altana, led by the first order of the Royal Knights of [[San d'Oria]], reconstructed this underground fortress in hopes of taking the [[beastmen]] armies in [[Sauromugue Champaign|Sauromugue]] by surprise. Outfitted with hundreds of troops from all three nations, the forces of Altana were successful in their attacks on the beastmen--until an enemy unit discovered a secret entrance to the citadel. This miscalculation resulted in the slaughter of all within the fortress, dealing a severe blow to the allied forces. |
| Description = During the [[Great War]], the armies of Altana, led by the first order of the Royal Knights of [[San d'Oria]], reconstructed this underground fortress in hopes of taking the [[beastmen]] armies in [[Sauromugue Champaign|Sauromugue]] by surprise. Outfitted with hundreds of troops from all three nations, the forces of Altana were successful in their attacks on the beastmen--until an enemy unit discovered a secret entrance to the citadel. This miscalculation resulted in the slaughter of all within the fortress, dealing a severe blow to the allied forces. |
||
[[File:Garlaige-citadel-pic.jpg|300px|center]] |
[[File:Garlaige-citadel-pic.jpg|300px|center]] |
||
| + | | Monstrosity = {{Medium}} |
||
| − | |||
| Connections = |
| Connections = |
||
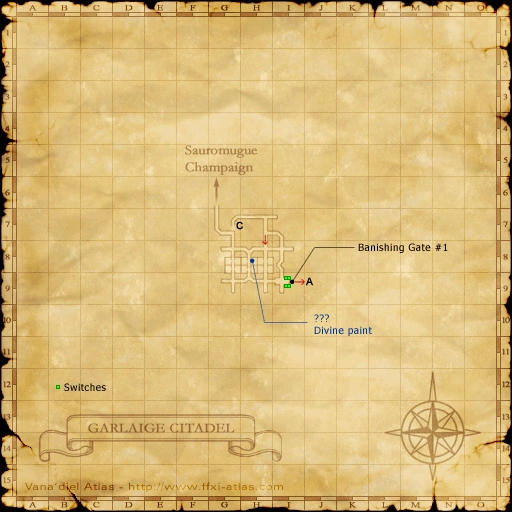
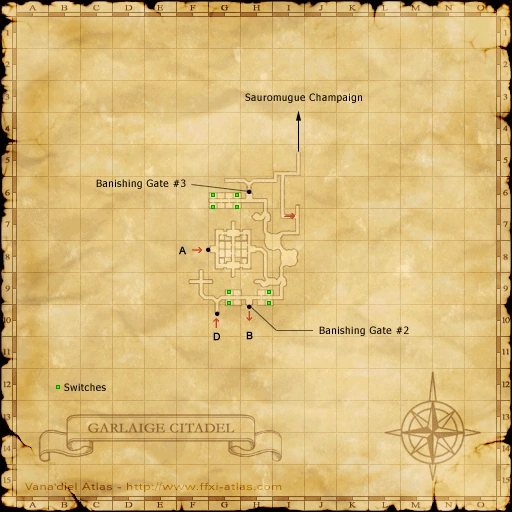
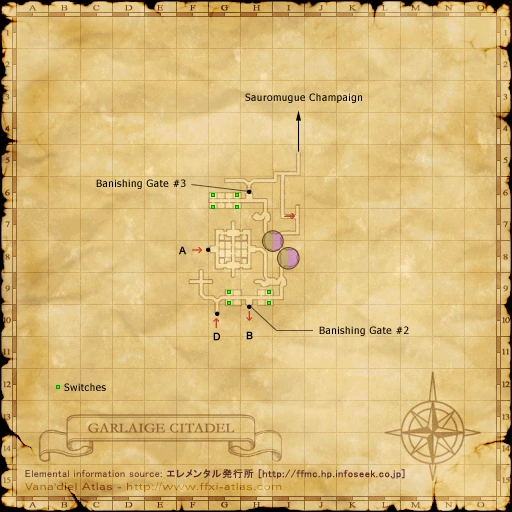
| − | [[Sauromugue Champaign]]: {{Tooltip-Connection-Map|map=GarlaigeCitadel1.png|blip=GreenBlip|text=G-6|x=42.57|y=40.03}}, {{Tooltip-Connection-Map|map=GarlaigeCitadel2.png|blip=GreenBlip|text=I-5|x=58.39|y=29.29}}, [[Escape]] |
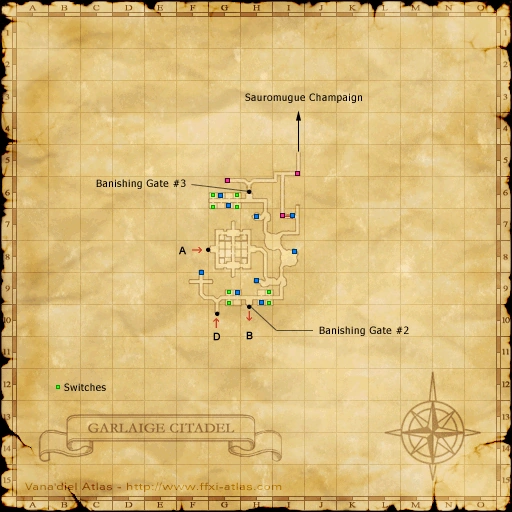
+ | *[[Sauromugue Champaign]]: {{Tooltip-Connection-Map|map=GarlaigeCitadel1.png|blip=GreenBlip|text=G-6|x=42.57|y=40.03}}, {{Tooltip-Connection-Map|map=GarlaigeCitadel2.png|blip=GreenBlip|text=I-5|x=58.39|y=29.29}}, [[Escape]] |
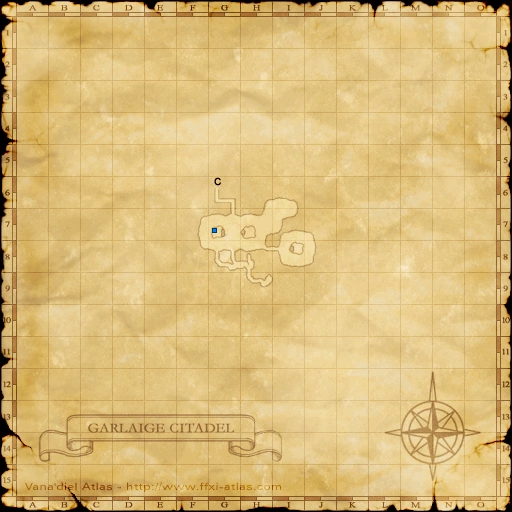
| + | *[[Survival Guide]]: {{Location Tooltip|area=Garlaige Citadel|map=Map 1|pos=G-7}} |
||
| Stats = {{Tractor}} {{Fellow}} {{Escape}} |
| Stats = {{Tractor}} {{Fellow}} {{Escape}} |
||
| Region = Aragoneu |
| Region = Aragoneu |
||
| Type = Dungeon |
| Type = Dungeon |
||
| + | | Maps = |
||
| + | {{Zone Tooltip Map|Map 1}} |
||
| + | {{Zone Tooltip Map|Map 2}} |
||
| + | {{Zone Tooltip Map|Map 3}} |
||
| + | {{Zone Tooltip Map|Map 4}} |
||
| Map Acquisition = [[Map of the Garlaige Citadel|Purchase]] |
| Map Acquisition = [[Map of the Garlaige Citadel|Purchase]] |
||
| Restrictions = None |
| Restrictions = None |
||
| Requirements = None |
| Requirements = None |
||
| + | | BGM = None |
||
| Expansion = Final Fantasy XI |
| Expansion = Final Fantasy XI |
||
| − | | Notes = |
+ | | Notes = Obtaining the {{KeyItem}}[[Pouch of weighted stones]] from the ??? target at ({{Location Tooltip|area=Garlaige Citadel|map=Map 1|pos=G-8}}) allows players to open [[Banishing Gate]]s simply by examining the gates. |
}} |
}} |
||
== Involved in [[:Category:Quests|Quests]]/[[:Category:Missions|Missions]] == |
== Involved in [[:Category:Quests|Quests]]/[[:Category:Missions|Missions]] == |
||
{{TableQuestHeader}} |
{{TableQuestHeader}} |
||
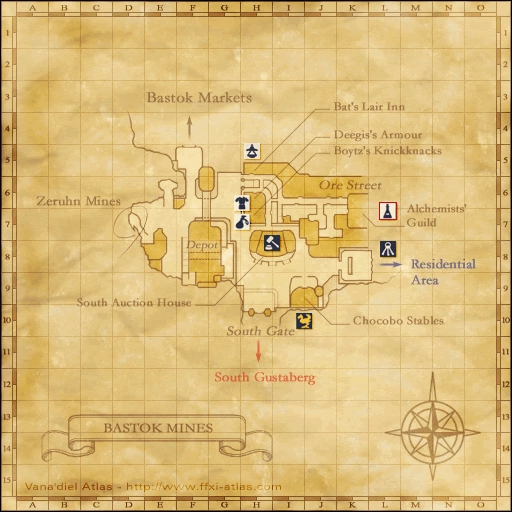
| − | {{TableQuestLine |Name=Altana's Sorrow| Type= General| Starter= [[Virnage]]| Zone= [[Bastok Mines]]| Coordinates= I-5}} |
+ | {{TableQuestLine |Name=Altana's Sorrow| Type= General| Starter= [[Virnage]]| Zone= [[Bastok Mines]]| Coordinates= {{Location Tooltip|area=Bastok Mines|pos=I-5}}}} |
| − | {{TableQuestLine |Name= |
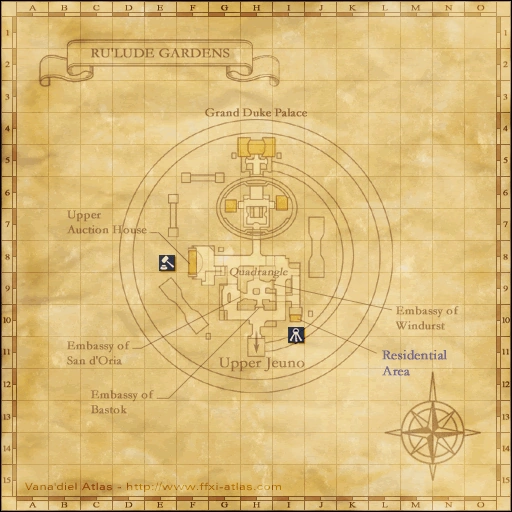
+ | {{TableQuestLine |Name=Battle on a New Front| Type=[[Voidwatch]]| Starter= Audience Chamber door| Zone= [[Ru'Lude Gardens]]| Coordinates= {{Location Tooltip|area=Ru'Lude Gardens|pos=H-6}}}} |
| − | {{TableQuestLine |Name=Borghertz's |
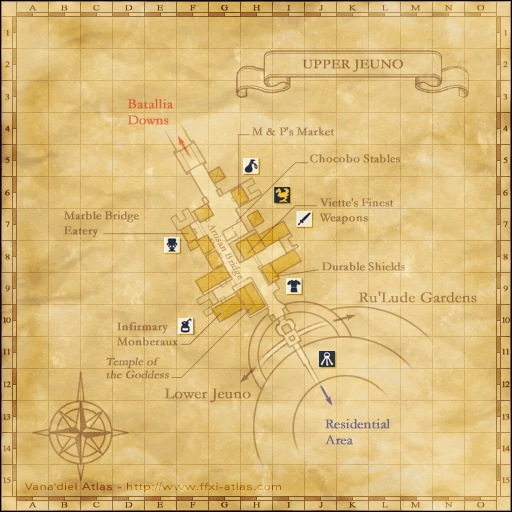
+ | {{TableQuestLine |Name=Borghertz's Chasing Hands| Type=[[RNG]] [[:Category:Artifact Armor|AF]]| Starter= [[Guslam]]| Zone= [[Upper Jeuno]]| Coordinates= {{Location Tooltip|area=Upper Jeuno|pos=H-8}}}} |
| − | {{TableQuestLine |Name=Borghertz's |
+ | {{TableQuestLine |Name=Borghertz's Healing Hands| Type=[[WHM]] [[:Category:Artifact Armor|AF]]| Starter= [[Guslam]]| Zone= [[Upper Jeuno]]| Coordinates= {{Location Tooltip|area=Upper Jeuno|pos=H-8}}}} |
| − | {{TableQuestLine |Name=Borghertz's |
+ | {{TableQuestLine |Name=Borghertz's Sorcerous Hands| Type=[[BLM]] [[:Category:Artifact Armor|AF]]| Starter= [[Guslam]]| Zone= [[Upper Jeuno]]| Coordinates= {{Location Tooltip|area=Upper Jeuno|pos=H-8}}}} |
| − | {{TableQuestLine |Name=Borghertz's |
+ | {{TableQuestLine |Name=Borghertz's Stalwart Hands| Type=[[PLD]] [[:Category:Artifact Armor|AF]]| Starter= [[Guslam]]| Zone= [[Upper Jeuno]]| Coordinates= {{Location Tooltip|area=Upper Jeuno|pos=H-8}}}} |
| − | {{TableQuestLine |Name=Borghertz's |
+ | {{TableQuestLine |Name=Borghertz's Striking Hands| Type=[[MNK]] [[:Category:Artifact Armor|AF]]| Starter= [[Guslam]]| Zone= [[Upper Jeuno]]| Coordinates= {{Location Tooltip|area=Upper Jeuno|pos=H-8}}}} |
| − | {{TableQuestLine |Name=Borghertz's |
+ | {{TableQuestLine |Name=Borghertz's Vermillion Hands| Type=[[RDM]] [[:Category:Artifact Armor|AF]]| Starter= [[Guslam]]| Zone= [[Upper Jeuno]]| Coordinates= {{Location Tooltip|area=Upper Jeuno|pos=H-8}}}} |
| − | {{TableQuestLine |Name= |
+ | {{TableQuestLine |Name=Borghertz's Wild Hands| Type=[[BST]] [[:Category:Artifact Armor|AF]]| Starter= [[Guslam]]| Zone= [[Upper Jeuno]]| Coordinates= {{Location Tooltip|area=Upper Jeuno|pos=H-8}}}} |
| − | {{TableQuestLine |Name= |
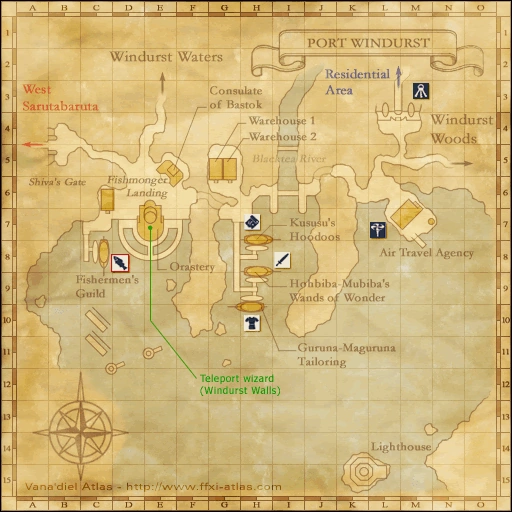
+ | {{TableQuestLine |Name=Escort for Hire (Windurst)| Type=General| Starter= [[Dehn Harzhapan]]| Zone= [[Port Windurst]]| Coordinates= {{Location Tooltip|area=Port Windurst|pos=G-6}}}} |
| − | {{TableQuestLine |Name= |
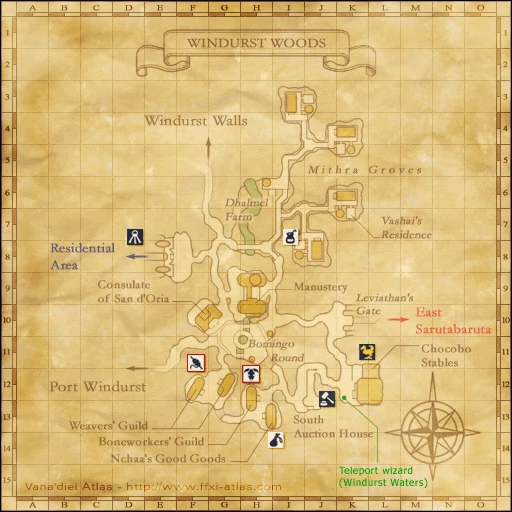
+ | {{TableQuestLine |Name=Hitting the Marquisate| Type=[[THF]] [[:Category:Artifact Armor|AF]] 3| Starter= [[Nanaa Mihgo]]| Zone= [[Windurst Woods]]| Coordinates= {{Location Tooltip|area=Windurst Woods|pos=J-3}}}} |
| − | {{TableQuestLine |Name= |
+ | {{TableQuestLine |Name=In Defiant Challenge| Type=[[Genkai]]| Starter= [[Maat]]| Zone= [[Ru'Lude Gardens]]| Coordinates= {{Location Tooltip|area=Ru'Lude Gardens|pos=H-5}}}} |
| − | {{TableQuestLine |Name= |
+ | {{TableQuestLine |Name=Making Amens!| Type=General| Starter= [[Kuroido-Moido]]| Zone= [[Port Windurst]]| Coordinates= {{Location Tooltip|area=Port Windurst|pos=E-7}}}} |
| − | {{TableQuestLine |Name= |
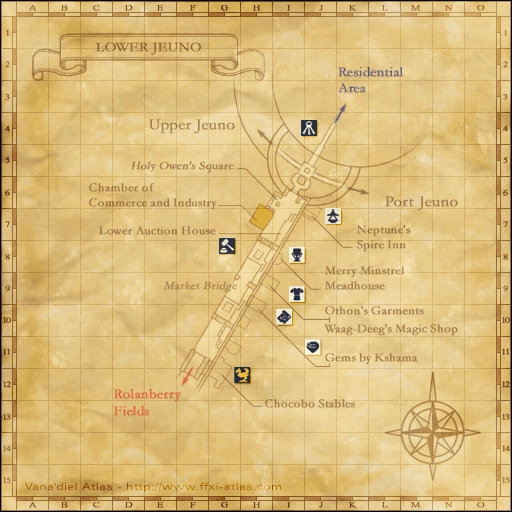
+ | {{TableQuestLine |Name=Now Recording...| Type=General| Starter= [[Darcia]]| Zone= [[Lower Jeuno]]| Coordinates= {{Location Tooltip|area=Lower Jeuno|pos=H-7}}}} |
| + | |||
| + | {{TableQuestLine |Name=Peace for the Spirit| Type=[[RDM]] [[:Category:Artifact Armor|AF]] 3| Starter= [[Curilla]]| Zone= [[Chateau d'Oraguille]]| Coordinates= {{Location Tooltip|area=Chateau d'Oraguille|pos=I-9}}}} |
||
| + | |||
| + | {{TableQuestLine |Name=Rubbish Day| Type=General| Starter= [[Chululu]]| Zone= [[Lower Jeuno]]| Coordinates= {{Location Tooltip|area=Lower Jeuno|pos=I-8}}}} |
||
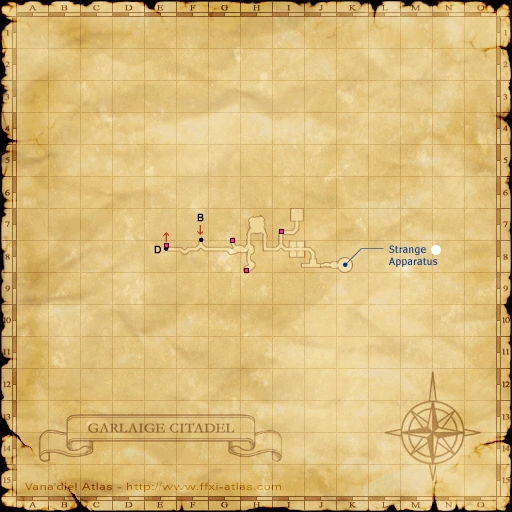
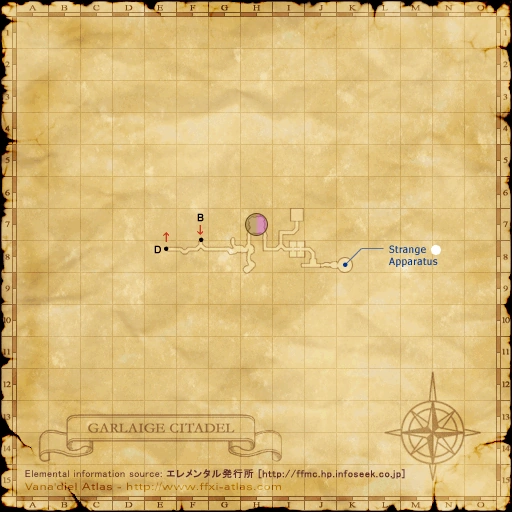
{{TableQuestLine |Name=Strange Apparatus| Type=General| Starter= ---| Zone= ---| Coordinates= }} |
{{TableQuestLine |Name=Strange Apparatus| Type=General| Starter= ---| Zone= ---| Coordinates= }} |
||
| − | + | {{TableMissionHeader}} |
|
| − | {{TableMissionLine |Name= | Nation= | Starter= | Zone= | Coordinates= }} |
+ | {{TableMissionLine |Name= The Geomagnetron| Nation= [[Seekers of Adoulin Missions|Adoulin 1-2]]| Starter= [[Darcia]]| Zone= [[Lower Jeuno]]| Coordinates= {{Location Tooltip|area=Lower Jeuno|pos=H-7}}}} |
{{TableQuestFooter}} |
{{TableQuestFooter}} |
||
| Line 61: | Line 72: | ||
{{Zone Section Header|chest}} |
{{Zone Section Header|chest}} |
||
{{:{{PAGENAME}}/Treasure Chest}} |
{{:{{PAGENAME}}/Treasure Chest}} |
||
| ⚫ | |||
| ⚫ | |||
| ⚫ | |||
<br> |
<br> |
||
{{Zone Section Header|coffer}} |
{{Zone Section Header|coffer}} |
||
{{:{{PAGENAME}}/Treasure Coffer}} |
{{:{{PAGENAME}}/Treasure Coffer}} |
||
| ⚫ | |||
| ⚫ | |||
| ⚫ | |||
<br> |
<br> |
||
|} |
|} |
||
| Line 81: | Line 92: | ||
! width="40"|Tabs |
! width="40"|Tabs |
||
|- BGCOLOR="#E3E6FF" |
|- BGCOLOR="#E3E6FF" |
||
| − | |rowspan="8"|[[Garlaige Citadel]] |
+ | |rowspan="8"|[[Garlaige Citadel]]<br/> |
| + | (G-8) 1st map<br/> |
||
| + | (I-5) 2nd Map<br/> |
||
| + | (G-6) 4th Map |
||
|1 |
|1 |
||
|40~43 |
|40~43 |
||
| Line 93: | Line 107: | ||
|2 |
|2 |
||
|40~44 |
|40~44 |
||
| − | | |
+ | |57 |
| |
| |
||
*4 [[Siege Bat]]s |
*4 [[Siege Bat]]s |
||
| Line 115: | Line 129: | ||
*4 [[Funnel Bats]] |
*4 [[Funnel Bats]] |
||
*2 [[Explosure]]s |
*2 [[Explosure]]s |
||
| + | |1310-2620 |
||
| − | |???-??? |
||
| − | | |
+ | |131-262 |
|- BGCOLOR="#E3E6FF" |
|- BGCOLOR="#E3E6FF" |
||
|5 |
|5 |
||
| Line 157: | Line 171: | ||
{| border="0" width="100%" cellpadding="0" cellspacing="1" |
{| border="0" width="100%" cellpadding="0" cellspacing="1" |
||
| − | |- |
+ | |- |
! style="background:#A58D63;" colspan="2" align="center" | Brown Casket |
! style="background:#A58D63;" colspan="2" align="center" | Brown Casket |
||
! style="background:#63C4DC;" colspan="2" align="center" | Blue Casket |
! style="background:#63C4DC;" colspan="2" align="center" | Blue Casket |
||
| − | |- |
+ | |- |
! style="background:#A58D63;" width="20%" | Item |
! style="background:#A58D63;" width="20%" | Item |
||
! style="background:#A58D63;" width="5%" | Abundance |
! style="background:#A58D63;" width="5%" | Abundance |
||
! style="background:#63C4DC;" width="20%" | Item |
! style="background:#63C4DC;" width="20%" | Item |
||
! style="background:#63C4DC;" width="5%" | Abundance |
! style="background:#63C4DC;" width="5%" | Abundance |
||
| − | |- |
+ | |- |
| − | | style="background:#ECD2A5; padding-left:1em;" |[[Metasoma Katars ]]{{ |
+ | | style="background:#ECD2A5; padding-left:1em;" |[[Metasoma Katars ]]{{Rare|nc}} |
| − | | style="background:#ECD2A5; padding-left:1em;" |{{Abundance|3| |
+ | | style="background:#ECD2A5; padding-left:1em;" |{{Abundance|3|116}} |
| − | | style="background:#BBE6E6; padding-left:1em;" |[[Champion's Tonic]]{{ |
+ | | style="background:#BBE6E6; padding-left:1em;" |[[Champion's Tonic]]{{Rare|nc}}{{Exclusive|nc}}{{Temp|nc}} |
| style="background:#BBE6E6; padding-left:1em;" |{{Abundance|8|229}} |
| style="background:#BBE6E6; padding-left:1em;" |{{Abundance|8|229}} |
||
| − | |- |
+ | |- |
| style="background:#ECD2A5; padding-left:1em;" |[[Hi-Elixir]] |
| style="background:#ECD2A5; padding-left:1em;" |[[Hi-Elixir]] |
||
| − | | style="background:#ECD2A5; padding-left:1em;" |{{Abundance|15| |
+ | | style="background:#ECD2A5; padding-left:1em;" |{{Abundance|15|116}} |
| − | | style="background:#BBE6E6; padding-left:1em;" |[[Cleric's Drink]]{{ |
+ | | style="background:#BBE6E6; padding-left:1em;" |[[Cleric's Drink]]{{Rare|nc}}{{Exclusive|nc}}{{Temp|nc}} |
| style="background:#BBE6E6; padding-left:1em;" |{{Abundance|3|229}} |
| style="background:#BBE6E6; padding-left:1em;" |{{Abundance|3|229}} |
||
| − | |- |
+ | |- |
| style="background:#ECD2A5; padding-left:1em;" |[[Hi-Ether +3]] |
| style="background:#ECD2A5; padding-left:1em;" |[[Hi-Ether +3]] |
||
| − | | style="background:#ECD2A5; padding-left:1em;" |{{Abundance| |
+ | | style="background:#ECD2A5; padding-left:1em;" |{{Abundance|7|116}} |
| − | | style="background:#BBE6E6; padding-left:1em;" |[[Lucid Elixir I]]{{ |
+ | | style="background:#BBE6E6; padding-left:1em;" |[[Lucid Elixir I]]{{Rare|nc}}{{Exclusive|nc}}{{Temp|nc}} |
| style="background:#BBE6E6; padding-left:1em;" |{{Abundance|8|229}} |
| style="background:#BBE6E6; padding-left:1em;" |{{Abundance|8|229}} |
||
| − | |- |
+ | |- |
| style="background:#ECD2A5; padding-left:1em;" |[[Hi-Potion +1]] |
| style="background:#ECD2A5; padding-left:1em;" |[[Hi-Potion +1]] |
||
| − | | style="background:#ECD2A5; padding-left:1em;" |{{Abundance|7| |
+ | | style="background:#ECD2A5; padding-left:1em;" |{{Abundance|7|116}} |
| − | | style="background:#BBE6E6; padding-left:1em;" |[[Mana Mist]]{{ |
+ | | style="background:#BBE6E6; padding-left:1em;" |[[Mana Mist]]{{Rare|nc}}{{Exclusive|nc}}{{Temp|nc}} |
| style="background:#BBE6E6; padding-left:1em;" |{{Abundance|7|229}} |
| style="background:#BBE6E6; padding-left:1em;" |{{Abundance|7|229}} |
||
| − | |- |
+ | |- |
| style="background:#ECD2A5; padding-left:1em;" |[[Mythril Bolt Heads]] |
| style="background:#ECD2A5; padding-left:1em;" |[[Mythril Bolt Heads]] |
||
| − | | style="background:#ECD2A5; padding-left:1em;" |{{Abundance|6| |
+ | | style="background:#ECD2A5; padding-left:1em;" |{{Abundance|6|116}} |
| − | | style="background:#BBE6E6; padding-left:1em;" |[[Mana Powder]]{{ |
+ | | style="background:#BBE6E6; padding-left:1em;" |[[Mana Powder]]{{Rare|nc}}{{Exclusive|nc}}{{Temp|nc}} |
| style="background:#BBE6E6; padding-left:1em;" |{{Abundance|7|229}} |
| style="background:#BBE6E6; padding-left:1em;" |{{Abundance|7|229}} |
||
| − | |- |
+ | |- |
| style="background:#ECD2A5; padding-left:1em;" |[[Poison Dust]] |
| style="background:#ECD2A5; padding-left:1em;" |[[Poison Dust]] |
||
| − | | style="background:#ECD2A5; padding-left:1em;" |{{Abundance|4| |
+ | | style="background:#ECD2A5; padding-left:1em;" |{{Abundance|4|116}} |
| − | | style="background:#BBE6E6; padding-left:1em;" |[[Monarch's Drink]]{{ |
+ | | style="background:#BBE6E6; padding-left:1em;" |[[Monarch's Drink]]{{Rare|nc}}{{Exclusive|nc}}{{Temp|nc}} |
| style="background:#BBE6E6; padding-left:1em;" |{{Abundance|9|229}} |
| style="background:#BBE6E6; padding-left:1em;" |{{Abundance|9|229}} |
||
| − | |- |
+ | |- |
| style="background:#ECD2A5; padding-left:1em;" |[[Pro-Ether +3]] |
| style="background:#ECD2A5; padding-left:1em;" |[[Pro-Ether +3]] |
||
| − | | style="background:#ECD2A5; padding-left:1em;" |{{Abundance|12| |
+ | | style="background:#ECD2A5; padding-left:1em;" |{{Abundance|12|116}} |
| − | | style="background:#BBE6E6; padding-left:1em;" |[[Stalwart's Tonic]]{{ |
+ | | style="background:#BBE6E6; padding-left:1em;" |[[Stalwart's Tonic]]{{Rare|nc}}{{Exclusive|nc}}{{Temp|nc}} |
| style="background:#BBE6E6; padding-left:1em;" |{{Abundance|14|229}} |
| style="background:#BBE6E6; padding-left:1em;" |{{Abundance|14|229}} |
||
| − | |- |
+ | |- |
| style="background:#ECD2A5; padding-left:1em;" |[[Remedy]] |
| style="background:#ECD2A5; padding-left:1em;" |[[Remedy]] |
||
| − | | style="background:#ECD2A5; padding-left:1em;" |{{Abundance|17| |
+ | | style="background:#ECD2A5; padding-left:1em;" |{{Abundance|17|116}} |
| − | | style="background:#BBE6E6; padding-left:1em;" |[[Lucid Ether II]]{{ |
+ | | style="background:#BBE6E6; padding-left:1em;" |[[Lucid Ether II]]{{Rare|nc}}{{Exclusive|nc}}{{Temp|nc}} |
| style="background:#BBE6E6; padding-left:1em;" |{{Abundance|11|229}} |
| style="background:#BBE6E6; padding-left:1em;" |{{Abundance|11|229}} |
||
| − | |- |
+ | |- |
| style="background:#ECD2A5; padding-left:1em;" |[[Silver Beastcoin]] |
| style="background:#ECD2A5; padding-left:1em;" |[[Silver Beastcoin]] |
||
| − | | style="background:#ECD2A5; padding-left:1em;" |{{Abundance|3| |
+ | | style="background:#ECD2A5; padding-left:1em;" |{{Abundance|3|116}} |
| − | | style="background:#BBE6E6; padding-left:1em;" |[[Ascetic's Tonic]]{{ |
+ | | style="background:#BBE6E6; padding-left:1em;" |[[Ascetic's Tonic]]{{Rare|nc}}{{Temp|nc}}{{Exclusive|nc}} |
| style="background:#BBE6E6; padding-left:1em;" |{{Abundance|10|229}} |
| style="background:#BBE6E6; padding-left:1em;" |{{Abundance|10|229}} |
||
|- |
|- |
||
| style="background:#ECD2A5; padding-left:1em;" |[[Angon]] |
| style="background:#ECD2A5; padding-left:1em;" |[[Angon]] |
||
| − | | style="background:#ECD2A5; padding-left:1em;" |{{Abundance|2| |
+ | | style="background:#ECD2A5; padding-left:1em;" |{{Abundance|2|116}} |
| − | | style="background:#BBE6E6; padding-left:1em;" |[[Lucid Potion III]]{{ |
+ | | style="background:#BBE6E6; padding-left:1em;" |[[Lucid Potion III]]{{Rare|nc}}{{Temp|nc}}{{Exclusive|nc}} |
| style="background:#BBE6E6; padding-left:1em;" |{{Abundance|14|229}} |
| style="background:#BBE6E6; padding-left:1em;" |{{Abundance|14|229}} |
||
| − | |- |
+ | |- |
| style="background:#ECD2A5; padding-left:1em;" |[[Koenigs Knuckles]] |
| style="background:#ECD2A5; padding-left:1em;" |[[Koenigs Knuckles]] |
||
| − | | style="background:#ECD2A5; padding-left:1em;" |{{Abundance|4| |
+ | | style="background:#ECD2A5; padding-left:1em;" |{{Abundance|4|116}} |
| − | | style="background:#BBE6E6; padding-left:1em;" |[[Lucid Potion I]]{{ |
+ | | style="background:#BBE6E6; padding-left:1em;" |[[Lucid Potion I]]{{Rare|nc}}{{Exclusive|nc}}{{Temp|nc}} |
| style="background:#BBE6E6; padding-left:1em;" |{{Abundance|13|229}} |
| style="background:#BBE6E6; padding-left:1em;" |{{Abundance|13|229}} |
||
| − | |- |
+ | |- |
| style="background:#ECD2A5; padding-left:1em;" |[[Cythara Anglica]] |
| style="background:#ECD2A5; padding-left:1em;" |[[Cythara Anglica]] |
||
| − | | style="background:#ECD2A5; padding-left:1em;" |{{Abundance|1| |
+ | | style="background:#ECD2A5; padding-left:1em;" |{{Abundance|1|116}} |
| − | | style="background:#BBE6E6; padding-left:1em;" |[[Fool's Tonic]]{{ |
+ | | style="background:#BBE6E6; padding-left:1em;" |[[Fool's Tonic]]{{Rare|nc}}{{Exclusive|nc}}{{Temp|nc}} |
| style="background:#BBE6E6; padding-left:1em;" |{{Abundance|9|229}} |
| style="background:#BBE6E6; padding-left:1em;" |{{Abundance|9|229}} |
||
| − | |- |
+ | |- |
| style="background:#ECD2A5; padding-left:1em;" |[[Gavial Greaves]] |
| style="background:#ECD2A5; padding-left:1em;" |[[Gavial Greaves]] |
||
| − | | style="background:#ECD2A5; padding-left:1em;" |{{Abundance|3| |
+ | | style="background:#ECD2A5; padding-left:1em;" |{{Abundance|3|116}} |
| − | | style="background:#BBE6E6; padding-left:1em;" |[[Fanatic's Tonic]]{{ |
+ | | style="background:#BBE6E6; padding-left:1em;" |[[Fanatic's Tonic]]{{Rare|nc}}{{Exclusive|nc}}{{Temp|nc}} |
| style="background:#BBE6E6; padding-left:1em;" |{{Abundance|2|229|}} |
| style="background:#BBE6E6; padding-left:1em;" |{{Abundance|2|229|}} |
||
| − | |- |
+ | |- |
| style="background:#ECD2A5; padding-left:1em;" |[[Maple Log]] |
| style="background:#ECD2A5; padding-left:1em;" |[[Maple Log]] |
||
| − | | style="background:#ECD2A5; padding-left:1em;" |{{Abundance|2| |
+ | | style="background:#ECD2A5; padding-left:1em;" |{{Abundance|2|116}} |
| − | | style="background:#BBE6E6; padding-left:1em;" |[[Daedalus Wing]]{{ |
+ | | style="background:#BBE6E6; padding-left:1em;" |[[Daedalus Wing]]{{Rare|nc}}{{Exclusive|nc}}{{Temp|nc}} |
| style="background:#BBE6E6; padding-left:1em;" |{{Abundance|8|229|}} |
| style="background:#BBE6E6; padding-left:1em;" |{{Abundance|8|229|}} |
||
| − | |- |
+ | |- |
| style="background:#ECD2A5; padding-left:1em;" |[[Wool Thread]] |
| style="background:#ECD2A5; padding-left:1em;" |[[Wool Thread]] |
||
| − | | style="background:#ECD2A5; padding-left:1em;" |{{Abundance|1| |
+ | | style="background:#ECD2A5; padding-left:1em;" |{{Abundance|1|116}} |
| − | | style="background:#BBE6E6; padding-left:1em;" |[[Healing Salve I]]{{ |
+ | | style="background:#BBE6E6; padding-left:1em;" |[[Healing Salve I]]{{Rare|nc}}{{Exclusive|nc}}{{Temp|nc}} |
| style="background:#BBE6E6; padding-left:1em;" |{{Abundance|7|229|}} |
| style="background:#BBE6E6; padding-left:1em;" |{{Abundance|7|229|}} |
||
| − | |- |
+ | |- |
| style="background:#ECD2A5; padding-left:1em;" |[[Cobalt Cell]] |
| style="background:#ECD2A5; padding-left:1em;" |[[Cobalt Cell]] |
||
| − | | style="background:#ECD2A5; padding-left:1em;" |{{Abundance|5| |
+ | | style="background:#ECD2A5; padding-left:1em;" |{{Abundance|5|116}} |
| − | | style="background:#BBE6E6; padding-left:1em;" |[[Clear Salve I]]{{ |
+ | | style="background:#BBE6E6; padding-left:1em;" |[[Clear Salve I]]{{Rare|nc}}{{Exclusive|nc}}{{Temp|nc}} |
| style="background:#BBE6E6; padding-left:1em;" |{{Abundance|13|229|}} |
| style="background:#BBE6E6; padding-left:1em;" |{{Abundance|13|229|}} |
||
| − | |- |
+ | |- |
| style="background:#ECD2A5; padding-left:1em;" |[[Xanthous Cell]] |
| style="background:#ECD2A5; padding-left:1em;" |[[Xanthous Cell]] |
||
| − | | style="background:#ECD2A5; padding-left:1em;" |{{Abundance|6| |
+ | | style="background:#ECD2A5; padding-left:1em;" |{{Abundance|6|116}} |
| − | | style="background:#BBE6E6; padding-left:1em;" |[[Healing Mist]]{{ |
+ | | style="background:#BBE6E6; padding-left:1em;" |[[Healing Mist]]{{Rare|nc}}{{Exclusive|nc}}{{Temp|nc}} |
| style="background:#BBE6E6; padding-left:1em;" |{{Abundance|3|229|}} |
| style="background:#BBE6E6; padding-left:1em;" |{{Abundance|3|229|}} |
||
| − | |- |
+ | |- |
| style="background:#ECD2A5; padding-left:1em;" |[[Jade Cell]] |
| style="background:#ECD2A5; padding-left:1em;" |[[Jade Cell]] |
||
| − | | style="background:#ECD2A5; padding-left:1em;" |{{Abundance|4| |
+ | | style="background:#ECD2A5; padding-left:1em;" |{{Abundance|4|116}} |
| − | | style="background:#BBE6E6; padding-left:1em;" |[[Catholicon]]{{ |
+ | | style="background:#BBE6E6; padding-left:1em;" |[[Catholicon]]{{Rare|nc}}{{Exclusive|nc}}{{Temp|nc}} |
| style="background:#BBE6E6; padding-left:1em;" |{{Abundance|12|229}} |
| style="background:#BBE6E6; padding-left:1em;" |{{Abundance|12|229}} |
||
| − | |- |
+ | |- |
| style="background:#ECD2A5; padding-left:1em;" |[[Revival Root]] |
| style="background:#ECD2A5; padding-left:1em;" |[[Revival Root]] |
||
| − | | style="background:#ECD2A5; padding-left:1em;" |{{Abundance| |
+ | | style="background:#ECD2A5; padding-left:1em;" |{{Abundance|5|116}} |
| − | | style="background:#BBE6E6; padding-left:1em;" |[[Vicar's Drink]]{{ |
+ | | style="background:#BBE6E6; padding-left:1em;" |[[Vicar's Drink]]{{Rare|nc}}{{Exclusive|nc}}{{Temp|nc}} |
| style="background:#BBE6E6; padding-left:1em;" |{{Abundance|5|229}} |
| style="background:#BBE6E6; padding-left:1em;" |{{Abundance|5|229}} |
||
| − | |- |
+ | |- |
| style="background:#ECD2A5; padding-left:1em;" |[[Ram Skin]] |
| style="background:#ECD2A5; padding-left:1em;" |[[Ram Skin]] |
||
| − | | style="background:#ECD2A5; padding-left:1em;" |{{Abundance|2| |
+ | | style="background:#ECD2A5; padding-left:1em;" |{{Abundance|2|116}} |
| − | | style="background:#BBE6E6; padding-left:1em;" |[[Braver's Drink]]{{ |
+ | | style="background:#BBE6E6; padding-left:1em;" |[[Braver's Drink]]{{Rare|nc}}{{Exclusive|nc}}{{Temp|nc}} |
| style="background:#BBE6E6; padding-left:1em;" |{{Abundance|9|229}} |
| style="background:#BBE6E6; padding-left:1em;" |{{Abundance|9|229}} |
||
| − | |- |
+ | |- |
| style="background:#ECD2A5; padding-left:1em;" |[[Bomb Ash]] |
| style="background:#ECD2A5; padding-left:1em;" |[[Bomb Ash]] |
||
| − | | style="background:#ECD2A5; padding-left:1em;" |{{Abundance|1| |
+ | | style="background:#ECD2A5; padding-left:1em;" |{{Abundance|1|116}} |
| − | | style="background:#BBE6E6; padding-left:1em;" |[[Healing Powder]]{{ |
+ | | style="background:#BBE6E6; padding-left:1em;" |[[Healing Powder]]{{Rare|nc}}{{Exclusive|nc}}{{Temp|nc}} |
| style="background:#BBE6E6; padding-left:1em;" |{{Abundance|6|229}} |
| style="background:#BBE6E6; padding-left:1em;" |{{Abundance|6|229}} |
||
| − | |- |
+ | |- |
| style="background:#ECD2A5; padding-left:1em;" |[[Pro-Ether +1]] |
| style="background:#ECD2A5; padding-left:1em;" |[[Pro-Ether +1]] |
||
| − | | style="background:#ECD2A5; padding-left:1em;" |{{Abundance|3| |
+ | | style="background:#ECD2A5; padding-left:1em;" |{{Abundance|3|116}} |
| − | | style="background:#BBE6E6; padding-left:1em;" |[[Lucid Ether I]]{{ |
+ | | style="background:#BBE6E6; padding-left:1em;" |[[Lucid Ether I]]{{Rare|nc}}{{Exclusive|nc}}{{Temp|nc}} |
| style="background:#BBE6E6; padding-left:1em;" |{{Abundance|5|229}} |
| style="background:#BBE6E6; padding-left:1em;" |{{Abundance|5|229}} |
||
| − | |- |
+ | |- |
| style="background:#ECD2A5; padding-left:1em;" |[[X-Potion +3]] |
| style="background:#ECD2A5; padding-left:1em;" |[[X-Potion +3]] |
||
| − | | style="background:#ECD2A5; padding-left:1em;" |{{Abundance|5| |
+ | | style="background:#ECD2A5; padding-left:1em;" |{{Abundance|5|116}} |
| − | | style="background:#BBE6E6; padding-left:1em;" |[[Fanatic's Tonic]]{{ |
+ | | style="background:#BBE6E6; padding-left:1em;" |[[Fanatic's Tonic]]{{Rare|nc}}{{Exclusive|nc}}{{Temp|nc}} |
| style="background:#BBE6E6; padding-left:1em;" |{{Abundance|5|229}} |
| style="background:#BBE6E6; padding-left:1em;" |{{Abundance|5|229}} |
||
| − | |- |
+ | |- |
| style="background:#ECD2A5; padding-left:1em;" |[[Mythril Beastcoin]] |
| style="background:#ECD2A5; padding-left:1em;" |[[Mythril Beastcoin]] |
||
| − | | style="background:#ECD2A5; padding-left:1em;" |{{Abundance|1| |
+ | | style="background:#ECD2A5; padding-left:1em;" |{{Abundance|1|116}} |
| − | | style="background:#BBE6E6; padding-left:1em;" |[[Champion's Gambir]]{{ |
+ | | style="background:#BBE6E6; padding-left:1em;" |[[Champion's Gambir]]{{Rare|nc}}{{Exclusive|nc}}{{Temp|nc}} |
| style="background:#BBE6E6; padding-left:1em;" |{{Abundance|7|229}} |
| style="background:#BBE6E6; padding-left:1em;" |{{Abundance|7|229}} |
||
| − | |- |
+ | |- |
| style="background:#ECD2A5; padding-left:1em;" |[[Adaman Ore]] |
| style="background:#ECD2A5; padding-left:1em;" |[[Adaman Ore]] |
||
| − | | style="background:#ECD2A5; padding-left:1em;" |{{Abundance| |
+ | | style="background:#ECD2A5; padding-left:1em;" |{{Abundance|4|116}} |
| − | | style="background:#BBE6E6; padding-left:1em;" |[[Lucid Potion II]]{{ |
+ | | style="background:#BBE6E6; padding-left:1em;" |[[Lucid Potion II]]{{Rare|nc}}{{Exclusive|nc}}{{Temp|nc}} |
| style="background:#BBE6E6; padding-left:1em;" |{{Abundance|4|229}} |
| style="background:#BBE6E6; padding-left:1em;" |{{Abundance|4|229}} |
||
| − | |- |
+ | |- |
| style="background:#ECD2A5; padding-left:1em;" |[[Elm Log]] |
| style="background:#ECD2A5; padding-left:1em;" |[[Elm Log]] |
||
| − | | style="background:#ECD2A5; padding-left:1em;" |{{Abundance|4| |
+ | | style="background:#ECD2A5; padding-left:1em;" |{{Abundance|4|116}} |
| − | | style="background:#BBE6E6; padding-left:1em;" |[[Clear Salve II]]{{ |
+ | | style="background:#BBE6E6; padding-left:1em;" |[[Clear Salve II]]{{Rare|nc}}{{Exclusive|nc}}{{Temp|nc}} |
| style="background:#BBE6E6; padding-left:1em;" |{{Abundance|8|230}} |
| style="background:#BBE6E6; padding-left:1em;" |{{Abundance|8|230}} |
||
| − | |- |
+ | |- |
| style="background:#ECD2A5; padding-left:1em;" |[[Gavial Mask]] |
| style="background:#ECD2A5; padding-left:1em;" |[[Gavial Mask]] |
||
| − | | style="background:#ECD2A5; padding-left:1em;" |{{Abundance|1| |
+ | | style="background:#ECD2A5; padding-left:1em;" |{{Abundance|1|116}} |
| − | | style="background:#BBE6E6; padding-left:1em;" |[[Healing Salve II]]{{ |
+ | | style="background:#BBE6E6; padding-left:1em;" |[[Healing Salve II]]{{Rare|nc}}{{Exclusive|nc}}{{Temp|nc}} |
| style="background:#BBE6E6; padding-left:1em;" |{{Abundance|10|230}} |
| style="background:#BBE6E6; padding-left:1em;" |{{Abundance|10|230}} |
||
| − | |- |
+ | |- |
| style="background:#ECD2A5; padding-left:1em;" |[[Hi-Ether +1]] |
| style="background:#ECD2A5; padding-left:1em;" |[[Hi-Ether +1]] |
||
| − | | style="background:#ECD2A5; padding-left:1em;" |{{Abundance|6| |
+ | | style="background:#ECD2A5; padding-left:1em;" |{{Abundance|6|116}} |
| − | | style="background:#BBE6E6; padding-left:1em;" |[[Gnostic's Drink]]{{ |
+ | | style="background:#BBE6E6; padding-left:1em;" |[[Gnostic's Drink]]{{Rare|nc}}{{Exclusive|nc}}{{Temp|nc}} |
| style="background:#BBE6E6; padding-left:1em;" |{{Abundance|7|229}} |
| style="background:#BBE6E6; padding-left:1em;" |{{Abundance|7|229}} |
||
| − | |- |
+ | |- |
| style="background:#ECD2A5; padding-left:1em;" |[[Hi-Potion +3]] |
| style="background:#ECD2A5; padding-left:1em;" |[[Hi-Potion +3]] |
||
| − | | style="background:#ECD2A5; padding-left:1em;" |{{Abundance|8| |
+ | | style="background:#ECD2A5; padding-left:1em;" |{{Abundance|8|116}} |
| − | | style="background:#BBE6E6; padding-left:1em;" |[[Lucid Wings I]]{{ |
+ | | style="background:#BBE6E6; padding-left:1em;" |[[Lucid Wings I]]{{Rare|nc}}{{Exclusive|nc}}{{Temp|nc}} |
| style="background:#BBE6E6; padding-left:1em;" |{{Abundance|10|231}} |
| style="background:#BBE6E6; padding-left:1em;" |{{Abundance|10|231}} |
||
| − | |- |
+ | |- |
| style="background:#ECD2A5; padding-left:1em;" |[[Mythril Ingot]] |
| style="background:#ECD2A5; padding-left:1em;" |[[Mythril Ingot]] |
||
| − | | style="background:#ECD2A5; padding-left:1em;" |{{Abundance|2| |
+ | | style="background:#ECD2A5; padding-left:1em;" |{{Abundance|2|116}} |
| − | | style="background:#BBE6E6; padding-left:1em;" |[[Stalwart's Gambir]]{{ |
+ | | style="background:#BBE6E6; padding-left:1em;" |[[Stalwart's Gambir]]{{Rare|nc}}{{Exclusive|nc}}{{Temp|nc}} |
| style="background:#BBE6E6; padding-left:1em;" |{{Abundance|6|229}} |
| style="background:#BBE6E6; padding-left:1em;" |{{Abundance|6|229}} |
||
| − | |- |
+ | |- |
| style="background:#ECD2A5; padding-left:1em;" |[[Olive Oil]] |
| style="background:#ECD2A5; padding-left:1em;" |[[Olive Oil]] |
||
| − | | style="background:#ECD2A5; padding-left:1em;" |{{Abundance|1| |
+ | | style="background:#ECD2A5; padding-left:1em;" |{{Abundance|1|116}} |
| − | | style="background:#BBE6E6; padding-left:1em;" |[[Dusty Elixir]]{{ |
+ | | style="background:#BBE6E6; padding-left:1em;" |[[Dusty Elixir]]{{Rare|nc}}{{Exclusive|nc}}{{Temp|nc}} |
| style="background:#BBE6E6; padding-left:1em;" |{{Abundance|6|229}} |
| style="background:#BBE6E6; padding-left:1em;" |{{Abundance|6|229}} |
||
| − | |- |
+ | |- |
| style="background:#ECD2A5; padding-left:1em;" |[[Voiddust]] |
| style="background:#ECD2A5; padding-left:1em;" |[[Voiddust]] |
||
| − | | style="background:#ECD2A5; padding-left:1em;" |{{Abundance|1| |
+ | | style="background:#ECD2A5; padding-left:1em;" |{{Abundance|1|116}} |
| − | | style="background:#BBE6E6; padding-left:1em;" |[[Lucid Ether III]]{{ |
+ | | style="background:#BBE6E6; padding-left:1em;" |[[Lucid Ether III]]{{Rare|nc}}{{Exclusive|nc}}{{Temp|nc}} |
| style="background:#BBE6E6; padding-left:1em;" |{{Abundance|10|229}} |
| style="background:#BBE6E6; padding-left:1em;" |{{Abundance|10|229}} |
||
| − | |- |
+ | |- |
| style="background:#ECD2A5; padding-left:1em;" |[[X-Potion +1]] |
| style="background:#ECD2A5; padding-left:1em;" |[[X-Potion +1]] |
||
| − | | style="background:#ECD2A5; padding-left:1em;" |{{Abundance|2| |
+ | | style="background:#ECD2A5; padding-left:1em;" |{{Abundance|2|116}} |
| style="background:#BBE6E6; padding-left:1em;" | |
| style="background:#BBE6E6; padding-left:1em;" | |
||
| style="background:#BBE6E6; padding-left:1em;" | |
| style="background:#BBE6E6; padding-left:1em;" | |
||
| − | |- |
+ | |- |
| style="background:#ECD2A5; padding-left:1em;" |[[Percolator]] |
| style="background:#ECD2A5; padding-left:1em;" |[[Percolator]] |
||
| − | | style="background:#ECD2A5; padding-left:1em;" |{{Abundance|1| |
+ | | style="background:#ECD2A5; padding-left:1em;" |{{Abundance|1|116}} |
| + | | style="background:#BBE6E6; padding-left:1em;" | |
||
| + | | style="background:#BBE6E6; padding-left:1em;" | |
||
|- |
|- |
||
| style="background:#ECD2A5; padding-left:1em;" |[[Rubicund Cell]] |
| style="background:#ECD2A5; padding-left:1em;" |[[Rubicund Cell]] |
||
| − | | style="background:#ECD2A5; padding-left:1em;" |{{Abundance|1| |
+ | | style="background:#ECD2A5; padding-left:1em;" |{{Abundance|1|116}} |
| style="background:#BBE6E6; padding-left:1em;" | |
| style="background:#BBE6E6; padding-left:1em;" | |
||
| style="background:#BBE6E6; padding-left:1em;" | |
| style="background:#BBE6E6; padding-left:1em;" | |
||
| Line 343: | Line 359: | ||
{{TableNPCHeader}} |
{{TableNPCHeader}} |
||
| − | {{TableNPCLine | Name= [[Mashira]]| Coordinates= I-7| Type= Quest NPC}} |
+ | {{TableNPCLine | Name= [[Mashira]]| Coordinates= {{Location Tooltip|area=Garlaige Citadel|map=Map 3|pos=I-7}}| Type= Quest NPC}} |
| − | {{TableNPCLine | Name= [[Wanzo-Unzozo]]| Coordinates= G-6| Type= Quest NPC}} |
+ | {{TableNPCLine | Name= [[Wanzo-Unzozo]]| Coordinates= {{Location Tooltip|area=Garlaige Citadel|map=Map 1|pos=G-6}}| Type= Quest NPC}} |
{{TableNPCFooter}} |
{{TableNPCFooter}} |
||
| Line 369: | Line 385: | ||
{{TableMobHeader-Regular}} |
{{TableMobHeader-Regular}} |
||
| − | {{TableMobLine-Regular | Name= |
+ | {{TableMobLine-Regular | Name=Wingrats| Spawn= | Lvl= 40-42| Drop= [[Bat Fang]] <br>[[Bat Wing]] | Steal= | Family= Bat Trios| NumSpawns= 10<br>Respawn: 14 min| Note= L, H}} |
| − | {{TableMobLine-Regular | Name= |
+ | {{TableMobLine-Regular | Name=Siege Bat| Spawn= | Lvl= 40-43| Drop= [[Bat Fang]] <br>[[Bat Wing]] <br>[[Fiend Blood]] | Steal= | Family= Giant Bats| NumSpawns= 22<br>Respawn: 14 min| Note= L}} |
{{TableMobLine-Regular | Name=Borer Beetle| Spawn= | Lvl= 41-44| Drop= [[Beetle Jaw]] <br>[[Beetle Shell]] <br>[[Insect Wing]] | Steal= | Family= Beetles| NumSpawns= 7<br>Respawn: 14 min| Note=A, S, Sc }} |
{{TableMobLine-Regular | Name=Borer Beetle| Spawn= | Lvl= 41-44| Drop= [[Beetle Jaw]] <br>[[Beetle Shell]] <br>[[Insect Wing]] | Steal= | Family= Beetles| NumSpawns= 7<br>Respawn: 14 min| Note=A, S, Sc }} |
||
| − | {{TableMobLine-Regular | Name= |
+ | {{TableMobLine-Regular | Name=Fallen Evacuee| Spawn= | Lvl= 42-43| Drop= [[Absorb-AGI]] <br>[[Absorb-INT]] <br>[[Absorb-VIT]] <br>[[Bone Chip]] <br>[[Garlaige Key]] | Steal= [[Bone Chip]] | Family= Skeletons| NumSpawns= 6<br>Respawn: 14 min| Note= A, H, HP}} |
| − | {{TableMobLine-Regular | Name= |
+ | {{TableMobLine-Regular | Name=Oil Spill| Spawn= | Lvl= 43-45| Drop= [[Slime Oil]] | Steal= | Family= Slimes| NumSpawns= 2<br>Respawn: 14 min| Note= A, H, Sc}} |
| + | |||
| ⚫ | |||
{{TableMobLine-Regular | Name=Clockwork Pod| Spawn= | Lvl= 44-45| Drop= [[Magic Pot Shard]] <br>[[Mercury]] <br>[[Eastern Pottery]] <br>[[Chrysoberyl]] | Steal= | Family= Magic Pots| NumSpawns= 2<br>Respawn: 14 min| Note= M}} |
{{TableMobLine-Regular | Name=Clockwork Pod| Spawn= | Lvl= 44-45| Drop= [[Magic Pot Shard]] <br>[[Mercury]] <br>[[Eastern Pottery]] <br>[[Chrysoberyl]] | Steal= | Family= Magic Pots| NumSpawns= 2<br>Respawn: 14 min| Note= M}} |
||
| − | {{TableMobLine-Regular | Name= |
+ | {{TableMobLine-Regular | Name=Revenant| Spawn= | Lvl= 44-46| Drop= [[Cotton Cloth]] <br>[[Revival Tree Root]] | Steal= [[Cotton Cloth]]| Family= Ghosts| NumSpawns= 2| Note= A, H, HP}} |
| − | {{TableMobLine-Regular | Name= |
+ | {{TableMobLine-Regular | Name=Citadel Bats| Spawn= | Lvl= 46-48| Drop= [[Bat Fang]] <br>[[Bat Wing]] | Steal= | Family=Bat Trios | NumSpawns=22<br>Respawn: 14 min | Note= A, L, H}} |
| − | {{TableMobLine-Regular | Name= |
+ | {{TableMobLine-Regular | Name=Demonic Weapon| Spawn= | Lvl= 47-49| Drop= | Steal= | Family= Evil Weapons| NumSpawns= 8| Note= A, H, M}} |
| − | {{TableMobLine-Regular | Name= |
+ | {{TableMobLine-Regular | Name= Bhuta| Spawn= | Lvl= 47-49| Drop=[[Cotton Cloth]]<br>[[Revival Tree Root]]<br>[[Luminicloth]] | Steal= [[Cotton Cloth]]| Family= Ghosts| NumSpawns= 4| Note= A, H, HP}} |
| + | |||
| ⚫ | |||
{{TableMobLine-Regular | Name=Explosure| Spawn= | Lvl= 52-53| Drop= [[Bomb Arm]] <br>[[Bomb Ash]] <br>[[Bomb Coal]] <br>[[Garlaige Chest Key]] | Steal= [[Bomb Ash]]| Family= Bombs| NumSpawns= 13| Note= A, S, M}} |
{{TableMobLine-Regular | Name=Explosure| Spawn= | Lvl= 52-53| Drop= [[Bomb Arm]] <br>[[Bomb Ash]] <br>[[Bomb Coal]] <br>[[Garlaige Chest Key]] | Steal= [[Bomb Ash]]| Family= Bombs| NumSpawns= 13| Note= A, S, M}} |
||
| − | {{TableMobLine-Regular | Name= |
+ | {{TableMobLine-Regular | Name= Acid Grease| Spawn= | Lvl= 52-54| Drop= [[Slime Oil]] <br>[[Garlaige Chest Key]] | Steal= | Family= Slimes| NumSpawns= 6| Note=A, H, Sc }} |
| − | {{TableMobLine-Regular | Name= |
+ | {{TableMobLine-Regular | Name=Droma| Spawn= | Lvl= 52-54| Drop= [[Chrysoberyl]] <br>[[Garlaige Chest Key]] <br>[[Jadeite]] <br>[[Magic Pot Shard]] <br>[[Mercury]] | Steal= | Family= Magic Pots| NumSpawns= 12| Note= M}} |
| − | {{TableMobLine-Regular | Name= |
+ | {{TableMobLine-Regular | Name=Earth Elemental| Spawn= ''During Earth Weather''| Lvl= 52-54| Drop= [[Earth Cluster]] | Steal= | Family= Elementals| NumSpawns= 7| Note= M}} |
| ⚫ | |||
{{TableMobLine-Regular | Name=Fallen Officer| Spawn= | Lvl= 52-55| Drop= [[Bone Chip]] <br>[[Garlaige Chest Key]]<br>[[Absorb-INT]]<br>[[Absorb-AGI]]<br>[[Absorb-VIT]] | Steal= [[Bone Chip]] | Family= Skeletons| NumSpawns= 24| Note= A, H, HP}} |
{{TableMobLine-Regular | Name=Fallen Officer| Spawn= | Lvl= 52-55| Drop= [[Bone Chip]] <br>[[Garlaige Chest Key]]<br>[[Absorb-INT]]<br>[[Absorb-AGI]]<br>[[Absorb-VIT]] | Steal= [[Bone Chip]] | Family= Skeletons| NumSpawns= 24| Note= A, H, HP}} |
||
| − | {{TableMobLine-Regular | Name= |
+ | {{TableMobLine-Regular | Name=Funnel Bats| Spawn= | Lvl= 53-55| Drop= [[Bat Fang]] <br>[[Bat Wing]] <br>[[Garlaige Chest Key]] | Steal= | Family= Bat Trios| NumSpawns= 30| Note= A, L, H}} |
{{TableMobLine-Regular | Name=Fetid Flesh| Spawn= | Lvl= 54-56| Drop= [[Garlaige Chest Key]] <br>[[Revival Tree Root]] <br>[[Undead Skin]] | Steal= | Family= Doomed| NumSpawns= 2| Note= A, H, HP}} |
{{TableMobLine-Regular | Name=Fetid Flesh| Spawn= | Lvl= 54-56| Drop= [[Garlaige Chest Key]] <br>[[Revival Tree Root]] <br>[[Undead Skin]] | Steal= | Family= Doomed| NumSpawns= 2| Note= A, H, HP}} |
||
| − | {{TableMobLine-Regular | Name= |
+ | {{TableMobLine-Regular | Name=Chamber Beetle| Spawn= | Lvl= 56-58| Drop=[[Beetle Jaw]] <br>[[Beetle Shell]] <br>[[Insect Wing]] <br>[[Garlaige Chest Key]] | Steal= | Family=Beetles | NumSpawns=20<br>Respawn: 16 min | Note= A, L, S, Sc}} |
| − | {{TableMobLine-Regular | Name= |
+ | {{TableMobLine-Regular | Name=Fallen Mage| Spawn= | Lvl= 59-62| Drop= [[Bone Chip]] <br>[[Garlaige Coffer Key]] <br>[[Blizzard III|Scroll of Blizzard III]] | Steal= [[Bone Chip]] | Family= Skeletons| NumSpawns= 7| Note= A, H, HP}} |
| + | |||
| ⚫ | |||
{{TableMobLine-Regular | Name=Hellmine| Spawn= | Lvl= 59-62| Drop= [[Bomb Arm]] <br>[[Bomb Ash]] <br>[[Garlaige Coffer Key]] | Steal= | Family= Bombs| NumSpawns= 7<br>Respawn: 16 min| Note= A, S, M}} |
{{TableMobLine-Regular | Name=Hellmine| Spawn= | Lvl= 59-62| Drop= [[Bomb Arm]] <br>[[Bomb Ash]] <br>[[Garlaige Coffer Key]] | Steal= | Family= Bombs| NumSpawns= 7<br>Respawn: 16 min| Note= A, S, M}} |
||
| − | |||
| ⚫ | |||
| − | |||
| ⚫ | |||
| − | |||
| ⚫ | |||
{{TableMobLine-Regular | Name=Over Weapon| Spawn= | Lvl= 59-62| Drop= [[Garlaige Coffer Key]] | Steal= | Family= Evil Weapons| NumSpawns= 7| Note= A, H, M}} |
{{TableMobLine-Regular | Name=Over Weapon| Spawn= | Lvl= 59-62| Drop= [[Garlaige Coffer Key]] | Steal= | Family= Evil Weapons| NumSpawns= 7| Note= A, H, M}} |
||
| − | {{TableMobLine-Regular | Name= |
+ | {{TableMobLine-Regular | Name=Vault Weapon| Spawn= | Lvl= 59-62| Drop= [[Garlaige Coffer Key]] | Steal= | Family= Evil Weapons| NumSpawns= 7| Note= A, H, M}} |
| − | {{TableMobLine-Regular | Name= |
+ | {{TableMobLine-Regular | Name=Wraith| Spawn= | Lvl= 60-62| Drop= [[Cotton Cloth]] <br>[[Garlaige Coffer Key]] <br>[[Revival Tree Root]] | Steal= [[Cotton Cloth]]| Family= Ghosts| NumSpawns= 8| Note= A, H, HP}} |
| − | {{TableMobLine-Regular | Name= |
+ | {{TableMobLine-Regular | Name=Magic Jug| Spawn= | Lvl= 62-64| Drop= [[Garlaige Coffer Key]] <br>[[Magic Pot Shard]] <br>[[Mercury]] <br>[[Enaero II|Scroll of Enaero II]] <br>[[Shell IV|Scroll of Shell IV]] | Steal= | Family=Magic Pots | NumSpawns= 6<br>Respawn: 5 min| Note= M}} |
{{TableMobLine-Regular | Name=Tainted Flesh| Spawn= | Lvl= 63-65| Drop= [[Garlaige Coffer Key]] <br>[[Undead Skin]] | Steal= | Family= Doomed| NumSpawns= 4| Note= A, H, HP}} |
{{TableMobLine-Regular | Name=Tainted Flesh| Spawn= | Lvl= 63-65| Drop= [[Garlaige Coffer Key]] <br>[[Undead Skin]] | Steal= | Family= Doomed| NumSpawns= 4| Note= A, H, HP}} |
||
| − | {{TableMobLine-Regular | Name= |
+ | {{TableMobLine-Regular | Name=Donjon Bat| Spawn= | Lvl= 91-96| Drop= [[Bat Wing]] <br>[[Fiend Blood]] | Steal= | Family= Giant Bats| NumSpawns= | Note= }} |
| − | {{TableMobLine-Regular | Name= |
+ | {{TableMobLine-Regular | Name=Kaboom| Spawn= | Lvl= 91-96| Drop= [[Bomb Arm]] <br>[[Bomb Ash]]| Steal=| Family= Bombs| NumSpawns=| Note= A, S, M}} |
| + | |||
| ⚫ | |||
{{TableMobLine-Regular | Name=Warden Beetle| Spawn= | Lvl= 95-98| Drop=[[Beetle Jaw]] <br>[[Beetle Shell]] <br>[[Insect Wing]] | Steal= | Family=Beetles | NumSpawns=?<br>Respawn: 16 min | Note= L, Sc}} |
{{TableMobLine-Regular | Name=Warden Beetle| Spawn= | Lvl= 95-98| Drop=[[Beetle Jaw]] <br>[[Beetle Shell]] <br>[[Insect Wing]] | Steal= | Family=Beetles | NumSpawns=?<br>Respawn: 16 min | Note= L, Sc}} |
||
| − | |||
| ⚫ | |||
| − | |||
| ⚫ | |||
{{TableMobFooter-Regular}} |
{{TableMobFooter-Regular}} |
||
Revision as of 04:27, 23 June 2020
|
Table of Contents
|
Zone Information
| ||||||||||||||||||||||||||||||||||
|
Description
During the Great War, the armies of Altana, led by the first order of the Royal Knights of San d'Oria, reconstructed this underground fortress in hopes of taking the beastmen armies in Sauromugue by surprise. Outfitted with hundreds of troops from all three nations, the forces of Altana were successful in their attacks on the beastmen--until an enemy unit discovered a secret entrance to the citadel. This miscalculation resulted in the slaughter of all within the fortress, dealing a severe blow to the allied forces. 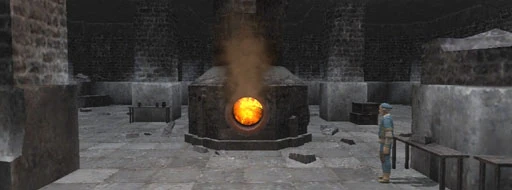 | |||||||||||||||||||||||||||||||||||
|
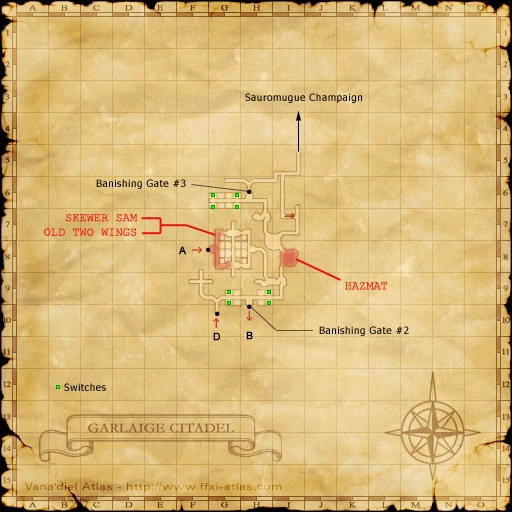
Connections
|
Involved in Quests/Missions

Other Information
|
[ edit ]
[ edit ]
[ edit ]
| |||||||||||||||||||||||||||||||||||||||||||||||||||||||||||||
Individual Training
| Area of Book | Pg | Tgt. Level | Max Level | Mobs to Fight | XP/Gil | Tabs |
|---|---|---|---|---|---|---|
| Garlaige Citadel (G-8) 1st map |
1 | 40~43 | 57 |
|
1160-2320 | 116-232 |
| 2 | 40~44 | 57 | 1160-2320 | 116-232 | ||
| 3 | 46~49 | 63 |
|
1240-2480 | 124-248 | |
| 4 | 51~55 | 68 | 1310-2620 | 131-262 | ||
| 5 | 52~58 | 69 | 1240-2500 | 124-250 | ||
| 6 | 59~62 | 99 |
|
1270~2540 | 127~254 | |
| 7 | 91~96 | 99 |
|
1840-3680 | 184-368 | |
| 8 | 92~96 | 99 | 2220-4440 | 222-444 |
NPCs Found Here
| Name | Location | Type |
|---|---|---|
| Mashira | I-7 | Quest NPC |
| Wanzo-Unzozo | G-6 | Quest NPC |
Notorious Monsters Found Here
| Name | Level | Drops | Steal | Family | Spawns | Notes
|
|---|---|---|---|---|---|---|
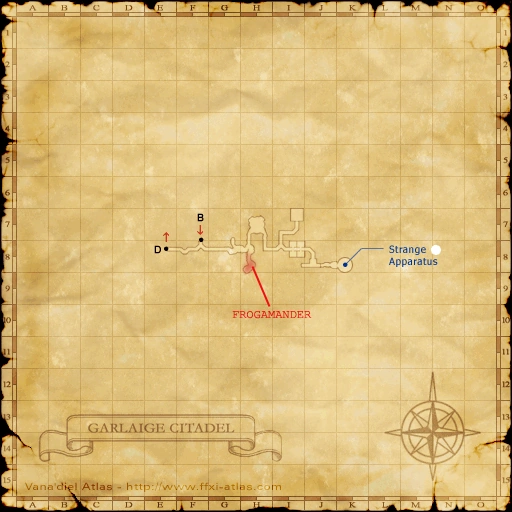
| Frogamander
|
71-73 | Selemnus Belt | Doomed | A, H, HP
| ||
| Hazmat
|
57-58 | Promptitude Solea | Bombs | A, H
| ||
| Old Two-Wings
|
52 | Bat Cape Fiend Blood |
Giant Bats | A, H
| ||
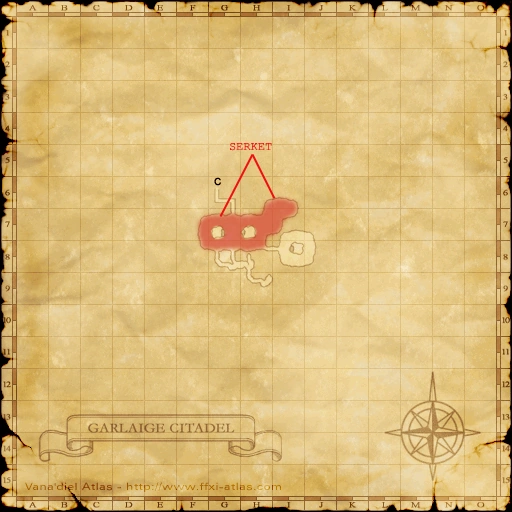
Serket
|
70 | Hi-Reraiser Reraiser Scorpion Claw Scorpion Shell Serket Ring Serket Shield Triple Dagger Venomous Claw Vile Elixir Vile Elixir +1 |
Scorpions | H
| ||
Skewer Sam
|
54 | Cockatrice Skin Wind Spear |
Cockatrice | A, S
| ||
| Hovering Hotpot
|
~60 |
Sleight Kukri | Magic Pots |
|
|
HP = Detects Low HP; M = Detects Magic; Sc = Follows by Scent; T(S) = True-sight; T(H) = True-hearing JA = Detects job abilities; WS = Detects weaponskills; Z(D) = Asleep in Daytime; Z(N) = Asleep at Nighttime; A(R) = Aggressive to Reive participants |
Regular Monsters Found Here
|
HP = Detects Low HP; M = Detects Magic; Sc = Follows by Scent; T(S) = True-sight; T(H) = True-hearing JA = Detects job abilities; WS = Detects weaponskills; Z(D) = Asleep in Daytime; Z(N) = Asleep at Nighttime; A(R) = Aggressive to Reive participants |
Event Monsters Found Here
| Name | Family | Spawns | Notes |
|---|---|---|---|
Chandelier
|
Bombs | 1 | A, S, M |
Guardian Statue
|
Dolls | 1 | A |
|
HP = Detects Low HP; M = Detects Magic; Sc = Follows by Scent; T(S) = True-sight; T(H) = True-hearing JA = Detects job abilities; WS = Detects weaponskills; Z(D) = Asleep in Daytime; Z(N) = Asleep at Nighttime; A(R) = Aggressive to Reive participants |
See Also