|
Enemies
| Monster | Level | Strengths | Weaknesses | Spawns |
Notes |
|---|---|---|---|---|---|
|
5 |
| |||
|
76-78 |
|
|
8 |
A, S, M | |
|
76-78 |
|
|
4 |
L | |
|
76-78 |
|
|
5 |
L | |
|
HP = Detects Low HP; M = Detects Magic; Sc = Follows by Scent; T(S) = True-sight; T(H) = True-hearing JA = Detects job abilities; WS = Detects weaponskills; Z(D) = Asleep in Daytime; Z(N) = Asleep at Nighttime; A(R) = Aggressive to Reive participants | |||||
Drops
|
|
Walkthrough
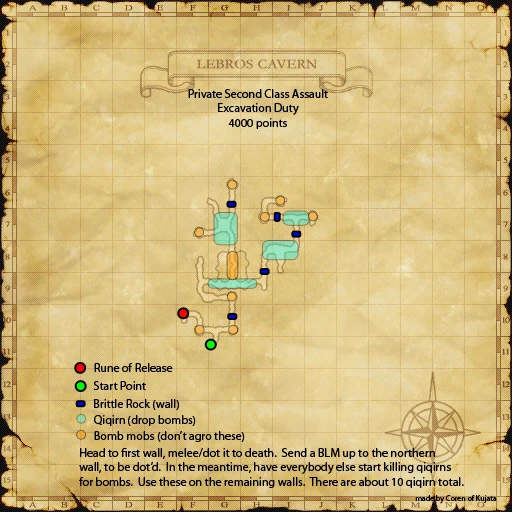
Destroy all of the Brittle Rocks.
- You start at (G-11).
- The party will proceed to the wall at (G-10) and destroy it.
- After the (G-10) wall is down, typically one party member will head to the northern wall at (G-6) to solo it. The rest of the party will destroy the wall at (H-8) and the two at (I-7).
- For specific strategies about how to destroy the walls, refer to Assault Mission - Excavation Duty/Strategy
- Qiqirn Mines will take out the wall in one shot.
- Both kinds of Qiqirn drop Qiqirn Mine temporary items.
- To use a mine, have the person engage the Brittle Rock, use the Qiqirn Mine on it, and stay engaged while it blows it up.
- The mines appear immediately in a player's inventory, without going through the treasure pool.
- The drop rate of these mines may be affected by Treasure Hunter and Moon Phase; you can get more or less than the 4 you need if every Qiqirn is killed.
- Having a bomb Self-Destruct by a wall WILL destroy it completely.
- The bomb must be extremely close to the wall when it blows up. If it is too far away, it will despawn and have no effect on the wall. Getting the positioning correct is said to be difficult.
- You may also need to engage the Brittle Rock for Self-Destruct to take it out.
- The Rune of Release appears at (F-10).
- It takes roughly 2:45 to run from the furthest Brittle Rock at I-7 to the Rune of Release with quickening active. This time will vary if the runner does not have invisible and needs to wait for bombs to move.
Strategy
- The Brittle Rocks will take 0-22 damage from normal melee and magic attacks (uncapped).
- Elemental enfeebles (such as Burn) will never get fully resisted (i.e: "resists the spell" message) by Brittle Rocks, so even a lower level Black or Red Mage may be able to solo the northern wall with the usual DoT strategy regardless of level cap.
- The Qiqirn Ceramists have very high Evasion because they're Thiefs; Sushi and/or Madrigal recommended.
- Weapon Skills are unlikely to perform significantly better at greater than 100 TP. Holding TP will almost certainly lower total damage output.
- Skillchains seem to always produce zero damage. Magic bursting is untested. **Compression and Darkness Skillchains have been seen to do minor damage
- Critcal hits seem to experience some damage limitation, they do not produce damage as proportional high as they would elsewhere.
- The Brittle Rocks are susceptible to Sneak Attack if Hide is used first. Combining Hide with Sneak Attack is a good way to do a 40 damage hit every 5 minutes.
- Thief 60+ can use Trick Attack effectively on the Brittle Rock. It is recommended to only do this with Weapon Skills because melee attacks will not always reach the target when standing behind a teammate, while Weapon Skills have slightly greater range. It has also been observed that more damage is dealt from stacking Trick Attack with a Weapon Skill than performing them separately.
- RDM en-spells generally result in 0 additional DMG. However, with enhancing equipment (eg: Fencer's Ring, Magnetic Earring, Enhancing Sword) en-spells may inflict non-zero damage. A consistent 1 additional DMG, with 0-3 as a range, is commonly reported. *** Tried this with +30 enhancing 75 rdm. Waste of time; nothing above 0 damage.
- Drain Samba will work on the Brittle Rocks. Note however that Drain Samba does not inflict extra damage like en-spell does, though it will allow HP recovery after aggro/Qiqirn fights.
- BLM or RDM might perform better in 60 cap. The walls will have lower HP and Choke, Burn, Shock, and Bio II may do higher relative DoT based on +INT and +Dark Skill gear (reaching 100 INT so that elemental enfeebles produce 4DMG/tic is very important). The walls go down to DoT in about 4 minutes in 60 cap.
- Corsair Card Shot does a consistent amount of DMG every one minute (it can equal WS damage). Combined with Slug Shot this produces excellent DMG output. Also, Corsair buffs help the BLMs and RDMs maintain the MP needed for nonstop nuking and DoT. Corsair can be quite good for this Assault.
- All types of mages should melee in this assault until they need to rest for MP to keep DoTs and nuking consistently. This should not occur often with even rudimentary refresh spells, items or gear.
- Beastmasters and Puppetmasters perform very well in this Assault since the damage caps amplify pets damage relative to players. Automatons WS's will likely match other DDs WS output.
- Due to the per hit damage cut-offs, multi-hit WS tend to produce higher damage output than other WS.
- Damage cut-offs also mean that lower tier nukes tend to produce higher damage/MP ratios than higher tiered nukes. Ancient magics are particularly ineffective here due to their high cast times combined low damage/MP returns.
- Tarutaru should take care to watch their combat log for "out of range" messages while engaged with the Brittle Rocks. Tarutaru just can't reach the rocks if they are positioned poorly!
Map
| Assault | |
|---|---|
| Leujaoam Missions | |
| Mamool Ja Missions | |
| Lebros Missions | |
| Periqia Missions | |
| Ilrusi Missions | |
| Nyzul Isle Missions | |
| Assault Point Rewards | |
| Nyzul Isle Rewards | |