|
Enemies
- Brittle Rock x 5
- Strong to: All magic and melee; 0-18 from normal melee and magic attacks, up to 60 from Weapon Skills; having a bomb Self-Destruct by them WILL destroy them completely, however. (Tested and proven!) Refer to Volcanic Bomb info below for further explanation.
- Weak to: Qiqirn Mines. To use a mine, have the person engage the Brittle Rock, use the Qiqirn Mine on it, and stay engaged while it blows it up. This will take out the wall in one shot. DoT spells such as Bio and Shock also result in a significant amount of damage. Poison and Requiem, however, are fully resisted.
- Volcanic Bomb x 5
- Although these are in this Assault Mission, there is no need to fight them. It will only take up precious time. Invis around them if necessary.
- It has been reported that Self-Destruct can knock out a Brittle Rock if the bomb is extremely close to the wall when it blows up. Getting the positioning correct is said to be difficult. You may also need to engage the Brittle Rock for Self-Destruct to take it out. If it is too far away, it will have no effect on the wall.
- Qiqirn Volcanist (RNG) x 4 / Qiqirn Ceramist (THF) x 5
- Drops: Both Qiqirn drop a Temporary Item called a Qiqirn Mine. These appear immediately in a player's inventory, without going through the treasure pool. The drop rate of these mines may be affected by Treasure Hunter and Moon Phase; you can get more or less than the 4 you need if every Qiqirn is killed.
- Strong to: The Qiqirn Ceramists have very high Evasion because they're Thiefs; Sushi and/or Madrigal recommended.
Drops
|
|
|
Walkthrough
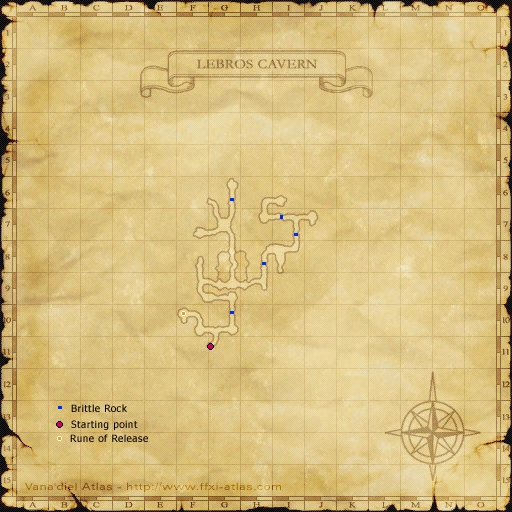
Starting Point: (G-11)
Rune of Release: (F-10)
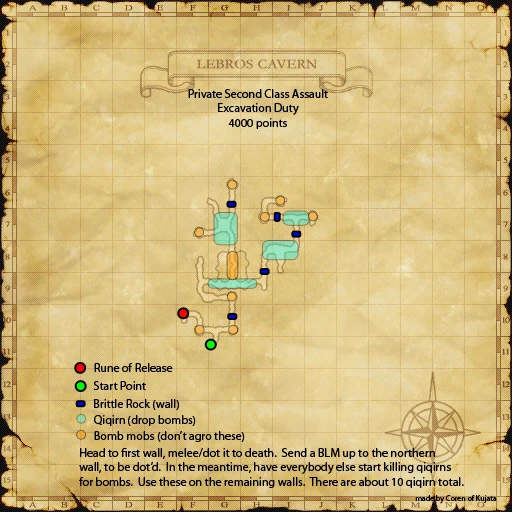
Completion Conditions: Destroy all of the Brittle Rocks.
There are two strategies to choose from for this mission. One involves defeating the Brittle Rocks with DoT, and the other relies on defeating Qirirns to obtain Qiqirn Mines to detonate the rocks. Note: If using the DoT strategy, make sure that against the first Brittle Rock, anyone casting is right up against the wall to avoid the possibility of bomb aggro.
DoT Strategy
Recommended Setup: 3 person party: 1 MNK, NIN, WAR or BST; 1 BLM; 1 RDM/BLM or BLM (or DRK/BLM?) (or Good WHM/BLM*)
- This approach is very MP-efficient and leads quickly to the win, without having to deal with the uncertainty of trying to obtain Qiqirn mines.
- 2 BLM + 1 melee is better than 3 BLM; once the walls are DoTed, a melee DD eating meat will do significantly more damage than an additional BLM's nukes.
- Keep Bio II, Choke, Burn, and Shock up at all times, and cast Drain whenever it is ready. Attack only with Blizzard, Thunder, and Stone II.
- Make sure anyone casting Elemental Debuffs can break 100INT to bring the damage up to 4HP a tick.
- Melee stay Hasted, eat meat, equip Haste, STR and Attack gear, and use Mighty Strikes or Hundred Fists on the first wall.
- After the first wall, one BLM goes north to solo the wall up there while the other two go east.
- The first wall should take approximately 4 minutes to defeat. The north wall should take about 6-8 minutes. The three east walls (which are being worked on at the same time as the north wall) should take approximately 5 minutes each. Your party should complete the mission in about 20-25 minutes.
- It takes approximately 3:00 to run from the final wall at (I-7) to the Rune of Release without any +Movement Speed gear or Flee, so plan accordingly.
- One player can head for the Rune of Release when the last wall drops below 50% and reach the Rune at about the same time that the wall falls.
(* A good WHM/BLM can also replace the RDM/BLM in this run though the WHM will have a harder time keeping up. Yagudo Drink are recomended for any WHM doing this mission and Dia II can be used to replace Bio II in my experiance.)
Qiqirn Mine Strategy
Recommended Setup: Any well-balanced party of 6. Treasure Hunter is reported to help make the Qiqirn Mines drop.
- This strategy relies on Qiqirns dropping Qiqirn Mines for your party. Depending on your luck, you may finish quickly or fail the mission entirely.
- Break down the first wall with normal attacks using the strategy above. Invis past the Volcanic Bombs, as they don't drop anythng you can use, and their Self-Destruct does as much damage as your melee attacks will do.
- If you are using 2hr's during your run, it is best to use them on the first wall because the first wall is the bottleneck preventing you from accessing the Qiqirns on the rest of the map.
- Once you've broken through, defeat the two Qiqirn you'll find at (G-9).
- Defeat the three Qiqirn to the North in (G-7) as well.
- Ignore the Brittle Rock at (G-6) for now; if you blow it up now, you risk running out of mines before you can get to all the Qiqirn.
- The remaining Qiqirn and Brittle Rocks are on the east side of the map. Continue attacking Qiqirns and detonating rocks until you have defeated all five Brittle Rocks. If you run out of Qiqirns and do not have any more Qiqirn Mines then you must defeat the remaining rocks by force.
- Once you have knocked down the first two walls on the east side, someone with a mine should go back to knock down the (G-6) wall.
Brute Force Strategy
Recommended Setup: 1 RDM/BLM or BLM and 3-5 melee
- This strategy is possible after the July 24 update, as melee hits do more damage than before.
- Attack the first wall per DoT strategy above. The mage casts DoTs and hastes the melees.
- Mage goes to solo the north wall using DoTs. After this wall is defeated, the mage goes to the Rune of Release.
- Melees fight the three eastern walls. A DRK is helpful for Bio II and Absorb-TP.
- 4 person setup may require the use of 2-HR abilities. 5 and 6 person strategy are very safe on time and do not need 2-HR.
Game Description
Mission Orders: The Imperial Army plans to traverse Lebros Cavern as part of their attack on Halvung, however the tunnels are blocked with rocks. You must remove the obstructions.
Map