(→Notes) |
m (→Drops) |
||
| Line 123: | Line 123: | ||
! Ancient Lockbox |
! Ancient Lockbox |
||
|- BGCOLOR=#e3e6ff align=center |
|- BGCOLOR=#e3e6ff align=center |
||
| − | | [[Remedy]] |
+ | | [[Remedy]] {{Drop Rate|2|1}} |
|- BGCOLOR=#e3e6ff align=center |
|- BGCOLOR=#e3e6ff align=center |
||
| − | | [[Hi-Potion Plus 3|Hi-Potion +3]] |
+ | | [[Hi-Potion Plus 3|Hi-Potion +3]] {{Drop Rate|1|1}} |
|} |
|} |
||
| Line 131: | Line 131: | ||
{| width=100% |
{| width=100% |
||
|- BGCOLOR=#ffdead |
|- BGCOLOR=#ffdead |
||
| − | ! [[??? Earring]] |
+ | ! [[??? Earring]] {{Drop Rate|1|1}} |
|- BGCOLOR=#e3e6ff align=center |
|- BGCOLOR=#e3e6ff align=center |
||
| − | | [[Storm Loop]] |
+ | | [[Storm Loop]] {{Drop Rate|0|1}} |
|- BGCOLOR=#e3e6ff align=center |
|- BGCOLOR=#e3e6ff align=center |
||
| − | | [[Reraise Earring]] |
+ | | [[Reraise Earring]] {{Drop Rate|0|1}} |
|- BGCOLOR=#e3e6ff align=center |
|- BGCOLOR=#e3e6ff align=center |
||
| − | | [[Beetle Earring]] |
+ | | [[Beetle Earring]]{{Drop Rate|0|1}} |
|- BGCOLOR=#e3e6ff align=center |
|- BGCOLOR=#e3e6ff align=center |
||
| − | | [[Silver Earring]] |
+ | | [[Silver Earring]]{{Drop Rate|1|1}} |
|- BGCOLOR=#e3e6ff align=center |
|- BGCOLOR=#e3e6ff align=center |
||
| − | | [[Bone Earring]] |
+ | | [[Bone Earring]] {{Drop Rate|0|1}} |
|- BGCOLOR=#e3e6ff align=center |
|- BGCOLOR=#e3e6ff align=center |
||
| − | | [[Shell Earring]] |
+ | | [[Shell Earring]] {{Drop Rate|0|1}} |
|} |
|} |
||
| Line 149: | Line 149: | ||
{| width=100% |
{| width=100% |
||
|- BGCOLOR=#ffdead |
|- BGCOLOR=#ffdead |
||
| − | ! [[??? Box]] |
+ | ! [[??? Box]] {{Drop Rate|0|1}} |
|- BGCOLOR=#e3e6ff align=center |
|- BGCOLOR=#e3e6ff align=center |
||
| − | | [[Velvet Cloth]] |
+ | | [[Velvet Cloth]] {{Drop Rate|0|1}} |
|- BGCOLOR=#e3e6ff align=center |
|- BGCOLOR=#e3e6ff align=center |
||
| − | | [[Red Rock]] |
+ | | [[Red Rock]] {{Drop Rate|0|1}} |
|- BGCOLOR=#e3e6ff align=center |
|- BGCOLOR=#e3e6ff align=center |
||
| − | | [[Bomb Ash]] |
+ | | [[Bomb Ash]] {{Drop Rate|0|1}} |
|- BGCOLOR=#e3e6ff align=center |
|- BGCOLOR=#e3e6ff align=center |
||
| − | | [[Sulfur]] |
+ | | [[Sulfur]] {{Drop Rate|0|1}} |
|- BGCOLOR=#e3e6ff align=center |
|- BGCOLOR=#e3e6ff align=center |
||
| − | | [[Copper Ore]] |
+ | | [[Copper Ore]] {{Drop Rate|0|1}} |
|- BGCOLOR=#e3e6ff align=center |
|- BGCOLOR=#e3e6ff align=center |
||
| − | | [[Spartan Bullet Pouch]] |
+ | | [[Spartan Bullet Pouch]] {{Drop Rate|0|1}} |
|- BGCOLOR=#e3e6ff align=center |
|- BGCOLOR=#e3e6ff align=center |
||
| − | | [[Holy Basil]] |
+ | | [[Holy Basil]] {{Drop Rate|0|1}} |
|- BGCOLOR=#e3e6ff align=center |
|- BGCOLOR=#e3e6ff align=center |
||
| − | | [[Troll Pauldron]] |
+ | | [[Troll Pauldron]] {{Drop Rate|0|1}} |
|- BGCOLOR=#e3e6ff align=center |
|- BGCOLOR=#e3e6ff align=center |
||
| − | | [[Bronze Bullet Pouch]] |
+ | | [[Bronze Bullet Pouch]] {{Drop Rate|0|1}} |
|- BGCOLOR=#e3e6ff align=center |
|- BGCOLOR=#e3e6ff align=center |
||
| − | | [[Silver Bullet Pouch]] |
+ | | [[Silver Bullet Pouch]] {{Drop Rate|0|1}} |
|- BGCOLOR=#e3e6ff align=center |
|- BGCOLOR=#e3e6ff align=center |
||
| − | | [[Bullet Pouch]] |
+ | | [[Bullet Pouch]] {{Drop Rate|0|1}} |
|- BGCOLOR=#e3e6ff align=center |
|- BGCOLOR=#e3e6ff align=center |
||
| − | | [[Flan Meat]] |
+ | | [[Flan Meat]] {{Drop Rate|0|1}} |
|} |
|} |
||
Revision as of 13:46, 6 January 2008
|
Enemies
| Monster | Level | Strengths | Weaknesses | Spawns |
Notes |
|---|---|---|---|---|---|
|
5 |
| |||
|
76-78 |
|
|
8 |
A, S, M | |
|
76-78 |
|
|
4 |
L | |
|
76-78 |
|
|
5 |
L | |
|
HP = Detects Low HP; M = Detects Magic; Sc = Follows by Scent; T(S) = True-sight; T(H) = True-hearing JA = Detects job abilities; WS = Detects weaponskills; Z(D) = Asleep in Daytime; Z(N) = Asleep at Nighttime; A(R) = Aggressive to Reive participants | |||||
Drops
|
|
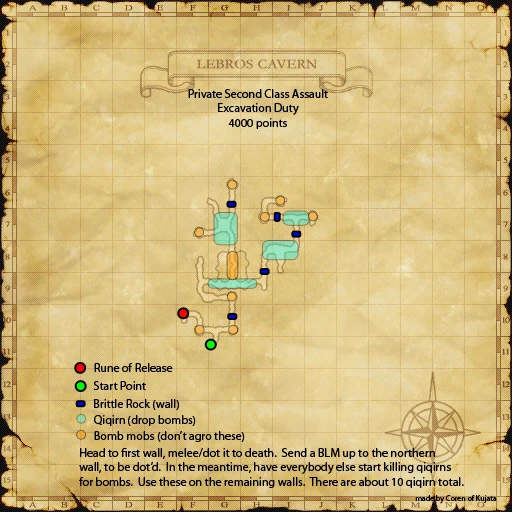
Walkthrough
Destroy all of the Brittle Rocks.
- You start at (G-11).
- The party will proceed to the wall at (G-10) and destroy it.
- After the (G-10) wall is down, typically one party member will head to the northern wall at (G-6) to solo it. The rest of the party will destroy the wall at (H-8) and the two at (I-7).
- For specific strategies about how to destroy the walls, refer to Assault Mission - Excavation Duty/Strategy
- Qiqirn Mines will take out the wall in one shot.
- Both kinds of Qiqirn drop Qiqirn Mine temporary items.
- To use a mine, have the person engage the Brittle Rock, use the Qiqirn Mine on it, and stay engaged while it blows it up.
- The mines appear immediately in a player's inventory, without going through the treasure pool.
- The drop rate of these mines may be affected by Treasure Hunter and Moon Phase; you can get more or less than the 4 you need if every Qiqirn is killed.
- Having a bomb Self-Destruct by a wall WILL destroy it completely.
- The bomb must be extremely close to the wall when it blows up. If it is too far away, it will have no effect on the wall. Getting the positioning correct is said to be difficult.
- You may also need to engage the Brittle Rock for Self-Destruct to take it out.
- The Rune of Release appears at (F-10).
Strategy
See Assault Mission - Excavation Duty/Strategy.
Notes
- The Brittle Rocks will take 0-22 damage from normal melee and magic attacks. They will take up to 70 from Weapon Skills. GKT will do 30 occasionally
- The Qiqirn Ceramists have very high Evasion because they're Thiefs; Sushi and/or Madrigal recommended.
- SAM Weapon Skills seem to have a cap damage of 20 either they are performed at 100 or 300 TP, they can do accordingly also 40 damages when Double Attack kicks in, there also seems to be some sort of limitation regarding Mighty Strikes since it didn't kick in Steel Cyclone, I would have thought it could be a damage cap matter but a Double Attack Steel Cyclone without Mighty Strikes beat a Steel Cyclone with Mighty Strikes and Double Attack. That being said I believe TP modificator doesn't matter for all Weapon Skills when it comes to damages, because the same Steel Cyclone performed with Mighty Strikes had also 300 TP and did 36 while a Steel Cyclone at 100 did 39.
- Thief 60+ can use Trick Attack effectively on the Brittle Rock. It is recommended to only do this with Weapon Skills because melee attacks will not always reach the target when standing behind a teammate, while Weapon Skills have slightly greater range. It has also been observed that more damage is dealt from stacking Trick Attack with a Weapon Skill than performing them separately. Also combining Hide with Sneak Attack is a good way to do a 40 damage hit every 5 minutes.
- Note for RDMs: When fighting the walls, it is usually the Rdm or the Blm to solo the inner wall, Rdm's tend to DoT and melee fight it and don't bother with en-spells. BUT.... with the Enhancing Sword using en-spells will work, doing an average of 0-3 normal melee and a consistant 1 additional dmg.
- If you have 2 or more black or red mages, it might be better to do 60 capped. The walls will have lower HP and Choke, Burn, Shock, and Bio 2 all do the same DoT in capped and uncapped. The walls go down to DoT in about 4 minutes in 60 capped.
- Corsair Card Shot does a consistent amount of dmg, which can equal the damage of the other DD's weapon skills, every one minute. This, combined with slug shot, can equal the damage of 2 forms of damage instead of just one. Also, Corsair buffs help the Blms and Rdms maintain the mp needed for nonstop nuking and DOT. Corsair can be quite good for this Assault.
Map
| Assault | |
|---|---|
| Leujaoam Missions | |
| Mamool Ja Missions | |
| Lebros Missions | |
| Periqia Missions | |
| Ilrusi Missions | |
| Nyzul Isle Missions | |
| Assault Point Rewards | |
| Nyzul Isle Rewards | |
Link title