Byrd (Message Wall | contribs) (→Drops) |
(→Notes: Added thoughts on the Flee strategy) |
||
| Line 159: | Line 159: | ||
* G-8 on the map is common place to encounter Dahaks. It is simple to avoid them. If you enter G-8 from the east, hug the right wall (northen wall) and wait in a corner for the oncoming Dahak to pass. If you enter G-8 from the southwest, hug the southern wall and wait in a corner for the Dahak to pass. |
* G-8 on the map is common place to encounter Dahaks. It is simple to avoid them. If you enter G-8 from the east, hug the right wall (northen wall) and wait in a corner for the oncoming Dahak to pass. If you enter G-8 from the southwest, hug the southern wall and wait in a corner for the Dahak to pass. |
||
* If you are seen by a [[Dahak]], it is possible to lose enmity from it, so long as you do not trigger [[Draw In]]. This is achievable by running away from the [[Dahak]]s but not too far ahead, easily done with a movement ability such as [[Flee]]. After about 20 seconds, as long as you don't trigger [[Draw In]], the [[Dahak]] will turn around and return to its patrol. This is when you do no action to claim it; I have not attempted if you colour its name red through claiming. |
* If you are seen by a [[Dahak]], it is possible to lose enmity from it, so long as you do not trigger [[Draw In]]. This is achievable by running away from the [[Dahak]]s but not too far ahead, easily done with a movement ability such as [[Flee]]. After about 20 seconds, as long as you don't trigger [[Draw In]], the [[Dahak]] will turn around and return to its patrol. This is when you do no action to claim it; I have not attempted if you colour its name red through claiming. |
||
| + | :* This is not an easy way to complete the mission, and requires experience. No solid strategy is given, so it is hard to duplicate with no knowledge of the distance. RNG will prove a much more effective sub for any job in this assault. While it is possible and effective to use [[Flee]], it should not be relied upon for your group if possible. |
||
* An [[Automaton]] fitted with appropriate attachments including a [[Flashbulb]] can be used to neutralize aggro in order to bypass a [[Dahak]] that is in the way or save a team member from dying. See [[Resheph's Golden Salvage Guide for Puppetmasters]] for further details on the macro that is used and how this method works. |
* An [[Automaton]] fitted with appropriate attachments including a [[Flashbulb]] can be used to neutralize aggro in order to bypass a [[Dahak]] that is in the way or save a team member from dying. See [[Resheph's Golden Salvage Guide for Puppetmasters]] for further details on the macro that is used and how this method works. |
||
Revision as of 22:27, 3 September 2008
|
Enemies
| Monster | Level | Strengths | Weaknesses | Spawns |
Notes |
|---|---|---|---|---|---|
|
|
3 |
A, T(S) | ||
|
HP = Detects Low HP; M = Detects Magic; Sc = Follows by Scent; T(S) = True-sight; T(H) = True-hearing JA = Detects job abilities; WS = Detects weaponskills; Z(D) = Asleep in Daytime; Z(N) = Asleep at Nighttime; A(R) = Aggressive to Reive participants | |||||
Drops
|
|
Walkthrough
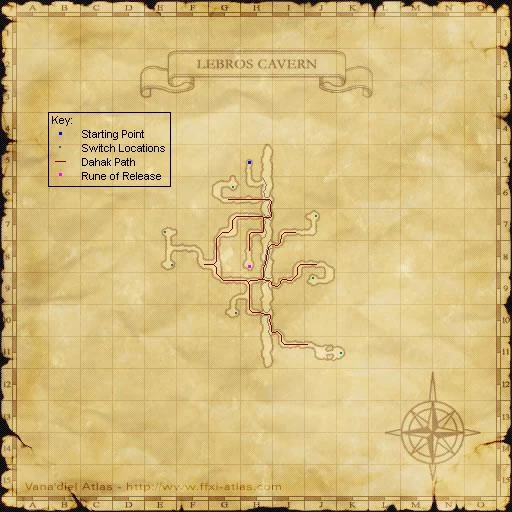
Find 3 Switches located around the area.
- The switches load in 3 of the 7 small rooms on the map.
- When you find a switch select a member of your party to stay guard, preferrably somone who does not have Widescan.
- The 3 switches must be active at the same time in order to spawn the rune of release. They stay active for three minutes after they are hit.
- If you are fortunate enough that both of the westernmost switch locations have switches, one person can hit both switches easily, freeing the rest of the party to check other locations.
- Avoid the Dahak dragons.
- The 3 Dahaks roam the area in a reasonably predictable pattern. Getting past them is just a matter of timing and luck.
- There are rock outcroppings in some paths that you can hide behind to avoid being seen by oncoming Dahaks. Noteable examples include:
- Since these Dahaks only detect by sight, it is possible to follow behind them very closely and sneak off to a sidepath to wait for them to pass by the other way.
- Be very careful if you do this. The Dahaks can and will turn around without any warning.
- Once all 3 switches are active at the same time, the Rune of Release will appear at (H-8).
Notes
- The Dahaks have extremely high HP, and should not be considered something worth killing.
- RNG or BST are very handy to have, even as a subjob, for their widescan. It makes it much easier to track the movements of the dragons, and figure out timing to get past them undetected.
- G-8 on the map is common place to encounter Dahaks. It is simple to avoid them. If you enter G-8 from the east, hug the right wall (northen wall) and wait in a corner for the oncoming Dahak to pass. If you enter G-8 from the southwest, hug the southern wall and wait in a corner for the Dahak to pass.
- If you are seen by a Dahak, it is possible to lose enmity from it, so long as you do not trigger Draw In. This is achievable by running away from the Dahaks but not too far ahead, easily done with a movement ability such as Flee. After about 20 seconds, as long as you don't trigger Draw In, the Dahak will turn around and return to its patrol. This is when you do no action to claim it; I have not attempted if you colour its name red through claiming.
- This is not an easy way to complete the mission, and requires experience. No solid strategy is given, so it is hard to duplicate with no knowledge of the distance. RNG will prove a much more effective sub for any job in this assault. While it is possible and effective to use Flee, it should not be relied upon for your group if possible.
- An Automaton fitted with appropriate attachments including a Flashbulb can be used to neutralize aggro in order to bypass a Dahak that is in the way or save a team member from dying. See Resheph's Golden Salvage Guide for Puppetmasters for further details on the macro that is used and how this method works.
Map
| Assault | |
|---|---|
| Leujaoam Missions | |
| Mamool Ja Missions | |
| Lebros Missions | |
| Periqia Missions | |
| Ilrusi Missions | |
| Nyzul Isle Missions | |
| Assault Point Rewards | |
| Nyzul Isle Rewards | |