| Start NPC | Octavernost - Western Adoulin (K-9, near Big Bridge waypoint) |
|---|---|
| Requirements | Rune Fencer Relic Armor Miniquest completed |
| Items Needed | |
| Title Granted | Sword Saint, upon winning the CL 135 fight |
| Repeatable | Yes, see Armor/Fights section |
| Reward | Erilaz Surcoat, 15000 XP. Depending on the CL of the fight defeated: 10000 bayld or Various crafting materials and a Codex of Etchings, see Walkthrough. |
| ← Previous Quest | Next Quest → |
|---|---|
| Rune Fencer Relic Armor Quests | None |
Walkthrough
- Speak to Octavernost (K-9) in Western Adoulin as a Rune Fencer (he's NOT the same NPC from RUN job quest).
- Go to Outer Ra'Kaznar (M-6) and check the Meeting Point for a cutscene. You will receive
 Refined Ra'Kaznar fiber.
 - Return to Octavernost. He will offer you the choice of three challenges. Each challenge is progressively more difficult than the last. Each fight takes place at one of the three inactive Strange Apparatuses in Vana'diel.
- Choosing Iridal core of the tomb corresponds to a level 109 solo fight in King Ranperre's Tomb.
- Choosing Iridal core of the ruins corresponds to a level 125 Solo fight in Fei'Yin.
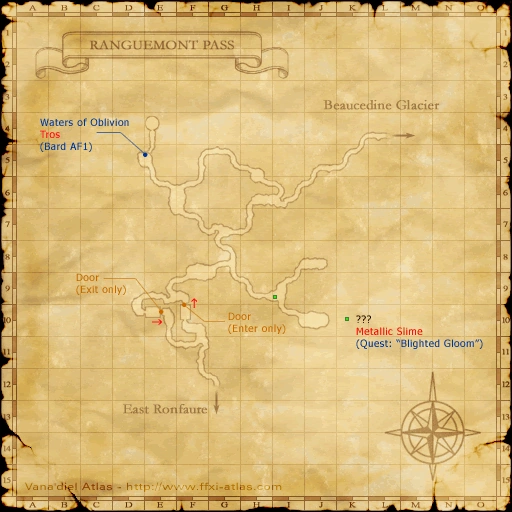
- Choosing the blank option will give you the Iridal core of the pass. This corresponds to a level 135 solo Rune Fencer fight in Ranguemont Pass.
- Choosing
King Ranperre's Tomb
- This is a solo fight. You do not need to have Rune Fencer set on main job to participate. Trusts are allowed for the fight, but Fellows are not. Buffs, reraise and TP will be reset. Time limit on this fight appears to be 5-10 minutes.
- Go to King Ranperre's Tomb (H-10) and examine the ??? in the middle of the west courtyard to enter map 2.
- Walk through the fake wall at (E-8) and head north to (E-7).
- Check the Hazy Rune behind the Strange Apparatus. Check it again to begin the fight.
- Your enemy is Arcus Blades, an Animated Weapon.
- Arcus Blades has access to Dire Whorl, which does minor damage in a small area and inflicts a 5-second Stun
- Arcus Blades will enrage if at any time buffs other than Wards are up on its target. This causes it to gain a significant buff to its casting speed and trigger the casting of Dispelga and higher tier elemental spells.
- Arcus Blades will begin the fight casting spells of same day's element. For example, if popped on Firesday, it will begin casting single target Fire IV, V or VI spells. After every use of Dire Whorl it will switch elements to the next day's element. Putting up a defensive Ward to counter the incoming damage is key to surviving this fight.
- Has low defense and can be killed quickly with 2 powerful weaponskills.
- Warning: The NM can kill a player very quickly with its high-tier fast cast spells.
- Upon defeating Arcus Blades you will earn 10000 bayld, and your Refined Ra'Kaznar fiber will become Arcus fiber.
Fei'Yin
- This is a Solo fight. You do not need to have Rune Fencer set on main job to participate. Trusts are allowed for the fight, but Fellows are not. Buffs and TP will be reset.
- Go to Fei'Yin. Enter map 2 at (G-9), then come back to map 1 at (E-7).
- Go to (G-6) and check the Hazy Rune behind the Strange Apparatus. Check it again to begin the fight.
- Your enemy is Arcus Blades, an Animated Weapon.
- Arcus Blades has access to Dire Whorl, which does minor damage in a small area and inflicts a 5-second Stun
- Arcus Blades will enrage if at any time buffs other than Wards are up on its target. This causes it to gain a significant buff to its casting speed and trigger the casting of Dispelga and higher tier elemental spells.
- Arcus Blades will begin the fight casting spells of same day's element. For example, if popped on Firesday, it will begin casting single target Fire IV, V or VI spells. After every use of Dire Whorl it will switch elements to the next day's element. Putting up a defensive Ward to counter the incoming damage is key to surviving this fight.
- Upon defeating Arcus Blades you will receive , and your Refined Ra'Kaznar fiber will become Arcus fiber.
Ranguemont Pass
- This is a solo fight for Rune Fencers only. Neither Trusts nor Fellows are allowed. Most buffs, including Reraise, those from Enhancing Magic and Ninjutsu will be removed, and TP will be reset to 0. Food buffs remain, as well as buffs such as Vallation or Liement.
- Head to Ranguemont Pass (E-4) and click the Hazy Rune behind the Strange Apparatus to begin the fight against Arcus Blades
- Arcus Blades has access to Dire Whorl, which does minor damage in a small area and inflicts a 5-second Stun
- Arcus Blades will enrage if at any time buffs other than Wards are up on its target. This causes it to gain a significant buff to its casting speed and trigger the casting of Dispelga and higher tier elemental spells.
- Arcus Blades will begin the fight casting spells of same day's element. For example, if popped on Firesday, it will begin casting single target Fire IV, V or VI spells. After every use of Dire Whorl it will switch elements to the next day's element. Predictively applying appropriate runes and putting up a defensive Ward to counter the incoming damage is key to surviving this fight.
- Arcus Blades only has approximately 11,000 HP, but at content level 135 is very evasive. Accuracy food and gear is highly recommended.
- When defeated, The player will obtain 10 crafting materials relevant to the construction of the remaining pieces of Empyrean Armor, and a Codex of Etchings. These items are not added to the treasure pool, they are immediately added to the player's inventory, so make sure you have 11 empty inventory spots before the fight. Furthermore, your Refined Ra'Kaznar fiber will become Arcus fiber.
Finishing Up
- Return to Octavernost (optional).
- Check Amchuchu's Laboratory (J-10) in Western Adoulin for a cutscene. You will lose your reward key item.
- Wait one game day, then talk to Octavernost for your reward: 15000 XP and Erilaz Surcoat.
Armor/Fights
- Speak to Octavernost to receive a new Key Item to repeat a fight. Should you lose the fight, you can reacquire the KI for unlimited times. And if you win the fight, he will only provide a new KI after Conquest Tally.
- Octavernost provides free instant warp to the Strange Apparatus location matching the KI of your choice: First, speak to him and receive the KI of your choosing. Then, speak to him again and ask about KI again. Inside the KI menu, go down to the bottom, and there will be an option to let him "beam you up" to the appropriate Strange Apparatus.
- Speak to Octavernost to commission additional armor pieces. When you trade him the required materials, you will receive an Order slip representing the commissioned piece. The next in game day, you will receive the corresponding armor piece and can commission work on another piece from Octavernost until you have the complete set.
- If you drop, upgrade or store your Erilaz armor, you may reacquire any piece from the set by trading him the materials a second time. You must still wait until the next in-game day to retrieve your item once you have received the order slip.
- If you finish Quiescence, you only need a single Isgebind's Heart or half as much bayld (rounded down). Consult
Without Quiescence finished
| Armor Piece | Ingredients | |||
|---|---|---|---|---|
to trade for Erilaz Galea |
Isgebind's Heart | Molybdenum Ingot | Molybdenum Ore | |
| OR | ||||
| 15 High-purity Bayld | ||||
to trade for Erilaz Surcoat |
Isgebind's Heart | Galateia | Molybdenum Ingot | |
| OR | ||||
| 30 High-purity Bayld | ||||
to trade for Erilaz Gauntlets |
Isgebind's Heart | Flocon-de-mer | Cerberus Hide | |
| OR | ||||
| 10 High-purity Bayld | ||||
to trade for Erilaz Leg Guards |
Isgebind's Heart | Galateia | Cerberus Hide | |
| OR | ||||
| 25 High-purity Bayld | ||||
to trade for Erilaz Greaves |
Isgebind's Heart | Molybdenum Ingot | Cerberus Hide | |
| OR | ||||
| 20 High-purity Bayld | ||||
With Quiescence finished
| Armor Piece | Ingredients | |||
|---|---|---|---|---|
to trade for Erilaz Galea |
Isgebind's Heart | |||
| OR | ||||
| 7 High-purity Bayld | ||||
to trade for Erilaz Surcoat |
Isgebind's Heart | |||
| OR | ||||
| 15 High-purity Bayld | ||||
to trade for Erilaz Gauntlets |
Isgebind's Heart | |||
| OR | ||||
| 5 High-purity Bayld | ||||
to trade for Erilaz Leg Guards |
Isgebind's Heart | |||
| OR | ||||
| 12 High-purity Bayld | ||||
to trade for Erilaz Greaves |
Isgebind's Heart | |||
| OR | ||||
| 10 High-purity Bayld | ||||
Game Description
- Client
- Octavernost (Big Bridge Western Adoulin (K-9)
- Summary
- Octavernost has enlisted your aid in a secret project headed by Amchuchu herself.