Ojba (Message Wall | contribs) No edit summary |
(Formatting) |
||
| (29 intermediate revisions by 20 users not shown) | |||
| Line 1: | Line 1: | ||
| − | [[Category:Bestiary]][[Category:Notorious Monsters]][[Category:Dynamis]] |
+ | [[Category:Bestiary]][[Category:Notorious Monsters]][[Category:Dynamis]][[Category:Shadow Lords]] |
{| border="0" width="100%" |
{| border="0" width="100%" |
||
|width="50%" align="left" valign="center"| |
|width="50%" align="left" valign="center"| |
||
'''Job:''' [[Warrior]]/[[Monk]]/[[Red Mage]]/[[Dark Knight]]<br> |
'''Job:''' [[Warrior]]/[[Monk]]/[[Red Mage]]/[[Dark Knight]]<br> |
||
| + | '''Family:''' [[:Category:Shadow Lords|Shadow Lords]]<br> |
||
'''Title Obtained:''' Lifter of Shadows |
'''Title Obtained:''' Lifter of Shadows |
||
| Line 18: | Line 19: | ||
{{question}} |
{{question}} |
||
|<!--Please update all drop rates--> |
|<!--Please update all drop rates--> |
||
| − | *[[100 Byne Bill]] {{Drop Rate| |
+ | *[[100 Byne Bill]] {{Drop Rate| 11|86}} |
| − | *[[ |
+ | *[[Fiendish Tome: Chapter 26]] {{Drop Rate| 3|3}} |
| − | *[[ |
+ | *[[Lungo-Nango Jadeshell]] {{Drop Rate| 30|86}} |
| − | *[[ |
+ | *[[Montiont Silverpiece]] {{Drop Rate| 15|86}} |
| − | *[[Shadow |
+ | *[[Shadow Mantle]] {{Drop Rate| 45|86}} |
| + | *[[Shadow Ring]] {{Drop Rate| 19|86}} |
||
| + | *{{KeyItem}}[[Hydra Corps Battle Standard]] {{Drop Rate|100%}} |
||
| |
| |
||
|align="center"|1 |
|align="center"|1 |
||
|align="center"|A, L, T(S) |
|align="center"|A, L, T(S) |
||
| + | {{HPMP|low hp=81000|high hp=|low mp=|high mp=}} |
||
|- |
|- |
||
|align="center" colspan="6" BGCOLOR="#ffdead"| |
|align="center" colspan="6" BGCOLOR="#ffdead"| |
||
| Line 31: | Line 35: | ||
|} |
|} |
||
<br> |
<br> |
||
| − | {| |
+ | {| width="60%" cellspacing="1" cellpadding="2" border="0" bgcolor="#e3e6ff" |
|- |
|- |
||
|BGCOLOR="#ffdead" width="100%" align="center" |<big>'''Special Attacks:'''</big> |
|BGCOLOR="#ffdead" width="100%" align="center" |<big>'''Special Attacks:'''</big> |
||
| Line 39: | Line 43: | ||
|BGCOLOR="#FFE4E1" |'''[[Mana Storm]]:''' [[AoE]] [[Aspir]] |
|BGCOLOR="#FFE4E1" |'''[[Mana Storm]]:''' [[AoE]] [[Aspir]] |
||
|- |
|- |
||
| − | | |
+ | | bgcolor="#FFE4E1" |'''[[Tera Slash]]:''' [[Cone Attack]] high damage, ignores [[Utsusemi]]. Chance to Insta-Death (when his HP<25%{{Verification}}). |
|- |
|- |
||
| − | | |
+ | | bgcolor="#FFE4E1" |'''[[Violent Rupture]]:''' [[AoE]] damage with [[Knockback]] and [[Weight]] that overwrites [[Flee (Status Effect)|Flee]], absorbed by multiple [[Utsusemi]] shadows |
|- |
|- |
||
| − | | |
+ | | bgcolor="#FFE4E1" |'''[[Oblivion Smash]]:''' Extreme [[AoE]] damage, absorbed by multiple(2-3) [[Utsusemi]] shadows |
|- |
|- |
||
| − | | |
+ | | bgcolor="#FFE4E1" |'''[[Dynamic Assault]]:''' Single target physical damage |
|- |
|- |
||
| − | | |
+ | | bgcolor="#FFE4E1" |'''[[Dynamic Implosion]]:''' [[AoE]] physical damage and [[Stun]] |
|- |
|- |
||
| − | | |
+ | | width="100%" bgcolor="#ffdead" align="center" |<big>'''[[Two Hour Ability|Two Hour Abilities]]:'''</big> |
|- |
|- |
||
| − | | |
+ | | bgcolor="#FFE4E1" |'''[[Hundred Fists]]''' |
|- |
|- |
||
| − | | |
+ | | bgcolor="#FFE4E1" |'''[[Mighty Strikes]]''' |
|- |
|- |
||
| − | | |
+ | | bgcolor="#FFE4E1" |'''[[Blood Weapon]]''' |
|- |
|- |
||
| − | | |
+ | | bgcolor="#FFE4E1" |'''[[Chainspell]]''' |
|- |
|- |
||
| − | | |
+ | | width="100%" bgcolor="#ffdead" align="center" |<big>'''[[Magic]]:'''</big> |
|- |
|- |
||
| − | | |
+ | | bgcolor="#FFE4E1" |'''[[Bindga]]''' |
|- |
|- |
||
| − | | |
+ | | bgcolor="#FFE4E1" |'''[[Slowga]]''' |
|- |
|- |
||
| − | | |
+ | | bgcolor="#FFE4E1" |'''[[Silencega]]''' |
|- |
|- |
||
| − | | |
+ | | bgcolor="#FFE4E1" |'''[[Dispelga]]''' |
|- |
|- |
||
| − | | |
+ | | bgcolor="#FFE4E1" |'''[[Breakga]]''' |
|- |
|- |
||
| − | | |
+ | | bgcolor="#FFE4E1" |'''[[Sleepga]]''' |
|- |
|- |
||
| − | | |
+ | | bgcolor="#FFE4E1" |'''[[Death]]''' |
|- |
|- |
||
| − | | |
+ | | bgcolor="#FFE4E1" |'''All tier 3 -ga spells''' |
|- |
|- |
||
| − | | |
+ | | width="100%" bgcolor="#ffdead" align="center" |''Note: these spells all have near instant casting time'' |
|} |
|} |
||
| − | + | ==Notes== |
|
| + | *Spawned by trading a [[Shrouded Bijou]] to the ??? in front of Castle Zvahl. |
||
| − | :*Spawns at Castle Zvahl with [[Ying]] & [[Yang]] when the [[Dynamis - Xarcabard#Kindred|15 Kindred NMs]] are defeated. |
||
| + | *Immune to Silence but appears susceptible to Addle and Paralyze. |
||
| − | :*The Dynamis Lord is invulnerable to all magical and physical attacks unless [[Ying]] and [[Yang]] are both killed (this does not apply to the resummoned Ying and Yang - only the initial spawns in front of Castle Zvahl). [[Ying]] and [[Yang]] must be defeated within 20 seconds of each other, or they will revive at full health. |
||
| + | *At some point, Dynamis Lord summons [[Ying]] and [[Yang]]. |
||
| − | :*At some point, he will resummon [[Ying]] and [[Yang]] to help him. They will attack whomever the Dynamis Lord is attacking, and he will keep summoning them again if you kill them. If Dynamis Lord is defeated, they will automatically die as well. |
||
| + | **[[Ying]] and [[Yang]] must be defeated within 20 seconds of each other or they revive at full health. |
||
| − | :*Killable by: 10+ characters level 70-75 (using zerg methods) |
||
| + | **They are eventually resummoned even after being defeated. |
||
| − | :*He has around 81,000 [[HP]]. |
||
| + | **[[Ying]] and [[Yang]] share [[enmity]] with Dynamis Lord. |
||
| − | :*The [[Dynamis Lord]] is one of the most damaging enemies in the entire game. The longer the battle is, the lower your chances are of beating him. It's best to tackle him with an all-out offense. |
||
| ⚫ | |||
| − | :*[[Feint]], [[Angon]], and [[Dia III]] are invaluable aids for this fight. |
||
| + | *Can drop both the [[Shadow Ring]] and the [[Shadow Mantle]] at the same time. |
||
| − | :*Defeating the [[Dynamis Lord]] usually involves RDM/DRK using [[Chainspell]] [[Stun]] in order to block his '''Oblivion Smash'''. It can be absorbed by 2 shadows from [[Utsusemi]], but it is highly suggested your group have at least 3 RDM/DRKs or more. It is a vital point in order to defeat him. |
||
| + | *Defeating the Dynamis Lord grants the {{KeyItem}}[[Hydra Corps Battle Standard]] and the title '''Dynamis - Xarcabard Interloper''' for clearing [[Dynamis - Xarcabard]]. |
||
| − | :*An excellent method to ensure '''Oblivion Smash''' is blocked is by having two RDM/DRKs Chainspell Stun for every minute of the battle. If timed correctly, they should be stunning about a second out of sync with each other. This will mean the Dynamis Lord is being stunned at least once a second, which more or less prevents any TP moves from executing (one fight for our group resulted in zero casualties using this dual-Stunning method). |
||
| + | *Can be defeated by around 10 characters at around levels 70-75. |
||
| ⚫ | |||
| + | [[Talk:Dynamis_Lord#Strategies_and_Testimonials|''(See Strategies and Testimonials)'']] |
||
| − | :*[[Ying]] and [[Yang]] share their hate with Dynamis Lord, making them extremely difficult to take enough hate to kite away long enough to finish the fight without major casualties. |
||
| − | :*Dynamis Lord frequently starts off the fight with [[Sleepga]] or [[Bindga]] on the whole alliance. Everyone fighting Dynamis Lord should begin by drinking a [[Poison Potion]] or [[Venom Potion]], and [[White Mage]]s should be prepared for [[Divine Seal]] [[Erase]] at or near the start of the fight. |
||
| − | :*Click the [[???]] left behind after killing Dynamis Lord to obtain the [[Hydra Corps Battle Standard|key item]], for winning [[Dynamis - Xarcabard]], and the title "Dynamis - Xarcabard Interloper". Those in the killing alliance receive an additional NM title of "Lifter of Shadows". |
||
| − | :*Unlike other Dynamis bosses, defeating the Dynamis Lord ''does not'' grant a time extension. |
||
| − | :* '''TP-Burn Strategy:''' [[Dynamis Lord]] can easily be killed via one full alliance of melees, including one bard per party, and 1 Corsair per party about 4 RDM/DRKs (staggering [[Chainspell]]+[[Stun]]; the next RDM starts his chainstuns before the previous RDM finishes to ensure that there are no gaps in the chainstuns). The three parties initially begin with DDx4 COR and BRD. Each BRD is assigned one song among: [[March]], [[Madrigal]], or [[Minuet]]. The three bards 2hr at the same time, and also use [[Troubadour]] and [[Nightingale]]. After each bard does his two songs (e.g. two highest [[March]] songs), they drop and join the next party, and continue this sequence until all three parties each have six songs (meanwhile WHMs outside the alliance [[Haste]] the melees).Corsairs all roll for their parties usually [[Chaos Roll]] / [[Samurai Roll]] or [[Fighter's Roll]]. All bards drop and WHMs are invited to each party (to use [[Benediction]] in case [[Slowga]] or any other negative status effect is cast at the start by the [[Dynamis Lord]]. Once all melee are sent in and start, the Corsairs run in (usually about 30 secs or so after melee ran in) and use [[Wild Card]] to reset 2hr abilities and Job abilities.with this setup, the fight typically lasts about 30-45 seconds; aside from poison potions, no other items (TP wing, Opo-Opo Necklace, etc) are needed. [[Dynamis Lord]] Should be killed in roughly 1-2 minutes. |
||
| − | :*Can drop both shadow ring and mantle on same run. |
||
| − | ---- |
||
| − | == Video == |
+ | == Video == |
| + | See the [[/Video|Video page]]. |
||
| − | Vengabus Sylph 19 Man. |
||
| − | <youtube>D3Qs61HPHio</youtube> |
||
Revision as of 20:02, 3 February 2020
|
Job: Warrior/Monk/Red Mage/Dark Knight Mega Boss |
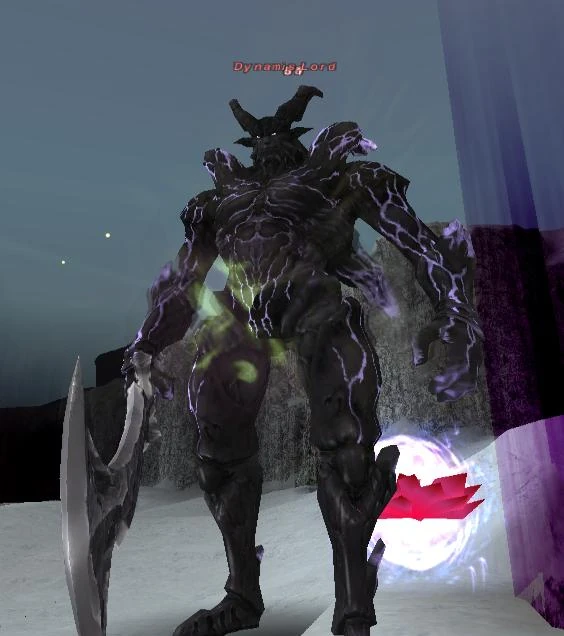 Dynamis Lord |
| Zone | Level | Drops | Steal | Spawns | Notes |
|---|---|---|---|---|---|
|
|
1 | A, L, T(S) | |||
|
HP = Detects Low HP; M = Detects Magic; Sc = Follows by Scent; T(S) = True-sight; T(H) = True-hearing JA = Detects job abilities; WS = Detects weaponskills; Z(D) = Asleep in Daytime; Z(N) = Asleep at Nighttime; A(R) = Aggressive to Reive participants | |||||
| Special Attacks: |
| Transfusion: AoE Drain |
| Mana Storm: AoE Aspir |
| Tera Slash: Cone Attack high damage, ignores Utsusemi. Chance to Insta-Death (when his HP<25% |
| Violent Rupture: AoE damage with Knockback and Weight that overwrites Flee, absorbed by multiple Utsusemi shadows |
| Oblivion Smash: Extreme AoE damage, absorbed by multiple(2-3) Utsusemi shadows |
| Dynamic Assault: Single target physical damage |
| Dynamic Implosion: AoE physical damage and Stun |
| Two Hour Abilities: |
| Hundred Fists |
| Mighty Strikes |
| Blood Weapon |
| Chainspell |
| Magic: |
| Bindga |
| Slowga |
| Silencega |
| Dispelga |
| Breakga |
| Sleepga |
| Death |
| All tier 3 -ga spells |
| Note: these spells all have near instant casting time |
Notes
- Spawned by trading a Shrouded Bijou to the ??? in front of Castle Zvahl.
- Immune to Silence but appears susceptible to Addle and Paralyze.
- At some point, Dynamis Lord summons Ying and Yang.
- The Dynamis Lord can create copies of itself while using special abilities, shifting its place and causing target lock to be released. These copies perish soon afterwards.
- Can drop both the Shadow Ring and the Shadow Mantle at the same time.
- Defeating the Dynamis Lord grants the
 Hydra Corps Battle Standard and the title Dynamis - Xarcabard Interloper for clearing Dynamis - Xarcabard.
 - Can be defeated by around 10 characters at around levels 70-75.
(See Strategies and Testimonials)
Video
See the Video page.