No edit summary |
Tags: Visual edit apiedit |
||
| (35 intermediate revisions by 20 users not shown) | |||
| Line 1: | Line 1: | ||
| − | [[Category:Areas]][[Category:Dynamis]] |
+ | [[Category:Areas]][[Category:Dynamis]] |
[[de:Dynamis - San d'Oria]] |
[[de:Dynamis - San d'Oria]] |
||
| + | {{Zone Infobox |
||
| − | __NOTOC__ |
||
| + | | ToC = [[#Treasure|Treasure]] • [[#Monsters Found Here|Monsters]] • [[#Notorious Monsters|NMs]] |
||
| ⚫ | |||
| + | | Description = |
||
| + | | Connections = Entered via '''Trail Markings''' in [[Southern San d'Oria]] (''L-5'') |
||
| + | | HELM = None |
||
| + | | Stats = {{Tractor}} |
||
| + | | Region = Dynamis |
||
| + | | Type = Outdoors |
||
| + | | Map Acquisition = [[Map of Dynamis - San d'Oria|Purchase]] |
||
| + | | Restrictions = 1-hour time limit |
||
| + | | Requirements = Rank 6<br>Level 65<br>{{KeyItem}}[[Vial of Shrouded Sand]]<br>{{KeyItem}}[[Prismatic Hourglass]] |
||
| + | | Expansion = [[Rise of the Zilart]] |
||
| + | | Weather = {{Zone Icon|dark}}{{Zone Icon|dark}} |
||
| + | | BGM = "Shadow Lord" |
||
| ⚫ | |||
| ⚫ | |||
|width="70%" valign="top"| |
|width="70%" valign="top"| |
||
{|cellpadding="5" width="100%" cellspacing="3" cellpadding="0" |
{|cellpadding="5" width="100%" cellspacing="3" cellpadding="0" |
||
| − | |valign="top" width="30%" BGCOLOR="#e3e6ff"| |
+ | |valign="top" width="30%" BGCOLOR="#e3e6ff"| '''Trail Markings:''' |
| − | |valign="top" BGCOLOR="#E0E0E0"| |
+ | |valign="top" BGCOLOR="#E0E0E0"| [[Southern San d'Oria]] (''L-5'') |
|- |
|- |
||
| − | |valign="top" BGCOLOR="#e3e6ff"| |
+ | |valign="top" BGCOLOR="#e3e6ff"| '''Boss:''' |
| − | |valign="top" BGCOLOR="#E0E0E0"| |
+ | |valign="top" BGCOLOR="#E0E0E0"| [[Overlord's Tombstone]] |
| − | * Level 65 or higher. |
||
| − | * Completion of Mission 5-2 for your nation. |
||
|- |
|- |
||
| − | |valign="top" BGCOLOR="#e3e6ff"| |
+ | |valign="top" BGCOLOR="#e3e6ff"| '''Title:''' |
| − | |valign="top" BGCOLOR="#E0E0E0"| |
+ | |valign="top" BGCOLOR="#E0E0E0"| Dynamis-San d'Oria Interloper |
|- |
|- |
||
| − | |valign="top" BGCOLOR="#e3e6ff"| |
+ | |valign="top" BGCOLOR="#e3e6ff"| '''Repeatable:''' |
| − | |valign="top" BGCOLOR="#E0E0E0"| |
+ | |valign="top" BGCOLOR="#E0E0E0"| After [[Japanese Midnight]] |
|- |
|- |
||
| − | |valign="top" BGCOLOR="#e3e6ff"| |
+ | |valign="top" BGCOLOR="#e3e6ff"| '''Reward:''' |
| − | |valign="top" BGCOLOR="#E0E0E0"| |
+ | |valign="top" BGCOLOR="#E0E0E0"| {{KeyItem}} [[Hydra Corps Command Scepter]] |
| ⚫ | |||
| ⚫ | |||
| − | |valign="top" BGCOLOR="#E0E0E0"| Yes (after 72 hours real time) |
||
| ⚫ | |||
| − | |valign="top" BGCOLOR="#e3e6ff"| '''Reward:''' |
||
| − | |valign="top" BGCOLOR="#E0E0E0"| Key Item: [[Hydra Corps Command Scepter]] |
||
|} |
|} |
||
| − | |||
==Treasure== |
==Treasure== |
||
{|cellpadding="5" width="100%" cellspacing="3" cellpadding="0" |
{|cellpadding="5" width="100%" cellspacing="3" cellpadding="0" |
||
| − | |valign="top" width=" |
+ | |valign="top" width="35%" rowspan="2" BGCOLOR="#e3e6ff"| '''Ancient Currency:''' |
| − | |BGCOLOR="#E0E0E0"| |
+ | |BGCOLOR="#E0E0E0"| [[Ordelle Bronzepiece]] |
|- |
|- |
||
| − | |BGCOLOR="#E0E0E0"| |
+ | |BGCOLOR="#E0E0E0"| [[Montiont Silverpiece]] |
|- |
|- |
||
| − | |valign="top" rowspan="7" BGCOLOR="#e3e6ff"| |
+ | |valign="top" rowspan="7" BGCOLOR="#e3e6ff"| '''Items:''' |
| − | |BGCOLOR="#E0E0E0"| |
+ | |BGCOLOR="#E0E0E0"| [[Fresh Orc Liver]] |
|- |
|- |
||
| − | |BGCOLOR="#E0E0E0"| |
+ | |BGCOLOR="#E0E0E0"| [[Griffon Hide]] |
|- |
|- |
||
| − | |BGCOLOR="#E0E0E0"| |
+ | |BGCOLOR="#E0E0E0"| [[Giant Frozen Head]] |
|- |
|- |
||
| − | |BGCOLOR="#E0E0E0"| |
+ | |BGCOLOR="#E0E0E0"| [[Gold Beastcoin]] |
|- |
|- |
||
| − | |BGCOLOR="#E0E0E0"| |
+ | |BGCOLOR="#E0E0E0"| [[Infinity Core]] |
|- |
|- |
||
| − | |BGCOLOR="#E0E0E0"| |
+ | |BGCOLOR="#E0E0E0"| [[Mythril Beastcoin]] |
|- |
|- |
||
| − | |BGCOLOR="#E0E0E0"| |
+ | |BGCOLOR="#E0E0E0"| [[Sparkling Stone]] |
|- |
|- |
||
| − | |valign="top" rowspan="4" BGCOLOR="#e3e6ff"| |
+ | |valign="top" rowspan="4" BGCOLOR="#e3e6ff"| '''Relic Weapons:''' |
| − | |BGCOLOR="#E0E0E0"| |
+ | |BGCOLOR="#E0E0E0"| [[Ihintanto]] (NIN) |
|- |
|- |
||
| − | |BGCOLOR="#E0E0E0"| |
+ | |BGCOLOR="#E0E0E0"| [[Relic Bhuj]] (WAR) |
|- |
|- |
||
| − | |BGCOLOR="#E0E0E0"| |
+ | |BGCOLOR="#E0E0E0"| [[Relic Gun]] (RNG) |
|- |
|- |
||
| − | |BGCOLOR="#E0E0E0"| |
+ | |BGCOLOR="#E0E0E0"| [[Relic Lance]] (DRG) |
|- |
|- |
||
| − | |valign="top" rowspan="15" BGCOLOR="#e3e6ff"| |
+ | |valign="top" rowspan="15" BGCOLOR="#e3e6ff"| '''Relic Armor:''' |
| − | |BGCOLOR="#E0E0E0"| |
+ | |BGCOLOR="#E0E0E0"| [[Warrior's Calligae]] (WAR Feet) |
|- |
|- |
||
| − | |BGCOLOR="#E0E0E0"| |
+ | |BGCOLOR="#E0E0E0"| [[Melee Hose]] (MNK Legs) |
|- |
|- |
||
| − | |BGCOLOR="#E0E0E0"| |
+ | |BGCOLOR="#E0E0E0"| [[Cleric's Cap]] (WHM Head) |
|- |
|- |
||
| − | |BGCOLOR="#E0E0E0"| |
+ | |BGCOLOR="#E0E0E0"| [[Duelist's Boots]] (RDM Feet) |
|- |
|- |
||
| − | |BGCOLOR="#E0E0E0"| |
+ | |BGCOLOR="#E0E0E0"| [[Valor Gauntlets]] (PLD Hands) |
|- |
|- |
||
| − | |BGCOLOR="#E0E0E0"| |
+ | |BGCOLOR="#E0E0E0"| [[Monster Trousers]] (BST Legs) |
|- |
|- |
||
| − | |BGCOLOR="#E0E0E0"| |
+ | |BGCOLOR="#E0E0E0"| [[Bard's Roundlet]] (BRD Head) |
|- |
|- |
||
| − | |BGCOLOR="#E0E0E0"| |
+ | |BGCOLOR="#E0E0E0"| [[Scout's Braccae]] (RNG Legs) |
|- |
|- |
||
| − | |BGCOLOR="#E0E0E0"| |
+ | |BGCOLOR="#E0E0E0"| [[Koga Hakama]] (NIN Legs) |
|- |
|- |
||
| − | |BGCOLOR="#E0E0E0"| |
+ | |BGCOLOR="#E0E0E0"| [[Wyrm Greaves]] (DRG Feet) |
|- |
|- |
||
| − | |BGCOLOR="#E0E0E0"| |
+ | |BGCOLOR="#E0E0E0"| [[Summoner's Pigaches]] (SMN Feet) |
|- |
|- |
||
| − | |BGCOLOR="#E0E0E0"| |
+ | |BGCOLOR="#E0E0E0"| [[Mirage Bazubands]] (BLU Hands) |
|- |
|- |
||
| − | |BGCOLOR="#E0E0E0"| |
+ | |BGCOLOR="#E0E0E0"| [[Commodore Culottes]] (COR Legs) |
|- |
|- |
||
| − | |BGCOLOR="#E0E0E0"| |
+ | |BGCOLOR="#E0E0E0"| [[Pantin Babouches]] (PUP Feet) |
|- |
|- |
||
| − | |BGCOLOR="#E0E0E0"| |
+ | |BGCOLOR="#E0E0E0"| [[Argute Bracers]] (SCH Hands) |
| ⚫ | |||
| ⚫ | |||
| + | |BGCOLOR="#E0E0E0"| [[Barbaric Bijou]] |
||
| ⚫ | |||
| + | |BGCOLOR="#E0E0E0"| [[Odious Cryptex]] |
||
| ⚫ | |||
| + | |BGCOLOR="#E0E0E0"| [[Odious Scale]] |
||
| ⚫ | |||
| + | |BGCOLOR="#E0E0E0"| [[Odious Leather]] |
||
| ⚫ | |||
| + | |BGCOLOR="#E0E0E0"| [[Odious Strongbox]] |
||
|- |
|- |
||
|} |
|} |
||
| + | |width="30%" valign="top"| |
||
| − | |||
| ⚫ | |||
| + | [[File:New_dynamis_San_d'Oria.gif|thumb|NEW TE and spawn points]] |
||
| + | |} |
||
| + | |} |
||
== Monsters Found Here == |
== Monsters Found Here == |
||
{| border="0" width="100%" cellpadding="4" cellspacing="2" |
{| border="0" width="100%" cellpadding="4" cellspacing="2" |
||
| − | | |
+ | |align="center" width="30%" BGCOLOR="#ffdead"|'''Monster Family''' |
| ⚫ | |||
| − | !Name || Job || Notes |
||
| − | | |
+ | |align="center" width="15%" BGCOLOR="#ffdead"|'''Min Level''' |
| + | |align="center" width="15%" BGCOLOR="#ffdead"|'''Max Level''' |
||
| ⚫ | |||
| + | |align="center" width="10%" BGCOLOR="#ffdead"|'''Aggro''' |
||
| ⚫ | |||
| − | | |
+ | |align="center" width="20%" BGCOLOR="#ffdead"|'''Currency''' |
| ⚫ | |||
| ⚫ | |||
| ⚫ | |||
| − | |align="center"|[[:category:Simulacra|Simulacrum]] || Casts [[Red Mage]] spells. |
||
| ⚫ | |||
| ⚫ | |||
| ⚫ | |||
| − | |[[Vanguard Amputator]] |
||
| ⚫ | |||
| − | |align="center"|[[White Mage]] || Uses [[Benediction]] at random. [[Stun]] can prevent its use. |
||
| ⚫ | |||
| ⚫ | |||
| + | |align="center"|[[Ordelle Bronzepiece|O. Bronzepiece]] |
||
| − | |[[Vanguard Backstabber]] |
||
| ⚫ | |||
| − | |align="center"|[[Ninja]] ||Uses [[Mijin Gakure]] at low health. [[Stun]] recommended. |
||
| ⚫ | |||
| ⚫ | |||
| ⚫ | |||
| ⚫ | |||
| − | |align="center"| |
+ | |align="center"|95 |
| ⚫ | |||
| ⚫ | |||
| ⚫ | |||
| − | |[[Vanguard Dollmaster]] |
||
| + | |align="center"|[[Ordelle Bronzepiece|O. Bronzepiece]] |
||
| − | :''[[Vanguard's Avatar]]'' |
||
| + | |- |
||
| − | |align="center"|[[Summoner]] || Keep avatar asleep when [[Astral Flow]] goes off. |
||
| + | |} |
||
| ⚫ | |||
| + | |||
| − | |[[Vanguard Footsoldier]] |
||
| + | == Notorious Monsters == |
||
| ⚫ | |||
| + | {| border="0" width="100%" cellpadding="4" cellspacing="2" |
||
| ⚫ | |||
| + | |align="center" width="28%" BGCOLOR="#ffdead"|'''Name''' |
||
| − | |[[Vanguard Grappler]] |
||
| + | |align="center" width="5%" BGCOLOR="#ffdead"|'''Job''' |
||
| − | |align="center"|[[Monk]] || [[Hundred Fists]] can be very dangerous. |
||
| − | | |
+ | |align="center" width="10%" BGCOLOR="#ffdead"|'''Pos''' |
| + | |align="center" width="25%" BGCOLOR="#ffdead"|'''Drops''' |
||
| − | |[[Vanguard Gutslasher]] |
||
| − | |align="center" |
+ | |align="center" width="32%" BGCOLOR="#ffdead"|'''Notes''' |
| + | |- |
||
| ⚫ | |||
| ⚫ | |||
| − | |[[Vanguard Hawker]] |
||
| − | :''[[Vanguard's Hecteyes]]'' |
||
| ⚫ | |||
| ⚫ | |||
| − | |[[Vanguard Impaler]]<br> |
||
| ⚫ | |||
| ⚫ | |||
| ⚫ | |||
| − | |[[Vanguard Mesmerizer]] |
||
| ⚫ | |||
| ⚫ | |||
| − | |[[Vanguard Neckchopper]] |
||
| ⚫ | |||
| ⚫ | |||
| − | |[[Vanguard Pillager]] |
||
| ⚫ | |||
| ⚫ | |||
| − | |[[Vanguard Predator]] |
||
| − | |align="center"|[[Ranger]]|| [[Eagle Eye Shot]] can be deadly. |
||
| ⚫ | |||
| − | |[[Vanguard Trooper]] |
||
| ⚫ | |||
| ⚫ | |||
| ⚫ | |||
| ⚫ | |||
| ⚫ | |||
| ⚫ | |||
| ⚫ | |||
| ⚫ | |||
| − | |- BGCOLOR="#ffd9d9" |
||
|'''[[Reapertongue Gadgquok]]''' |
|'''[[Reapertongue Gadgquok]]''' |
||
| − | |align="center"|[[Summoner]] |
+ | |align="center"|[[Summoner|SMN]] |
| + | |align="center"|(L-6) |
||
| ⚫ | |||
| + | |[[Barbaric Bijou]]<br>[[Ordelle Bronzepiece|O. Bronzepiece]]<br>Items |
||
| − | |- BGCOLOR="#ffd9d9" |
||
| + | |Timed spawn<br>Supported by [[Vanguard's Avatar]]<br>Defeating the avatar prior to attacking the NM will prevent his use of [[Astral Flow]], unless he can summon a new one before being defeated. |
||
| ⚫ | |||
| ⚫ | |||
| + | |align-"center"|[[Ninja|NIN]] |
||
| + | |align="center"|(H-9) |
||
| + | |[[Barbaric Bijou]]{{Information Needed}}<br>[[Ordelle Bronzepiece|O. Bronzepiece]]<br>[[Montiont Silverpiece|M. Silverpiece]]<br>Items |
||
| + | |Timed spawn<br>Can use [[Mijin Gakure]] several times. |
||
| ⚫ | |||
|'''[[Wyrmgnasher Bjakdek]]''' |
|'''[[Wyrmgnasher Bjakdek]]''' |
||
| − | |align="center"|[[Dragoon]] |
+ | |align="center"|[[Dragoon|DRG]] |
| + | |align="center"|(K-9) |
||
| − | |style="font-weight:bold;color:#ff0000;"|NM - Boss Trigger for Overlord's Tombstone. |
||
| + | |[[Barbaric Bijou]]{{Information Needed}}<br>[[Ordelle Bronzepiece|O. Bronzepiece]]<br>[[Montiont Silverpiece|M. Silverpiece]]<br>Items |
||
| − | |- BGCOLOR="#ffd9d9" |
||
| ⚫ | |||
| ⚫ | |||
| ⚫ | |||
| + | |align="center"|{{Question}} |
||
| + | |align="center"|varies |
||
| + | |[[Montiont Silverpiece|M. Silverpiece]] Infinity Core |
||
| + | |||
| + | Gold Beastcoin |
||
| + | |Links with Orcs, and Orcs link with it.<br>Can cast various black magic spells<br>Defeating it can restore [[Hit Points|HP]], [[Magic Points|MP]] or [[Tactical Points|TP]] |
||
| ⚫ | |||
| ⚫ | |||
| + | |align="center"|{{Question}} |
||
| + | |align="center"|(M-7)<br>(I-9)<br>(D-8)<br>(E-9)<br>(H-7) |
||
| + | |[[Amber granules of time]] (+10 min)<br>[[Azure granules of time]] (+10 min)<br>[[Alabaster granules of time]] (+15 min)<br>[[Crimson granules of time]] (+10 min)<br>[[Obsidian granules of time]] (+15 min) |
||
| + | |(M-7) is on upper balcony<br>(I-9) is located on top of the Auction House.<br>(D-8) is in the northeast corner by the Leathercraft Guild<br>(E-9) is in the passage going up<br>(H-7) is where PLD quests are received.<br>All five time extensions are needed for maximum stagger effect on all monsters in the zone. |
||
| ⚫ | |||
|'''[[Battlechoir Gitchfotch]]''' |
|'''[[Battlechoir Gitchfotch]]''' |
||
| − | |align="center"|[[Bard]] |
+ | |align="center"|[[Bard|BRD]] |
| + | |align="center"|(I-7/8) |
||
| − | |style="font-weight:bold;color:#ff0000;"|NM - Spawned by mega boss. |
||
| + | | |
||
| − | |- BGCOLOR="#ffd9d9" |
||
| + | |Summoned by [[Overlord's Tombstone]] along with [[Soulsender Fugbrag]]<br>Uses [[Soul Voice]] |
||
| ⚫ | |||
|'''[[Soulsender Fugbrag]]''' |
|'''[[Soulsender Fugbrag]]''' |
||
| − | |align="center"|[[Bard]] |
+ | |align="center"|[[Bard|BRD]] |
| + | |align="center"|(I-7/8) |
||
| − | |style="font-weight:bold;color:#ff0000;"|NM - Spawned by mega boss. |
||
| + | | |
||
| − | |- BGCOLOR="#ffd9d9" |
||
| + | |Summoned by [[Overlord's Tombstone]] along with [[Battlechoir Gitchfotch]]<br>Uses [[Soul Voice]] |
||
| ⚫ | |||
|'''[[Overlord's Tombstone]]''' |
|'''[[Overlord's Tombstone]]''' |
||
| ⚫ | |||
| − | |align="center"|[[:category:Simulacra|Simulacrum]] |
||
| + | |align="center"|(I-7/8) |
||
| − | |style="font-weight:bold;color:#ff0000;"|Mega Boss. |
||
| + | |[[Fiendish Tome: Chapter 1]]<br>[[Montiont Silverpiece|M. Silverpiece]] |
||
| ⚫ | |||
| + | |Forced spawn by trading [[Barbaric Bijou]] to ??? at (I-7/8)<br>Accompanied by [[Battlechoir Gitchfotch]] and [[Soulsender Fugbrag]]<br>Examine the ??? after defeating it to get the {{KeyItem}}[[Hydra Corps Command Scepter]] |
||
| ⚫ | |||
| ⚫ | |||
| + | |'''[[Bladeburner Rokgevok]]''' |
||
| ⚫ | |||
| + | |align="center"|(L-10) |
||
| + | |[[Oneiros Sash]]<br>[[Fiendish Tome: Chapter 2]] |
||
| + | |Forced spawn by trading an [[Odious Scale]] to ??? at (L-10).<br>Can use [[Mighty Strikes]] and [[Manafont]] multiple times.<br>[[Fanatic Dance]] will cause the NM to eventually despawn if allowed. |
||
| ⚫ | |||
| + | |'''[[Steelshank Kratzvatz]]''' |
||
| ⚫ | |||
| + | |align="center"|(I-11) |
||
| + | |[[Oneiros Cappa]]<br>[[Fiendish Tome: Chapter 3]] |
||
| + | |Forced spawn by trading an [[Odious Leather]] to the ??? at (I-11)<br>Assisted by [[Kratzvatz's Hecteyes]]<br>Can use [[Invincible]] and [[Familiar]] several times |
||
| ⚫ | |||
| + | |'''[[Bloodfist Voshgrosh]]''' |
||
| + | |align="center"|[[Dark Knight|DRK]]<br>[[Monk|MNK]] |
||
| + | |align="center"|(G-10) |
||
| + | |[[Oneiros Belt]]<br>[[Fiendish Tome: Chapter 4]] |
||
| + | |Forced spawn by trading an [[Odious Cryptex]] to ??? at (G-10)<br>Can use [[Blood Weapon]] and [[Hundred Fists]] several times. |
||
| + | [[Fanatic Dance]] will cause the NM to eventually despawn if allowed. |
||
| ⚫ | |||
| + | |'''[[Spellspear Djokvukk]]''' |
||
| ⚫ | |||
| + | |align="center"|(B/C-6) |
||
| + | |[[Oneiros Cape]]<br>[[Fiendish Tome: Chapter 5]] |
||
| + | |Forced spawn by trading an [[Odious Strongbox]] to the ??? at (B/C-6).<br>Assisted by [[Djokvukk's Wyvern]].<br>Can use [[Chainspell]] several times. |
||
| ⚫ | |||
| + | |'''[[Arch Overlord Tombstone]]''' |
||
| ⚫ | |||
| + | |align="center"|(I-7/8) |
||
| + | |[[Oneiros Lance]]<br>[[Oneiros Cest]]<br>[[Oneiros Helm]] |
||
| + | |Forced spawn by trading all Fiendish Tomes from NMs in Dynamis - San d'Oria<br>Uses [[Hundred Fists]].<br>Seismostomp has some hate reset.<br>Has enhanced movement speed. |
||
|} |
|} |
||
| + | [[Category:Areas]][[Category:Dynamis]] |
||
| − | *'''Note:''' All the Orc NMs in Dynamis have an additional TP attack: [[Fanatic Dance]]. This [[charm]]s everyone in melee range, which can become perilous to back-line jobs. |
+ | *'''Note:''' All the Orc NMs in Dynamis have an additional TP attack: [[Fanatic Dance]]. This [[charm]]s everyone in melee range, which can become perilous to back-line jobs. There are several proposed tactics for dealing with this: |
| + | *Zerg the NM with max WS and nukes to avoid building too much TP. |
||
| + | *Have everyone in the alliance stand in range of charm effect, so that everyone gets charmed and nobody is attacked. |
||
| + | *Alternate between nuke/WS and sleep. |
||
| + | *Have melee types avoid attacking the NM. |
||
| − | *'''Note:''' While the above tatic may be advantageous in some situations, it also assumes there are ample mages within your group to accomplish this task. As with all creatures in Vana'diel, spells also generate TP, which make their TP attack just as likely via melee or magic. The best tatic for dealing with these NMs therefore would be any means possible to take them down in as little time a possible. |
||
| − | |width="30%" valign="top"| |
||
| ⚫ | |||
| − | [[File:san1.jpg|thumb|Dynamis - San d'Oria (map 1)]] |
||
| − | [[File:san2.jpg|thumb|Dynamis - San d'Oria (map 2)]] |
||
| − | [[File:DynamisSandoria001.jpg|thumb|Map of Original Spawn Points]] |
||
| − | [[File:DynamisSandoria002.jpg|thumb|Map of Triggered Spawns]] |
||
| − | [[File:DynamisSandy002.jpg|thumb|Strategy Map]] |
||
| − | [[File:Dynamis-sandoria.jpg|thumb|Map of Sac Pulls]] |
||
| ⚫ | |||
| ⚫ | |||
| − | |||
| − | ==Game Script== |
||
| − | {{spoiler3 |
||
| − | | spoiler = '''[[Francmage]]:''' I never believed that my indifference to the state of other nations would cause harm to my beloved [[San d'Oria]]... As part of my penance, I will infuse the [[Timeless Hourglass]] with what guidance I can. |
||
| ⚫ | |||
{{Dynamis Notes}} |
{{Dynamis Notes}} |
||
Revision as of 17:35, 28 May 2017
|
Table of Contents
|
Zone Information
| ||||||||||||||||||||||||||||||
|
Description
| |||||||||||||||||||||||||||||||
|
Connections
Entered via Trail Markings in Southern San d'Oria (L-5) |
Treasure
|
 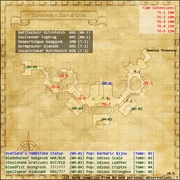 NEW TE and spawn points |
Monsters Found Here
| Monster Family | Job | Min Level | Max Level | Aggro | Currency |
| Orcish Vanguard | All | 75 | 77 | S, L | O. Bronzepiece |
| Orcish Vanguard | All | 95 | 97 | S, L | O. Bronzepiece |
Notorious Monsters
| Name | Job | Pos | Drops | Notes |
| Reapertongue Gadgquok | SMN | (L-6) | Barbaric Bijou O. Bronzepiece Items |
Timed spawn Supported by Vanguard's Avatar Defeating the avatar prior to attacking the NM will prevent his use of Astral Flow, unless he can summon a new one before being defeated. |
| Voidstreaker Butchnotch | NIN | (H-9) | Barbaric Bijou O. Bronzepiece M. Silverpiece Items |
Timed spawn Can use Mijin Gakure several times. |
| Wyrmgnasher Bjakdek | DRG | (K-9) | Barbaric Bijou O. Bronzepiece M. Silverpiece Items |
Assisted by Vanguard's Wyvern |
| Serjeant Tombstone | varies | M. Silverpiece Infinity Core
Gold Beastcoin |
Links with Orcs, and Orcs link with it. Can cast various black magic spells Defeating it can restore HP, MP or TP | |
| Warchief Tombstone | (M-7) (I-9) (D-8) (E-9) (H-7) |
Amber granules of time (+10 min) Azure granules of time (+10 min) Alabaster granules of time (+15 min) Crimson granules of time (+10 min) Obsidian granules of time (+15 min) |
(M-7) is on upper balcony (I-9) is located on top of the Auction House. (D-8) is in the northeast corner by the Leathercraft Guild (E-9) is in the passage going up (H-7) is where PLD quests are received. All five time extensions are needed for maximum stagger effect on all monsters in the zone. | |
| Battlechoir Gitchfotch | BRD | (I-7/8) | Summoned by Overlord's Tombstone along with Soulsender Fugbrag Uses Soul Voice | |
| Soulsender Fugbrag | BRD | (I-7/8) | Summoned by Overlord's Tombstone along with Battlechoir Gitchfotch Uses Soul Voice | |
| Overlord's Tombstone | Mega Boss | (I-7/8) | Fiendish Tome: Chapter 1 M. Silverpiece |
Forced spawn by trading Barbaric Bijou to ??? at (I-7/8) Accompanied by Battlechoir Gitchfotch and Soulsender Fugbrag Examine the ??? after defeating it to get the |
| Bladeburner Rokgevok | WAR BLM |
(L-10) | Oneiros Sash Fiendish Tome: Chapter 2 |
Forced spawn by trading an Odious Scale to ??? at (L-10). Can use Mighty Strikes and Manafont multiple times. Fanatic Dance will cause the NM to eventually despawn if allowed. |
| Steelshank Kratzvatz | BST PLD |
(I-11) | Oneiros Cappa Fiendish Tome: Chapter 3 |
Forced spawn by trading an Odious Leather to the ??? at (I-11) Assisted by Kratzvatz's Hecteyes Can use Invincible and Familiar several times |
| Bloodfist Voshgrosh | DRK MNK |
(G-10) | Oneiros Belt Fiendish Tome: Chapter 4 |
Forced spawn by trading an Odious Cryptex to ??? at (G-10) Can use Blood Weapon and Hundred Fists several times. Fanatic Dance will cause the NM to eventually despawn if allowed. |
| Spellspear Djokvukk | DRG RDM |
(B/C-6) | Oneiros Cape Fiendish Tome: Chapter 5 |
Forced spawn by trading an Odious Strongbox to the ??? at (B/C-6). Assisted by Djokvukk's Wyvern. Can use Chainspell several times. |
| Arch Overlord Tombstone | Arch Mega Boss | (I-7/8) | Oneiros Lance Oneiros Cest Oneiros Helm |
Forced spawn by trading all Fiendish Tomes from NMs in Dynamis - San d'Oria Uses Hundred Fists. Seismostomp has some hate reset. Has enhanced movement speed. |
- Note: All the Orc NMs in Dynamis have an additional TP attack: Fanatic Dance. This charms everyone in melee range, which can become perilous to back-line jobs. There are several proposed tactics for dealing with this:
- Zerg the NM with max WS and nukes to avoid building too much TP.
- Have everyone in the alliance stand in range of charm effect, so that everyone gets charmed and nobody is attacked.
- Alternate between nuke/WS and sleep.
- Have melee types avoid attacking the NM.
| Dynamis | |
|---|---|
| Original Areas |
|
| Dreamworld Areas | |
| Bosses | |
| Time Extension Monsters | |
| Rewards | |
| Other | |