(Quick summary of important items and their locations.) Tags: Visual edit apiedit |
Tag: Visual edit |
||
| Line 20: | Line 20: | ||
== Walkthrough == |
== Walkthrough == |
||
* Examine the [[Regal Pawprints]] at (G-9) in [[Beaucedine Glacier (S)]] for a cutscene. |
* Examine the [[Regal Pawprints]] at (G-9) in [[Beaucedine Glacier (S)]] for a cutscene. |
||
| + | * The '''Regal Pawprints''' is not next to the tower but one level higher |
||
**They are located on the same level as the Campaign Arbiter (C.A.), at the west edge of the cliff overlooking the tower. |
**They are located on the same level as the Campaign Arbiter (C.A.), at the west edge of the cliff overlooking the tower. |
||
* Examine the [[Regal Pawprints]] again while in possession of an {{KeyItem}}[[Aroma Bug]] to begin an assault in [[Everbloom Hollow]]. |
* Examine the [[Regal Pawprints]] again while in possession of an {{KeyItem}}[[Aroma Bug]] to begin an assault in [[Everbloom Hollow]]. |
||
Revision as of 11:36, 23 June 2018
| Mission Name | Dungeons and Dancers |
|---|---|
| Number | 23 |
| Level | 75 |
| Items Needed | |
| Reward |
| ← Previous Mission | Next Mission → |
|---|---|
| A Sanguinary Prelude | Distorter of Time |
| Replay Cutscenes | |
|---|---|
| Dungeons and Dancers (pt.1-3) | Goblin Footprint Beaucedine Glacier (S) (H-11) |
Walkthrough
- Examine the Regal Pawprints at (G-9) in Beaucedine Glacier (S) for a cutscene.
- The Regal Pawprints is not next to the tower but one level higher
- They are located on the same level as the Campaign Arbiter (C.A.), at the west edge of the cliff overlooking the tower.
- Examine the Regal Pawprints again while in possession of an
 Aroma Bug to begin an assault in Everbloom Hollow.
Assault

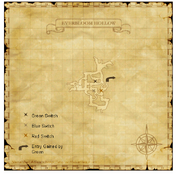
Map 1
- Buffs wear on entry. Time limit is 30 minutes, and alter egos may be summoned inside.
- At the start of the mission, each party member will receive 2 Ratstail Explosives that you can use to demolish stone walls marked with ???.
- When defeated, Goblin Reavers will disappear, after which a glowing ??? will take its place that can award 3 additional Ratstail Explosives. You can only carry 3 explosives at a time. You must check the ??? once per explosive desired.
- In other words, clicking on the glowing ??? yields 1 Ratstail Explosive. To receive another, click on the glowing ??? again, and again for the third.
- Goblin Reaver has a respawn time of 5 minutes.
- If a Giddy Bomb uses Self-Destruct near a destructible wall, there is a chance that it will explode.
- To detonate a Ratstail Explosive, click on the ??? next to the wall and chose to use it from the menu choice. You do not use your trade ability or use the item.
- There are 3 different colours of switch to detonate 3 matching colours of firesand. Make sure the colours of the fuse matches the switch.
Optimal path:
- Go northwest to start and hug the right wall. Blow up the wall at (H/I-9), then blow up the wall to the north at (H-8). Double back and kill the Goblin Reaver, and obtain the 3 explosives. (Do not forget this, remember to check ??? once per explosive desired.)
- Blow up the wall to the southeast at (I-9), then proceed northeast until you reach the dead-end. Examine it for a cutscene.
- Examine the dead-end again, and place the jar of Firesand.
- Circle back to (I-7/8) and trigger the green switch.
- Go back to the dead-end. You will now be in map 2.
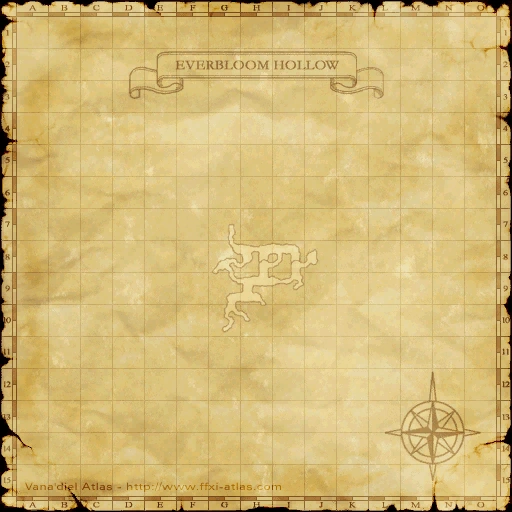

Map 2
- Blow up the wall to the southeast at (G-8/9).
- Travel east and blow up the wall at (I-9).
- Continue southeast and examine the blue warp to exit.
- You will receive a cutscene and the
 Umbra Bug.
 - Quick summary of locations:
- Fuse
- (J-5) Red fuse
- (J-8) Green fuse
- Ignition Switch
- (I-8) Red ignition switch
- (I-8/9) Blue ignition switch
- (I-7) Green ignition switch
- Exit Second map (I-9)
- Fuse
Notes
- If you fail, you must get a new Aroma Bug from the Regal Pawprints at the southern Pso'Xja tower at (H-10).
- You must wait one game day since entering the assault to receive a new Aroma Bug.
- You must wait one game day since entering the assault to receive a new
Game Description
- Mission Orders
- Lilisette and Portia are being detained in a subterranean location somewhere beneath the Beaucedine Glacier. Your rescue effort begins with a search for the entrance underground.