mNo edit summary |
|||
| (4 intermediate revisions by 4 users not shown) | |||
| Line 15: | Line 15: | ||
| next = [[Three Paths]] |
| next = [[Three Paths]] |
||
| cutscenes = |
| cutscenes = |
||
| − | {{Mission/Cutscene|Desires of Emptiness (pt.1)|[[Goblin Footprint]] |
+ | {{Mission/Cutscene|Desires of Emptiness (pt.1)|[[Goblin Footprint]] {{Location|Promyvion - Vahzl|H-9}}}} |
| − | {{Mission/Cutscene|Desires of Emptiness (pt.2)|[[Goblin Footprint]] |
+ | {{Mission/Cutscene|Desires of Emptiness (pt.2)|[[Goblin Footprint]] {{Location|Promyvion - Vahzl|H-9}}}} |
| − | {{Mission/Cutscene|Desires of Emptiness (pt.3)|[[Goblin Footprint]] |
+ | {{Mission/Cutscene|Desires of Emptiness (pt.3)|[[Goblin Footprint]] {{Location|Promyvion - Vahzl|H-9}}}} |
| − | {{Mission/Cutscene|Desires of Emptiness (pt.4)|[[Goblin Footprint]] |
+ | {{Mission/Cutscene|Desires of Emptiness (pt.4)|[[Goblin Footprint]] {{Location|Promyvion - Vahzl|H-9}}}} |
{{Mission/Cutscene|Desires of Emptiness (pt.1)|[[Goblin Footprint]] [[Spire of Vahzl]]}} |
{{Mission/Cutscene|Desires of Emptiness (pt.1)|[[Goblin Footprint]] [[Spire of Vahzl]]}} |
||
{{Mission/Cutscene|Desires of Emptiness (pt.2)|[[Goblin Footprint]] [[Spire of Vahzl]]}} |
{{Mission/Cutscene|Desires of Emptiness (pt.2)|[[Goblin Footprint]] [[Spire of Vahzl]]}} |
||
{{Mission/Cutscene|Desires of Emptiness (pt.3)|[[Goblin Footprint]] [[Spire of Vahzl]]}} |
{{Mission/Cutscene|Desires of Emptiness (pt.3)|[[Goblin Footprint]] [[Spire of Vahzl]]}} |
||
{{Mission/Cutscene|Desires of Emptiness (pt.4)|[[Goblin Footprint]] [[Spire of Vahzl]]}} |
{{Mission/Cutscene|Desires of Emptiness (pt.4)|[[Goblin Footprint]] [[Spire of Vahzl]]}} |
||
| − | {{Mission/Cutscene|Desires of Emptiness|[[Goblin Footprint]] |
+ | {{Mission/Cutscene|Desires of Emptiness|[[Goblin Footprint]] {{Location|Beaucedine Glacier|E-11}}}} |
}} |
}} |
||
== Walkthrough == |
== Walkthrough == |
||
| − | '''Note:''' The information here is from when there was a [[Level Restriction]] at 50. Any job at 75, and even considerably lower, can solo this mission with varying difficulty/speed {{testimonials}}. As with other Promyvion areas, there are aggressive monsters around level 80, but they are easily identified from their names and can be avoided as long as players pay attention to them. |
+ | '''Note:''' The information here is from when there was a [[Level Restriction]] at 50. Any job at 75+, and even considerably lower, can solo this mission with varying difficulty/speed {{testimonials}}. As with other Promyvion areas, there are aggressive monsters around level 80, but they are easily identified from their names and can be avoided as long as players pay attention to them. |
=== Promyvion-Vahzl === |
=== Promyvion-Vahzl === |
||
| Line 33: | Line 33: | ||
*[[Promyvion - Vahzl]] is five islands instead of four, and the monsters are stronger than in other areas of [[Promyvion]]. Like the other Promyvions, it's only tough if you or your party is aggroing everything in sight. At level 75, although many monsters will check as [[Easy Prey]], nothing will be a high-enough level to aggro. |
*[[Promyvion - Vahzl]] is five islands instead of four, and the monsters are stronger than in other areas of [[Promyvion]]. Like the other Promyvions, it's only tough if you or your party is aggroing everything in sight. At level 75, although many monsters will check as [[Easy Prey]], nothing will be a high-enough level to aggro. |
||
*[[Idle Wanderer]]s, [[Woeful Weeper]]s, and [[Livid Seether]]s are aggressive to 99, and deadly to level 75, so be careful around them. It should not be necessary to go near them for the mission. |
*[[Idle Wanderer]]s, [[Woeful Weeper]]s, and [[Livid Seether]]s are aggressive to 99, and deadly to level 75, so be careful around them. It should not be necessary to go near them for the mission. |
||
| − | *On the third, fourth, and fifth islands, you will have to search for [[Memory Flux]] gates before proceeding to the [[Memory Receptacle|Memory Receptacles]]. Each will spawn a Notorious Monster, and these are '''mandatory fights''' that are '''required''' to proceed with the mission. If you do not defeat all the three [[Memory Flux]] NMs and get the cutscenes at the [[Memory Flux]]es, you will not be able to cross to the Web of Recollections within the [[Spire of Vahzl]]. |
+ | *On the third, fourth, and fifth islands, you will have to search for [[Memory Flux]] gates before proceeding to the [[Memory Receptacle|Memory Receptacles]]. Each will spawn a Notorious Monster, and these are '''mandatory fights''' that are '''required''' to proceed with the mission. If you do not defeat all the three [[Memory Flux]] NMs and get the cutscenes at the [[Memory Flux]]es, you will not be able to cross to the Web of Recollections within the [[Spire of Vahzl]]. |
| + | *'''Make sure to examine the [[Memory Flux]] after defeating each NM.''' |
||
:*'''Third island''': [[Propagator]] ([[:Category:Gorgers|Gorger]] type) will spawn multiple [[Offspring]] if given the chance; be prepared to deal with these adds. They will all die if the [[Propagator]] is killed. |
:*'''Third island''': [[Propagator]] ([[:Category:Gorgers|Gorger]] type) will spawn multiple [[Offspring]] if given the chance; be prepared to deal with these adds. They will all die if the [[Propagator]] is killed. |
||
:*'''Fourth island''': [[Solicitor]] ([[:Category:Cravers|Craver]] type) has a dangerous single-target attack and an AoE Poison attack that deals damage and gives a strong poison effect. It is advisable that jobs that cannot cure poison have a few antidotes. Also, if needed, have someone cast [[Gravity]] on the NM so healers can Cure without worrying about any threats. |
:*'''Fourth island''': [[Solicitor]] ([[:Category:Cravers|Craver]] type) has a dangerous single-target attack and an AoE Poison attack that deals damage and gives a strong poison effect. It is advisable that jobs that cannot cure poison have a few antidotes. Also, if needed, have someone cast [[Gravity]] on the NM so healers can Cure without worrying about any threats. |
||
| Line 55: | Line 56: | ||
:*It is simplest to remember that they will engage in alphabetical order. |
:*It is simplest to remember that they will engage in alphabetical order. |
||
*As with all [[Empty]], their elements will be random. It is shown as a flame burning somewhere inside their bodies, colored to match their element. |
*As with all [[Empty]], their elements will be random. It is shown as a flame burning somewhere inside their bodies, colored to match their element. |
||
| + | *Two appropriately chosen -ja spells are more than enough to win the battle, even with a poorly geared BLM. (15/12/2013) |
||
*The battle has a time limit of 30 minutes. |
*The battle has a time limit of 30 minutes. |
||
*You will receive 1500 experience for winning the fight. |
*You will receive 1500 experience for winning the fight. |
||
=== Finishing Up === |
=== Finishing Up === |
||
| − | *When the Spire battle is cleared, you will be warped inside of the (F-7) [[Nue]] Tower in [[Beaucedine Glacier]] where a cutscene between the three CoP Mission Tarutaru ([[Cherukiki]], [[Kukki-Chebukki]] and [[Makki-Chebukki]]) and [[Nag'molada]] will play. |
+ | *When the Spire battle is cleared, you will be warped inside of the ({{Location Tooltip|area=Beaucedine Glacier|pos=F-7}}) [[Nue]] Tower in [[Beaucedine Glacier]] where a cutscene between the three CoP Mission Tarutaru ([[Cherukiki]], [[Kukki-Chebukki]] and [[Makki-Chebukki]]) and [[Nag'molada]] will play. |
| − | *''Optional:'' Talk to the three Tarutaru ([[Leigon-Moigon]], [[Potete]] and [[Torino-Samarino]]) at the (I-7) tower in [[Beaucedine Glacier]]. There will not be a cutscene from these three Tarutaru, nor will the mission log change. This is only 6 lines of dialogue. |
+ | *''Optional:'' Talk to the three Tarutaru ([[Leigon-Moigon]], [[Potete]] and [[Torino-Samarino]]) at the ({{Location Tooltip|area=Beaucedine Glacier|pos=I-7}}) tower in [[Beaucedine Glacier]]. There will not be a cutscene from these three Tarutaru, nor will the mission log change. This is only 6 lines of dialogue. |
*In order to complete the mission, talk to [[Cid]] in [[Bastok]] [[Metalworks]] for a cutscene. (NOTE: This will also start the next mission) |
*In order to complete the mission, talk to [[Cid]] in [[Bastok]] [[Metalworks]] for a cutscene. (NOTE: This will also start the next mission) |
||
| Line 70: | Line 72: | ||
}} |
}} |
||
| − | === Game Script and Cutscene Video === |
||
{{spoiler2}} |
{{spoiler2}} |
||
Revision as of 12:19, 8 December 2019
| Mission Name | Desires of Emptiness |
|---|---|
| Number | PM5-2 |
| Title Granted | Frozen Dead Body |
| Reward | 1500 EXP |
| ← Previous Mission | Next Mission → |
|---|---|
| The Enduring Tumult of War | Three Paths |
| Replay Cutscenes | |
|---|---|
| Desires of Emptiness (pt.1) | Goblin Footprint Promyvion - Vahzl (H-9) |
| Desires of Emptiness (pt.2) | Goblin Footprint Promyvion - Vahzl (H-9) |
| Desires of Emptiness (pt.3) | Goblin Footprint Promyvion - Vahzl (H-9) |
| Desires of Emptiness (pt.4) | Goblin Footprint Promyvion - Vahzl (H-9) |
| Desires of Emptiness (pt.1) | Goblin Footprint Spire of Vahzl |
| Desires of Emptiness (pt.2) | Goblin Footprint Spire of Vahzl |
| Desires of Emptiness (pt.3) | Goblin Footprint Spire of Vahzl |
| Desires of Emptiness (pt.4) | Goblin Footprint Spire of Vahzl |
| Desires of Emptiness | Goblin Footprint Beaucedine Glacier (E-11) |
Walkthrough
Note: The information here is from when there was a Level Restriction at 50. Any job at 75+, and even considerably lower, can solo this mission with varying difficulty/speed (see testimonials). As with other Promyvion areas, there are aggressive monsters around level 80, but they are easily identified from their names and can be avoided as long as players pay attention to them.
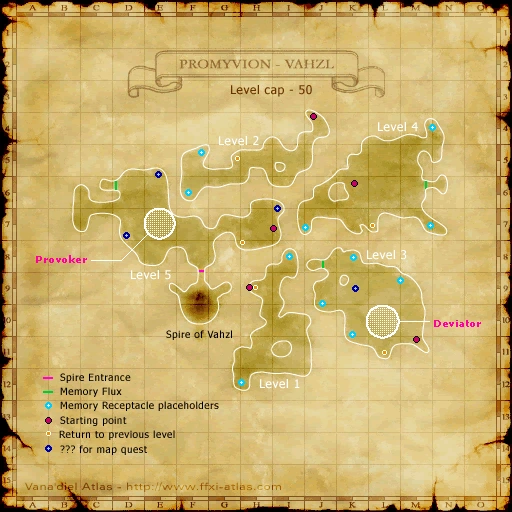
Promyvion-Vahzl

Promyvion Vahzl Map
- Promyvion - Vahzl is five islands instead of four, and the monsters are stronger than in other areas of Promyvion. Like the other Promyvions, it's only tough if you or your party is aggroing everything in sight. At level 75, although many monsters will check as Easy Prey, nothing will be a high-enough level to aggro.
- Idle Wanderers, Woeful Weepers, and Livid Seethers are aggressive to 99, and deadly to level 75, so be careful around them. It should not be necessary to go near them for the mission.
- On the third, fourth, and fifth islands, you will have to search for Memory Flux gates before proceeding to the Memory Receptacles. Each will spawn a Notorious Monster, and these are mandatory fights that are required to proceed with the mission. If you do not defeat all the three Memory Flux NMs and get the cutscenes at the Memory Fluxes, you will not be able to cross to the Web of Recollections within the Spire of Vahzl.
- Make sure to examine the Memory Flux after defeating each NM.
- Third island: Propagator (Gorger type) will spawn multiple Offspring if given the chance; be prepared to deal with these adds. They will all die if the Propagator is killed.
- Fourth island: Solicitor (Craver type) has a dangerous single-target attack and an AoE Poison attack that deals damage and gives a strong poison effect. It is advisable that jobs that cannot cure poison have a few antidotes. Also, if needed, have someone cast Gravity on the NM so healers can Cure without worrying about any threats.
- Fifth island: Ponderer (Thinker type with AOE Sleep so bring poison potions). The Ponderer can also absorb food and spell effects, so make sure your tank doesn't eat defense food when you're getting close to Ponderer. If it absorbs a Tavnazian Taco and Protect it is difficult to hurt with melee attacks.
- After you defeat each NM, check the Memory Flux a second time for a cutscene. Then heal up and search for the next Memory Receptacle.
- On the fifth island, you do not need to search for the Memory Receptacle. Proceed directly from the Memory Flux to the Web of Recollections within the Spire of Vahzl.
- When you receive the cutscene at the Memory Flux, you gain the ability to warp directly to that Memory Flux from the gate in Pso'Xja. This allows you to bypass the lower floors in case you need to leave or are helping someone else with the mission later on.
- The NM at each Memory Flux will re-spawn if a player leaves Promyvion - Vahzl and returns, then clicks the Memory Flux again (while the mission is still active). This is not necessary and your party can wipe easily this way, because the NM will aggro any player who teleports inside. In the rare event that this does happen, the NM will de-spawn if left unclaimed for 3 minutes.
Spire of Vahzl
- Buffs will wear upon entry.
- Enter the Web of Recollections and be prepared to face three bosses.
- You can choose which boss to fight first. One of them will join the fight when the one being fought has about 20% of HP left. The next boss will not attack if you kill the current boss you are fighting in one shot from above 20%. For example: weapon skill at 25% to kill it and the next boss will not attack.
- The only other way to get them to attack is to attack them first.
- If you attack Cumulator first, Procreator attacks next, Agonizer after that.
- If you attack Agonizer first, Cumulator attacks next, Procreator after that.
- If you attack Procreator first, Agonizer attacks next, Cumulator after that.
- It is simplest to remember that they will engage in alphabetical order.
- As with all Empty, their elements will be random. It is shown as a flame burning somewhere inside their bodies, colored to match their element.
- Two appropriately chosen -ja spells are more than enough to win the battle, even with a poorly geared BLM. (15/12/2013)
- The battle has a time limit of 30 minutes.
- You will receive 1500 experience for winning the fight.
Finishing Up
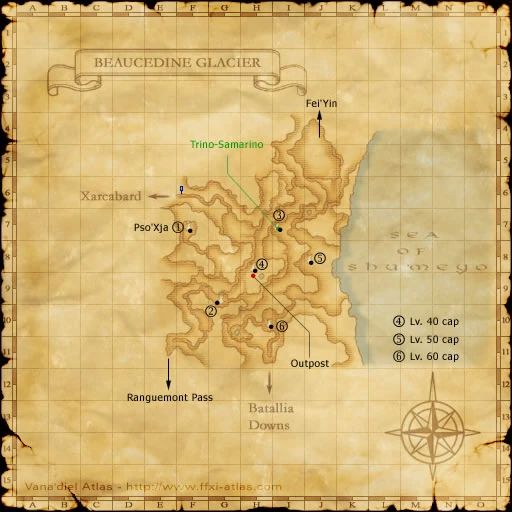
- When the Spire battle is cleared, you will be warped inside of the (F-7) Nue Tower in Beaucedine Glacier where a cutscene between the three CoP Mission Tarutaru (Cherukiki, Kukki-Chebukki and Makki-Chebukki) and Nag'molada will play.
- Optional: Talk to the three Tarutaru (Leigon-Moigon, Potete and Torino-Samarino) at the (I-7) tower in Beaucedine Glacier. There will not be a cutscene from these three Tarutaru, nor will the mission log change. This is only 6 lines of dialogue.
- In order to complete the mission, talk to Cid in Bastok Metalworks for a cutscene. (NOTE: This will also start the next mission)
Video
See the Video page.
Game Description
- Mission Orders
- The Emptiness has trapped you and your companions. You must find them before you are able to continue your journey into the depths of Promyvion.